As a skilled developer, you strive to thoroughly test all functionalities, code paths, and outcomes within your software. However, manually testing every possibility is incredibly challenging and often impractical.
The complexity of an application directly correlates with the likelihood of overlooking potential issues during manual testing. As your application expands, this likelihood increases significantly.
Automated testing for iOS, encompassing both the user interface (UI) and backend service APIs, can significantly boost your confidence in the software’s functionality and alleviate stress during development, refactoring, feature additions, or modifications.
Automated tests offer several advantages:
- Bug Reduction: While no method can completely eliminate the possibility of bugs, automated tests act as a robust safety net, significantly reducing their occurrence.
- Confident Changes: By mitigating the risk of introducing bugs when adding new features, automated tests empower you to make changes swiftly and with ease.
- Code Documentation: Tests serve as living documentation, clearly illustrating expected function behavior, conditions, and corner cases.
- Painless Refactoring: Refactoring, especially large-scale changes, can be daunting. Unit tests provide a safety net, ensuring the refactored code functions as intended.
This article serves as a guide to structuring and implementing automated testing on the iOS platform.
Unit Testing vs. UI Testing in iOS
Distinguishing between unit and UI tests is crucial.
A unit test focuses on a specific function within a specific context, ensuring that this isolated portion of code performs its intended task. Extensive resources on unit testing are readily available, so this post won’t delve into those details.
UI testing in iOS enables engineers to evaluate the user interface of their applications. This includes testing whether views update as expected or specific actions trigger correctly based on user interaction with UI elements.
Each UI test examines a specific user interaction within the application’s UI. Automated testing can and should be conducted at both the unit and UI test levels.
Setting up iOS App Automated Testing
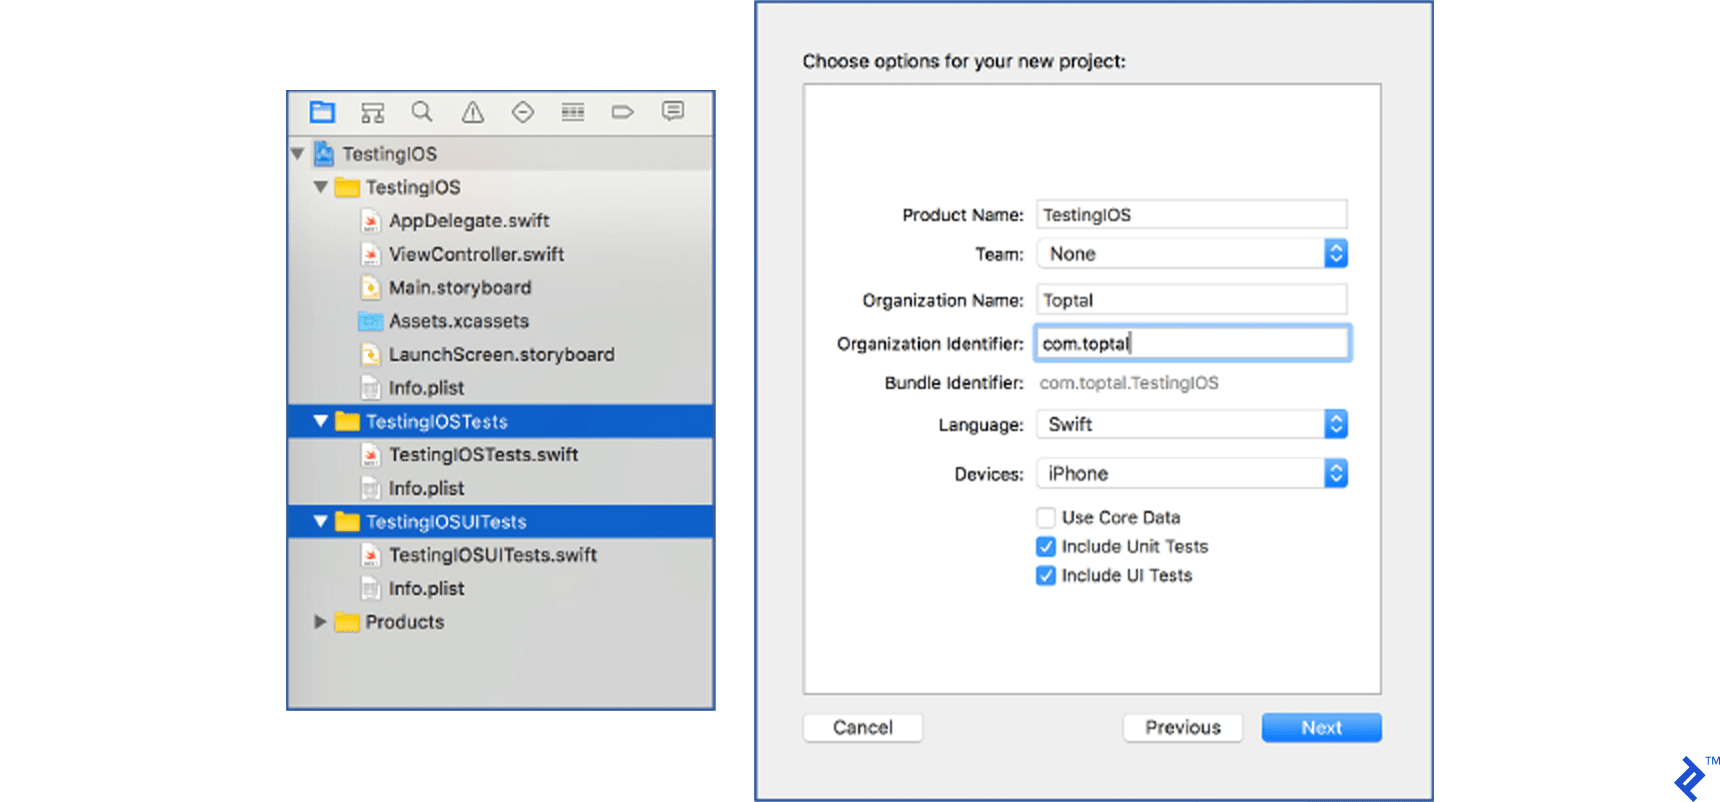
Xcode simplifies the integration of unit and UI testing. When initiating a new project, simply select “Include Unit Tests” and “Include UI Tests.”
Upon project creation, two new targets will appear, each appended with “Tests” or “UITests” to the project name.
And that’s it! You’re ready to start building automated tests for your project.
Adding UI and unit test support to an existing project involves a few extra steps, but the process remains straightforward.
Navigate to File → New → Target and choose either iOS Unit Testing Bundle for unit tests or iOS UI Testing Bundle for UI tests.
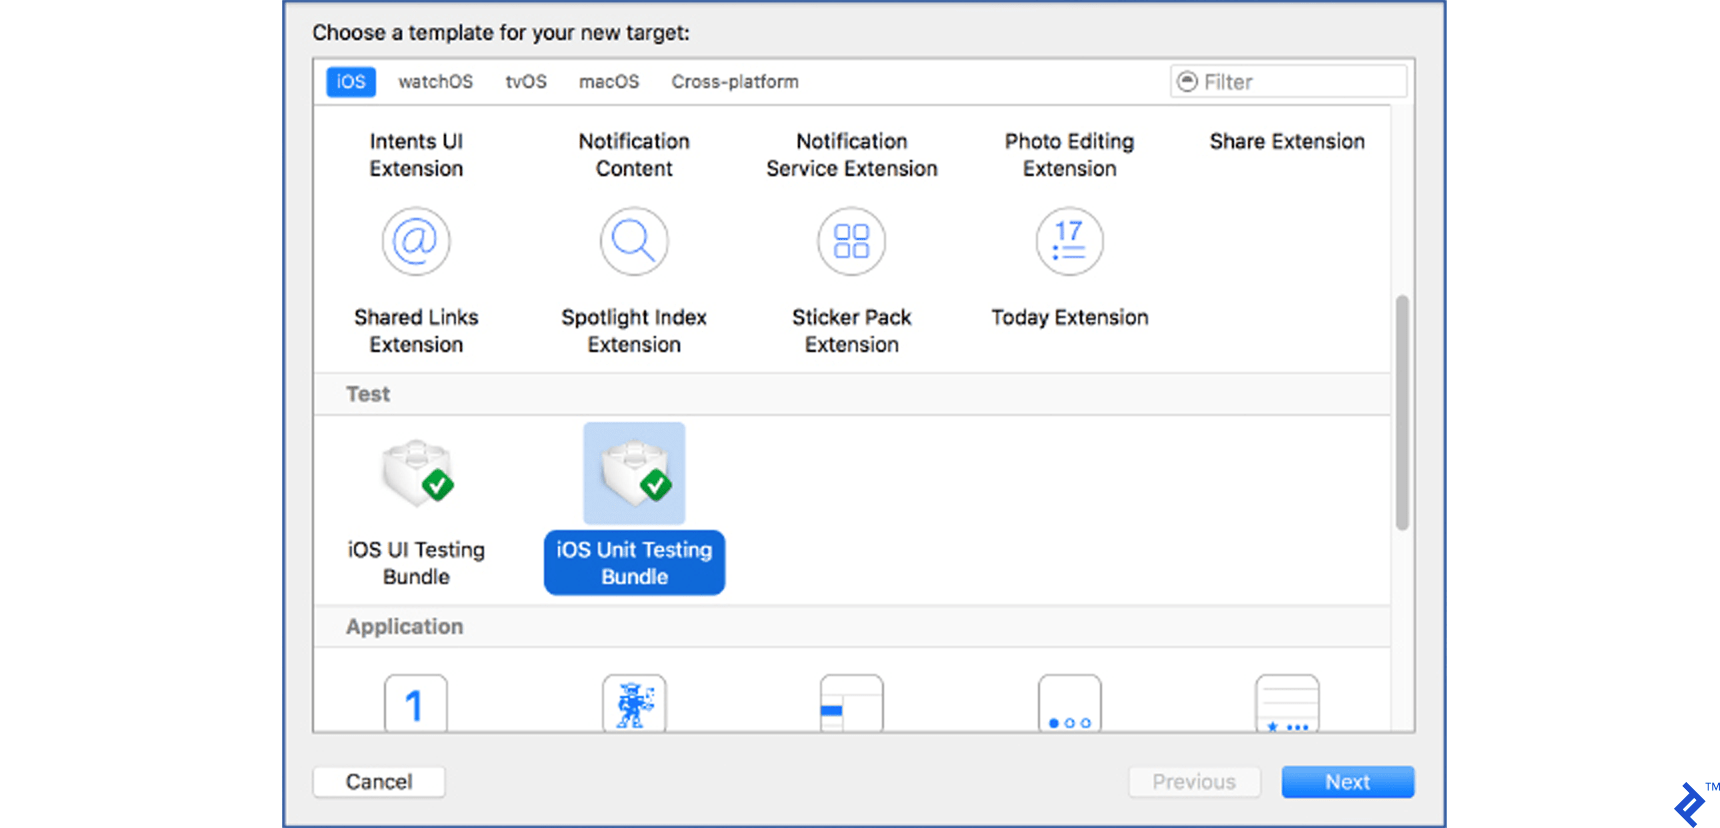
Click Next.
In the target options screen, you can retain the default settings. However, if you have multiple targets and want to test specific ones, select the desired target from the “Target to be tested” dropdown menu.
Click Finish. Replicate this process for UI tests, and your existing project will be ready for automated testing.
Writing Unit Tests
Before diving into writing unit tests, it’s important to understand their structure. When you include unit tests, a sample test class is generated. In this scenario, it will resemble the following:
| |
The crucial methods to grasp are setUp and tearDown. The setUp method executes before each test method, while the tearDown method executes after each test method. When tests within this example class are run, the execution order would be:
setUp → testExample → tearDown setUp → testPerformanceExample → tearDown
Tip: Initiate tests by pressing cmd + U, selecting Product → Test, or by clicking and holding the Run button until the options menu appears, then choosing Test.
To run a specific test method, click the button to the left of the method name (as illustrated in the image below).

With the testing environment ready, you can add a sample class and methods for testing.
Let’s create a class responsible for user registration. The user provides an email address, password, and password confirmation. Our sample class will validate input, check email availability, and attempt user registration.
Note: This example utilizes the MVVM (or Model-View-ViewModel) architectural pattern.
MVVM is chosen for its ability to create a cleaner application architecture that simplifies testing.
MVVM facilitates the separation of business logic from presentation logic, effectively addressing the issue of massive view controllers.
A detailed explanation of MVVM architecture is beyond the scope of this article, but further information can be found in this [link to an external resource].
Let’s create a view-model class dedicated to user registration.
| |
Initially, we’ve added a few properties, dynamic properties, and an init method.
Don’t be concerned about the Dynamic type. It’s an integral part of the MVVM architecture.
Setting a Dynamic<Bool> value to true triggers the enabling of the registration button in a view controller bound to the RegistrationViewModel. When loginSuccessful is set to true, the connected view updates accordingly.
Now, let’s add methods to validate the password and email format.
| |
Whenever the user types into the email or password field, the enableRegistrationAttempt method verifies the email and password format, enabling or disabling the registration button through the registrationEnabled dynamic property.
For simplicity, let’s add two straightforward methods – one to check email availability and another to attempt registration with the provided username and password.
| |
These methods utilize the NetworkService to verify email availability and attempt registration.
To maintain simplicity, the NetworkService implementation doesn’t interact with a backend API. Instead, it’s a stub that simulates results. NetworkService is implemented as a protocol and its corresponding implementation class.
| |
NetworkService is a concise protocol with two methods: registration attempt and email availability check. The protocol implementation is handled by the NetworkServiceImpl class.
| |
Both methods simulate network request delays and subsequently call the appropriate callback methods.
Tip: Adhering to protocols (interfaces in other programming languages) is recommended practice. More information can be found by searching for the “programming to interfaces principle.” You’ll also observe how well it aligns with iOS unit testing.
With the example in place, we can now write unit tests to cover the methods within this class.
Create a new test class for our view model. Right-click the
TestingIOSTestsfolder in the Project Navigator pane, select New File → Unit Test Case Class, and name itRegistrationViewModelTests.Remove the
testExampleandtestPerformanceExamplemethods to make way for our own test methods.Since Swift utilizes modules, and our tests reside in a different module than our application’s code, we need to import our application’s module as
@testable. Below the import statement and class definition, add@testable import TestingIOS(or your application’s module name). This step is crucial as it allows us to reference our application’s classes and methods.Add the
registrationViewModelvariable.
Our empty test class now appears as follows:
| |
Let’s write a test for the emailValid method. We’ll create a new test method named testEmailValid. It’s essential to prefix the name with the test keyword for it to be recognized as a test method.
Our test method will look like this:
| |
This test method utilizes the assertion method XCTAssert, which checks if a condition is true or false.
If the condition is false, the assertion fails (along with the test), and our message is displayed.
Numerous assert methods are available for use in tests. However, covering each one would warrant its own article.
Some examples of assert methods include: XCTAssertEqualObjects, XCTAssertGreaterThan, XCTAssertNil, XCTAssertTrue, and XCTAssertThrows.
More information on available assert methods can be found here.
Running the test now results in a successful pass. You’ve created your first test method! However, it’s not quite ready for production yet. There are three issues (one major and two minor) that need to be addressed.
Issue 1: Reliance on the Real Implementation of the NetworkService Protocol
A fundamental principle of unit testing is the isolation of each test from external factors or dependencies. Unit tests should be atomic.
Testing a method that relies on an API call introduces dependencies on your networking code and server availability. If the server is unavailable during testing, your test will fail, incorrectly indicating a problem with the tested method.
In this case, we are testing a method within RegistrationViewModel.
RegistrationViewModel depends on the NetworkServiceImpl class, even though the tested method, emailValid, doesn’t directly rely on NetworkServiceImpl.
When writing unit tests, all external dependencies should be eliminated. But how can you remove the NetworkService dependency without modifying the implementation of the RegistrationViewModel class?
Object Mocking offers a solution. Examining the RegistrationViewModel reveals its dependency on the NetworkService protocol.
| |
During the initialization of RegistrationViewModel, an implementation of the NetworkService protocol is provided (injected) to the RegistrationViewModel object.
This principle is known as dependency injection via constructor (other types of dependency injection exist).
Numerous articles online delve into dependency injection, such as this one on objc.io.
A concise yet informative article providing a straightforward explanation of dependency injection can be found here.
Additionally, a comprehensive article on the single responsibility principle and DI is available on the Toptal blog.
When RegistrationViewModel is instantiated, it injects a NetworkService protocol implementation within its constructor (hence the name of the dependency injection principle):
| |
Since our view model class only depends on the protocol, we can create a custom (mocked) NetworkService implementation class and inject it into our view model object.
Let’s create our mocked NetworkService protocol implementation.
Add a new Swift file to our test target. Right-click the TestingIOSTests folder in the Project Navigator, select “New File,” choose “Swift file,” and name it NetworkServiceMock.
Our mocked class should resemble the following:
| |
Currently, it’s not significantly different from our actual implementation (NetworkServiceImpl). However, in a real-world scenario, the actual NetworkServiceImpl would handle networking code, response handling, and similar functionalities.
Our mocked class, on the other hand, remains inactive—which is its intended purpose. By doing nothing, it won’t interfere with our tests.
To address the first issue in our test, let’s modify our test method by replacing:
| |
with:
| |
Issue 2: Instantiating the registrationVM Within the Test Method Body
The setUp and tearDown methods exist for a reason.
These methods handle the initialization or setup of objects required for tests. Utilizing them prevents code duplication by avoiding repetitive initialization or setup code within every test method. While not always a critical issue, especially when dealing with specific configurations for individual test methods, it’s good practice to use them.
Since our initialization of the RegistrationViewModel class is straightforward, let’s refactor our test class to incorporate the setup and tearDown methods.
The RegistrationViewModelTests class should now appear as follows:
| |
Issue 3: Multiple Asserts Within a Single Test Method
Although not a major concern, some advocate for having only one assert per method.
The primary rationale behind this principle is error detection.
If a test method contains multiple asserts and the first one fails, the entire test method is marked as failed, preventing subsequent asserts from being evaluated.
This approach reveals only one error at a time, leaving you unaware of potential failures or successes in other asserts.
However, having multiple asserts within a single method isn’t always detrimental. Since you can only address one error at a time, detecting one error at a time might not be a significant drawback.
In our case, we are testing the validity of an email format. As this involves a single function, grouping all asserts within one method can enhance readability and comprehension.
Since this issue isn’t critical, and some might argue it’s not an issue at all, we’ll keep our test method as is.
When writing your unit tests, decide which approach (one assert per test or multiple asserts) best suits each test method. You’ll likely encounter scenarios where both philosophies are applicable.
Testing Methods with Asynchronous Calls
Even in simple applications, there’s a high probability of encountering methods requiring asynchronous execution on a separate thread, particularly when you prefer to have the UI running on its own thread.
The challenge with unit testing asynchronous calls lies in their execution time. Unit tests don’t inherently wait for asynchronous calls to complete. As a result, the unit test might finish before the code within an async block executes, leading to consistent test results regardless of the code within the async block.
To illustrate this, let’s create a test for the checkEmailAvailability method.
| |
Here, we aim to test whether the registrationEnabled variable is set to false when our method indicates email unavailability (already taken).
Running this test results in a pass. However, try changing the assert to:
| |
Running the test again still yields a pass.
This occurs because our assert isn’t being evaluated. The unit test completes before the callback block is executed (remember, our mocked network service implementation introduces a one-second delay before returning).
Fortunately, Xcode 6 introduced test expectations to the XCTest framework in the form of the XCTestExpectation class. Here’s how it works:
- At the beginning of the test, you define your test expectation—a simple text describing the expected outcome.
- Within an async block, after your test code executes, you fulfill the expectation.
- At the end of the test, you include the
waitForExpectationWithTimerblock, which executes when the expectation is fulfilled or the timer expires—whichever occurs first. - Now, the unit test won’t conclude until either the expectation is fulfilled or the expectation timer runs out.
Let’s rewrite our test using the XCTestExpectation class.
| |
Running the test now results in a failure—as expected. To make it pass, change the assert to:
| |
Rerun the test to observe its success. Experiment by adjusting the delay time in the mocked network service implementation to see what happens when the expectation timer expires.
Testing Methods with Asynchronous Calls without a Callback
Our example project’s attemptUserRegistration method utilizes the NetworkService.attemptRegistration method, which includes asynchronously executed code. This method attempts to register a user with the backend service.
In our demo application, the method simulates a network call by waiting for one second and then fakes successful registration. Upon successful registration, the loginSuccessful value is set to true. Let’s create a unit test to verify this behavior.
| |
Running this test results in a failure because the loginSuccessful value isn’t set to true until the asynchronous networkService.attemptRegistration method completes.
Since we have a mocked NetworkServiceImpl where the attemptRegistration method waits for one second before returning successful registration, we can utilize Grand Central Dispatch (GCD) and its asyncAfter method to check our assert after one second. Adding GCD’s asyncAfter to our test code:
| |
However, this still won’t work. The test method executes before the asyncAfter block, always resulting in a successful test pass. Again, the XCTestException class comes to the rescue.
Let’s rewrite our method to incorporate the XCTestException class:
| |
With unit tests covering our RegistrationViewModel, we gain confidence that adding new or updating existing functionality won’t break existing code.
Important Note: Unit tests lose their value if they aren’t updated alongside changes to the functionality they cover. Writing unit tests is an ongoing process that must keep pace with application development.
Tip: Don’t delay writing tests until the end. Integrate testing into your development process to gain a clearer understanding of what needs testing and potential edge cases.
Writing UI Tests
Thorough unit testing provides confidence in the correct functionality of individual code units. However, it doesn’t guarantee that the application as a whole behaves as intended.
That’s where integration tests, including UI tests, play a crucial role.
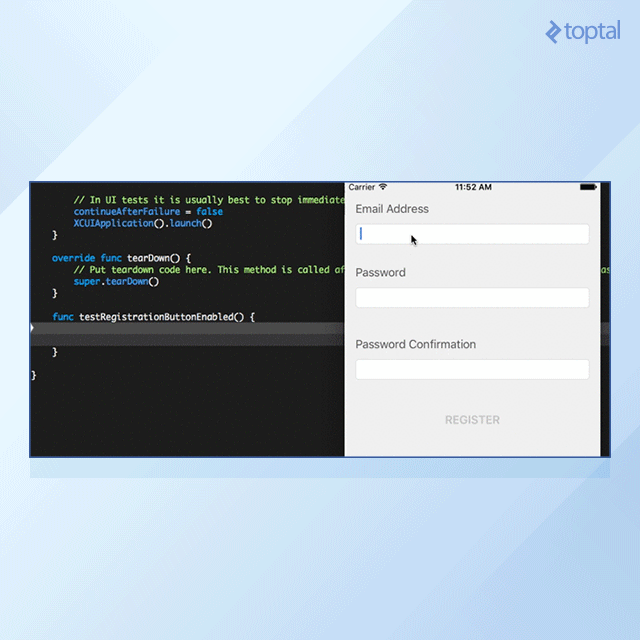
Before diving into UI testing, we need UI elements and interactions (user stories) to test. Let’s create a simple view and its view controller.
- Open
Main.storyboardand design a simple view controller resembling the one depicted below.
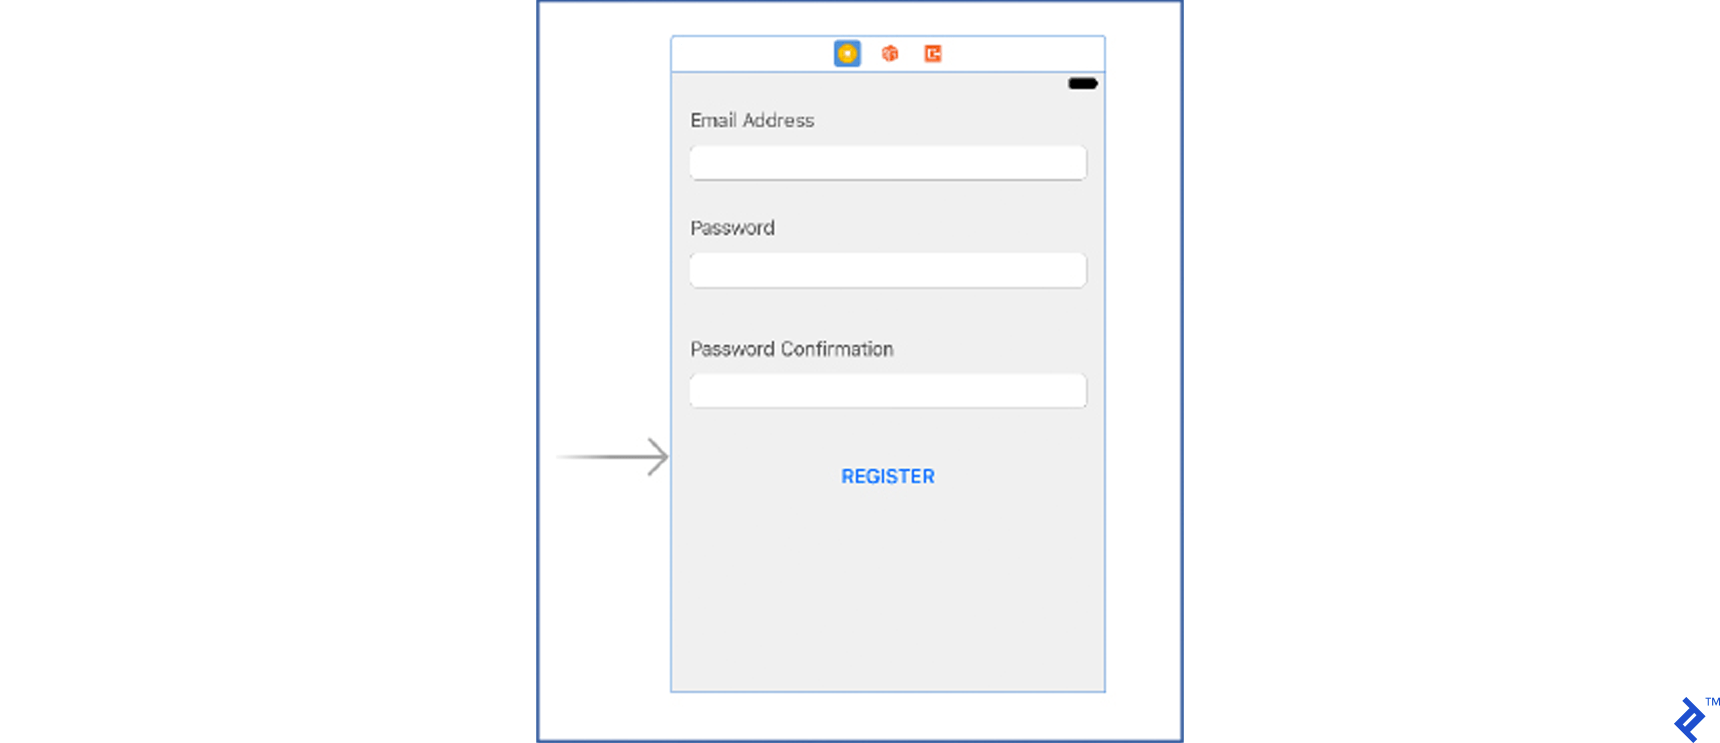
Set the tag values for the email, password, and password confirmation text fields to 100, 101, and 102, respectively.
- Add a new view controller file named
RegistrationViewController.swiftand connect all outlets within the storyboard.
| |
Here, we’ve added IBOutlets and a TextFieldTags struct to the class.
This enables the identification of the text field being edited. To utilize the Dynamic properties within the view-model, you need to “bind” them within the view controller. You can achieve this using the bindViewModel method:
| |
Now, let’s add a text field delegate method to track updates to any of the text fields:
| |
- Update
AppDelegateto bind the view controller to the appropriate view model (a requirement of the MVVM architecture). The updatedAppDelegatecode should look like this:
| |
While the storyboard file and RegistrationViewController are intentionally simple, they suffice for demonstrating automated UI testing.
When set up correctly, the registration button should be disabled upon app launch. It should only become enabled when all required fields are filled in with valid input.
With this foundation in place, we can create our first UI test.
Our UI test will verify if the Register button becomes enabled only when a valid email address, password, and matching password confirmation are provided. Here’s how:
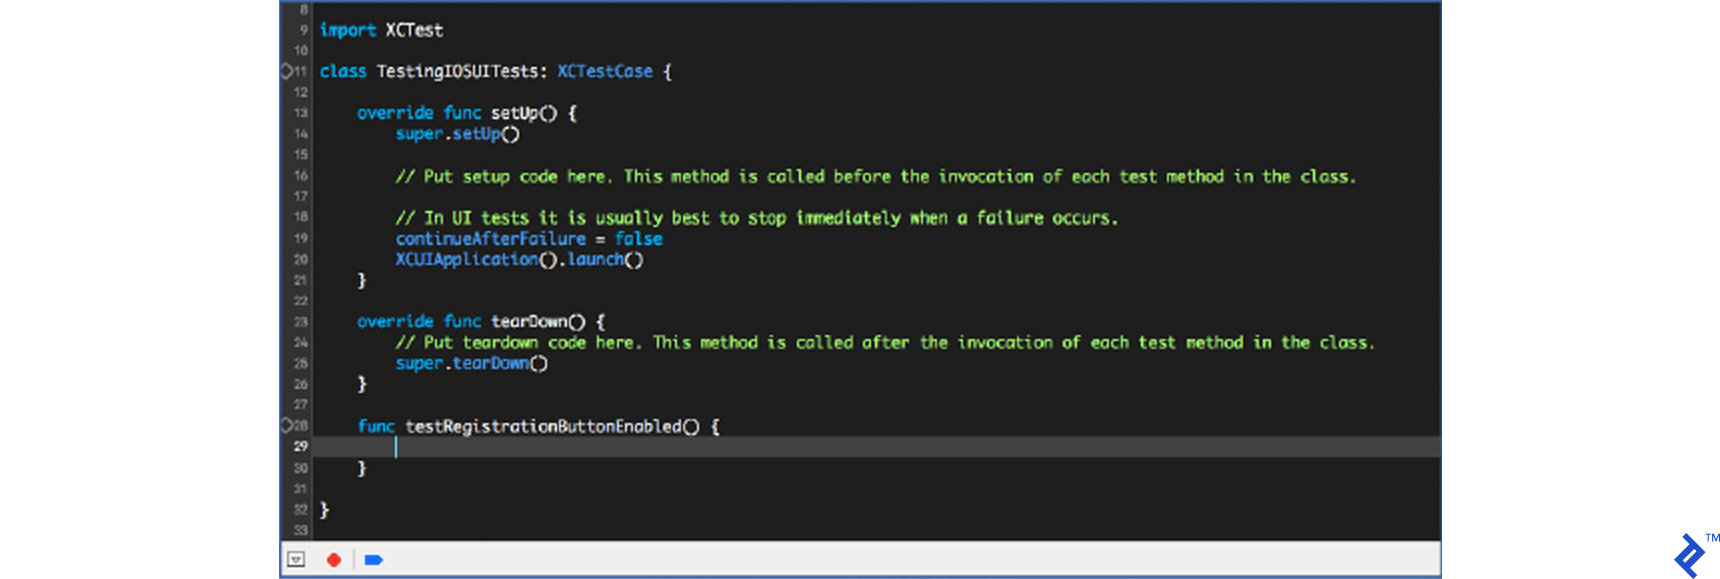
- Open the
TestingIOSUITests.swiftfile. - Remove the
testExample()method and add atestRegistrationButtonEnabled()method. - Place your cursor within the
testRegistrationButtonEnabledmethod as if you were about to write code. - Click the Record UI test button (red circle at the bottom of the screen).
- Pressing the Record button launches the application.
- Once the application loads, tap the email text field and enter “email@test.com.” Observe how code automatically appears within the test method body.
You can record all UI interactions using this feature, but manually writing simple instructions might be quicker.
Here’s an example of a recorded instruction for tapping the password text field and entering “email@test.com”:
| |
- After recording the desired UI interactions, press the stop button (the Record button label changes to “Stop” during recording) to stop the recording.
- With your UI interactions recorded, you can add various
XCTAssertsto test different application or UI element states.
Recorded instructions aren’t always self-explanatory and can make the test method less readable. Fortunately, you can manually enter UI instructions.
Let’s manually create the following UI instructions:
- User taps the password text field.
- User enters a “password”.
To reference a UI element, use a placeholder identifier, which can be set in the storyboard’s Identity Inspector pane under Accessibility. Set the password text field’s accessibility identifier to “passwordTextField”.
The password UI interaction can now be written as:
| |
The last UI interaction involves the confirm password input. This time, we’ll reference the confirm password text field using its placeholder. In the storyboard, add the “Confirm Password” placeholder for the confirm password text field. Now, the user interaction can be written as follows:
| |
With all necessary UI interactions in place, we just need to write a simple XCTAssert (similar to what we did in unit testing) to check if the Register button’s isEnabled state is set to true. Reference the register button using its title. The assert to verify a button’s isEnabled property looks like this:
| |
The complete UI test should now appear as follows:
| |
Running the test prompts Xcode to launch the simulator and our test application. After the application launches, our UI interaction instructions execute sequentially, culminating in the successful assertion of our assert.
Let’s enhance the test by verifying that the register button’s isEnabled property remains false if any required field isn’t filled in correctly.
The complete test method with this improvement looks like this:
| |
Tip: Using accessibility identifiers is the preferred method for identifying UI elements. Relying on localizable properties like names or placeholders can lead to test failures when different languages are used.
This example UI test, while simple, demonstrates the power of automated UI testing in iOS.
The best way to explore the extensive capabilities of Xcode’s UI testing framework is to incorporate UI tests into your projects. Begin with straightforward user stories like the one shown, gradually progressing to more complex scenarios and tests.
Become a Better Developer by Writing Good Tests
In my experience, learning and striving to write effective tests influence other development aspects positively. Mastering Swift automated testing contributes to becoming a well-rounded iOS developer.
Writing good tests often necessitates learning how to structure code effectively.
Well-organized, modular, and cleanly written code is fundamental to successful and stress-free unit and UI testing. In some cases, poorly organized code can even render testing impossible.
When considering application structure and code organization, you’ll find that employing patterns like MVVM, MVP, VIPER, or others leads to better-structured, modular, and testable code, while simultaneously mitigating issues like Massive View Controller.
Creating mocked classes during testing often leads to exploring and understanding the dependency injection principle and protocol-oriented programming. Embracing these principles significantly enhances code quality in future projects.
The process of writing tests often encourages developers to consider corner cases and edge conditions more carefully during code development. This proactive approach helps eliminate potential bugs early on. By contemplating potential issues and negative outcomes, you’ll naturally progress from testing only positive outcomes to incorporating negative outcome testing as well.
As you can see, unit tests have far-reaching implications for various development aspects. Writing effective unit and UI tests not only improves code quality but also contributes to a more enjoyable and fulfilling development experience.
Start integrating automated tests into your workflow, and you’ll eventually reap the rewards on your iPhone. Automated testing on iOS is a rewarding endeavor, and once you witness its benefits firsthand, you’ll become a staunch advocate for it.