The initial draft for a Web Audio API was introduced by W3C in 2011. While webpages have supported audio for quite some time, the ability to generate audio directly within the web browser was a relatively recent development. I believe Google Chrome played a significant role in this, as their focus on the browser as a central computing platform spurred innovation in this area. It’s worth remembering that the web browser landscape didn’t see substantial changes until Google Chrome emerged. Back then, incorporating sound into a webpage was often considered a suboptimal design choice. However, with the rise of web experiments, web audio started to regain relevance. Modern web browsers have transformed into tools for artistic expression, and video and audio play a crucial role in this evolution.
The Web Audio API, while still under development, can be challenging to utilize for certain tasks. Fortunately, several JavaScript libraries have emerged to simplify its use. In this instance, I will demonstrate how to begin using the Web Audio API with a library called Tone.js. By grasping the basics of this library, you’ll be well-equipped to handle most of your browser-based sound requirements.
Introduction to the Web Audio API
Getting Started
Let’s start without utilizing the library. Our initial experiment involves generating three sine waves. Given the simplicity of this example, we’ll create a single file named hello.html, a basic HTML file with minimal markup.
| |
The fundamental element of the Web Audio API is the audio context. This object acts as a container for all web audio-related components. It’s generally discouraged to have multiple audio contexts within a single project. We’ll initiate our journey by creating an audio context, adhering to the guidelines provided in Mozilla’s Web Audio API documentation.
| |
Creating an Oscillator
With an audio context established, you already possess an audio component: audioCtx.destination. This component serves as the equivalent of your speakers. To produce sound, it’s essential to connect it to audioCtx.destination. Now, let’s generate some sound by creating an oscillator:
| |
While we’ve created an oscillator, it won’t produce sound yet. We need to activate it and connect it to our audioCtx.destination:
| |
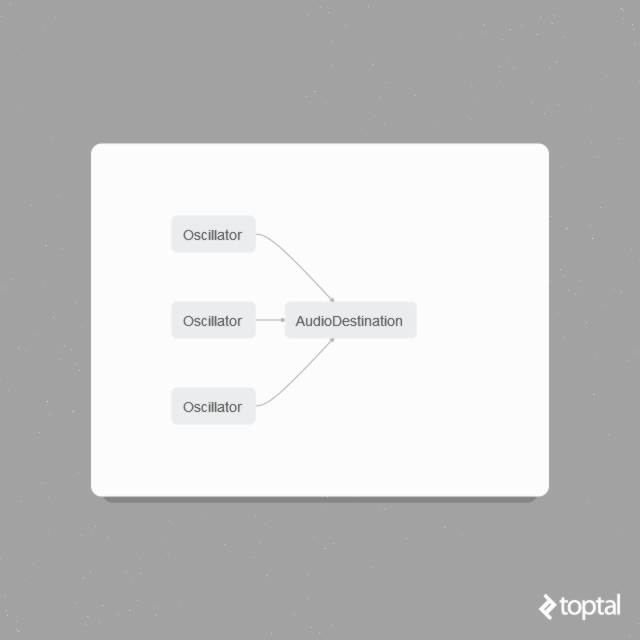
These four lines of code will result in a webpage that emits a continuous sine wave sound. While potentially annoying, this demonstrates the fundamental concept of connecting audio modules. In the following script, we’ll create three sine-wave tones, each with a distinct frequency, and connect them to the output. The code is self-explanatory:
| |
Oscillators offer flexibility beyond sine waves, allowing you to generate triangle, sawtooth, square, and even custom waveforms, as stated in the MDN.
Understanding Web Audio’s Patching Logic
Next, let’s incorporate a gain module into our Web Audio component ensemble. This module enables us to adjust the amplitude of our sounds, similar to a volume knob. We’ve already utilized the connect function to link an oscillator to the audio output. We can employ the same connect function to connect any audio component. Using Firefox and examining the web audio console would reveal the following:
To modify the volume, our audio routing, or patch, should resemble this:
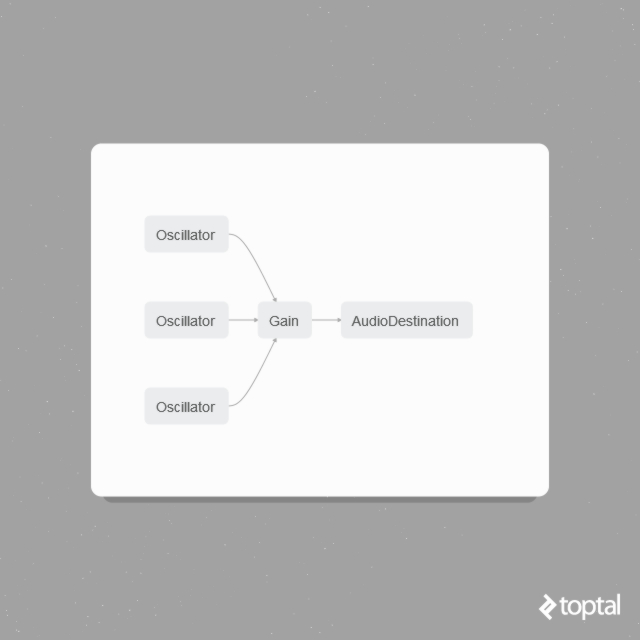
This illustration indicates that the oscillators are no longer directly connected to the audio destination. Instead, they are routed through a gain module, which is then connected to the destination. Visualizing this process as connecting guitar pedals and cables can be helpful. The corresponding code would look like this:
| |
The solution can be found at https://github.com/autotel/simple-webaudioapi/.
GainNode is the most fundamental effect unit, but the Web Audio API provides a variety of others, including delay, convolver, biquadratic filter, stereo panner, wave shaper, and many more. Additional effects can be obtained from libraries like Tone.js.
Organizing these sound patches within their own objects promotes reusability and facilitates the creation of more intricate orchestrations with less code. This concept could be explored further in a future post.
Simplifying Things with Tone.js
Having briefly examined the workings of vanilla Web Audio modules, let’s shift our attention to the impressive Web Audio framework, Tone.js. Utilizing Tone.js (along with NexusUI for user interface elements) simplifies the process of constructing more engaging synths and sounds. To illustrate, we’ll create a sampler, apply some interactive effects, and implement basic controls for it.
Tone.js Sampler
Let’s start by establishing a simple project structure:
| |
Our JavaScript libraries will reside within the js directory. For this demonstration, we’ll use the NoiseCollector’s hit4.wav file, downloadable from Freesound.org.
Tone.js delivers its functionalities through Player objects. These objects can load and play audio samples, either once or in a loop. Our first step is to create a player object within a variable named “sampler” inside the sampler.html file:
| |
Note that the first argument passed to the player constructor is the name of the WAV file, followed by a callback function. While WAV is supported, other file types are compatible as well, with compatibility often depending more on the web browser than the library. The callback function executes once the player successfully loads the sample into its buffer.
We also need to connect our sampler to the output. Tone.js provides a convenient way to achieve this:
| |
In this code snippet, sampler represents a Tone.Player object, and the toMaster function is a shorthand for connect(Tone.Master). This line should be placed after line 10.
Opening the webpage in a browser with the developer console open should display the “samples loaded” message, confirming the successful creation of the player. Now, let’s add a button to the webpage, allowing us to hear the sample when clicked. We’ll use a NexusUI button for this purpose, placing it within the body:
| |
You should now see a rounded button rendered on the page. To program it to play our sample, we’ll add a NexusUI listener:
| |
NexusUI automatically creates a global variable for each NexusUI element. You can disable this behavior by setting nx.globalWidgets to false, which confines these variables within nx.widgets[]. For simplicity, we’ll stick with the default behavior as we’re only creating a few elements.
Similar to jQuery, we attach .on events, with the first argument representing the event name. Here, we’re assigning a function to any action performed on the button, denoted by “*”. More information about events for each element can be found in the NexusUI API documentation. Instead of logging messages, let’s modify the code to play the sample when the button is pressed.
| |
Notice that the listener resides within an onload callback. NexusUI elements are drawn on a canvas, so you can’t reference them until nx invokes the onload function, much like working with DOM elements in jQuery.
The event is triggered on both mouse down and release. If you prefer it to trigger only on press, you can check if event.press equals one.
With this modification, the button will play the sample each time it’s pressed. Setting sampler.retrigger to true allows the sample to be played even if it’s currently playing. Otherwise, you’d have to wait for the sample to finish before retriggering it.
Incorporating Effects
Tone.js makes it straightforward to create a delay effect:
| |
The first argument specifies the delay time, which can be expressed in musical notation as shown here. The second argument controls the wet level, determining the mix between the original sound and the delayed sound. For delays, it’s generally preferable to avoid a 100% wet setting, as delays are more interesting when they interact with the original sound.
Next, we’ll reroute our sampler from the master output to the delay effect. Adjust the line connecting the sampler to master as follows:
| |
Clicking the button again will now produce an audible delay effect.
Let’s add two dials to the webpage:
| |
We’ll use the NexusUI listener to apply the dials’ values to the delay effect:
| |
You can find the parameters that can be adjusted for each event in the Tone.js documentation. For the delay effect, the parameter is here. Now you can experiment with the example and manipulate the delay parameters using the NexusUI dials. This process can be applied to any NexusUI element, not just effects. For instance, try adding another dial and attaching the following listener:
| |
These files are available at github.com/autotel/simpleSampler
Conclusion
Exploring these APIs filled me with excitement and a sense of boundless possibilities. The key distinction between this audio implementation and traditional digital audio lies not in the audio itself, but in its context. While there are no groundbreaking synthesis methods introduced here, the true innovation lies in the convergence of audio and music creation with web technologies.
As someone involved in electronic music production, I’ve always been fascinated by the blurred lines between live performance and simply pressing play on a pre-recorded track. Achieving truly live electronic music often necessitates crafting custom performance tools or “music-making robots” for improvisation. However, if electronic music performance boils down to tweaking parameters within pre-programmed algorithms, it opens up avenues for audience participation. I’ve been experimenting with integrating web and audio for crowdsourced music, and perhaps soon we’ll attend parties where the music originates from the audience’s smartphones. In essence, it’s not too different from the rhythmic jams our ancestors enjoyed in prehistoric times.