With the increasing complexity of web applications, achieving scalability has become paramount. While ad-hoc JavaScript and jQuery sufficed in the past, modern web app development demands more discipline and formal software development practices. These practices include:
- Unit tests to prevent new code from breaking existing functionality.
- Linting to maintain consistent coding style and avoid errors.
- Separate production builds that are optimized for performance.
Web development also presents unique challenges. For instance, webpages rely heavily on asynchronous requests, and requesting numerous JS and CSS files can hinder performance due to overhead from headers, handshakes, etc. Bundling these files into single JS and CSS files is a common solution.
Furthermore, developers often use preprocessors like SASS and JSX that compile to JS and CSS, along with JS transpilers like Babel, to leverage ES6 while ensuring ES5 compatibility.
These tasks, unrelated to the core application logic, can be automated using task runners. Task runners enhance the development environment and streamline workflows, allowing developers to focus on writing code. Once configured, a single terminal command executes these tasks.
This article will utilize Gulp as the task runner due to its user-friendliness, ease of learning, and clear syntax.
A Quick Introduction to Gulp
Gulp’s API comprises four primary functions:
gulp.srcgulp.destgulp.taskgulp.watch
Here’s a simple task illustrating three of these functions:
| |
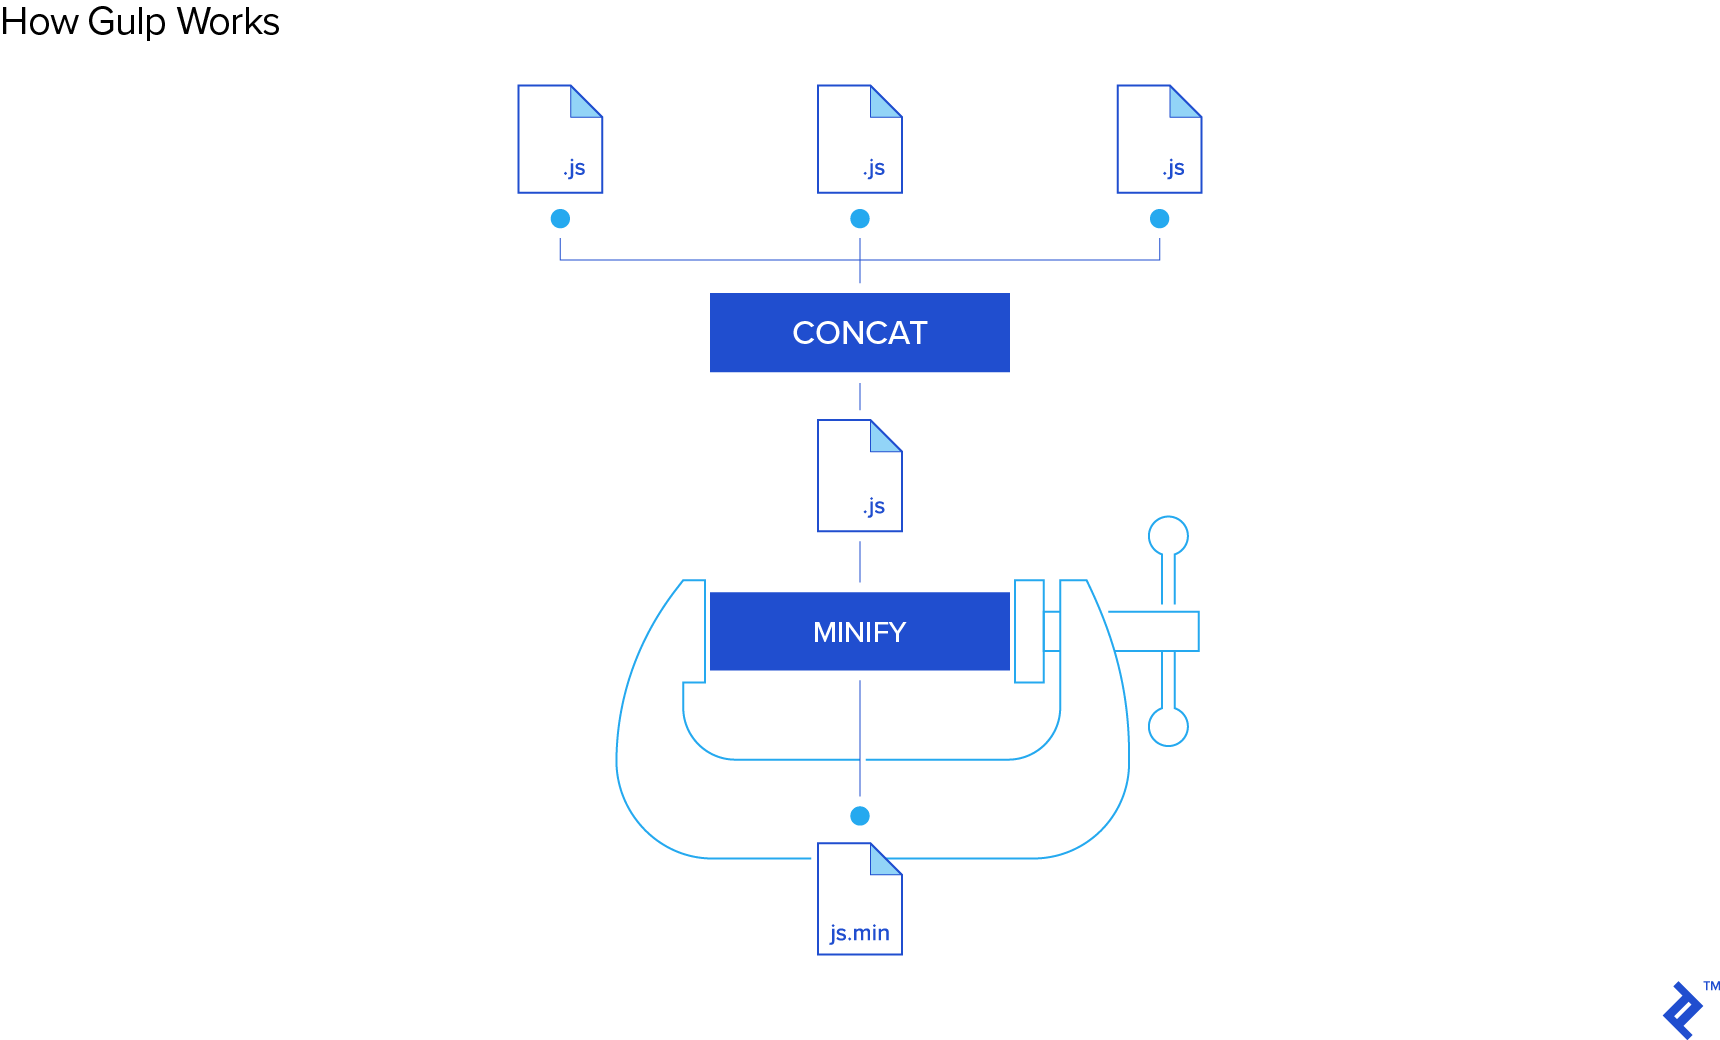
When my-first-task is executed, all JS files within the /public/js directory and its subdirectories are minified and moved to a build folder.
The elegance of Gulp lies in its .pipe() chaining. It takes input files, applies transformations sequentially, and outputs the results. Libraries usually handle the transformations, like minify(), so you rarely need to write custom ones beyond file renaming.
Understanding task dependencies is key to mastering Gulp.
| |
In this example, my-second-task only executes its callback after the lint and bundle tasks are finished. This promotes separation of concerns, where small, focused tasks handle specific actions like converting LESS to CSS, while a master task orchestrates these sub-tasks through dependencies.
Lastly, gulp.watch monitors files for changes and runs tasks upon detection.
| |
Here, changes to JS files within /public/js and its subdirectories trigger the lint and reload tasks. Live reloads in the browser, a valuable development feature, are a common use case for gulp.watch.
With that, you’ve grasped the fundamentals of gulp.
Where Does Webpack Fit In?

Unlike simple concatenation, bundling JavaScript files using the CommonJS pattern requires resolving dependencies. An entry point, typically named index.js or app.js, contains require or import statements:
ES5
| |
ES6
| |
Dependencies must be resolved before executing the remaining app.js code. These dependencies might have their own dependencies, creating a complex tree. Additionally, a dependency might be required in multiple locations but should only be resolved once. Bundlers like Browserify and Webpack address this complexity.
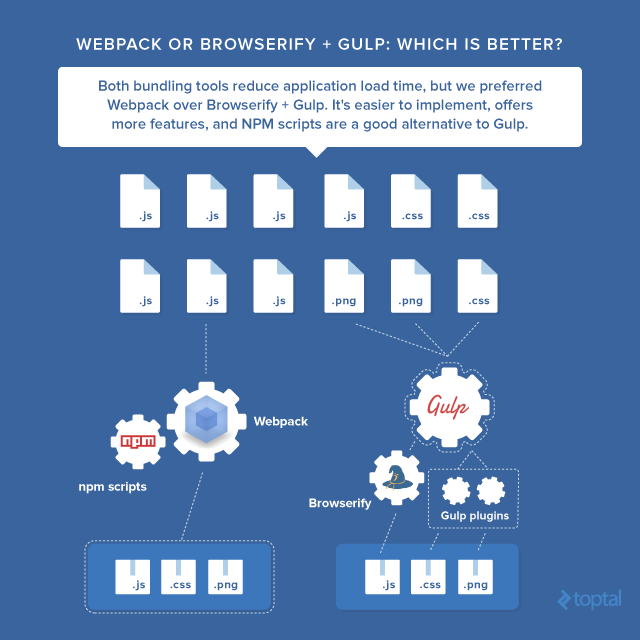
Why Use Webpack over Gulp?
Webpack is a module bundler, while Gulp is a task runner. You might expect them to be used together, but there’s a growing trend, particularly within the React community, to use Webpack instead of Gulp. Why?
Webpack’s capabilities often overlap with those of a task runner. It handles minification, sourcemaps, and can be run as middleware via webpack-dev-server, which supports both live and hot reloading. Loaders further extend its functionality to include ES6 to ES5 transpilation, and CSS pre- and post-processing. This leaves only unit tests and linting as tasks Webpack can’t handle independently, leading many developers to use NPM scripts directly, simplifying their project setup.
However, Webpack’s configuration can be complex, making it less appealing for quick project setups.
Three Task Runner Setups
This article will showcase a project with three different task runner setups, each accomplishing the following:
- Development server with live reloading.
- Scalable JS and CSS bundling (including ES6 transpilation, SASS compilation, and sourcemaps).
- Unit tests (standalone and watch modes).
- Linting (standalone and watch modes).
- Single command execution.
- Production bundle generation with optimizations.
The setups are:
- Gulp + Browserify
- Gulp + Webpack
- Webpack + NPM Scripts
We’ll use React for the front-end, simplifying tasks for the runner as it only requires a single HTML file and works well with CommonJS.
Each setup’s benefits and drawbacks will be analyzed to help you decide which best suits your project.
A Git repository with branches for each approach is available (link). To test each setup:
| |
Let’s explore the code for each branch.
Common Code
Folder Structure
| |
A simple HTML file loads the React application into a <div> with the id “app.” Only a single bundled JS and CSS file is used (the Webpack development setup won’t even need the separate CSS file).
This is the entry point for the JavaScript code. It loads React Router into the “app” div defined in the HTML.
This file defines the application routes. URLs like /, /about, and /contact are mapped to corresponding React components.
This contains unit tests for native JavaScript behavior. In a production application, you’d typically have unit tests for each React component, but for this example, functional unit tests that can run in watch mode are sufficient.
This component acts as a container for page views. Each page will include a header component and the specific content for that page.
This is the home view of the application. It utilizes react-bootstrap to leverage Bootstrap’s grid system for responsive layout.
The remaining components (Header, AboutPage, ContactPage) follow a similar structure.
CSS Styling Approach
This project employs a modular CSS approach with one stylesheet per component, scoping styles to that component. Each component’s top-level div has a class matching the component name. For instance, HomePage.js has:
| |
The corresponding HomePage.scss file looks like this:
| |
This approach minimizes unintended cascading by isolating component styles.
Consider two components, Component1 and Component2, where we want to override the h2 font size:
| |
The h2 font size in each component remains independent regardless of their placement in the markup. This self-contained styling ensures consistent component appearance throughout the application.
In addition to component-specific styles, a styles folder contains a global stylesheet (global.scss) and SASS partials (_fonts.scss and _variables.scss). The global stylesheet defines the overall application style, while partials can be imported by component stylesheets as needed.
Now, let’s delve into the first task runner/bundler combination.
Gulp + Browserify Setup
This setup results in a large gulpfile with numerous imports and lines of code. For brevity, we’ll focus on the js, css, server, watch, and default tasks.
JS Bundle
| |
This approach is less than ideal for several reasons. First, the task is fragmented into three parts. The Browserify bundle object b is created with options and event handlers. The Gulp task itself takes a named function as a callback due to how b.on('update') utilizes this callback. This lacks the typical Gulp task elegance of chaining transformations from gulp.src.
Second, it forces different reload approaches for HTML, CSS, and JS in the browser. In the Gulp watch task:
| |
Changing an HTML file re-runs the html task.
| |
The final pipe calls livereload() unless in a production environment, refreshing the browser.
CSS watches follow the same logic, but JS watches are different. Instead of calling the js task directly, Browserify’s b.on('update', bundle) handles reloads using hot module replacement. This inconsistency, while annoying, is necessary for incremental builds. Simply using livereload() at the end of the bundle function would rebuild the entire JS bundle for any JS file change, leading to performance issues as the project grows.
CSS Bundle
| |
Vendor CSS inclusion is cumbersome, requiring manual gulpfile modifications for new files instead of adding imports in the source code.
The pipe logic is also convoluted, requiring an external library (gulp-cond) for conditional logic within the pipes, resulting in less readable code.
Server Task
| |
This task essentially wraps the command nodemon server.js, running server.js in a Node.js environment. nodemon automatically restarts the process upon file changes. The nodemon.json file limits the scope to prevent restarts on every JS file change.
| |
Let’s review the server code.
| |
This sets the server’s base directory and port based on the environment and creates an Express.js instance.
| |
Middleware for live reloading (connect-livereload) and serving static assets is added.
| |
A simple API route demonstrates backend integration. Navigating to localhost:3000/api/sample-route displays a response.
| |
A real backend would typically involve a dedicated folder for API routes, separate files for database connections, and more.
| |
This catch-all route serves index.html for any unmatched URL, letting React Router handle client-side routing.
| |
This starts the Express.js server on the specified port and opens a new browser tab with the application.
A minor annoyance in the server setup is:
| |
This duplicates the livereload functionality already present in the gulpfile.
Default Task
| |
This task executes when running gulp in the terminal. It uses runSequence to enforce sequential execution, as tasks within an array normally run in parallel. For instance, the clean task needs to precede the html task to ensure empty destination folders. Gulp 4 will natively support gulp.series and gulp.parallel, but for now, we rely on this workaround.
Beyond that, the setup is elegant. A single command sets up and hosts the application. The workflow is easy to grasp by examining individual tasks in the run sequence. Breaking down the sequence into smaller, focused tasks like validate (combining lint and test) or host (combining server and watch) enhances task management as the application grows.
Development vs Production Builds
| |
The yargs library enables passing command-line flags to Gulp. Here, the --prod flag sets the node environment to “production.” The PROD variable differentiates development and production behavior within the gulpfile. For example:
| |
This configures Browserify to disable plugins in production and use hmr and watchify otherwise.
The PROD conditional avoids writing separate Gulp files for different environments, reducing code duplication. It allows running tasks in production mode (e.g., gulp --prod or gulp html --prod). However, conditional logic within pipes using cond(!PROD, livereload()) can impact readability. Ultimately, choosing between a boolean flag and separate gulpfiles is a matter of preference.
Now, let’s explore replacing Browserify with Webpack while keeping Gulp as the task runner.
Gulp + Webpack Setup
The gulpfile significantly shrinks to 99 lines with fewer imports. The default task becomes:
| |
The setup now requires only five tasks instead of nine.
The watch task is simplified:
| |
It no longer triggers rebundling, and transferring index.html is unnecessary.
The html, css, js, and fonts tasks are replaced by a single build task:
| |
This task runs clean and html sequentially, then pipes the entry point through Webpack, using a webpack.config.js file for configuration, and outputs the bundle to the appropriate directory.
Let’s examine the Webpack config:
| |
This specifies the sourcemap type. Webpack offers various sourcemap options balancing detail and rebuild speed. We can use a “cheap” option during development for faster reloads and a more detailed option for production.
| |
This defines the entry point for bundling. The array allows multiple entry points. We include the main application entry point (app/index.js) and webpack-hot-middleware for hot reloading.
| |
This sets the output path for the bundled file. The publicPath determines the base URL for the bundle on the server. For example, if publicPath is /public/assets, the bundle will be accessible at /public/assets/bundle.js.
| |
This sets the server’s root directory, determining where static files are served from.
To clarify how Webpack maps files:
path+filename: The bundle’s location within the project.contentBase(as the root,/) +publicPath: The bundle’s URL on the server.
| |
Plugins extend Webpack’s functionality. For example, webpack.optimize.UglifyJsPlugin handles minification.
| |
Loaders pre-process files loaded via require(), similar to Gulp pipes.
Here’s a sample loader:
| |
The test property applies the loader to files matching the regex (in this case, SASS files). The loader property defines the action. We chain the style, css, resolve-url, and sass loaders, executed in reverse order.
The loader3!loader2!loader1 syntax, while functional, is less elegant than reading from left to right. Despite this, loaders are a powerful feature. We can import SASS files directly into JavaScript:
index.js
| |
Similarly, components can import their stylesheets. Webpack bundles the CSS (and potentially images and fonts) into the JS bundle.
This capability significantly streamlines JavaScript development. CSS bundling, minification, and sourcemaps are handled seamlessly, and hot module reloading works with CSS. Managing JS and CSS imports in the same file simplifies development, reducing context switching.
Webpack can also inline images and fonts:
| |
The URL loader inlines resources under 100KB as data URLs, improving performance.
This summarizes Webpack configuration. While setup might seem daunting, the benefits are substantial. Webpack loaders offer greater flexibility compared to Browserify’s plugins and transforms.
Webpack + NPM Scripts Setup
This setup utilizes NPM scripts directly for task automation, eliminating the need for a gulpfile.
package.json
| |
Development and production builds are triggered using npm start and npm run start:prod, respectively.
This approach is significantly more concise than a gulpfile. However, the commands are less expressive than Gulp tasks. For instance, there’s no direct way to run some commands in series and others in parallel within a single script.
A major advantage is the direct use of NPM libraries like mocha. Instead of installing Gulp wrappers, you install the libraries directly.
Instead of:
- gulp-eslint
- gulp-mocha
- gulp-nodemon
- etc
We install:
- eslint
- mocha
- nodemon
- etc
Cory House, in his post Why I Left Gulp and Grunt for NPM Scripts, highlights three key issues with Gulp:
- Plugin dependency.
- Debugging difficulties.
- Fragmented documentation.
1. Plugin Dependency
Gulp plugins rely on their native counterparts to stay updated. Maintainer inactivity or delays can lead to compatibility issues and limit access to new features.
2. Frustrating to Debug
While tools like gulp-plumber improve error handling, Gulp’s error reporting can be cryptic, hindering debugging. Stack traces might not always point to the root cause in the source code.
3. Disjointed Documentation
Smaller Gulp plugins often lack comprehensive documentation, and developers might need to consult both the plugin and native library documentation, increasing the cognitive load.
Conclusion
While all options have their merits, Webpack combined with NPM scripts emerges as a strong contender, minimizing dependencies and streamlining the development process.
Gulp provides greater expressiveness compared to NPM scripts, but at the cost of abstraction. The ideal choice depends on your project’s specific needs. However, if minimizing dependencies and easing debugging are priorities, Webpack with NPM scripts offers a compelling approach.