Monitoring conversions is essential for achieving success with Google Ads. The availability of various conversion tracking methods has increased in recent years, presenting both opportunities and challenges. While customization is enhanced, there’s also a higher chance of errors that can affect the accuracy of your campaign tracking.
This article will guide you on how to configure conversion tracking settings in Google Ads. This will enable you to track all desired conversions for optimization and gain insights into other crucial campaign actions, all while ensuring accurate performance indicators.
Customizing Your Google Ads Conversion Tracking
To gain a clearer understanding of your campaign’s performance, follow these steps to customize your Google Ads conversion tracking:
- Familiarize yourself with Google’s conversion tracking framework
- Establish primary conversions
- Categorize your conversions
- Review and update your account’s default goals
- Select conversion goals at the campaign level
- Adhere to best practices for conversion setup
Let’s begin by examining the layout of the Summary page within the Conversion Manager. The provided screenshot highlights various organizational levels within the conversion tab. Notice the three boxes labeled “Submit lead form,” “Sign-up,” and “Phone call lead.” Each box, highlighted in an orange box, represents a conversion category.
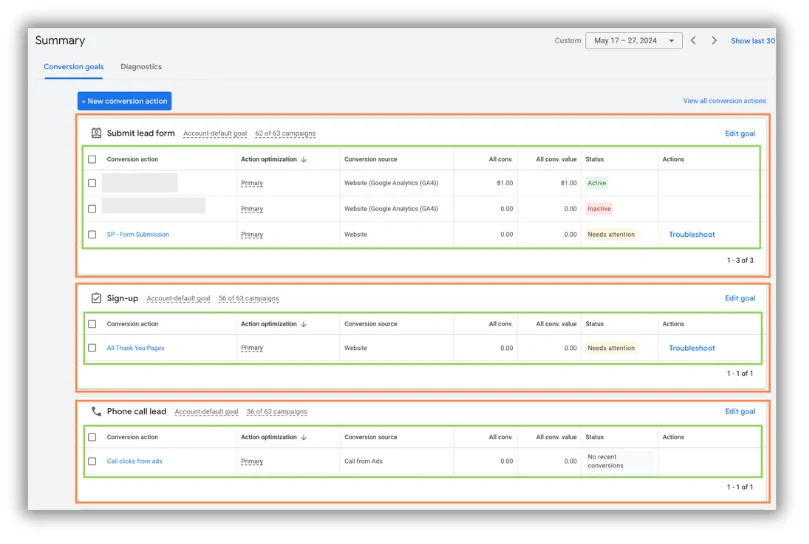 Categories contain individual conversion actions, outlined in green within the “Submit lead form” category. These actions must be correctly categorized to maintain a well-structured conversion tracking system.
 Whenever you introduce a new conversion action, you’ll need to assign it to an appropriate category. Choose the most relevant category, but don’t fret about making changes later on. You can always reassign conversion categories to existing conversion actions.
With the basic structure covered, let’s delve into the specifics of the conversion manager page. Mastering these details will ensure that your campaigns are optimized for your intended goals.
Whenever you introduce a new conversion action, you’ll need to assign it to an appropriate category. Choose the most relevant category, but don’t fret about making changes later on. You can always reassign conversion categories to existing conversion actions.
With the basic structure covered, let’s delve into the specifics of the conversion manager page. Mastering these details will ensure that your campaigns are optimized for your intended goals.
 Concerned about wasted Google Ads spending? Get a free, instant analysis » Google Ads Performance Grader
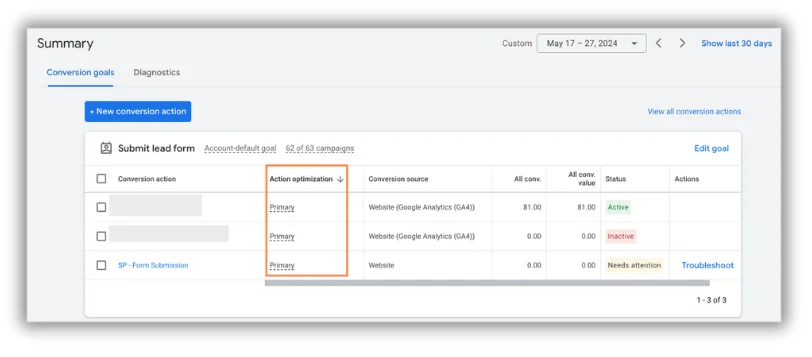
First, we’ll examine a crucial setting for each conversion action that determines if it will be tallied in the Conversions column. While this might seem confusing initially, remember that there’s an All Conversions column. This is where the distinction between Primary and Secondary conversion actions is crucial. The screenshot below demonstrates that all three conversion actions within the Submit lead form category are categorized as Primary conversions. As a result, their conversions will be reflected in the Conversion column.
 If I select the first conversion action and proceed to “Edit settings…”
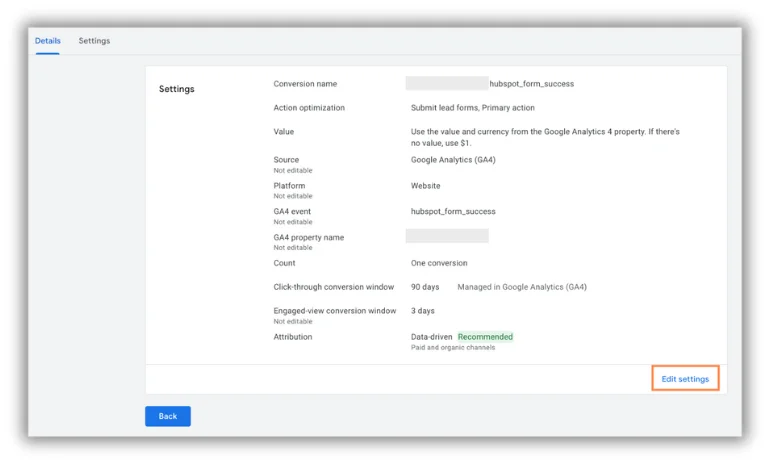 I can modify the Action Optimization setting to designate this conversion action as Secondary. The blue box on this page emphasizes the importance of this distinction.
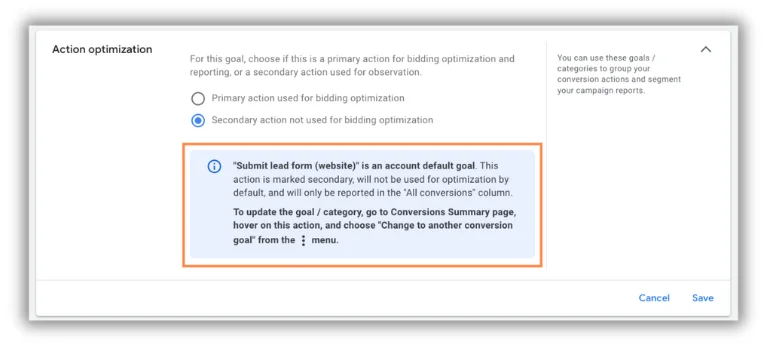 Conversions designated as Secondary are excluded from the Conversions column and are not factored into optimization efforts. Consequently, actions classified as Secondary won’t affect bidding strategies aimed at boosting conversions. Bidding strategies like Target CPA, Max Conversions, Target ROAS, and Maximize Conversion Value strive to optimize performance for prioritized conversions.
Key Takeaway: Designate only those conversion actions as Primary Conversions that you want included in the Conversion column and subject to automated bidding optimization. These typically encompass lead form submissions, phone calls, content downloads, and similar actions. In many accounts, I’ve observed regular landing page or time-on-site goals incorrectly set as Primary conversions when they should be Secondary to more significant goals. While using these as your sole actions is acceptable, if you have more substantial goals, ensure that only your primary objectives are designated as Primary actions. (Explore additional conversion tracking pitfalls to avoid!)
Conversions designated as Secondary are excluded from the Conversions column and are not factored into optimization efforts. Consequently, actions classified as Secondary won’t affect bidding strategies aimed at boosting conversions. Bidding strategies like Target CPA, Max Conversions, Target ROAS, and Maximize Conversion Value strive to optimize performance for prioritized conversions.
Key Takeaway: Designate only those conversion actions as Primary Conversions that you want included in the Conversion column and subject to automated bidding optimization. These typically encompass lead form submissions, phone calls, content downloads, and similar actions. In many accounts, I’ve observed regular landing page or time-on-site goals incorrectly set as Primary conversions when they should be Secondary to more significant goals. While using these as your sole actions is acceptable, if you have more substantial goals, ensure that only your primary objectives are designated as Primary actions. (Explore additional conversion tracking pitfalls to avoid!)
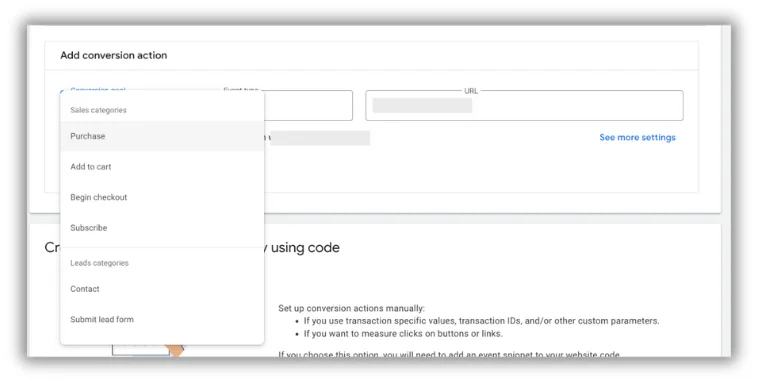
Although it might not seem significant at first, I’ve found that managing Google Ads accounts becomes much smoother when conversion categories are logically structured. The reasons for this will become clearer later, but for now, consider this a friendly reminder. Here are the default conversion categories provided by Google:
- Purchase
- Add to Cart
- Begin Checkout
- Subscribe
- Contact
- Submit Lead Form
- Book Appointment
- Sign-Up
- Request Quote
- Get Directions
- Outbound Click
- Page View
- Other With numerous options at your disposal, maintaining well-organized conversion actions within these categories proves invaluable when setting up campaigns.
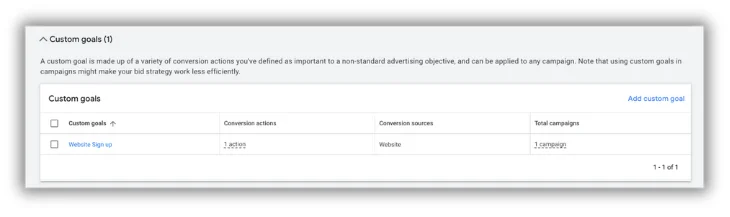 If none of the provided categories align with your needs, you can create a Custom Goal, allowing you to define your own category based on your specific requirements.
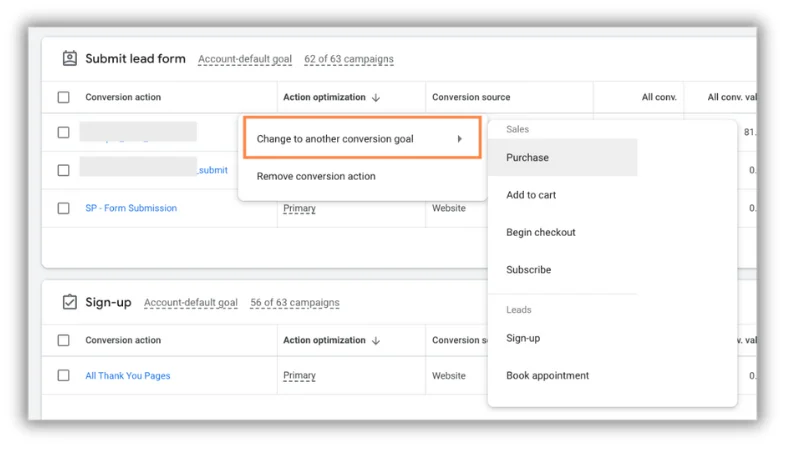 It’s important to note that each conversion action can belong to only one conversion category. To illustrate, clicking on the three gray dots beside our main conversion action presents the “Change to another conversion goal” option, requiring you to choose a new category for the action. The key is to ensure that the organization makes sense to you, especially considering the next topic we’ll cover.
 Is your Google Ads account primed for success? Get your free download now » The Last Guide to Google Ads Account Structure You’ll Ever Need
You might have observed the subtle gray text “Account-default goal” adjacent to the conversion category name in the previous image.
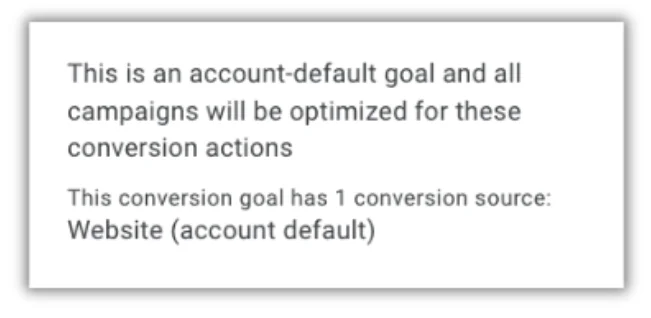 Hovering over this text reveals that default goals are employed for all campaign optimizations. We’ll discuss an exception to this later, but for now, let’s consider this statement true.
Essentially, this means that any new campaign you establish in Google will automatically factor in all Primary conversion actions associated with your Account Default Goal categories as conversions. These conversions will contribute to the Conversion column and be included in the campaign’s optimization process.
Therefore, for this specific account, all three goals within the Submit Lead Form category, all All Thank You Pages within Sign Up, and Call Clicks from Ads within Phone Call Lead will be incorporated into the Conversion column and optimized for in the campaign.
Hovering over this text reveals that default goals are employed for all campaign optimizations. We’ll discuss an exception to this later, but for now, let’s consider this statement true.
Essentially, this means that any new campaign you establish in Google will automatically factor in all Primary conversion actions associated with your Account Default Goal categories as conversions. These conversions will contribute to the Conversion column and be included in the campaign’s optimization process.
Therefore, for this specific account, all three goals within the Submit Lead Form category, all All Thank You Pages within Sign Up, and Call Clicks from Ads within Phone Call Lead will be incorporated into the Conversion column and optimized for in the campaign.
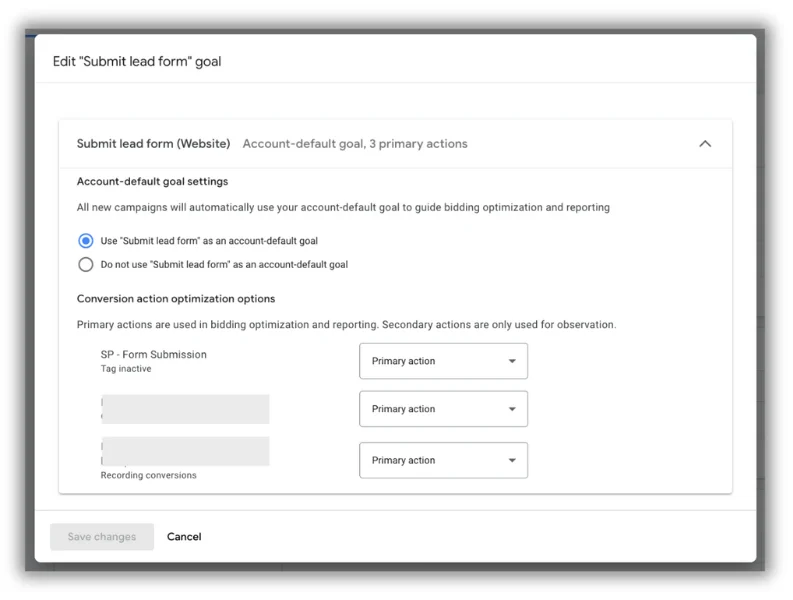 Modifying your account default goals is straightforward. Simply click the “Edit Goal” button located on the far right and choose the option to exclude that category from your account goals. It’s that easy.
This page also provides a convenient way to switch a conversion action’s optimization setting between Primary and Secondary, eliminating the need for the more detailed steps mentioned earlier.
Modifying your account default goals is straightforward. Simply click the “Edit Goal” button located on the far right and choose the option to exclude that category from your account goals. It’s that easy.
This page also provides a convenient way to switch a conversion action’s optimization setting between Primary and Secondary, eliminating the need for the more detailed steps mentioned earlier.
Looking at the image below, you’ll notice that the Submit Lead Form category is applied to only 62 out of 63 campaigns. How is this possible if it’s designated as an Account Default Goal?
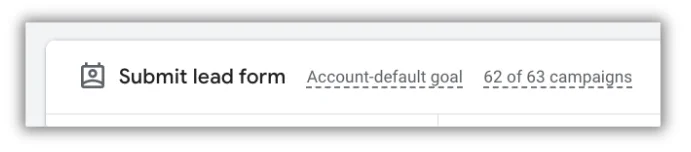 This discrepancy brings us to the exception mentioned earlier, which relates to conversion optimization at the campaign level.
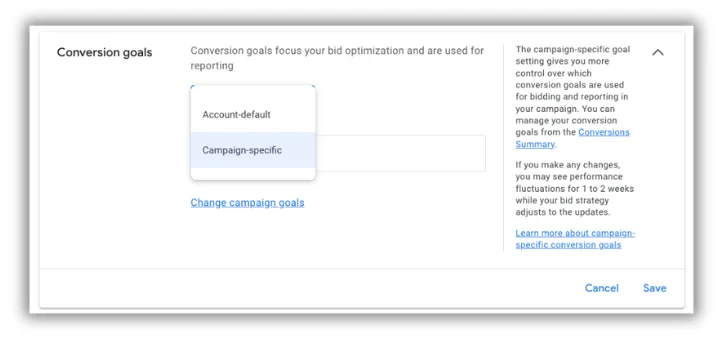
For any given campaign, you can access the settings tab, navigate to the Conversion goals section, and use the first dropdown menu to select either Account Default or Campaign Specific. This allows you to customize the conversion categories utilized for that particular campaign.
This discrepancy brings us to the exception mentioned earlier, which relates to conversion optimization at the campaign level.
For any given campaign, you can access the settings tab, navigate to the Conversion goals section, and use the first dropdown menu to select either Account Default or Campaign Specific. This allows you to customize the conversion categories utilized for that particular campaign.
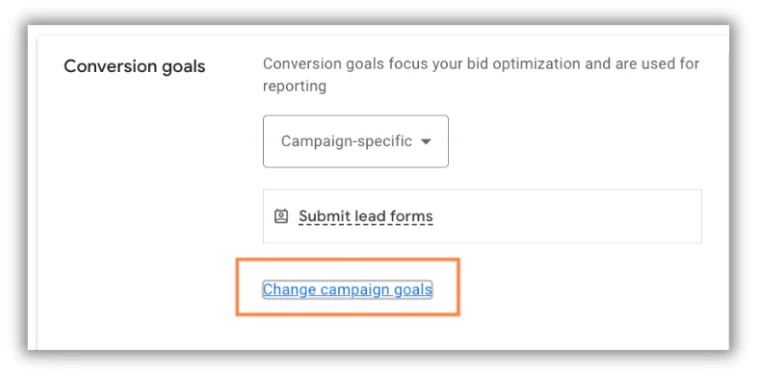
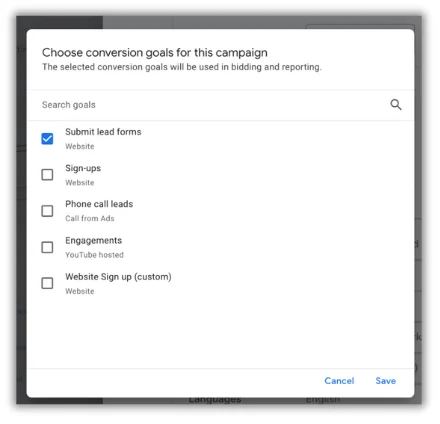
 After switching to Campaign Specific, you’ll have access to the “Change conversion goals” link.
 Simply select the checkboxes next to the conversion categories you wish to include in that campaign.
 This is where the value of maintaining clear conversion categories becomes apparent. Since you can’t directly view the constituent conversion actions within each category, having a well-organized structure simplifies the process. You can easily opt into desired categories and actions without repeatedly switching back and forth from the conversion manager to keep track of everything.
Once you’ve implemented the necessary changes, save the settings, and your campaign will shift to optimizing solely for those newly selected conversion actions.
This is where the value of maintaining clear conversion categories becomes apparent. Since you can’t directly view the constituent conversion actions within each category, having a well-organized structure simplifies the process. You can easily opt into desired categories and actions without repeatedly switching back and forth from the conversion manager to keep track of everything.
Once you’ve implemented the necessary changes, save the settings, and your campaign will shift to optimizing solely for those newly selected conversion actions.
 Download your free guide » 12 Secrets to a Higher Click-Through Rate (& Lower Costs!)
With a grasp of the conversion organization process, let’s outline some recommended best practices to ensure your account is set up for optimal performance:
- Verify the accuracy of all your conversion action tracking.
- Group all conversion actions into clear and logical categories.
- Designate only the goals you aim to optimize for as Primary actions. All other goals should be classified as Secondary.
- Align your Account Default Goals with your overarching Google Ads strategy.
- Utilize Campaign Level Goals when a specific campaign deviates from your overall strategy or requires the inclusion of goals that shouldn’t be tracked for other campaigns.
The Right Way to Configure Your Google Ads Conversion Tracking
Google Ads conversion tracking provides extensive flexibility and customization options, but it can also feel overwhelming, potentially leading to errors if you’re unsure about the process. Hopefully, this article sheds light on the functions of different controls and offers a clear roadmap for effectively setting up conversion tracking within your account. If you need assistance, feel free to schedule a demo to explore how we can help you.