The early days of the web saw basic user input elements like buttons, checkboxes, text inputs, and radio buttons. Remarkably, these elements persist in modern web applications even though the HTML standard has advanced significantly, now offering a wide range of sophisticated interactions.
Input validation remains crucial for any reliable web application.
Angular application forms can consolidate the state of all their input fields, providing a comprehensive overview such as the validation status of the entire form. This is incredibly useful for determining whether user input should be accepted or rejected without individually inspecting each field. It’s worth noting that Angular input validation without <form> tags is not covered in this article.
This article guides you through working with forms and effortlessly implementing form validation within your Angular application.
Angular offers two types of forms: template-driven and reactive. We’ll explore both types using a consistent example, highlighting different implementation approaches for the same functionality. Later, we’ll delve into a unique method for setting up and managing Angular nested form validation.
Angular 4 Forms
Angular 4 supports these commonly encountered form statuses:
valid: Reflects the validity of all form controls, true when every control is valid.invalid: The opposite ofvalid, true if any control has errors.pristine: Indicates whether the form remains untouched; true if no controls have been modified.dirty: The opposite ofpristine, true if any control has been modified.
Let’s examine a basic form example:
| |
This example comes with the following requirements:
name: This field is mandatory and must be unique across all registered users.birthYear: This field must be a valid number, and the user must be at least 18 and under 85 years old.country: A mandatory field. For added complexity, let’s say our service only operates in Paris. Therefore, if the selected country is France, the city must be Paris.phoneNumber: Each phone number must adhere to a specific format, at least one phone number is required, and users can add or remove phone numbers.The “Register” button is enabled only when all input fields are valid. Upon clicking, it should submit the form.
The “Print to Console” button, when clicked, simply logs the value of all input fields to the console.
Our ultimate objective is to fully implement these requirements.
Template-driven Forms
Template-driven forms closely resemble forms in AngularJS (or Angular 1). Therefore, developers familiar with AngularJS forms will find this approach quite intuitive.
With the introduction of modules in Angular 4, each form type resides in its own module. We must explicitly indicate the type we’ll be using by importing the relevant module. For template-driven forms, this is the FormsModule. You can enable template-driven forms like so:
| |
As shown in this code snippet, we start by importing the BrowserModule as it provides essential services for running a browser application (according to the Angular 4 docs). Then, we import the necessary FormsModule to activate template-driven forms. Finally, we declare our root component, AppComponent, where we’ll implement the form in subsequent steps.
Remember that for this example and the ones that follow, you need to ensure your application is bootstrapped correctly using the platformBrowserDynamic method.
| |
Let’s assume our AppComponent (app.component.ts) resembles the following:
| |
The template for this component is in the app.component.tpl.html file, and we can copy the initial template into this file.
Note that each input element must have the name attribute for proper identification within the form. While this appears to be a standard HTML form, we’ve already established an Angular 4-supported form (though it might not be immediately obvious). When FormsModule is imported, Angular 4 automatically detects any form HTML element and attaches the NgForm component to it (based on the selector property of the NgForm component). This is precisely what’s happening in our example. Although this Angular 4 form is now declared, it’s not yet aware of any Angular 4-supported inputs. Angular 4 doesn’t automatically register every input HTML element to its nearest form ancestor.
The key to making an input element recognizable as an Angular 4 element and registering it with the NgForm component is the NgModel directive. Let’s extend the app.component.tpl.html template:
| |
By adding the NgModel directive, we register all inputs with the NgForm component, effectively establishing a fully operational Angular 4 form. So far, so good. However, we still lack a mechanism to access the NgForm component and its features. NgForm offers two primary functionalities:
Retrieving the values of all registered input controls.
Retrieving the collective state of all controls.
To expose the NgForm, we can add the following to the <form> element:
| |
This is made possible by the exportAs property of the Component decorator.
Now, we can access the values of all input controls. Let’s extend the template:
| |
Here, myForm.value grants us access to JSON data containing the values of all registered inputs, and {{myForm.value | json}} neatly formats this JSON data.
What if we desire a sub-group of inputs from a specific context, wrapped in a container and represented as a separate object within the values JSON? For instance, a location object containing country and city or an array for phone numbers? No need to worry—template-driven forms in Angular 4 have got you covered. This is achievable using the ngModelGroup directive:
| |
We still need a way to add multiple phone numbers. Ideally, we’d use an array as it’s the best representation for an iterable container of multiple objects. However, as of this writing, feature hasn’t been implemented for template-driven forms. Therefore, we need a workaround. Let’s update the phone numbers section:
| |
The myForm.control.markAsTouched() line is used to set the form’s state to touched, allowing us to display any validation errors. Clicking buttons doesn’t affect this property, only interacting with the input fields does. For clarity in the following examples, I won’t be adding this line to the add() and remove() click handlers. Just assume it’s there. (It’s present in the provided Plunkers.)
We also need to update our AppComponent to include the following code:
| |
We need to generate a unique ID for each new phone number added. Within the *ngFor loop, we keep track of phone number controls using their IDs. Admittedly, it’s not the most elegant solution, but until the Angular 4 team implements a dedicated feature, this is the best we can do.
Let’s recap: We’ve added an Angular 4-supported form with inputs, grouped specific inputs (location and phone numbers), and exposed the form within the template. But what if we need to access the NgForm object from a component method? Let’s explore two ways to do this.
Firstly, the NgForm (labeled myForm in our example) can be passed as an argument to the function handling the form’s onSubmit event. For smoother integration, the onSubmit event is wrapped by an Angular 4-specific event called ngSubmit, which is the preferred approach for executing actions on form submission. Our example now looks like this:
| |
We’ll need a corresponding register method in our AppComponent. Something like:
| |
By leveraging the onSubmit event, we gain access to the NgForm component exclusively during form submission.
The second approach involves using a view query by adding the @ViewChild decorator to a component property.
| |
This method grants us access to the form regardless of whether the onSubmit event has been fired.
Excellent! We now have a fully functional Angular 4 form with component-level access. However, you might have noticed something missing. What if a user enters something like “this-is-not-a-year” in the “birthYear” field? Precisely! We’re lacking Angular form validation for our inputs, and we’ll address that in the next section.
Angular 4 Forms Validation
Validation is paramount in any application. We must always validate user input to prevent saving or sending invalid data, providing clear error messages to guide users toward correct input.
Enforcing a validation rule on an input requires associating the appropriate validator with that input. Angular 4 provides a set of built-in validators such as: required, maxLength, minLength, and more.
Associating a validator with an input is straightforward—simply add the validator directive:
| |
This example makes the “name” field mandatory. Let’s add some validations to all the inputs in our example.
| |
Note: We use
novalidateto disable the browser’s default form validation.
We’ve made the “name” required, the “birthYear” field required and numeric, the “country” input required, and the “phone number” field required. We also display the form’s validity status using {{myForm.valid}}.
Let’s enhance this example by showing what’s wrong with the user input (not just the overall validity status). Before we delve into additional validations, let’s create a helper component for displaying all errors associated with a given control:
| |
The list of errors is shown only if there are any errors and the input has been interacted with (touched or dirty).
We look up error messages in a predefined errorMessages map (I’ve included all messages upfront).
Here’s how you can use this component:
| |
We expose the NgModel for each input, passing it to the component responsible for rendering errors. You’ll notice that we used a pattern to check if the input is a number. What if the user enters “0000”? This should be considered invalid. Additionally, we still need validators for unique names, the country/city restriction, the phone number format, and ensuring at least one phone number exists. This is the perfect opportunity to explore custom validators.
Angular 4 provides an interface, Validator, which every custom validator must implement (no surprises there!). The Validator interface essentially looks like this:
| |
Every concrete implementation MUST implement the validate method. This method is interesting in terms of its input and output. It accepts an AbstractControl as input, which could be any type extending AbstractControl (FormGroup, FormControl, or FormArray). The output should be null or undefined (no output) for valid input, or a ValidationErrors object for invalid input. Armed with this knowledge, let’s implement a custom birthYear validator.
| |
There are a few things to note here. First, we implemented the Validator interface. The validate method checks if the user’s age is between 18 and 85 based on the entered birth year. If the input is valid, we return null; otherwise, we return an object containing the validation message. Crucially, we declare this directive as a Validator within the “providers” parameter of the @Directive decorator. This validator is provided as a value for the multi-provider NG_VALIDATORS. Don’t forget to declare this directive in your NgModule. Now, we can use this validator as follows:
| |
As simple as that!
For the phone number, we can validate its format like so:
| |
Now, let’s tackle the country and phone number count validations. Notice a commonality? Both require multiple controls for proper validation. Remember the Validator interface and our earlier discussion? The validate method accepts an AbstractControl, which could be a user input or the form itself. This allows us to create a validator that utilizes multiple controls to determine the validation status.
| |
We implemented a new countryCity validator. Observe that the validate method now receives a FormGroup, allowing us to access the required controls for validation. The rest is very similar to our single-input validator.
The validator for the number of phone numbers would look like this:
| |
And here’s how we can use them:
| |
Just like input validators, right? Except now applied at the form level.
Remember our ShowErrors component? We designed it to work with an AbstractControlDirective, meaning we can reuse it to display errors directly associated with the form. Keep in mind that currently, the only validation rules directly associated with the form are “Country-city” and “Telephone numbers” (the others are associated with specific form controls). To display all form errors, simply do the following:
| |
The last piece of the puzzle is validating for unique names. This is a bit different. Checking for name uniqueness likely requires a backend call to compare against existing names, making it an asynchronous operation. We can reuse our previous custom validator approach but make the validate method return an object that resolves in the future (a promise or an observable). In our case, we’ll use a promise:
| |
We introduce a one-second delay and then return a result. Similar to synchronous validators, resolving the promise with null signifies validation success, while any other value indicates failure. Note that we’re registering this validator with another multi-provider: NG_ASYNC_VALIDATORS. A useful property provided by forms for asynchronous validators is pending. You can use it like this:
| |
This will disable the button until all asynchronous validators have finished.
You can find the complete AppComponent, the ShowErrors component, and all validators in this Plunker.
These examples covered most use cases for template-driven forms. We demonstrated their similarity to AngularJS forms, easing migration for AngularJS developers. This form type offers easy integration with minimal coding effort, mainly through HTML template manipulation.
Reactive Forms
Reactive forms were previously known as “model-driven” forms, but I prefer “programmatic” forms—you’ll soon understand why. Reactive forms offer a fresh perspective on Angular 4 form management. Unlike template-driven forms, AngularJS developers won’t find them familiar.
Let’s dive in. Remember how template-driven forms had a dedicated module? Reactive forms have their own module as well—ReactiveFormsModule—which we must import to enable this form type.
| |
And, as always, remember to bootstrap your application.
We’ll start with the same AppComponent and template from the previous section.
If FormsModule isn’t imported (and make sure it isn’t), we’re left with a standard HTML form element and a few form controls—no Angular magic involved.
Now, let’s demonstrate why I prefer “programmatic” forms. To activate Angular 4 forms, we need to manually declare and populate a FormGroup object:
| |
The printForm and register methods remain the same from our previous examples and will be used in subsequent steps. The key types involved are FormGroup, FormControl, and FormArray—these are all we need to create a valid FormGroup. Let’s break them down:
- FormGroup: A container for holding and managing multiple controls (FormControls or other FormGroups).
- FormControl: Represents a single input control within the form.
- FormArray: A dynamic array for managing a collection of controls (perfect for our phone numbers!).
When constructing any of these types, keep the “rule of 3s” in mind. Each constructor accepts three arguments:
value: Represents the initial value of the control or form group.validator: A validator function or an array of validator functions for synchronous validation.asyncValidator: An asynchronous validator function or an array of asynchronous validator functions.
Let’s look at how each type uses these arguments:
| |
- FormGroup: The
valueis an object where keys represent control names, and values are the corresponding controls (FormControls or other FormGroups). - FormArray: The
valueis an array of controls. - FormControl: The
valueis either the control’s initial value or an initial state object containingvalueanddisabledproperties.
We’ve created the FormGroup, but our template remains unaware of it. The connection between the component’s FormGroup and the template is established using four directives: formGroup, formControlName, formGroupName, and formArrayName. Let’s see them in action:
| |
Now, with FormArray at our disposal, we can use this structure to render all phone numbers.
Let’s implement the functionality for adding and removing phone numbers (within the component):
| |
Voilà! A fully functional Angular 4 reactive form. Notice the difference from template-driven forms. With template-driven forms, the FormGroup was essentially “created within the template” (by analyzing its structure) and then passed to the component. With reactive forms, the process is reversed: the entire FormGroup is constructed within the component and then “passed down to the template,” linking it with the corresponding controls. However, we encounter the same validation challenges, which we’ll resolve in the next section.
Validation
Reactive forms offer greater validation flexibility compared to template-driven forms. Without any modifications, we can reuse our existing validators (created for template-driven forms). By simply adding the validator directives, we can activate the same validation logic:
| |
Keep in mind that we no longer have NgModel to pass to the ShowErrors component. However, since our FormGroup is already built, we can pass the appropriate AbstractControl to retrieve errors.
A fully working Plunker demonstrating this type of validation for reactive forms is available.
But it wouldn’t be as engaging if we merely reused existing validators, would it? Let’s explore how to specify validators directly when creating the form group.
Recall the “rule of 3s” for FormGroup, FormControl, and FormArray constructors? We mentioned that they can accept validator functions. Let’s try that approach.
First, let’s extract the validate functions from all our validators and expose them as static methods within a class:
| |
Now, let’s modify how we create ‘myForm’:
| |
There you have it—the “rule of 3s.” When defining a FormControl, multiple validators can be supplied as an array. When adding multiple validators to a FormGroup, we must “merge” them using Validators.compose (Validators.composeAsync is available for asynchronous validators). That’s it! Our validation should now be fully functional. We have a Plunker for this example as well.
For those who cringe at the sight of the “new” keyword, reactive forms provide a shortcut—a builder, to be precise. The FormBuilder allows us to create the entire FormGroup using a “builder pattern.” Let’s refactor our FormGroup construction:
| |
It might not seem like a significant improvement over instantiation with “new,” but the option is there. Rest assured, we have a Plunker for this as well.
In this section, we explored reactive forms in Angular 4. As you’ve seen, they introduce a fundamentally different approach to form handling. While seemingly more verbose, reactive forms grant developers complete control over the underlying form management structure in Angular 4. Additionally, since reactive forms are manually created within the component, they are readily accessible, making testing and manipulation straightforward—something that wasn’t as convenient with template-driven forms.
Nesting Forms
Nesting forms is a valuable and often necessary feature, especially when you need to determine the state (e.g., validity) of a sub-group of controls. Imagine a component tree—we might be interested in the validity of a component residing somewhere within that hierarchy. This would be challenging to achieve with a single form at the root component level.
However, nesting forms introduces its own set of complexities. Firstly, nesting actual HTML forms is not permitted by the HTML specification. Attempting to nest <form> elements might work in some browsers but isn’t guaranteed across all browsers as it violates the standard. In AngularJS, the workaround involved using the ngForm directive, which provided AngularJS form features (primarily control grouping, not all form element capabilities like server-side posting) and could be applied to any element. Additionally, AngularJS inherently supported nested forms (referring to NgForm). By simply declaring a hierarchy of elements with the ngForm directive, each form’s state would propagate up to the root element.
In the next section, we’ll examine a few ways to nest forms. It’s important to differentiate between two types of nesting: within the same component and across different components.
Nesting within the Same Component
Looking back at our template-driven and reactive form examples, you’ll notice two inner containers for controls: “location” and “phone numbers.” We used the NgModelGroup, FormGroupName, and FormArrayName directives to create these containers and store their values in separate objects. If you examine these directives closely, you’ll realize they all extend the ControlContainer class (directly or indirectly). It turns out that this inheritance is sufficient to provide the functionality we need—wrapping the state of all inner controls and propagating that state to the parent.
For our template-driven form, we’ll make the following changes:
| |
We added the ShowErrors component to each group to display errors associated specifically with that group. Since we moved the countryCity and telephoneNumbers validators to a different level, we also need to update them accordingly:
| |
And update telephone-numbers-validator.directive.ts to:
| |
You can explore the full template-driven form example in this Plunker.
For reactive forms, we’ll make similar modifications:
| |
The same changes from country-city-validator.directive.ts and telephone-numbers-validator.directive.ts are required for the countryCity and telephoneNumbers validators within CustomValidators to correctly locate controls.
Finally, let’s adjust how we construct our FormGroup:
| |
And there you have it—we’ve enhanced validation for reactive forms as well. As expected, here’s the Plunker for this example.
Nesting across Different Components
This might come as a surprise to AngularJS developers, but in Angular 4, out-of-the-box support for nesting forms across different components is absent. To be completely transparent, I believe there’s a reason for this lack of support (and it’s probably not an oversight by the Angular 4 team).
Angular 4 heavily emphasizes one-way data flow—top to bottom through the component tree. The entire framework is designed with this principle in mind, including the crucial change detection mechanism, which operates in the same top-down manner. Strictly adhering to this principle should, ideally, prevent issues, ensuring all changes are resolved within a single change detection cycle.
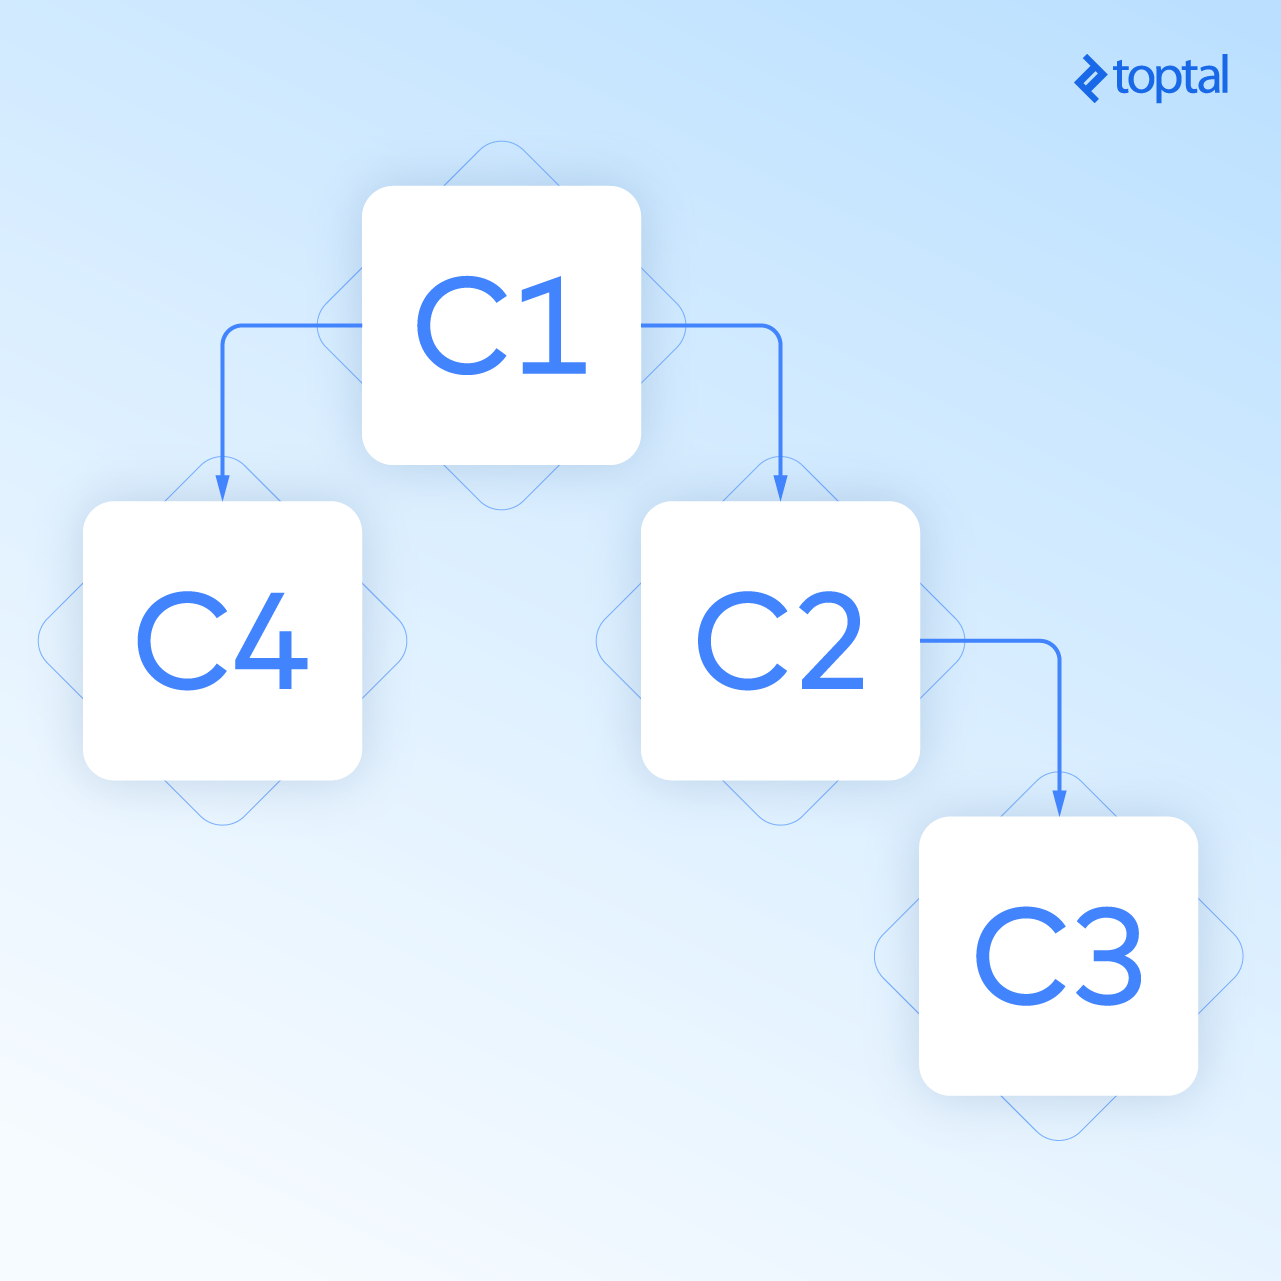
To ensure correct one-way data flow implementation, the Angular 4 team introduced a development mode feature where an additional change detection cycle is triggered after each regular cycle. This extra cycle verifies that no bindings have been modified due to reverse data propagation. Let’s illustrate this with a component tree (C1, C2, C3, C4) as depicted in Fig. 1. Change detection starts at C1, proceeds to C2, and concludes at C3.
Imagine a scenario where a method in C3 has a side effect that modifies a binding in C1. This constitutes pushing data upwards. However, change detection for C1 has already completed. In development mode, the second cycle detects this change in C1, which originated from a method execution in a child component, and raises an “Expression has changed after it was checked” exception. You could disable development mode to suppress the exception, but the underlying issue persists. Plus, how could you sleep soundly at night knowing you’re sweeping problems under the rug?
Now, consider what happens when we aggregate form states. That’s right, data flows upwards through the component tree. Even with single-level forms, integrating form controls (ngModel) with the form itself isn’t perfectly clean. They trigger an extra change detection cycle when registering or updating a control’s value (achieved using a resolved promise, but keep that under wraps). Why is this extra cycle necessary? You guessed it—data is flowing upwards, from the control to the form.
Sometimes, nesting forms across components is unavoidable, and we need a solution.
Given our current understanding, the first thought might be to use reactive forms, create the entire form tree in a root component, and pass child forms as inputs to child components. This approach tightly couples parent and child components, cluttering the root component’s logic with child form creation. But we’re professionals! We can surely devise a method to create fully isolated components with forms while enabling state propagation to their respective parents.
With all that said, here’s a directive that allows for nesting Angular 4 forms (implemented out of necessity for a project):
| |
The following GIF demonstrates a “main” component containing “form-1,” which in turn nests “component-2.” “Component-2” contains “form-2,” further nesting “form-2.1,” “form-2.2,” a component (“component-3”) with its own reactive form tree, and a component (“component-4”) housing a form isolated from all others. It’s a deliberately complex scenario to showcase this directive’s capabilities.

This example is implemented in this Plunker.
Here are its key features:
Enables nesting by adding the nestableForm directive to these elements: form, ngForm, [ngForm], [formGroup]
Supports both template-driven and reactive forms
Facilitates building form trees spanning multiple components
Isolates sub-trees of forms using
rootNestableForm="true"(prevents registration with the parent nestableForm)
This directive allows a child component’s form to register with the first parent nestableForm, regardless of whether the parent form is in the same component. Let’s dissect its implementation.
We’ll begin with the constructor. The first argument is:
| |
This retrieves the first NestableFormDirective parent. @SkipSelf prevents self-matching, and @Optional handles cases where a parent might not exist (like the root form). Now, we have a reference to the parent nestable form.
The second argument is:
| |
The injector fetches the current FormGroup provider (template-driven or reactive).
And lastly:
| |
This retrieves the value determining whether this form should be isolated from the form tree.
Next, within ngInit, as a postponed action (remember our reverse data flow discussion?), we resolve the current FormGroup, register a new FormArray control named CHILD_FORMS to this FormGroup (for holding child forms), and finally register the current FormGroup as a child of the parent nestable form.
The ngOnDestroy action executes when the form is destroyed. On destruction, again as a postponed action, we remove the current form from its parent (de-registration).
You can customize this nestable forms directive further—removing reactive form support, registering child forms under specific names instead of the CHILD_FORMS array, and so on. This particular implementation fulfilled the requirements of a specific project and is presented as is. It handles basic scenarios like dynamically adding or removing forms (*ngIf) and propagating form state to the parent. Essentially, it covers operations resolvable within a single change detection cycle (with or without postponement).
However, more advanced scenarios, like adding conditional validation to an input (e.g., [required]="someCondition"), which require two change detection cycles, won’t work due to Angular 4’s “one-detection-cycle-resolution” rule.
If you plan to use this directive or implement a similar solution, be mindful of the change detection aspects we discussed. This is how Angular 4 currently operates, but things might change in the future. Whether this setup and Angular 4’s enforced restrictions are a benefit or a drawback remains to be seen.
Forms Made Easy with Angular 4
As you can see, the Angular team has done a commendable job of providing comprehensive form handling capabilities. Hopefully, this post serves as a thorough guide to working with different form types in Angular 4 while shedding light on advanced concepts like nested forms and change detection intricacies.
While numerous resources exist for Angular 4 forms (and other Angular 4 topics), I find the official Angular 4 documentation to be the best starting point. Additionally, the Angular team provides excellent documentation within their codebase. Often, I find solutions by directly examining their source code and comments—no Googling required! Regarding nested forms, discussed in the last section, I believe this is a common stumbling block for AngularJS developers transitioning to Angular 4, which partly inspired this post.
As we’ve seen, Angular 4 offers two form types, and there’s no hard rule against using them together. Maintaining a clean and consistent codebase is always good practice. However, sometimes template-driven forms might be a better fit, and vice-versa. If slightly larger bundle sizes aren’t a concern, I recommend choosing the most appropriate approach on a case-by-case basis. Just avoid mixing them within the same component to prevent potential confusion.