Using Email for Support Apps in a New Way: An AWS Tutorial

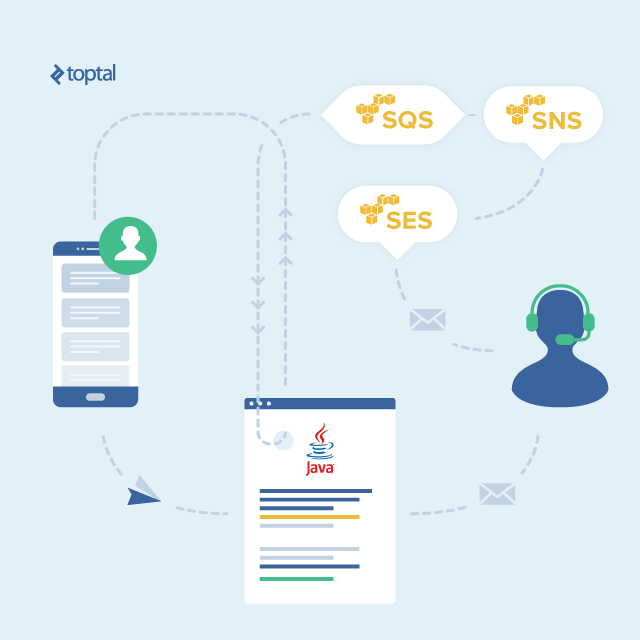
While it might not be the most glamorous communication method, email can still be surprisingly fun to work with. Recently, I had the task of building a messaging system within a mobile app, with the twist being that the actual communication had to happen over email. Our goal was for app users to interact with a support team as easily as sending a text message. Support team members, in turn, needed to receive these messages through email and be able to respond directly back to the user. To the end user, the entire experience had to feel like using any other modern messaging app.

This article will guide you through implementing a similar service using Java and a few of Amazon’s web services. You’ll need an active AWS account, a domain name, and your preferred Java IDE to follow along.

Setting Up the Infrastructure

Before diving into the code, let’s configure the necessary AWS services for handling email routing and consumption. We’ll leverage SES for sending and receiving emails, and use a combination of SNS and SQS for managing incoming messages.

Consuming Email Programmatically Using AWS
Revitalize e-mail in support applications with Amazon SES.

Our journey begins with SES. Log into your AWS account and navigate to the SES console.

Before we proceed, you need a verified domain name to send emails from.

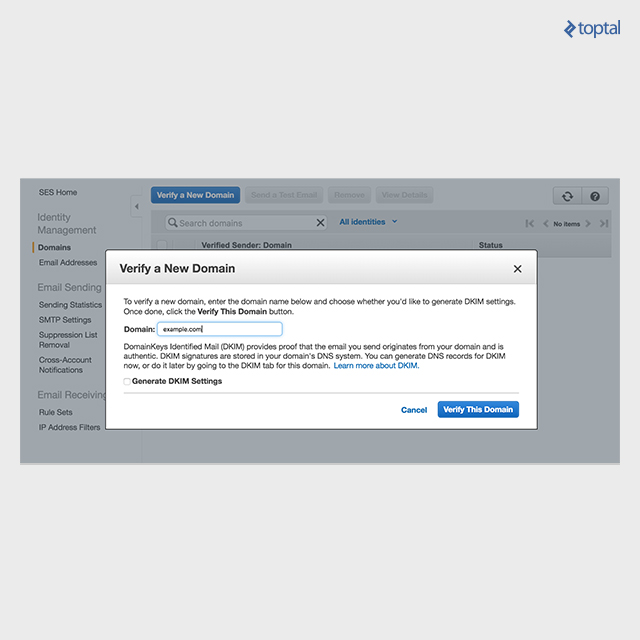
This domain will be used by both app users for sending messages and support members for replying. Verifying a domain with SES is a simple process, with detailed instructions available here.

If this is your first time using SES, or if you haven’t requested a sending limit increase, your account will be in sandbox mode. This means you can only send emails to addresses verified within AWS. This could cause an issue later when we try sending an email to our hypothetical help desk. To avoid this, verify the email address you plan to use for your help desk through the Email Addresses tab in the SES console.

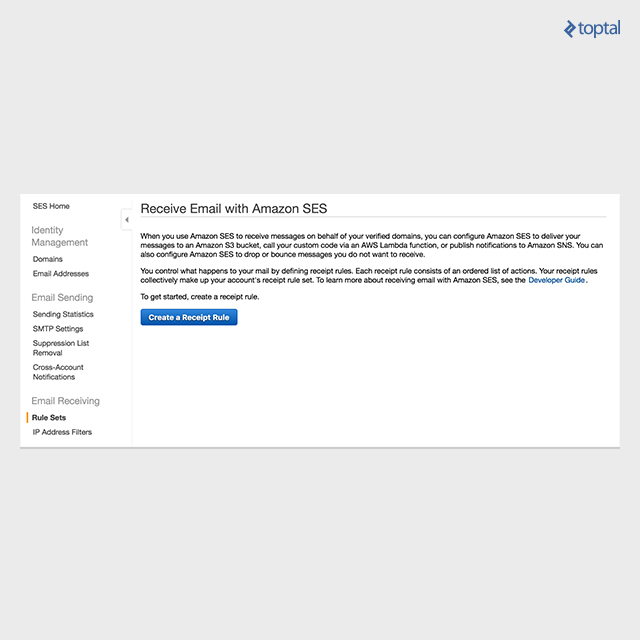
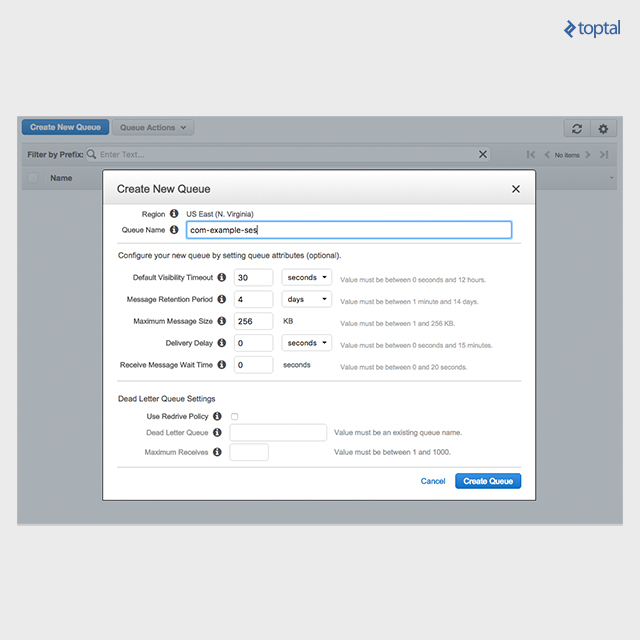
Once your domain is verified, we can create a rule set. Go to the Rule Sets tab in the SES console and create a new Receipt Rule.

The first step in creating a receipt rule is to define a recipient.

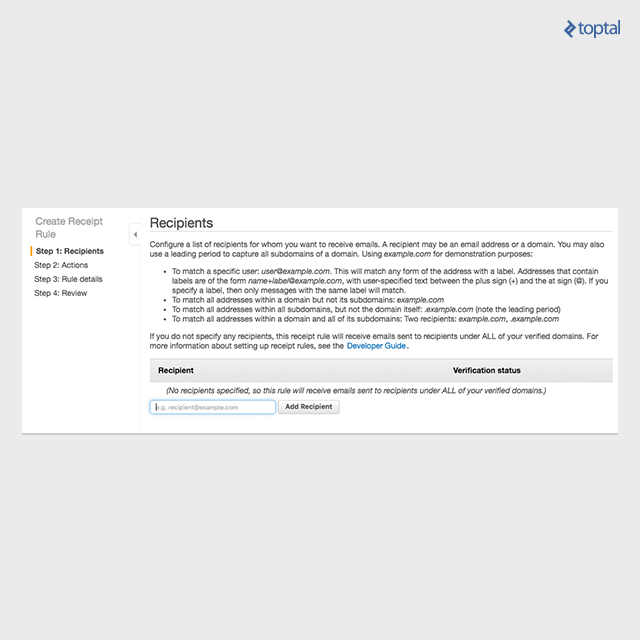
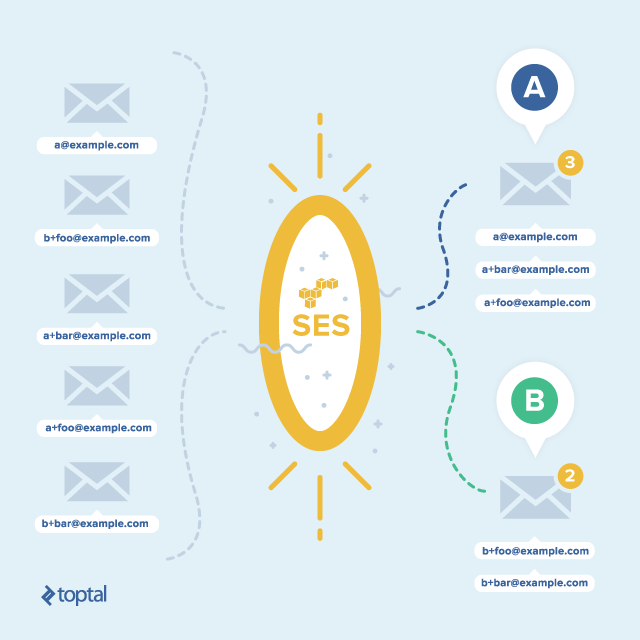
Recipient filters determine which emails SES processes and how each incoming message is handled. The recipient we specify here should match the domain and address pattern used by app user messages. For simplicity, we can add a recipient for the domain we verified earlier, example.com in our case. This configures SES to apply our rule to all emails sent to example.com (e.g., foo@example.com, bar@example.com).

Therefore, we would add example.com as the recipient to create a rule for our entire domain.

We can also match specific address patterns, which is useful for directing incoming messages to different SQS queues.

For instance, let’s say we have queue A and queue B. We could add two recipients: a@example.com and b@example.com. To add a message to queue A, we would send an email to a+foo@example.com. The “a” part matches our a@example.com recipient. Any information between the “+” and “@” is considered arbitrary user data and won’t impact SES’s address matching. To add a message to queue B, simply replace “a” with “b.”

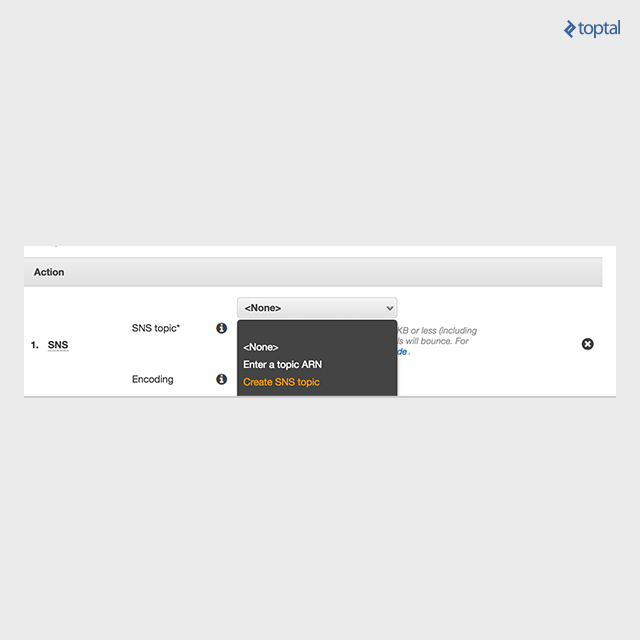
After defining your recipients, the next step is to configure the action SES takes upon receiving a new email. Our aim is to eventually have these messages end up in SQS. However, going directly from SES to SQS isn’t currently possible. We need to use SNS as a bridge. Select the SNS action and create a new topic. We’ll later configure this topic to send messages into SQS.

Choose the “create SNS topic” option and give it a descriptive name.

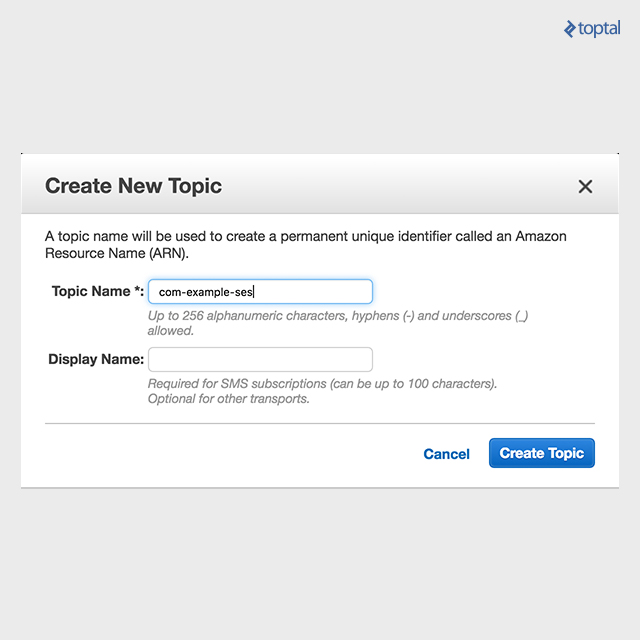
After creating the topic, select a message encoding method. I’ll use Base64 to ensure special characters are preserved. The encoding you choose will determine how messages are decoded when our service consumes them.

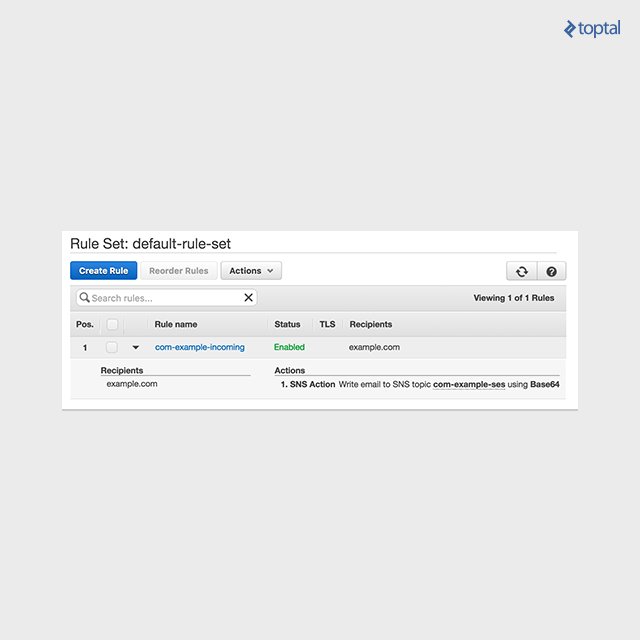
With the rule set, the final step is to give it a name.

Next, let’s configure SQS and SNS. Head over to the SQS console and create a new queue.

For consistency, I’m using the same name as our SNS topic.

After defining the queue, we need to adjust its access policy. We want to grant insert permission solely to our SNS topic. We can achieve this by adding a condition that matches our SNS topic ARN.

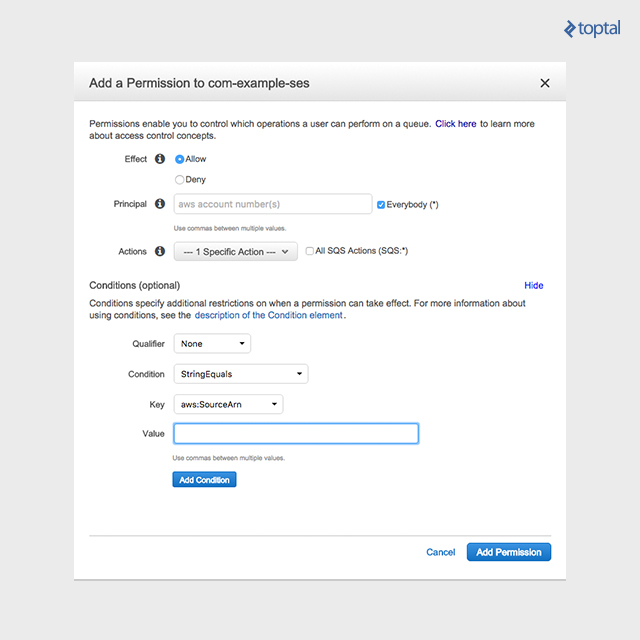
The value field should be populated with the ARN of the SNS topic that SES is configured to notify.

With SQS set up, we need to return to the SNS console one last time to configure your topic to deliver notifications to your newly created SQS queue.

In the SNS console, select the topic that SES is set to notify. From there, create a new subscription. Choose Amazon SQS as the subscription protocol, and set the destination to the ARN of the SQS queue you just generated.

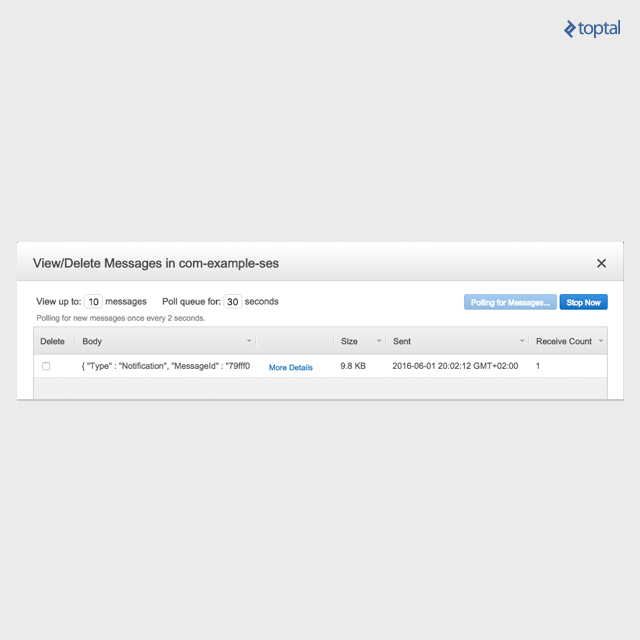
With all that done, the AWS side of things should be ready. Let’s test it out by sending an email to ourselves. Send an email to the domain configured with SES, then go to the SQS console and select your queue. You should see the payload containing your email.

Building the Java Service to Handle Emails

Now for the exciting part! In this section, we’ll create a simple microservice capable of sending messages and processing incoming emails. We’ll start by defining an API that sends emails to our support desk on behalf of a user.

A quick note: We’ll be focusing on the core business logic of this service and won’t be defining REST endpoints or a persistence layer.

We’ll be using Spring Boot and Maven to build our Spring service. We can generate a project using Spring Initializer, which you can find start.spring.io.

Initially, your pom.xml should resemble this:

 1
 2
 3
 4
 5
 6
 7
 8
 9
10
11
12
13
14
15
16
17
18
19
20
21
22
23
24
25
26
27
28
29
30
31
32
33
34
35
36
37
38
39
40
41
42
43
44
45
46
47
48
<?xml version="1.0" encoding="UTF-8"?>
<project xmlns="http://maven.apache.org/POM/4.0.0" xmlns:xsi="http://www.w3.org/2001/XMLSchema-instance"
	xsi:schemaLocation="http://maven.apache.org/POM/4.0.0 http://maven.apache.org/xsd/maven-4.0.0.xsd">
	<modelVersion>4.0.0</modelVersion>

	<groupId>com.toptal.tutorials</groupId>
	<artifactId>email-processor</artifactId>
	<version>0.0.1-SNAPSHOT</version>
	<packaging>jar</packaging>

	<name>email-processor</name>
	<description>A simple "micro-service" for emailing support on behalf of a user and processing replies</description>

	<parent>
		<groupId>org.springframework.boot</groupId>
		<artifactId>spring-boot-starter-parent</artifactId>
		<version>1.3.5.RELEASE</version>
		<relativePath/> <!-- lookup parent from repository -->
	</parent>

	<properties>
		<project.build.sourceEncoding>UTF-8</project.build.sourceEncoding>
		<java.version>1.8</java.version>
	</properties>

	<dependencies>
		<dependency>
			<groupId>org.springframework.boot</groupId>
			<artifactId>spring-boot-starter</artifactId>
		</dependency>
		<dependency>
			<groupId>org.springframework.boot</groupId>
			<artifactId>spring-boot-starter-test</artifactId>
			<scope>test</scope>
		</dependency>
	</dependencies>

	
	<build>
		<plugins>
			<plugin>
				<groupId>org.springframework.boot</groupId>
				<artifactId>spring-boot-maven-plugin</artifactId>
			</plugin>
		</plugins>
	</build>

</project>

Sending Emails to Support on Behalf of a User

Let’s begin by defining a bean responsible for sending emails to our support desk on behalf of a user. This bean will process an incoming message from a specific user ID and email it to our predefined support desk email address.

Let’s start by defining an interface:

1
2
3
4
5
6
7
8
9
public interface SupportBean {

    /**
     * Send a message to the application support desk on behalf of a user
     * @param fromUserId The ID of the originating user
     * @param message The message to send
     */
    void messageSupport(long fromUserId, String message);
}

And an empty implementation:

 1
 2
 3
 4
 5
 6
 7
 8
 9
10
11
12
13
14
@Component
public class SupportBeanSesImpl implements SupportBean {

    /**
     * Email address for our application help-desk
     * This is the destination address user support emails will be sent to
     */
    private static final String SUPPORT_EMAIL_ADDRESS = "support@example.com";

    @Override
    public void messageSupport(long fromUserId, String message) {
        //todo: send an email to our support address
    }
}

We also need to include the AWS SDK in our pom.xml, as we’ll be using the SES client to send emails:

1
2
3
4
5
<dependency>
	<groupId>com.amazonaws</groupId>
	<artifactId>aws-java-sdk</artifactId>
	<version>1.11.5</version>
</dependency>

The first step is to generate a unique email address for sending our user’s message. This address plays a crucial role in the message consumption part of our service. It needs to contain enough information to correctly route the help desk’s reply back to the original user.

To accomplish this, we’ll include the originating user ID in our generated email address. To keep things organized, we’ll create an object storing the user ID and then use its Base64 encoded JSON string representation as the email address.

Let’s create a new bean responsible for converting a user ID into an email address.

1
2
3
4
5
6
7
8
9
public interface UserEmailBean {

    /**
     * Returns a unique per user email address
     * @param userID Input user ID
     * @return An email address unique for the input userID
     */
    String emailAddressForUserID(long userID);
}

We’ll start our implementation by adding the necessary constructors and a simple inner class for serializing our JSON.

 1
 2
 3
 4
 5
 6
 7
 8
 9
10
11
12
13
14
15
16
17
18
19
20
21
22
23
24
25
26
27
28
29
30
31
32
33
34
35
@Component
public class UserEmailBeanJSONImpl implements UserEmailBean {

    /**
     * The TLD for all our generated email addresses
     */
    private static final String EMAIL_DOMAIN = "example.com";

    /**
     * com.fasterxml.jackson.databind.ObjectMapper used to create a JSON object including our user ID
     */
    private final ObjectMapper objectMapper = new ObjectMapper();

    @Override
    public String emailAddressForUserID(long userID) {
//todo: create the email address
        return null;
    }

    /**
     * Simple helper class we will serialize.
     * The JSON representation of this class will become our user email address
     */
    private static class UserDetails{
        private Long userID;

        public Long getUserID() {
            return userID;
        }

        public void setUserID(Long userID) {
            this.userID = userID;
        }
    }
}

Generating the email address is straightforward. We just need to create a UserDetails object and Base64 encode its JSON representation. The completed createAddressForUserID method should look like this:

 1
 2
 3
 4
 5
 6
 7
 8
 9
10
11
12
   @Override
    public String emailAddressForUserID(long userID) {
        UserDetails userDetails = new UserDetails();
        userDetails.setUserID(userID);
        //create a JSON representation.
        String jsonString = objectMapper.writeValueAsString(userDetails);
        //Base64 encode it
        String base64String = Base64.getEncoder().encodeToString(jsonString.getBytes());
        //create an email address out of it
        String emailAddress = base64String + "@" + EMAIL_DOMAIN;
        return emailAddress;
    }

Now, let’s go back to SupportBeanSesImpl and update it to use the new email bean we just created.

 1
 2
 3
 4
 5
 6
 7
 8
 9
10
11
12
13
private final UserEmailBean userEmailBean;

@Autowired
public SupportBeanSesImpl(UserEmailBean userEmailBean) {
        this.userEmailBean = userEmailBean;
}


@Override
public void messageSupport(long fromUserId, String message) throws JsonProcessingException {
        //user specific email
        String fromEmail = userEmailBean.emailAddressForUserID(fromUserId);
}

To send emails, we’ll use the AWS SES client provided by the AWS SDK.

1
2
3
4
5
6
  /**
     * SES client
     */
    private final AmazonSimpleEmailService amazonSimpleEmailService = new AmazonSimpleEmailServiceClient(
            new DefaultAWSCredentialsProviderChain() //see http://docs.aws.amazon.com/AWSJavaSDK/latest/javadoc/com/amazonaws/auth/DefaultAWSCredentialsProviderChain.html
    );

We’re leveraging the DefaultAWSCredentialsProviderChain to handle credentials for us. This class searches for AWS credentials as defined here.

We’ll need an AWS access key with permissions for both SES and, eventually, SQS. For more details, refer to the documentation from Amazon.

Next, let’s update our messageSupport method to send emails to support using the AWS SDK. The SES SDK simplifies this process. The final version of the method should look like this:

 1
 2
 3
 4
 5
 6
 7
 8
 9
10
11
12
13
14
15
16
17
18
19
20
21
@Override
public void messageSupport(long fromUserId, String message) throws JsonProcessingException {
        //User specific email
        String fromEmail = userEmailBean.emailAddressForUserID(fromUserId);

        //create the email 
        Message supportMessage = new Message(
                new Content("New support request from userID " + fromUserId), //Email subject
                new Body().withText(new Content(message)) //Email body, this contains the user’s message
        );
        
        //create the send request
        SendEmailRequest supportEmailRequest = new SendEmailRequest(
                fromEmail, //From address, our user's generated email
                new Destination(Collections.singletonList(SUPPORT_EMAIL_ADDRESS)), //to address, our support email address
                supportMessage //Email body defined above
        );
        
        //Send it off
        amazonSimpleEmailService.sendEmail(supportEmailRequest);
    }

To test it out, create a test class and inject the SupportBean. Make sure the SUPPORT_EMAIL_ADDRESS defined in SupportBeanSesImpl points to an email address you have access to. If your SES account is in sandbox mode, this address needs to be verified. You can verify email addresses in the SES console under the Email Addresses section.

1
2
3
4
@Test
public void emailSupport() throws JsonProcessingException {
	supportBean.messageSupport(1, "Hello World!");
}

After running this, you should receive a message in your inbox. Even better, try replying to the message and check the SQS queue we set up earlier. You should see a payload containing your reply.

Consuming Replies from SQS

The final step is to read emails from SQS, extract the email content, and determine the user ID to whom the reply should be forwarded.

Message queueing services like Amazon SQS play a vital role in service-oriented architecture by allowing services to communicate with each other without having to compromise speed, reliability or scalability.

To listen for new SQS messages, we’ll use the Spring Cloud AWS messaging SDK. This allows us to configure an SQS message listener using annotations, reducing the amount of boilerplate code.

First, let’s add the necessary dependencies.

Add the Spring Cloud messaging dependency:

1
2
3
4
<dependency>
	<groupId>org.springframework.cloud</groupId>
	<artifactId>spring-cloud-aws-messaging</artifactId>
</dependency>

And include Spring Cloud AWS in your pom dependency management:

 1
 2
 3
 4
 5
 6
 7
 8
 9
10
11
<dependencyManagement>
	<dependencies>
		<dependency>
			<groupId>org.springframework.cloud</groupId>
			<artifactId>spring-cloud-aws</artifactId>
			<version>1.1.0.RELEASE</version>
			<type>pom</type>
			<scope>import</scope>
		</dependency>
	</dependencies>
</dependencyManagement>

Currently, Spring Cloud AWS doesn’t support annotation-driven configuration, so we’ll need to define an XML bean. Fortunately, we only need minimal configuration, making our bean definition quite simple. The primary goal of this file is to enable annotation-driven queue listeners, allowing us to annotate a method with @SqsListener.

Create a new XML file named aws-config.xml in your resources folder. The definition should look like this:

 1
 2
 3
 4
 5
 6
 7
 8
 9
10
11
12
13
14
15
16
17
18
<?xml version="1.0" encoding="UTF-8"?>
<beans xmlns="http://www.springframework.org/schema/beans"
       xmlns:xsi="http://www.w3.org/2001/XMLSchema-instance"
       xmlns:aws-context="http://www.springframework.org/schema/cloud/aws/context"
       xmlns:aws-messaging="http://www.springframework.org/schema/cloud/aws/messaging"
       xsi:schemaLocation="http://www.springframework.org/schema/beans
       http://www.springframework.org/schema/beans/spring-beans.xsd
       http://www.springframework.org/schema/cloud/aws/context
       http://www.springframework.org/schema/cloud/aws/context/spring-cloud-aws-context.xsd
       http://www.springframework.org/schema/cloud/aws/messaging
     http://www.springframework.org/schema/cloud/aws/messaging/spring-cloud-aws-messaging.xsd">

    <!--enable annotation driven queue listeners -->
    <aws-messaging:annotation-driven-queue-listener />
    <!--define our region, this lets us reference queues by name instead of by URL. -->
    <aws-context:context-region region="us-east-1" />

</beans>

The crucial part is <aws-messaging:annotation-driven-queue-listener />. We’re also defining a default region, which isn’t mandatory but allows us to reference our SQS queue by name instead of its full URL. We’re not explicitly defining any AWS credentials; by omitting them, Spring defaults to DefaultAWSCredentialsProviderChain, the same provider used earlier in our SES bean. For more details, refer to the Spring Cloud AWS docs.

To use this XML config in our Spring Boot app, we need to explicitly import it. Go to your @SpringBootApplication class and import the file.

1
2
3
4
5
6
7
8
@SpringBootApplication
@ImportResource("classpath:aws-config.xml") //Explicit import for our AWS XML bean definition
public class EmailProcessorApplication {

	public static void main(String[] args) {
		SpringApplication.run(EmailProcessorApplication.class, args);
	}
}

Now, let’s define a bean to handle incoming SQS messages. Spring Cloud AWS makes this remarkably easy with a single annotation!

 1
 2
 3
 4
 5
 6
 7
 8
 9
10
11
12
13
14
15
16
17
18
19
20
21
22
/**
 * Bean reasonable for polling SQS and processing new emails
 */
@Component
public class EmailSqsListener {

    @SuppressWarnings("unused") //IntelliJ isn't quite smart enough to recognize methods marked with @SqsListener yet
    @SqsListener(value = "com-example-ses", deletionPolicy = SqsMessageDeletionPolicy.ON_SUCCESS)   //Mark this method as a SQS listener
                                                                                                    //Since we already set up our region we can use the logical queue name here
                                                                                                    //Spring will automatically delete messages if this method executes successfully
    public void consumeSqsMessage(@Headers Map<String, String> headers, //Map of headers returned when requesting a message from SQS
                                                                        //This map will include things like the relieved time, count and message ID
                                  @NotificationMessage String rawJsonMessage   //JSON string representation of our payload
                                                                            //Spring Cloud AWS supports marshaling here as well
                                                                            //For the sake of simplicity we will work with incoming messages as a JSON object
    ) throws Exception{

        //com.amazonaws.util.json.JSONObject included with the AWS SDK
        JSONObject jsonSqsMessage = new JSONObject(rawJsonMessage);

    }
}

The magic lies in the @SqsListener annotation. With this, Spring handles setting up an Executor and starts polling SQS for us. Whenever a new message arrives, our annotated method is invoked with the message content. Additionally, Spring Cloud can be configured to unmarshall incoming messages, enabling you to work directly with strongly-typed objects within your queue listener. Furthermore, you can inject either a specific header or a map containing all headers returned from the underlying AWS call.

We can use the logical queue name here because we defined the region earlier in aws-config.xml. If we hadn’t defined it, we would need to replace the value with the fully qualified SQS URL. We’re also defining a deletion policy, instructing Spring to delete the incoming message from SQS if a specific condition is met. SqsMessageDeletionPolicy defines multiple policies, and we’re configuring Spring to delete our message if the consumeSqsMessage method executes successfully.

We’re also injecting the returned SQS headers into our method using @Headers. This injected map contains metadata about the received queue and payload. The message body is injected using @NotificationMessage. Spring supports message marshalling using Jackson or via a custom message body converter. For convenience, we’ll simply inject the raw JSON string and work with it using the JSONObject class from the AWS SDK.

The payload retrieved from SQS contains a significant amount of data. It’s worth examining the JSONObject to familiarize yourself with the returned payload structure. Our payload includes data from each AWS service it passed through: SES, SNS, and finally SQS. For the purpose of this tutorial, we’re primarily interested in two things: the list of recipient email addresses and the email body. Let’s start by extracting the email addresses.

1
2
3
4
5
//Pull out the array containing all email addresses this was sent to
JSONArray emailAddressArray = jsonSqsMessage.getJSONObject("mail").getJSONArray("destination");
for(int i = 0 ; i < emailAddressArray.length() ; i++){
	String emailAddress = emailAddressArray.getString(i);
}

In a real-world scenario, our help desk might include more than just the original sender in their reply. So, before attempting to parse the user ID, we need to verify the address. This allows our support desk to communicate with multiple users simultaneously and include non-app users in the conversation.

Let’s go back to our UserEmailBean interface and add another method.

1
2
3
4
5
6
/**
 * Returns true if the input email address matches our template
 * @param emailAddress Email to check
 * @return true if it matches
 */
boolean emailMatchesUserFormat(String emailAddress);

To implement this method in UserEmailBeanJSONImpl, we need to do two things. First, we’ll check if the address ends with our EMAIL_DOMAIN. Then, we’ll check if we can successfully unmarshall it.

 1
 2
 3
 4
 5
 6
 7
 8
 9
10
11
12
13
14
15
16
17
18
19
20
21
22
23
24
25
26
27
28
29
30
31
32
   @Override
    public boolean emailMatchesUserFormat(String emailAddress) {

        //not our address, return right away
        if(!emailAddress.endsWith("@" + EMAIL_DOMAIN)){
            return false;
        }
        //We just care about the email part, not the domain part
        String emailPart = splitEmail(emailAddress);
        try {
            //Attempt to decode our email
            UserDetails userDetails = objectMapper.readValue(Base64.getDecoder().decode(emailPart), UserDetails.class);
            //We assume this email matches if the address is successfully decoded and marshaled  
            return userDetails != null && userDetails.getUserID() != null;
        } catch (IllegalArgumentException | IOException e) {
            //The Base64 decoder will throw an IllegalArgumentException it the input string is not Base64 formatted
            //Jackson will throw an IOException if it can't read the string into the UserDetails class
            return false;
        }
    }
    /**
     * Splits an email address on @
     * Returns everything before the @
     * @param emailAddress Address to split
     * @return all parts before @. If no @ is found, the entire address will be returned
     */
    private static String splitEmail(String emailAddress){
        if(!emailAddress.contains("@")){
            return emailAddress;
        }
        return emailAddress.substring(0, emailAddress.indexOf("@"));
    }

We’ve defined two new methods: emailMatchesUserFormat, which we just added to our interface, and a simple utility method for splitting an email address at the “@” symbol. Our emailMatchesUserFormat implementation attempts to Base64 decode and unmarshall the address part back into our UserDetails helper class. If successful, it checks if the required userID is populated. If all these conditions are met, we can safely assume a match.

Let’s return to our EmailSqsListener and inject the updated UserEmailBean.

1
2
3
4
5
6
   private final UserEmailBean userEmailBean;

    @Autowired
    public EmailSqsListener(UserEmailBean userEmailBean) {
        this.userEmailBean = userEmailBean;
    }

Now, we’ll update the consumeSqsMethod. First, let’s extract the email body:

1
2
3
4
5
6
7
8
9
 //Pull our content, remember the content will be Base64 encoded as per our SES settings
        String encodedContent = jsonSqsMessage.getString("content");
        //Create a new String after decoding our body
        String decodedBody = new String(
                Base64.getDecoder().decode(encodedContent.getBytes())      
        );
        for(int i = 0 ; i < emailAddressArray.length() ; i++){
            String emailAddress = emailAddressArray.getString(i);
        }

Next, let’s create a new method to process the email address and body.

1
2
3
private void processEmail(String emailAddress, String emailBody){
        
}

Finally, let’s update the email loop to invoke this method if a match is found.

1
2
3
4
5
6
7
8
//Loop over all sent to addresses
for(int i = 0 ; i < emailAddressArray.length() ; i++){
    String emailAddress = emailAddressArray.getString(i);
    //If we find a match, process the email and method
    if(userEmailBean.emailMatchesUserFormat(emailAddress)){
        processEmail(emailAddress, decodedBody);
    }
}

Before implementing processEmail, we need to add one more method to our UserEmailBean. We need a method to retrieve the userID from an email address. Head back to the UserEmailBean interface and add the final method.

1
2
3
4
5
6
7
   /**
     * Returns the userID from a formatted email address.
     * Returns null if no userID is found. 
     * @param emailAddress Formatted email address, this address should be verified using {@link #emailMatchesUserFormat(String)}
     * @return The originating userID if found, null if not
     */
    Long userIDFromEmail(String emailAddress);

This method will return the userID from a correctly formatted address. The implementation will be similar to our verification method. Let’s head over to UserEmailBeanJSONImpl and fill in the method.

 1
 2
 3
 4
 5
 6
 7
 8
 9
10
11
12
13
14
15
16
17
18
19
   @Override
    public Long userIDFromEmail(String emailAddress) {
        String emailPart = splitEmail(emailAddress);
        try {
            //Attempt to decode our email
            UserDetails userDetails = objectMapper.readValue(Base64.getDecoder().decode(emailPart), UserDetails.class);
            if(userDetails == null || userDetails.getUserID() == null){
                //We couldn't find a userID
                return null;
            }
            //ID found, return it
            return userDetails.getUserID();
        } catch (IllegalArgumentException | IOException e) {
            //The Base64 decoder will throw an IllegalArgumentException it the input string is not Base64 formatted
            //Jackson will throw an IOException if it can't read the string into the UserDetails class
            //Return null since we didn't find a userID
            return null;
        }
    }

Now, return to our EmailSqsListener and update processEmail to use this new method.

1
2
3
4
5
6
7
8
private void processEmail(String emailAddress, String emailBody){
    //Parse out the email address
    Long userID = userEmailBean.userIDFromEmail(emailAddress);
    if(userID == null){
        //Whoops, we couldn't find a userID. Abort!
        return;
    }
}

Great! We’re almost there. The last piece of the puzzle is to extract the reply from the raw message.

Email clients, just like web browsers from a few years ago, are plagued by the inconsistencies in their implementations.

Parsing replies from emails is surprisingly complex. Email message formats lack standardization, and variations between email clients can be vast. Moreover, the raw response contains more than just the reply and signature; it often includes the original message. The smart folks over at Mailgun have a fantastic blog post that dives deeper into these challenges. They’ve also open-sourced their machine-learning-based approach to email parsing, which you can check out here.

However, the Mailgun library is written in Python, so for our Java-based tutorial, we’ll use a simpler solution. GitHub user edlio has created an MIT-licensed email parser in Java based on one of GitHub’s libraries, which is what we’ll be using.

First, let’s update our pom.xml. We’ll use https://jitpack.io to pull in EmailReplyParser.

1
2
3
4
5
6
<repositories>
	<repository>
		<id>jitpack.io</id>
		<url>https://jitpack.io</url>
	</repository>
</repositories>

Now, add the GitHub dependency:

1
2
3
4
5
<dependency>
	<groupId>com.github.edlio</groupId>
	<artifactId>EmailReplyParser</artifactId>
	<version>v1.0</version>
</dependency>

We’ll also be using Apache Commons Email to parse the raw email into a javax.mail MimeMessage before passing it to the EmailReplyParser. Let’s add the Commons dependency:

1
2
3
4
5
<dependency>
	<groupId>org.apache.commons</groupId>
	<artifactId>commons-email</artifactId>
	<version>1.4</version>
</dependency>

Now we can return to our EmailSqsListener and finalize processEmail. At this point, we have both the originating userID and the raw email body. The only remaining task is to parse out the reply.

To achieve this, we’ll use a combination of javax.mail and edlio’s EmailReplyParser.

 1
 2
 3
 4
 5
 6
 7
 8
 9
10
11
12
13
14
15
16
17
18
19
20
21
22
23
24
private void processEmail(String emailAddress, String emailBody) throws Exception {
        //Parse out the email address
        Long userID = userEmailBean.userIDFromEmail(emailAddress);
        if(userID == null){
            //Whoops, we couldn't find a userID. Abort!
            return;
        }

        //Default javax.mail session
        Session session = Session.getDefaultInstance(new Properties());
        //Create a new mimeMessage out of the raw email body
        MimeMessage mimeMessage = MimeMessageUtils.createMimeMessage(
                session,
                emailBody
        );
        MimeMessageParser mimeMessageParser = new MimeMessageParser(mimeMessage);
        //Parse the message
        mimeMessageParser.parse();
        //Parse out the reply for our message
        String replyText = EmailReplyParser.parseReply(mimeMessageParser.getPlainContent());
        //Now we're done!
        //We have both the userID and the response!
        System.out.println("Processed reply for userID: " + userID + ". Reply: " + replyText);
    }

Wrapping Up

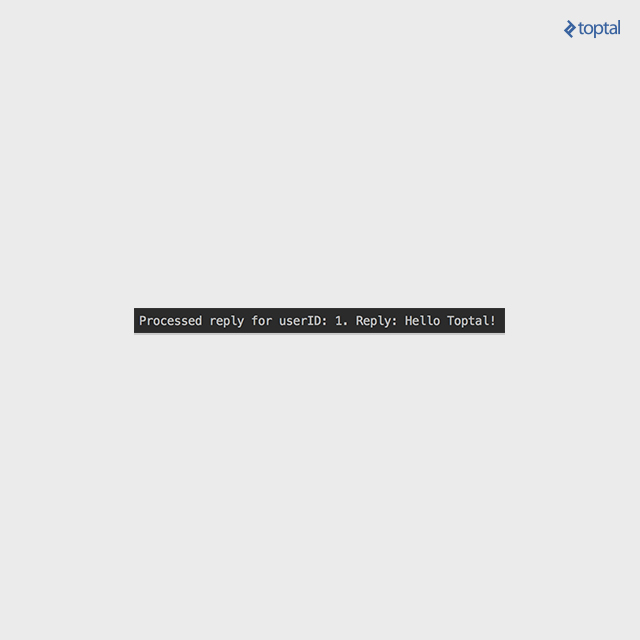
And there you have it! We’ve successfully built a system for delivering responses to the original user!

See? I told you email can be fun!

In this article, we demonstrated how Amazon Web Services can orchestrate complex pipelines. While our example focused on email, these same tools can be applied to even more intricate systems. This frees you from infrastructure management concerns, allowing you to focus on the enjoyable aspects of software engineering.

Licensed under CC BY-NC-SA 4.0