Modern web applications and their underlying systems are now incredibly fast and responsive. However, there are still situations where it’s beneficial to delegate resource-intensive tasks to other parts of your system architecture rather than burdening the main thread. These tasks typically fall into the following categories:
- Periodic tasks: These jobs are scheduled to run at specific times or intervals, like generating monthly reports or running a web scraper twice a day.
- Third-party tasks: To ensure a smooth user experience, web apps should avoid waiting for actions like sending emails, notifications, or updating internal tools (such as A/B testing data collection or system logging) during page loads.
- Long-running jobs: These tasks demand significant resources, requiring users to wait while computations are performed. Examples include complex workflow executions, graph generation, MapReduce-like tasks, and media content delivery (video, audio).
A simple solution for executing background tasks is to run them in a separate thread or process. However, while Python is a powerful high-level language, its built-in concurrency capabilities don’t match the scale of languages like Erlang, Go, Java, Scala, or Akka, which are based on Tony Hoare’s Communicating Sequential Processes (CSP](https://en.wikipedia.org/wiki/Communicating_sequential_processes)). Python threads rely on the global interpreter lock (GIL) for coordination and scheduling, limiting the simultaneous execution of Python bytecodes by multiple native threads. While removing the GIL is a hot topic among [Python developers, it’s not the focus of this article. Although concurrent programming in Python is considered somewhat outdated, you can explore it further in the Python Multithreading Tutorial by Toptaler Marcus McCurdy. It’s worth noting that designing communication between processes can be error-prone, leading to code coupling, reduced system maintainability, and scalability issues. Moreover, a Python process, along with the entire standard library, is resource-intensive. As the number of processes increases, context switching becomes time-consuming.
For a deeper dive into Python concurrency, I recommend David Beazley’s insightful talk at PyCon’15.
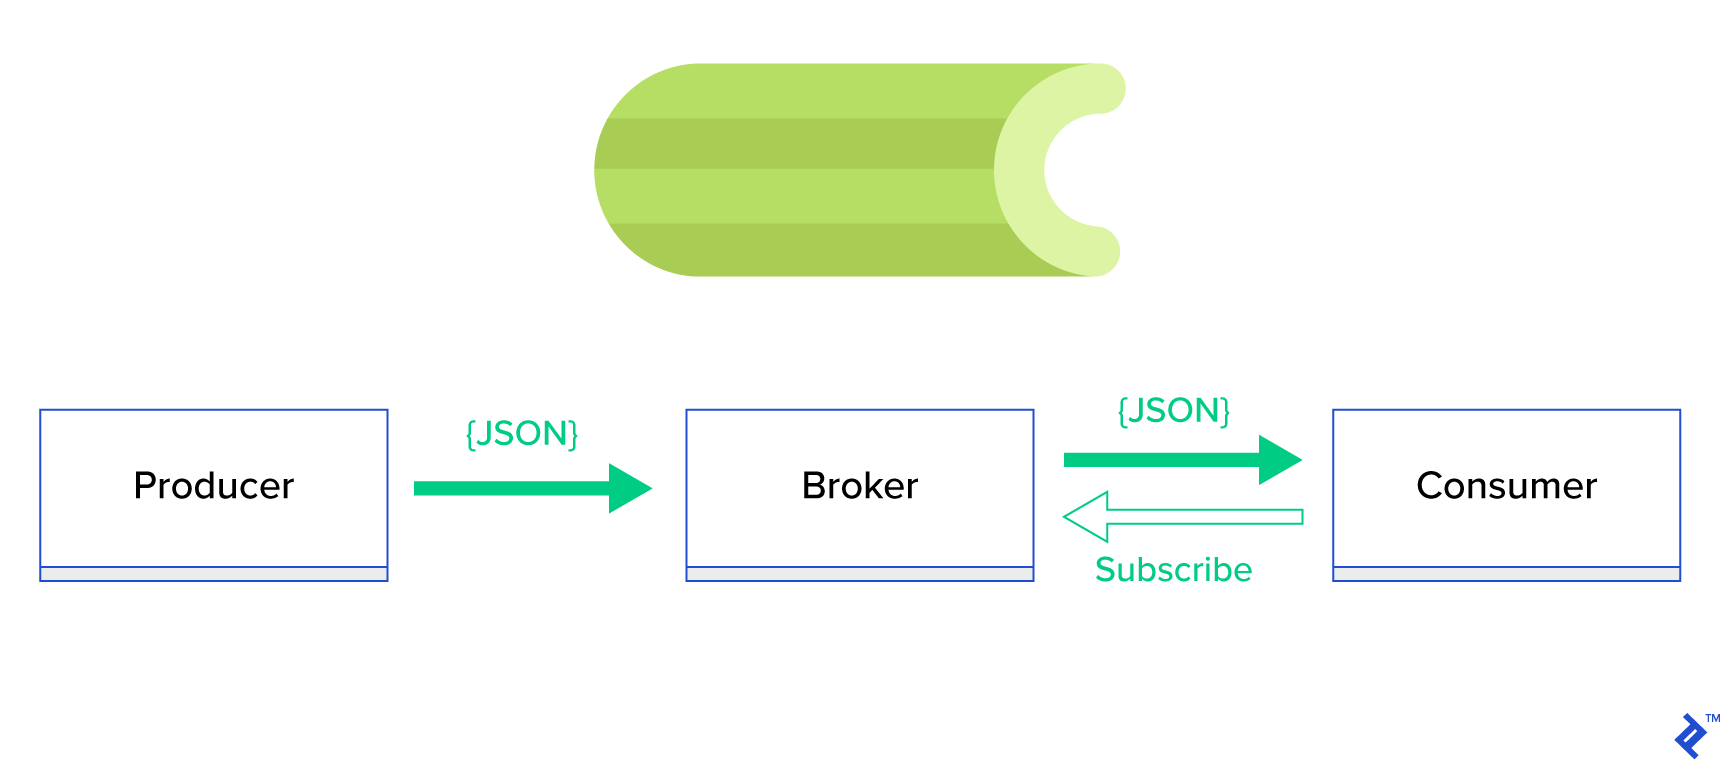
A more effective approach is to utilize a distributed queue or its related paradigm, publish-subscribe. In this model, illustrated in Figure 1, two types of applications interact: publishers send messages, while subscribers receive them. These agents operate independently and are unaware of each other. Publishers send messages to a central queue (the broker), and subscribers receive messages of interest from this broker. This method offers two key advantages:
- Scalability: Agents remain decoupled and topic-focused, enabling them to function asynchronously without direct dependencies.
- Loose coupling: Each agent represents a specific system component (service, module). This loose coupling allows for independent scaling beyond the datacenter.
Numerous messaging systems, such as JMS, RabbitMQ, Redis Pub/Sub, and Apache ActiveMQ, support these paradigms and provide streamlined APIs using TCP or HTTP protocols.
Introducing Celery
Celery is a widely-used Python background task manager. Compatible with message brokers like RabbitMQ and Redis, Celery can function as both a producer and consumer.
Celery is an asynchronous task queue/job queue built on distributed message passing. While focused on real-time operations, it also supports scheduling. Execution units, known as tasks, run concurrently on one or more worker servers using multiprocessing, Eventlet, or gevent. Tasks can be executed asynchronously (in the background) or synchronously (waiting for completion). – Celery Project
To embark on your Celery journey, follow the step-by-step guide at official docs.
This article aims to provide a comprehensive understanding of how Celery can be used for Python task management. We’ll explore practical examples and learn how to apply Celery to real-world scenarios like background emailing, report generation, logging, and error reporting. I’ll also share my approach to testing tasks beyond emulation and reveal some lesser-known tricks that I discovered through extensive research.
If you’re new to Celery, I recommend starting with the official tutorial.
Eager to Begin?
If you’re eager to dive into the code, head over to this GitHub repository for the code used in this Celery Python tutorial. The README file provides a quick guide to running and experimenting with the example applications.
Taking the First Steps with Celery
Let’s start with a series of practical examples demonstrating the simplicity and elegance of Celery as a Python task manager for handling seemingly complex tasks. Although presented within the Django framework, most examples can be easily adapted to other Python frameworks like Flask and Pyramid.
The project structure was generated using Cookiecutter Django. I’ve retained only the essential dependencies for development and streamlined the code for clarity.
| |
celery_uncovered/{toyex,tricks,advex}houses different applications covered in this post. Each application contains examples organized by the required level of Celery understanding.celery_uncovered/celery.pydefines a Celery instance.
File: celery_uncovered/celery.py:
| |
To ensure Celery starts with Django, we import the app in celery_uncovered/__init__.py.
File: celery_uncovered/__init__.py:
| |
config/settings serves as the configuration source for our app and Celery. Django loads environment-specific settings: local.py for development and test.py for testing. You can define custom environments by creating new Python modules (e.g., prod.py). Celery configurations are prefixed with CELERY_. For this post, I’ve configured RabbitMQ as the broker and SQLite as the result backend.
File: config/local.py:
| |
Scenario 1: Generating and Exporting Reports
Our first case study focuses on report generation and export. We’ll create a task to generate a CSV report and schedule it at regular intervals using celerybeat, Celery’s scheduler.
Use case: Fetch the top 500 trending repositories from GitHub within a chosen period (day, week, month), group them by topics, and export the results to a CSV file.
Imagine providing an HTTP service that triggers this feature with a “Generate Report” button. Executing this task synchronously would block the application, forcing users to wait for completion before receiving an HTTP response. This is not ideal. We strive for a fast and responsive web application. Instead of waiting, we can queue the task to Celery worker processes via a registered queue, sending a task_id back to the frontend. The frontend can then use this task_id to asynchronously query the task result (e.g., using AJAX) and provide progress updates to the user. Once the process finishes, the results can be downloaded as a file via HTTP.
Implementation Details
Let’s break down the process into smaller units and create a pipeline:
- Fetchers: Workers responsible for retrieving repositories from the GitHub API.
- Aggregator: A worker that consolidates results into a single list.
- Importer: A worker that generates CSV reports of the trending GitHub repositories.

Fetching repositories involves an HTTP request using the GitHub Search API GET /search/repositories endpoint. However, the GitHub API limits results to 100 repositories per request. While we could send five consecutive requests, we aim to minimize user waiting time for I/O bound operations like HTTP requests. Therefore, we’ll execute five concurrent HTTP requests with the appropriate page parameter, ranging from 1 to 5. Let’s define a task called fetch_hot_repos/3 -> list in the toyex/tasks.py module:
File: celery_uncovered/toyex/local.py
| |
The fetch_hot_repos task sends a request to the GitHub API and returns a list of repositories. It accepts three parameters to define the request payload:
since: Filters repositories by creation date.per_page: Specifies the number of results per request (limited to 100).page: Indicates the requested page number (ranging from 1 to 5).
Note: You’ll need an OAuth Token for authentication when using the GitHub Search API. In our case, it’s stored in the settings under GITHUB_OAUTH.
Now, let’s define a master task, produce_hot_repo_report_task/2->filepath:, responsible for aggregating results and exporting them to a CSV file:
File: celery_uncovered/toyex/local.py
| |
This task utilizes celery.canvas.group to concurrently execute five instances of fetch_hot_repos/3. The results are then collected, reduced to a list of repository objects, grouped by topic, and finally exported to a CSV file in the MEDIA_ROOT/ directory.
To schedule this task periodically, add an entry to the schedule list in the configuration file:
File: config/local.py
| |
Testing the Task
To launch and test the task, start the Celery process:
| |
Next, create the celery_uncovered/media/ directory. You can then test the functionality through the shell or Celerybeat:
Shell:
| |
Celerybeat:
| |
Results will be available in the MEDIA_ROOT/ directory.
Scenario 2: Email Reporting for Server 500 Errors
Email notifications are a common use case for Celery. As an offline I/O operation, email sending can be handled by a local SMTP server or a third-party service. Many scenarios involve sending emails, and users typically don’t need to wait for this process to complete. Therefore, it’s more efficient to execute such tasks in the background.
Use case: Send email reports to administrators for 50X errors using Celery.
Python and Django are well-equipped for system logging. I won’t delve into the intricacies of Python’s logging mechanism. If you’re unfamiliar with it or need a refresher, refer to the documentation of the built-in logging module. It’s an essential component for production environments. Django provides a special logger handler, AdminEmailHandler, which automatically emails administrators for each log message it receives.
Implementation Details
We’ll extend the send_mail method of the AdminEmailHandler class to send emails via Celery. This can be achieved as illustrated in the following diagram:

First, define a task called report_error_task that invokes mail_admins with the provided subject and message:
File: celery_uncovered/toyex/tasks.py
| |
Next, extend AdminEmailHandler to internally call the defined Celery task:
File: celery_uncovered/toyex/admin_email.py
| |
Finally, configure logging. Overriding LOGGING in Django’s settings allows you to use the newly defined handler:
File config/settings/local.py
| |
I’ve intentionally set the handler filter to require_debug_true to test this functionality in debug mode.
Testing the Functionality
To test, I’ve created a Django view that triggers a “division-by-zero” error at localhost:8000/report-error. Start a MailHog Docker container to verify email delivery.
| |
Additional Notes
For mail testing, I’ve set up MailHog and configured Django to use it for SMTP delivery. There are multiple ways to deploy and run MailHog. I opted for a Docker container. Details can be found in the corresponding README file:
File: docker/mailhog/README.md
| |
To configure your application to use MailHog, add the following lines to your settings:
File: config/settings/local.py
| |
Going Beyond Default Celery Tasks
Celery tasks can be created from any callable function. By default, user-defined tasks inherit from celery.app.task.Task as their parent (abstract) class. This class provides functionality for asynchronous and synchronous task execution, signature creation, and other utilities. In the following examples, we’ll extend Celery.app.task.Task to add custom behaviors to our tasks.
Scenario 3: Task-Specific File Logging
In a previous project, I developed an ETL-like tool that ingested and filtered large amounts of hierarchical data. The backend comprised two modules:
- Pipeline orchestration and data processing using Celery.
- Data processing with Go.
We deployed Celery with one Celerybeat instance and over 40 workers. The pipeline and orchestration activities involved more than twenty different tasks. Debugging and maintaining the Celery layer became challenging as task failures were logged to each worker’s system log. To improve manageability, we decided to isolate task logs to task-specific files.
Use case: Extend Celery to enable logging of standard output and errors to separate files for each task.
Celery offers granular control over its internal workings through a familiar signals framework. Applications can subscribe to these signals to modify the behavior of specific actions. We’ll leverage task-level signals to implement detailed tracking of individual task lifecycles. Celery already includes a logging backend, which we’ll extend to achieve our goal.
Implementation Details
Celery supports logging per task. Our goal is to direct log output to the appropriate location, which in this case is a file named after the task. We’ll override the built-in logging configuration on the Celery instance with dynamically inferred logging handlers. Subscribing to the celeryd_after_setup signal allows us to configure system logging:
File: celery_uncovered/toyex/celery_conf.py
| |
For each registered Celery task, we create a corresponding logger with its handler. Since each handler is of type logging.FileHandler, it receives a filename as input. Import this module into celery_uncovered/celery.py at the end of the file to activate this functionality:
| |
You can retrieve a specific task logger using get_task_logger(task_name). To generalize this behavior, we’ll extend celery.current_app.Task with utility methods:
File: celery_uncovered/tricks/celery_ext.py
| |
Now, when task.log_msg("Hello, my name is: %s", task.request.id) is called, the log output will be directed to the corresponding file under the task name.
Testing the Implementation
To test this functionality, start the Celery process:
| |
Then, test the task execution via the shell:
| |
The results can be found in the celery_uncovered/logs directory within a log file named after the task, such as celery_uncovered.tricks.tasks.add.log. After running the task multiple times, you might see output similar to the following:
| |
Scenario 4: Scope-Aware Tasks
Consider a multilingual Python application built with Celery and Django, where users can select their preferred language (locale).
Imagine designing a locale-aware email notification system. A dedicated Celery task handles email notifications, receiving key arguments and the current user’s locale to ensure language-specific emails.
If numerous tasks require a locale argument, it would be more efficient to handle this at a higher abstraction level. Let’s explore how to achieve this.
Use case: Automatically inherit scope from an execution context and inject it as a parameter into the current execution context.
Implementation Details
Similar to task logging, we’ll extend the base task class celery.current_app.Task and override methods responsible for task invocation. In this example, we’ll focus on celery.current_app.Task::apply_async. The module includes additional tasks to create a fully functional replacement.
File: celery_uncovered/tricks/celery_ext.py
| |
The key here is to pass the current locale as a key-value argument to the invoked task by default. If a task is explicitly called with a locale argument, it remains unchanged.
Testing the Functionality
To test this, define a dummy task of type ScopeBasedTask. This task will locate a file based on the locale ID and read its content as JSON:
File: celery_uncovered/tricks/tasks.py
| |
Now, follow the steps to launch Celery, start the shell, and test this task’s execution in different scenarios. Fixtures are located in the celery_uncovered/tricks/fixtures/locales/ directory.
Conclusion
This post explored Celery from various angles, covering conventional examples like mailing and report generation alongside advanced techniques for specific use cases. Celery’s data-driven approach can significantly simplify development workflows. Developing Celery-based services is relatively straightforward for Python developers, and its configuration options offer flexibility when needed.
Our team chose Celery for orchestrating background jobs and long-running tasks. We utilize it extensively for a wide range of scenarios, only a few of which were highlighted in this post. Celery plays a crucial role in our daily processing and analysis of gigabytes of data, and this is just the beginning of our exploration of horizontal scaling techniques.