In this series, we’ll build a prototype for a static website that displays the most recent releases for well-known GitHub repositories. It will do this by producing simple static HTML pages that are updated daily. Frameworks for building static sites are great for this, and we’ll be using Gatsby.js, one of the most popular options.
Gatsby offers several serverless methods for gathering data for your front end, such as Headless CMS platforms and Gatsby source plugins. However, to have complete control over both the front and back ends, we’ll set up a back end to hold fundamental details about GitHub repositories and their most recent releases.
Additionally, I’ll go over a number of techniques that will enable you to manually update your application every day, or whenever a particular event takes place.
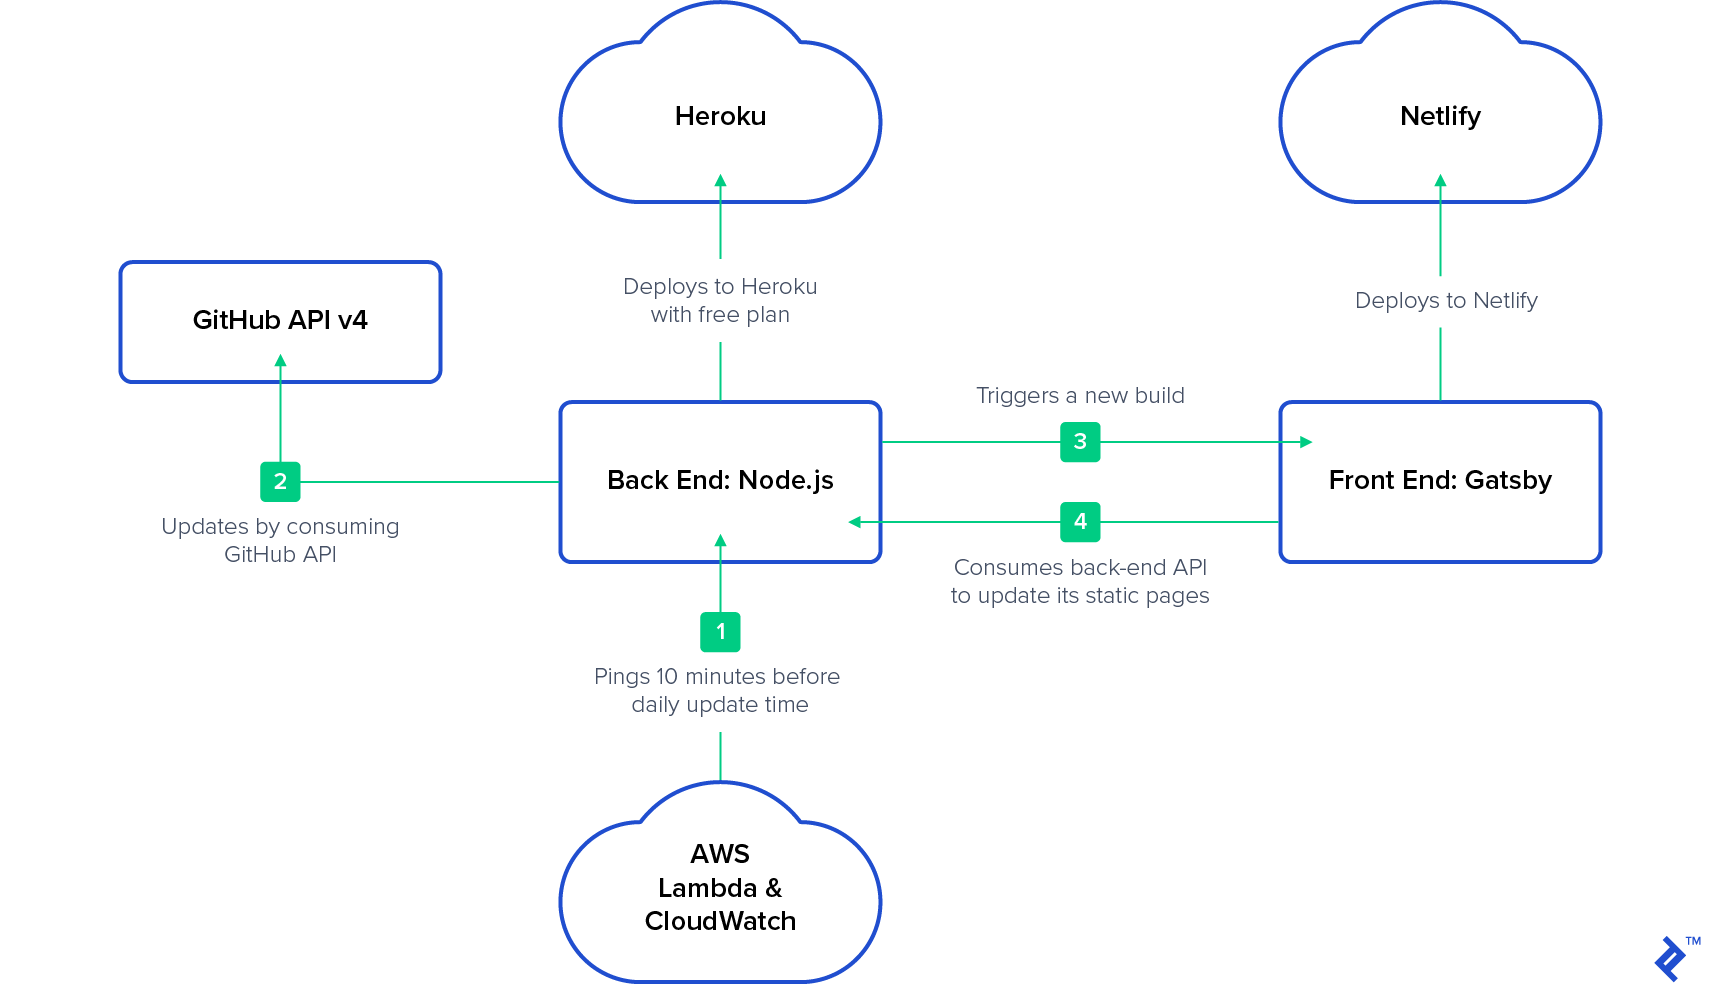
While our back-end application is hosted on Heroku with a free plan, our front-end application will operate on Netlify. It will sleep periodically: “The dyno manager will automatically awaken the web dyno to execute the web process type when someone accesses the app.” Thus, we can use AWS Lambda and AWS CloudWatch to rouse it. As of this writing, this is the most affordable method to keep a prototype online continuously.
Our Example Node Static Website: What to Anticipate
In the interest of clarity, this article won’t go into detail about authentication, validation, scalability, or other broad subjects. The project’s coding will be as straightforward as possible. More crucial are the tools’ proper use and the project’s organization.
We will create and deploy our back-end application in this first section of the series. We will create and deploy our front-end application in the second section, along with a trigger for daily builds.
The Back End in Node.js
Node.js will be used to create the back-end application (not required, but for simplicity), and all communication will be done via REST APIs. We won’t be gathering data from the front end for this project. (Take a look at Gatsby Forms if you’re interested in doing that.)
We’ll start by creating a straightforward REST API back end that exposes the CRUD operations for our MongoDB repository collection. We will then set up a cron job that uses the GitHub API v4 (GraphQL) to update the documents in this collection. After that, we’ll upload all of this to the Heroku cloud. Finally, after our cron job has finished, we’ll start a rebuild of the front end.
The Front End in Gatsby.js
We will concentrate on putting the createPages API](https://www.gatsbyjs.org/docs/creating-and-modifying-pages/) into practice in the second article. We’ll retrieve every repository from the back end and produce a single home page that lists every repository, along with a page for each repository record that is returned. After that, we’ll [publish our front end to Netlify.
From AWS Lambda and AWS CloudWatch
This step is optional if your application doesn’t go to sleep. You must ensure that your back end is operational while repositories are being updated if it doesn’t. You can set up a cron schedule on AWS CloudWatch 10 minutes before your daily update as a solution and link it to your AWS Lambda GET method as a trigger. The Heroku instance will awaken when the back-end application is accessed. At the conclusion of the second article, there will be more information.
The architecture we’ll be utilizing is as follows:
Assumptions
I presume that this article’s target audience is knowledgeable in the following fields:
- HTML
- CSS
- JavaScript
- REST APIs
- MongoDB
- Git
- Node.js
It’s also beneficial if you are familiar with:
- Express.js
- Mongoose
- GitHub API v4 (GraphQL)
- Heroku, AWS, or another cloud provider
- React
Let’s get started building the back end right away. We’ll divide it into two steps. Preparing REST API endpoints and linking them to our repository collection is the first step. Implementing a cron job that uses the GitHub API and updates the collection is the second.
Building the Back End of the Node.js Static Site Generator, Step 1: A Basic REST API
We’ll use Mongoose to handle our MongoDB connection and Express for our web application framework. You might be able to skip to Step 2 if you are already familiar with Express and Mongoose.
(If you need a refresher on Express, the official Express starter guide can help; if Mongoose is new to you, the official Mongoose starter guide should be helpful.)
Project Structure
Our project’s structure of files and folders will be straightforward:
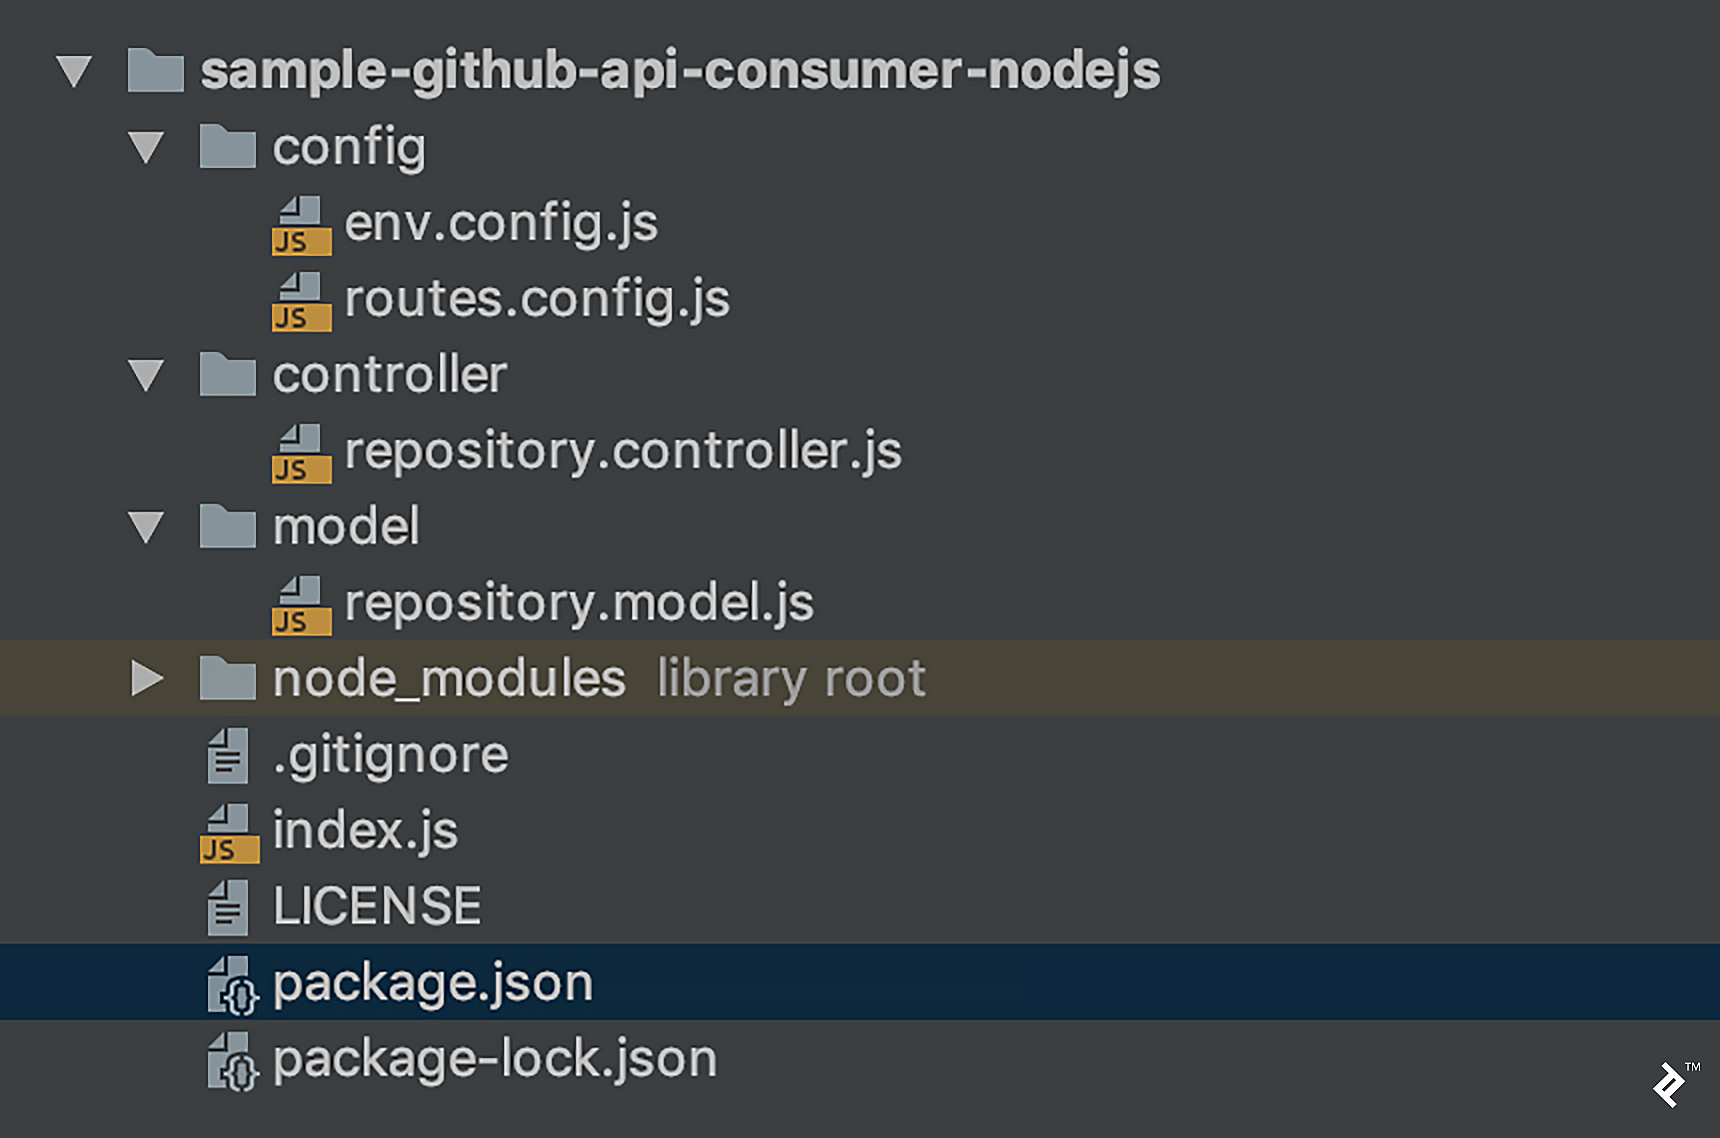
In greater detail:
- Environment variable configuration file:
env.config.js - For mapping rest endpoints:
routes.config.js - Methods for working with our repository model are located in
repository.controller.js - MongoDB schema for the repository and CRUD operations:
repository.model.js - Initializer class:
index.js - Project properties and dependencies are listed in
package.json
Implementation
After adding these dependencies to package.json, execute npm install (or yarn, if you have Yarn installed):
| |
Our env.config.js file currently only contains the port, environment (dev or prod), and mongoDbUri properties:
| |
Request mappings are stored in routes.config.js, which will invoke the appropriate method in our controller:
| |
The file repository.controller.js represents our service layer. It is in charge of calling the appropriate function in our repository model:
| |
MongoDb connectivity and CRUD operations for the repository model are handled by repository.model.js. The model’s fields are:
owner: The repository’s owner (business or individual).name: Repository’s namecreatedAt: Last release’s creation dateresourcePath: Last release’s pathtagName: Last release’s tagreleaseDescription: Notes on the releasehomepageUrl: The homepage URL of the project.repositoryDescription: Repository’s descriptionavatarUrl: Project owner’s avatar URL
| |
Following our initial commit, this is what we have: A MongoDB connection and our REST operations.
Using the following command, we can launch our application:
| |
Testing
Send requests to localhost:3000 for testing (using e.g. Postman or cURL):
Insert a Repository (Required Fields Only)
Post: http://localhost:3000/repositories
Body:
| |
Get Repositories
Get: http://localhost:3000/repositories
Get by ID
Get: http://localhost:3000/repositories/:id
Patch by ID
Patch: http://localhost:3000/repositories/:id
Body:
| |
It’s time to automate updates now that that’s working.
Building the Back End of the Node.js Static Site Generator, Step 2: Using a Cron Job to Update Repository Releases
In this section, we’ll set up a straightforward cron job (which will launch at UTC midnight) to update the GitHub repositories that we’ve added to our database. In our example above, we only included the owner and name parameters; however, these two elements are sufficient for us to retrieve general details about a specific repository.
We must use the GitHub API in order to update our data. It is advisable to be familiar with GraphQL and v4 of the GitHub API for this section.
Additionally, we must create a GitHub access token. These are the bare minimum scopes required:
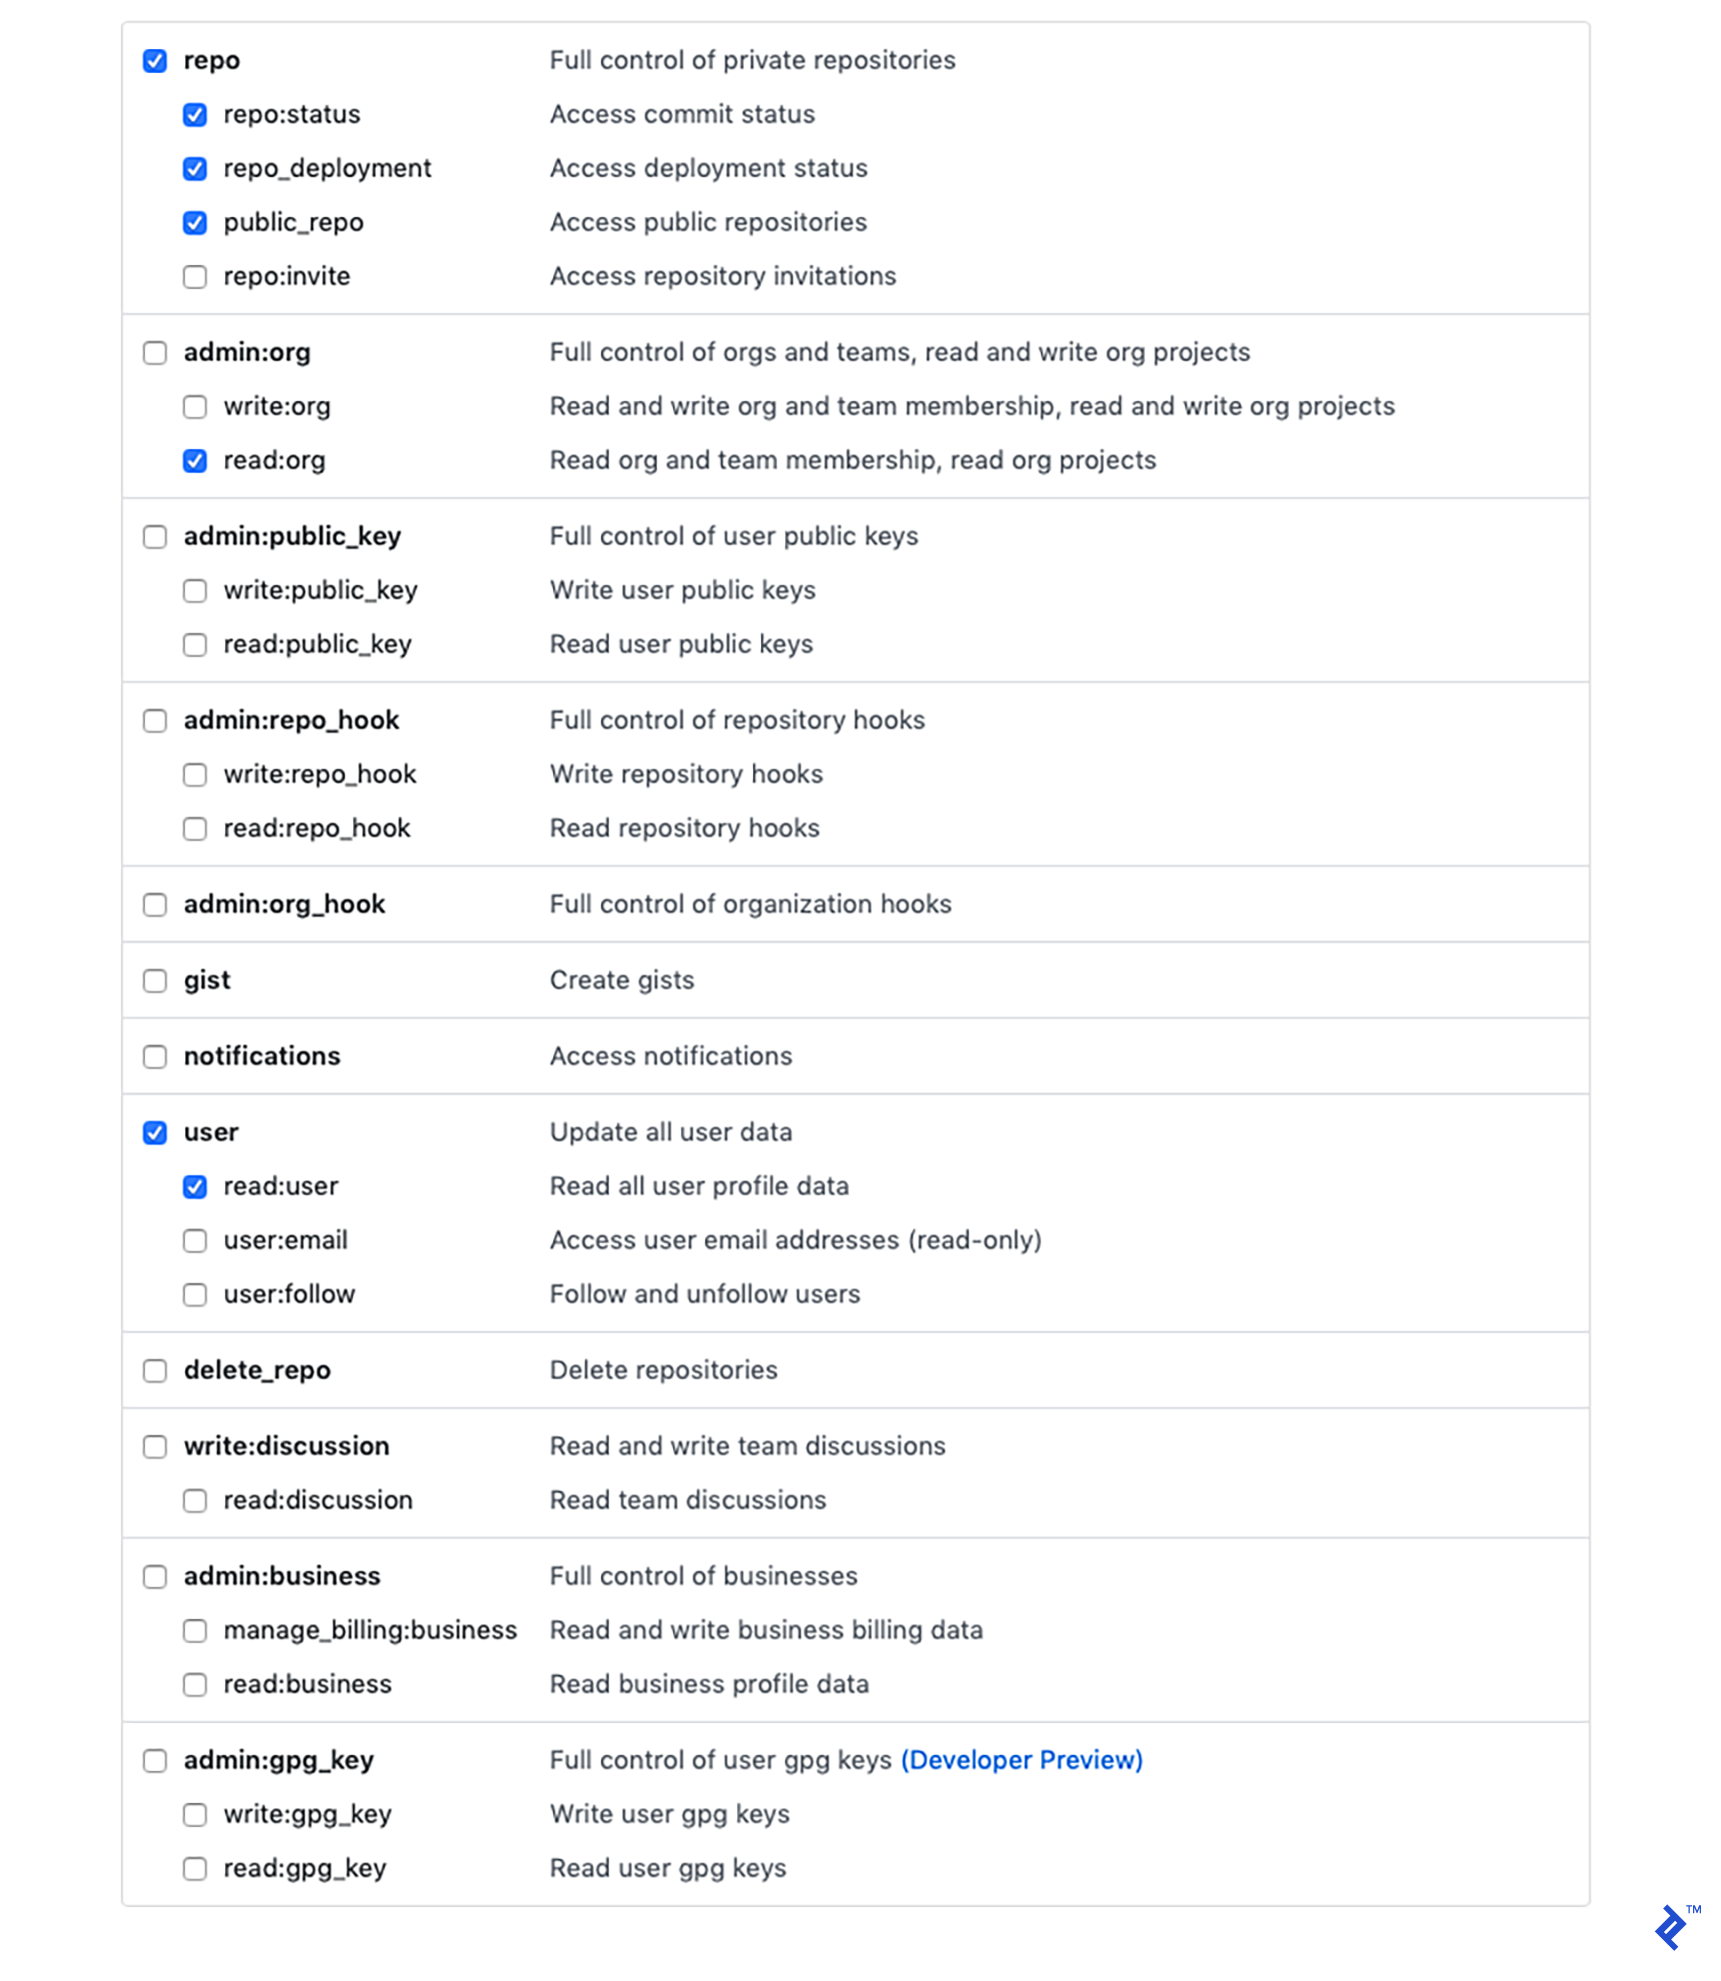
That will produce a token that we can use to communicate with GitHub and transmit requests.
Let’s now return to our code.
Two new dependencies exist in package.json:
"axios": "^0.18.0"is an HTTP client, allowing us to communicate with the GitHub API."cron": "^1.7.0"is a job scheduler for cron.
After adding dependencies, as usual, run npm install or yarn.
In config.js, we’ll also require two new properties:
"githubEndpoint": "https://api.github.com/graphql""githubAccessToken": process.env.GITHUB_ACCESS_TOKEN(you’ll need to configure theGITHUB_ACCESS_TOKENenvironment variable with your personal access token)
Make a new file named cron.controller.js in the controller directory. At the scheduled times, it will simply call the updateResositories method from repository.controller.js:
| |
The final adjustments for this section will be made to repository.controller.js. We’ll build it to update all repositories at once for the sake of clarity. However, you might go over the resource limitations of GitHub’s API if you have a lot of repositories. You’ll need to adjust this to run in smaller batches over time if that’s the case.
The update functionality’s all-at-once implementation will resemble this:
| |
Finally, we’ll call the endpoint to update the repository model.
The getLatestRelease function will generate a GraphQL query before contacting the GitHub API. Then, the updateDatabase function will handle the request’s response.
| |
We will have finished implementing a cron scheduler to get daily updates from our GitHub repositories following our second commit.
The back end is almost finished. However, we’ll cover the final step in the following article because it should be completed after the front end has been implemented.
Deploying the Node Static Site Generator Back End to Heroku
We will deploy our application to Heroku in this stage, so you’ll need to set up an account with them if you don’t already have one. If we link our Heroku account to GitHub, continuous deployment will be much simpler. Consequently, I’m hosting my project on GitHub.
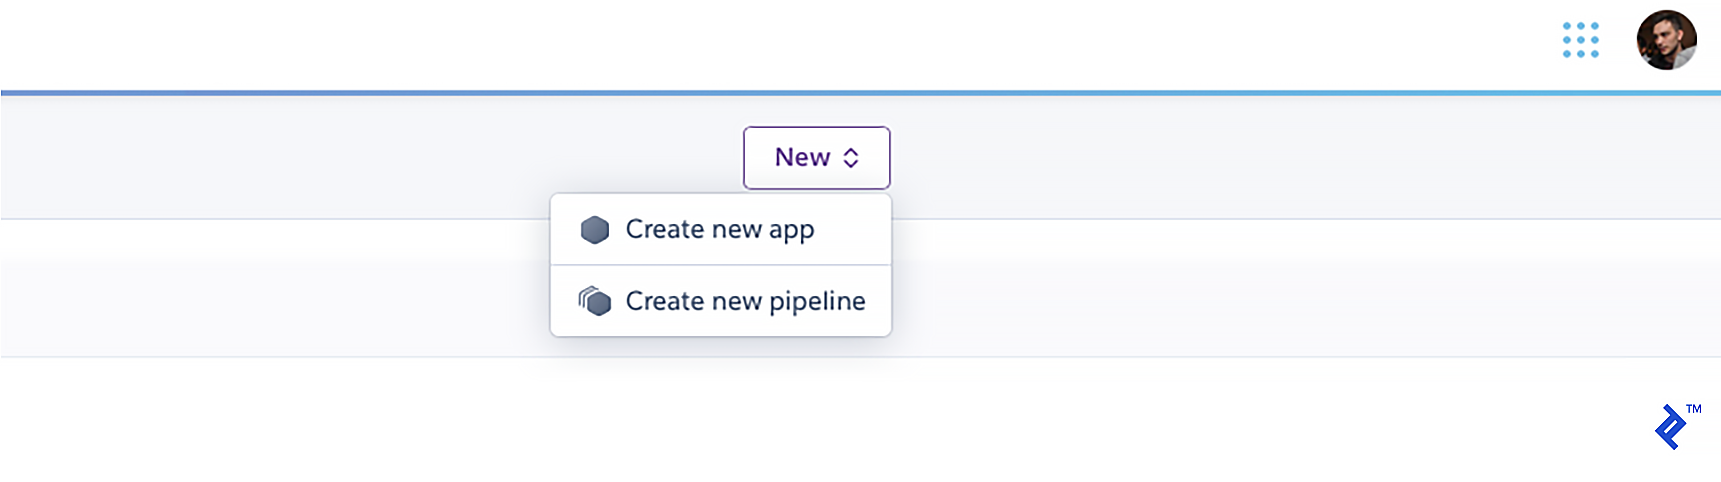
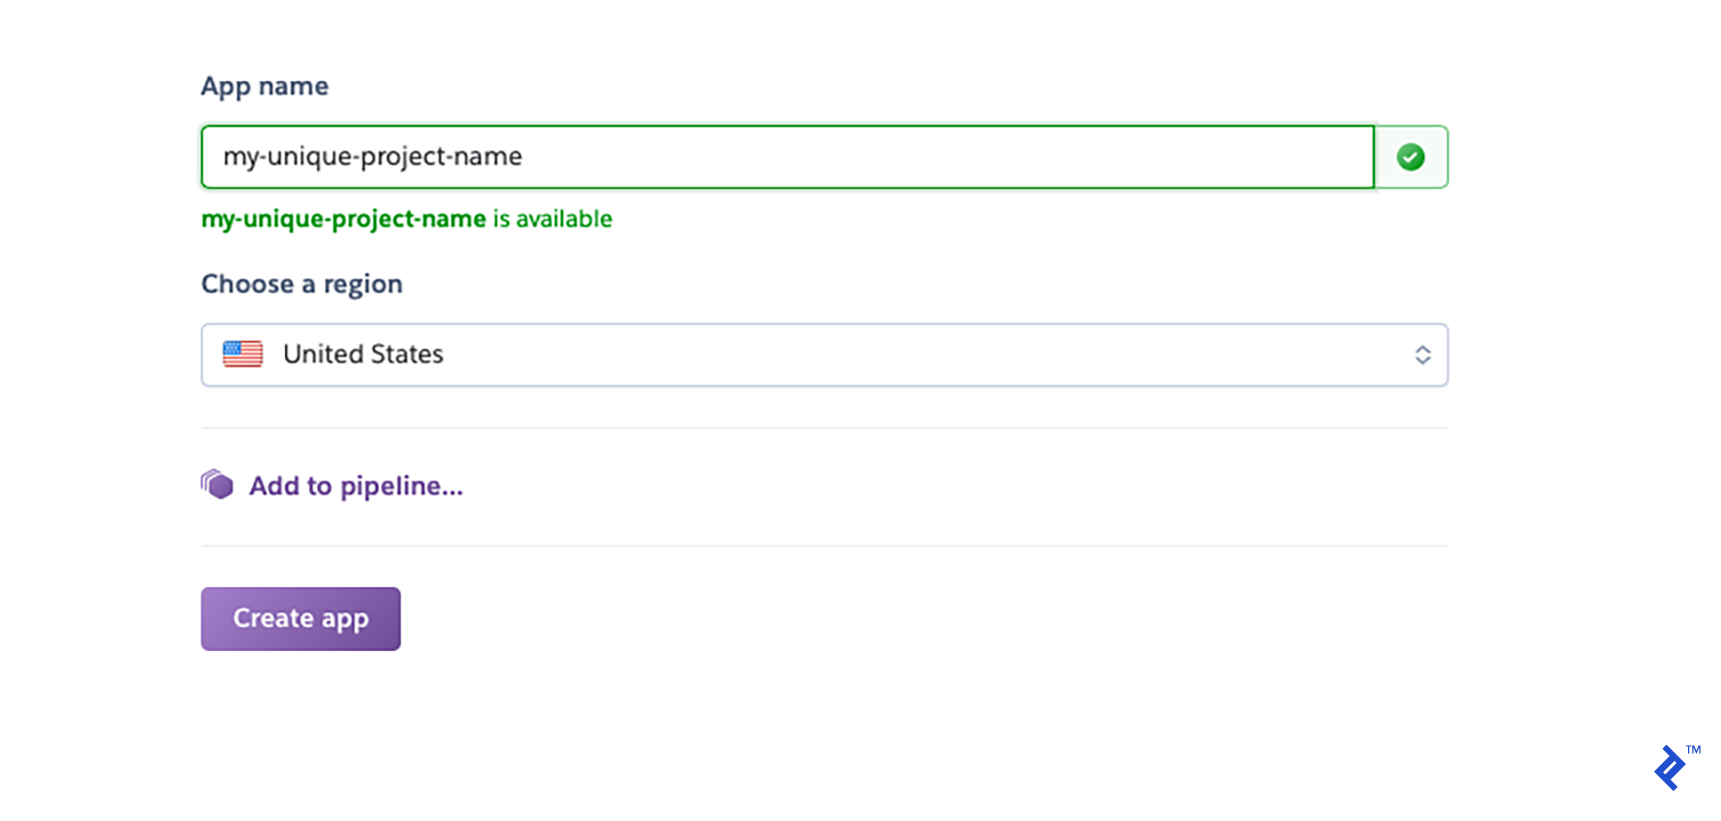
Add a new app from the dashboard after logging into your Heroku account:
Give it a distinct name:
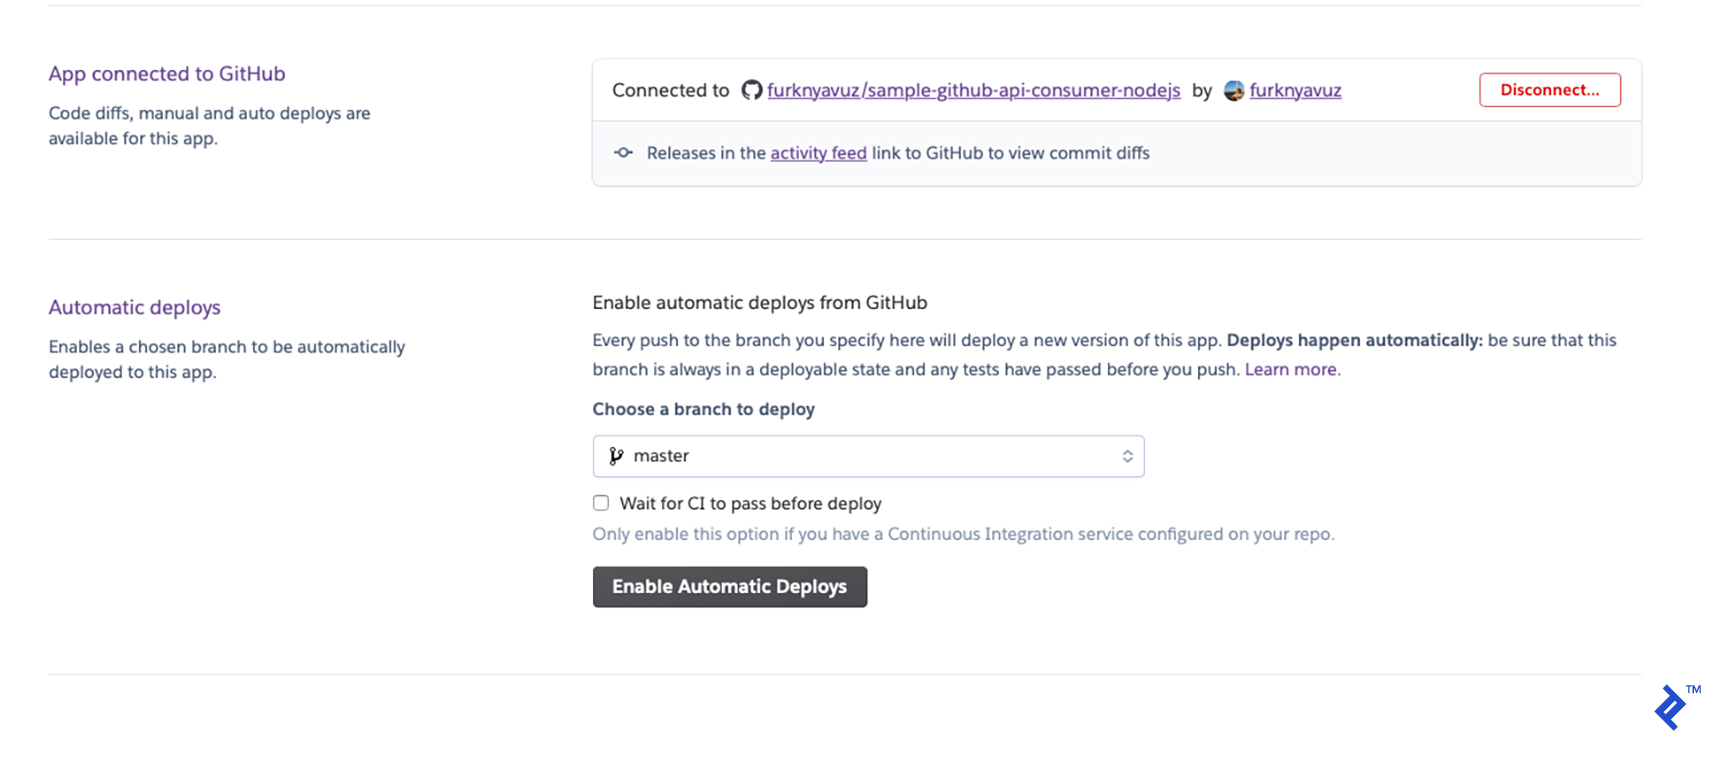
You’ll be taken to a deployment area. Choose GitHub as your deployment strategy, then select “Connect” after finding your repository.

You can enable automatic deployments to make things simpler. Whenever you commit to your GitHub repository, it will deploy:
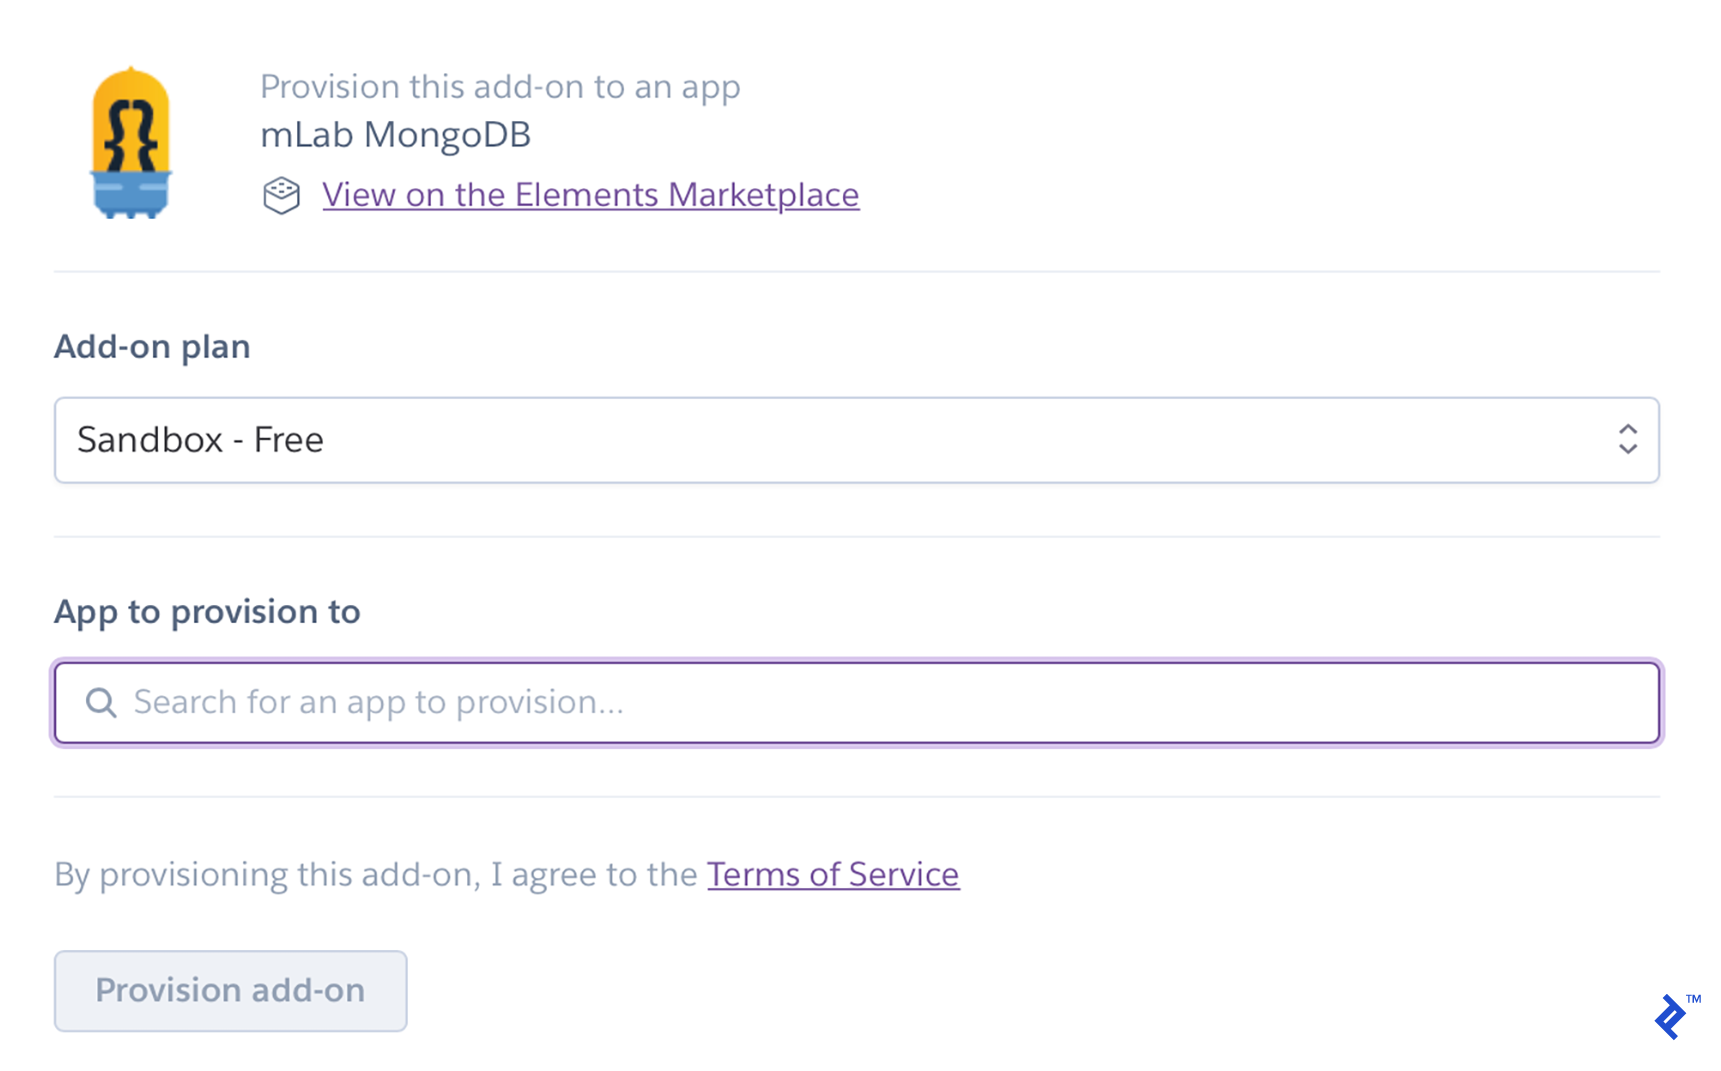
We must now include MongoDB as a resource. Click “Find more add-ons” under the Resources tab. (Personally, I use mLab mongoDB.)

Install it after entering the name of your app in the “App to provision to” field:
Finally, at the root of our project, we need to create a file called Procfile that lists the commands the app will run when Heroku launches.
Our Procfile is straightforward:
| |
Make the file, and then commit it. When you push the commit, Heroku will automatically deploy your application, which will be accessible at https://[YOUR_UNIQUE_APP_NAME].herokuapp.com/.
We can submit the same requests to localhost to see if it’s functioning.
Node.js, Express, MongoDB, Cron, and Heroku: We’re Halfway There!
We have this is what our repo will look like after our third commit.
We’ve established the Node.js/Express-based REST API on our back end, the updater that uses the GitHub API, and a cron job to start it. In order to later provide data for our static web content generator, we have deployed our back end using Heroku and a hook for continuous integration. You are now prepared for the second section, where we will finish the program and implement the front end.