Comprehending user actions is crucial for any online business to thrive, and Google Analytics 4 (GA4) equips marketers with a robust tool to extract practical insights from user data. Event tracking is a key GA4 feature, enabling marketers to collect granular information on user engagement and inform their marketing strategies with data-driven decisions. Unlike Universal Analytics, which depends on conventional tracking methods, GA4 event tracking leverages a more adaptable and customizable approach, leading to improved data accuracy and personalization.
 The Mechanics of Event Tracking in GA4.
This article provides a deep dive into the specifics of GA4 event tracking and illustrates how it can empower your business to enhance its marketing strategies. I will also provide a detailed guide on implementing custom events in GA4 using Google Tag Manager. Upon finishing this article, you will have a clearer understanding of how GA4 event tracking can be advantageous for businesses and how to implement it effectively using Google Tag Manager.
The Mechanics of Event Tracking in GA4.
This article provides a deep dive into the specifics of GA4 event tracking and illustrates how it can empower your business to enhance its marketing strategies. I will also provide a detailed guide on implementing custom events in GA4 using Google Tag Manager. Upon finishing this article, you will have a clearer understanding of how GA4 event tracking can be advantageous for businesses and how to implement it effectively using Google Tag Manager.
Table of contents
- What is Google Analytics 4 (+how it differs from Universal Analytics)
- What is event tracking in GA4 and why is it important for marketers?
- What are events and how are they tracked in GA4?
- How to use Google Tag Manager + Google Analytics 4 for better tracking
- Setting up Google Tag Manager for GA4
- How to create a custom event in GA4 via Google Tag Manager
- How to set up the Buy Now Pay Later Event in GA4
Introducing Google Analytics 4 and its Distinctions from Universal Analytics
Google Analytics 4 (GA4) is the latest version of Google’s web analytics platform and introduces several key differences compared to its predecessor, Universal Analytics (UA). Firstly, GA4 is engineered for enhanced cross-device and cross-platform tracking, enabling marketers to monitor and analyze user behavior across various devices and platforms, encompassing mobile applications, websites, and offline interactions. Conversely, UA offers a more restricted perspective of user interactions, primarily concentrating on website sessions.
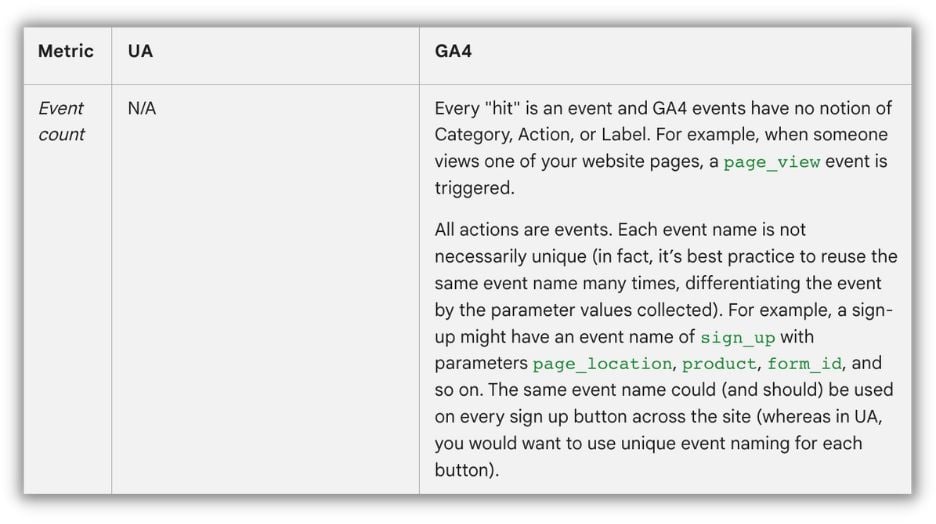
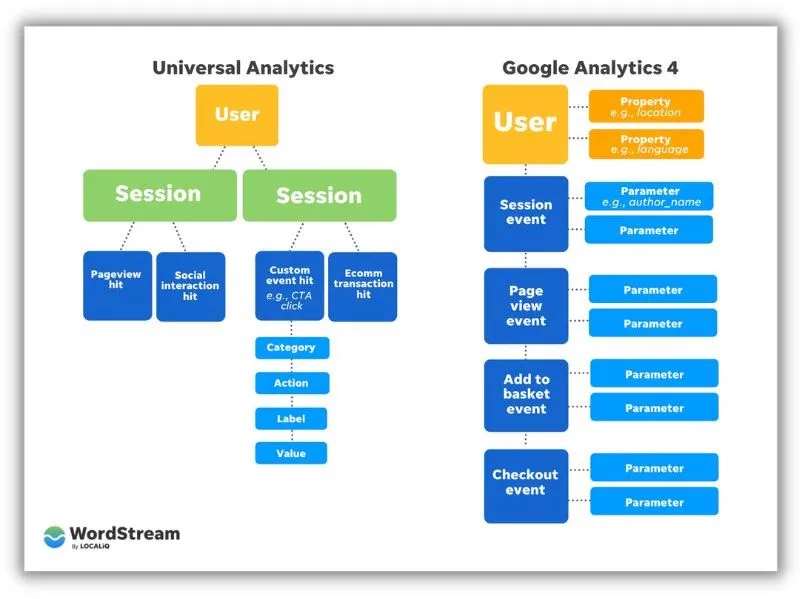 Another notable difference between GA4 and UA lies in their data modeling methodology. GA4 introduces a novel event-based data model that captures user interactions as discrete events, such as button clicks, video views, or form submissions, instead of grouping them into sessions as in UA.
Lastly, GA4 offers more sophisticated machine learning capabilities, allowing marketers to glean deeper insights into user behavior and refine their marketing strategies. For instance, GA4’s “predictive metrics” feature employs machine learning to anticipate user behavior and forecast potential outcomes.
Another notable difference between GA4 and UA lies in their data modeling methodology. GA4 introduces a novel event-based data model that captures user interactions as discrete events, such as button clicks, video views, or form submissions, instead of grouping them into sessions as in UA.
Lastly, GA4 offers more sophisticated machine learning capabilities, allowing marketers to glean deeper insights into user behavior and refine their marketing strategies. For instance, GA4’s “predictive metrics” feature employs machine learning to anticipate user behavior and forecast potential outcomes.
Event Tracking in GA4: Definition and Significance for Marketers
Event tracking is a fundamental element of Google Analytics 4, enabling marketers to gather detailed information about how users interact with their online platforms. In GA4, events represent specific user actions, such as clicking buttons, watching videos, and submitting forms, which marketers wish to track and examine. Event tracking empowers marketers to measure user behavior beyond simple pageviews and sessions, providing a more precise and detailed understanding of user engagement.
 Event tracking is crucial for marketers as it empowers them to make informed, data-driven decisions when crafting and optimizing marketing strategies. By tracking user interactions with their website or app, marketers can pinpoint the most captivating content and fine-tune the user experience to foster better engagement and conversions.
With GA4’s cross-device and cross-platform tracking capabilities, event tracking empowers marketers to attain a more comprehensive understanding of their users’ journeys across various devices and platforms, resulting in more effective marketing strategies.
Event tracking is crucial for marketers as it empowers them to make informed, data-driven decisions when crafting and optimizing marketing strategies. By tracking user interactions with their website or app, marketers can pinpoint the most captivating content and fine-tune the user experience to foster better engagement and conversions.
With GA4’s cross-device and cross-platform tracking capabilities, event tracking empowers marketers to attain a more comprehensive understanding of their users’ journeys across various devices and platforms, resulting in more effective marketing strategies.
Understanding Events and their Tracking in GA4
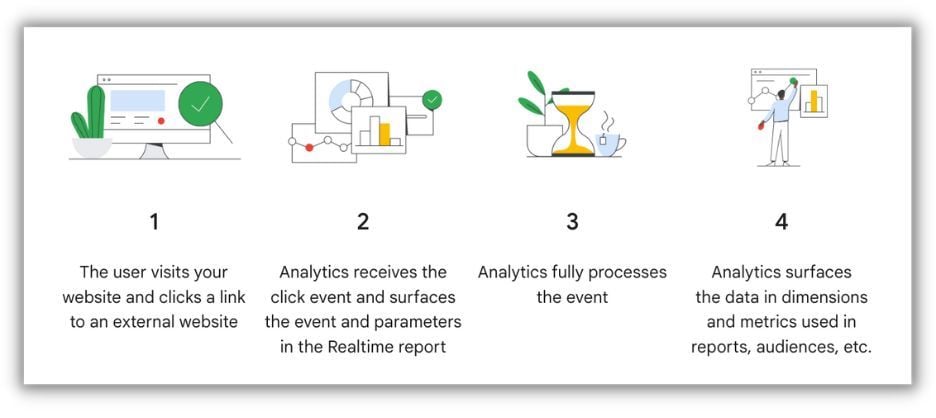
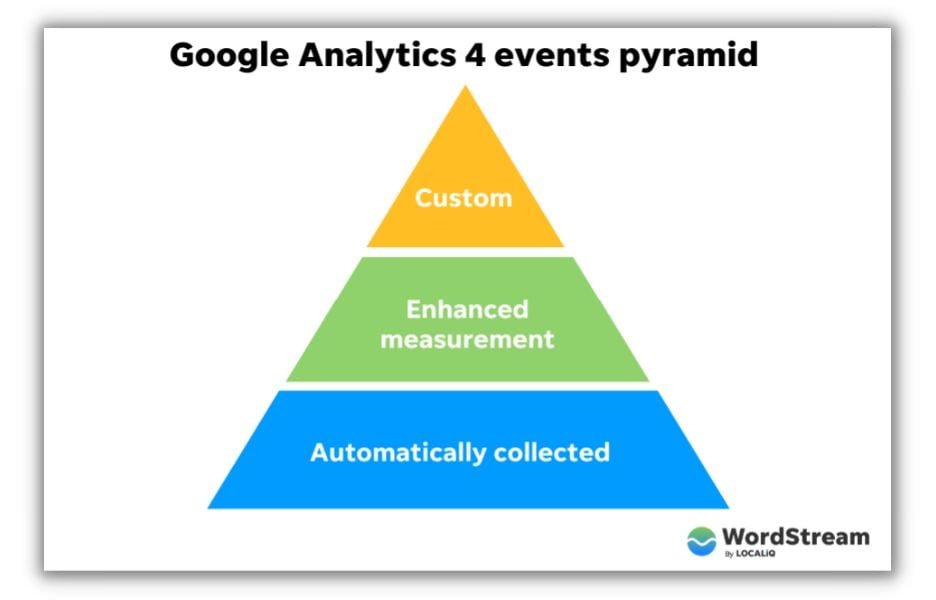
In GA4, events represent user interactions with content on a website or app that can be quantified and studied. They provide valuable information about how users engage with a digital platform, including the actions they take, the pages they visit, and the features they utilize. Tracking events in GA4 empowers businesses and marketers to understand user behavior, optimize user experience, and make data-informed decisions to improve their marketing strategies. GA4 employs the Google Analytics 4 data model, which is based on an event-driven approach, to track events. This data model prioritizes the capture of user interactions as individual events, which are then transmitted to Google Analytics for processing and reporting. Events in GA4 fall into three categories:
- Automatically collected events: These are events that GA4 automatically monitors without requiring any additional implementation, such as first_open, session_start, and page_view. They provide fundamental insights into user engagement and behavior.
- Enhanced measurement events: GA4 provides an Enhanced Measurement feature that automatically tracks supplementary user interactions like scrolling, clicking, and video engagement. This feature can be enabled or tailored within the GA4 interface.
- Custom events: These events are defined and implemented manually by you, based on specific user interactions relevant to your website or app. Custom events provide deeper insights into user behavior and engagement, tailored to your specific business needs.
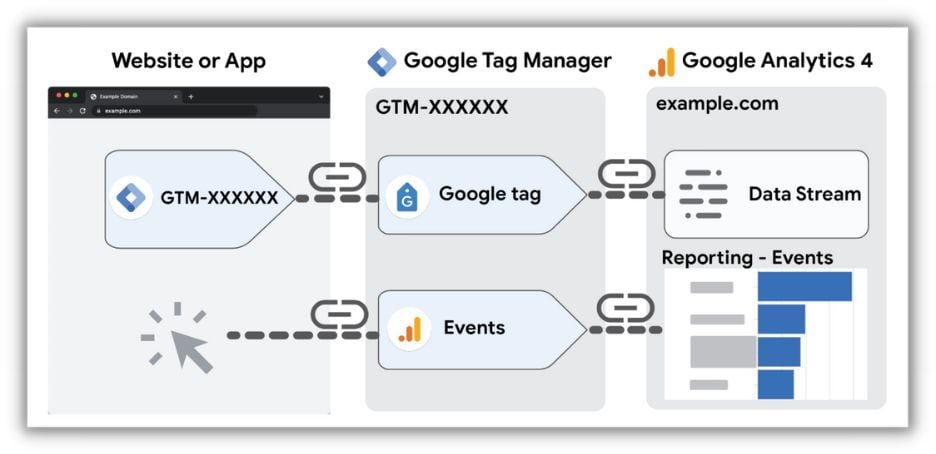
Utilizing Google Tag Manager and Google Analytics 4 for Enhanced Tracking
Setting up Google Tag Manager for GA4 allows you to more effectively track and comprehend event data. Let’s walk through some specific steps.
A Brief Overview of Google Tag Manager
Google Tag Manager (GTM) is a free, user-friendly platform that empowers you to manage and implement various tracking codes and marketing tags on your website or app without requiring extensive coding expertise. GTM simplifies the process of implementing tracking tags, including those from Google Analytics, Google Ads, Facebook Pixel, and other third-party providers, by centralizing their management within a single interface. Using GTM offers several advantages, including:
- User-friendliness: You can effortlessly add, modify, or remove tags without directly altering the website or app code, making it accessible to marketers and non-developers.
- Rapid Deployment: GTM streamlines the tag implementation process, allowing for quick deployment and updates without relying on developers.
- Version Control: GTM maintains a chronological record of your tag configurations, enabling you to revert to previous versions if errors or problems occur.
- Enhanced Site Performance: GTM utilizes asynchronous loading to minimize the impact of tags on your website’s performance and loading times.
- Integrated Triggers and Variables: GTM provides a variety of pre-built triggers and variables, allowing you to control when and how your tags are activated, ultimately improving the accuracy and relevance of your tracking data. I delve deeper into Google Tag Manager in this YouTube video.
Configuring Google Tag Manager for GA4
Configuring Google Tag Manager (GTM) for Google Analytics 4 (GA4) involves creating a GA4 tag within your GTM container and setting it up to transmit data to your GA4 property. Here’s a step-by-step guide to assist you in setting up GTM for GA4:
- Establish a GA4 property: If you haven’t already, set up a new GA4 property within your Google Analytics account. Make note of the Measurement ID (e.g., G-XXXXXXXXXX) linked to your GA4 property, as you’ll need it in subsequent steps.
- Access Google Tag Manager: Log in to your GTM account and choose the relevant container for your website or app.
- Generate a new GA4 tag:
- Click on “Tags” in the left sidebar menu.
- Click on “New” to create a new tag.
- In the “Tag Configuration” section, click on “Tag Type” and choose “Google Analytics: GA4 Configuration.”
- Input your GA4 Measurement ID from Step 1 into the designated “Measurement ID” field.
- Click on “Save” to preserve your tag configuration.
- Configure a trigger for the GA4 tag:
- In the “Triggering” section, click on the pencil icon to add a trigger.
- Select the “All Pages” trigger for websites or the “App – All Screens” trigger for apps. This ensures that the GA4 tag activates on every page or screen, allowing you to track fundamental interactions such as page views.
- Click on “Save” to associate the trigger with your GA4 tag.
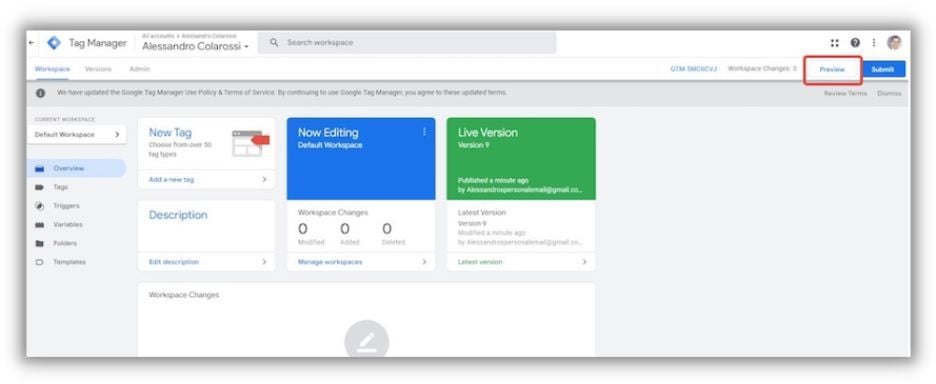
- Test your GA4 tag: Before publishing your changes, click on “Preview” in the GTM interface to test your GA4 tag. Navigate to your website or app and confirm that the tag is firing correctly using GTM’s Preview mode or the GA4 DebugView within Google Analytics.
- Publish your GTM container: Once you have verified that the GA4 tag is functioning as expected, click on “Submit” in the GTM interface to publish your changes. Your GA4 tag is now active, and data will begin flowing to your GA4 property.
 Source
After successfully configuring GTM for GA4, you can use GTM to manage other GA4 events, such as custom events or enhanced measurement events, by creating additional GA4 tags and configuring them with the appropriate triggers and variables.
Source
After successfully configuring GTM for GA4, you can use GTM to manage other GA4 events, such as custom events or enhanced measurement events, by creating additional GA4 tags and configuring them with the appropriate triggers and variables.
Creating a Custom Event in GA4 via Google Tag Manager
A client of mine wanted to monitor the number of times users clicked the “Buy Now Pay Later” button on their website. To accomplish this in Google Analytics 4 (GA4), we need to set up a custom event using Google Tag Manager. Below is a step-by-step guide on how to set up a custom button click event for the “Buy Now Pay Later” button:
- Locate the button: Begin by examining the HTML source code of the website to find the “Buy Now Pay Later” button.
- Create a trigger for the button click (using click text):
- Within your Google Tag Manager container, click on “Triggers” in the left sidebar menu.
- Click on “New” to create a new trigger.
- Assign a name to your trigger (e.g., “Buy Now Pay Later Click”).
- In the “Trigger Configuration” section, click on “Trigger Type” and choose “Click – All Elements.”
- Select “Some Clicks” under “This trigger fires on.”
- From the dropdown menus, select “Click Text” and enter the click text “Buy Now Pay Later” to accurately identify the button.
- Click on “Save” to store your trigger configuration.
- Generate a new GA4 Event tag:
- Click on “Tags” in the left sidebar menu.
- Click on “New” to create a new tag.
- Name your tag (e.g., “GA4 – Buy Now Pay Later Click”).
- In the “Tag Configuration” section, click on “Tag Type” and choose “Google Analytics: GA4 Event.”
- Enter your GA4 Measurement ID (e.g., G-XXXXXXXXXX) into the “Measurement ID” field.
- In the “Event Name” field, enter a descriptive name for your custom event (e.g., “buy_now_pay_later_click”).
- Click on “Add Row” under “Event Parameters” to define supplementary parameters for your event. Enter “button_name” into the “Parameter Name” field and “Buy Now Pay Later” into the “Parameter Value” field.
- Click on “Save” to save your tag configuration.
- Set up the trigger for the GA4 Event tag:
- In the “Triggering” section, click on the pencil icon to add a trigger.
- Select the “Buy Now Pay Later Click” trigger that you generated in Step 2.
- Click on “Save” to associate the trigger with your GA4 Event tag.
- Test your custom button event:
Click on “Preview” in the GTM interface to test your GA4 Event tag and custom trigger.
Visit your website and click on the “Buy Now Pay Later” button.
In GTM’s Preview mode or GA4’s DebugView, verify that your custom event triggers accurately when the button is clicked.
- Publish your GTM container:
- Once you have confirmed that the custom event is functioning as intended, click on “Submit” in the GTM interface to publish your changes.
- Your custom button event is now active, and data will be sent to your GA4 property whenever users click the “Buy Now Pay Later” button. By using the click text as the defining attribute in the trigger configuration, Google Tag Manager will activate the custom event whenever a user clicks on a button or element containing the text “Buy Now Pay Later” on the website.
Setting up the Buy Now Pay Later Event as a Conversion in GA4
To set up the “Buy Now Pay Later” event in GA4 using Google Tag Manager and designate it as a conversion, follow these steps:
Access the property settings by clicking on “Configure” (gear icon) located in the left-hand menu.
Click on “Events.”
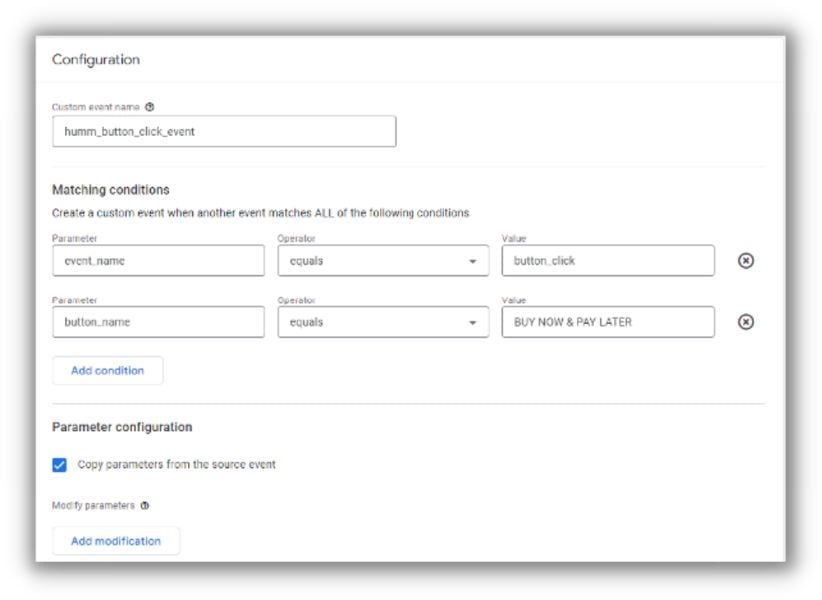
Click on “Create event.”
For the purpose of this demonstration, we will create an event that resembles the following:
Mark as conversions: Ensure that the event is successfully transmitting data to your GA4 property (you can use the real-time view in GA4 to confirm this).
Navigate to your GA4 property: Log in to your Google Analytics account and access the GA4 property where you have set up the “Buy Now Pay Later” button click event.
Define the event:
Click on “Configure” (gear icon) in the left-hand menu to access the property settings.
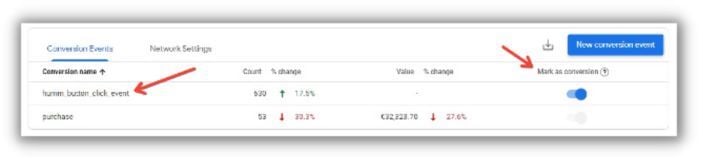
Click on “Conversions” and add the name that you assigned to your new event in the previous steps.
After a short while, the conversion should look like this (ensure that “Mark as conversion” is checked):
 I cover all of this in detail in the video tutorial below.
Start Tracking Your Events in Google Analytics 4
In conclusion, event tracking in Google Analytics 4 is an indispensable instrument for marketers seeking to understand user behavior and optimize their online platforms for enhanced engagement and conversions. GA4’s event-based data model provides a more adaptable and customizable approach to tracking user interactions, empowering businesses to gain deeper insights into user behavior and develop more effective marketing strategies. By utilizing Google Tag Manager, businesses can easily implement custom events in GA4, providing customized insights into specific user interactions. By adhering to the step-by-step guide outlined above, businesses can set up and designate custom events as conversions in GA4, allowing for even more granular analysis of user behavior and marketing performance. Overall, GA4’s event tracking feature is a potent tool that should not be overlooked by any online business looking to refine its marketing strategies and enhance its overall performance. And don’t forget to explore these helpful AI features in GA4.