In a prior article about the GWT Web Toolkit, we covered the advantages and features of GWT. As a quick refresher, this toolkit enables the conversion of Java source code into JavaScript, allowing for a smooth integration of Java and JavaScript libraries. We emphasized the remarkable optimization of the JavaScript code generated by GWT.
This article aims to delve a bit deeper and provide a practical demonstration of the GWT Toolkit. We’ll illustrate how GWT can be leveraged to develop a unique application: a real-time augmented reality (AR) web application that runs entirely in JavaScript within the browser.
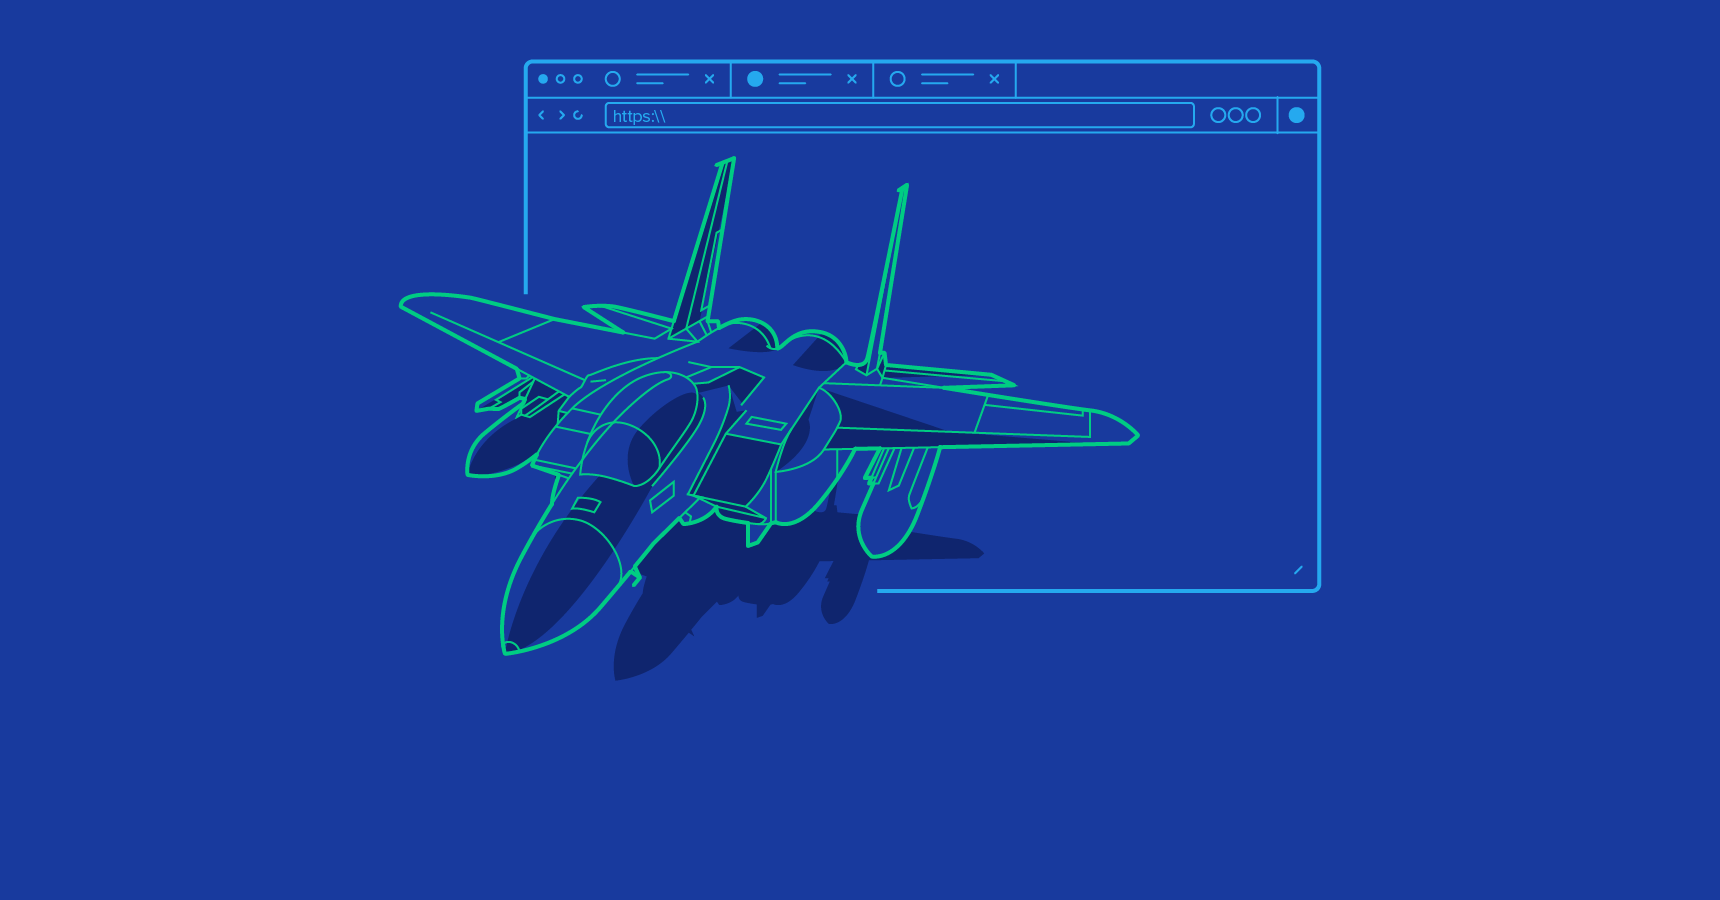
This article will concentrate on how GWT facilitates effortless interaction with various JavaScript APIs, including WebRTC and WebGL. Moreover, we’ll showcase how it allows us to utilize a comprehensive Java library, NyARToolkit, which was never designed for browser-based applications. I’ll explain how GWT empowered my team at Jooink to combine these components and create Picshare - our experimental marker-based AR application that you can test in your browser right now.
Instead of providing a detailed walkthrough of the application’s development process, this article will highlight how GWT helps overcome seemingly daunting challenges with remarkable ease.
From Reality to Augmented Reality: An Overview of the Project

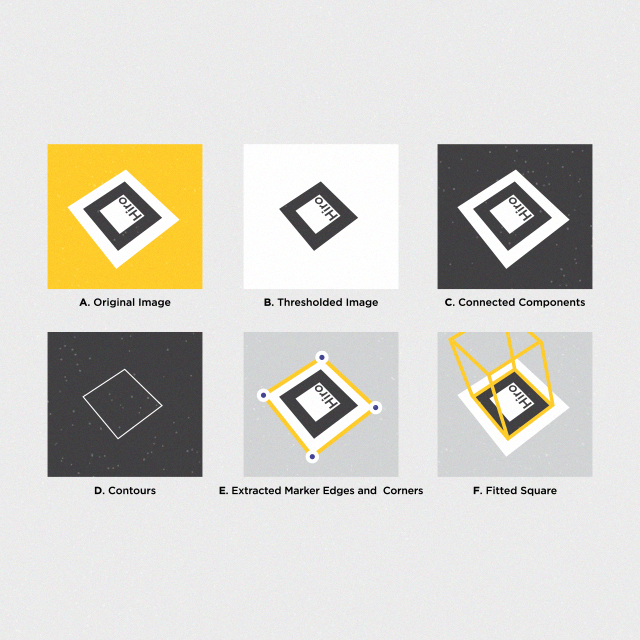
Picshare utilizes marker-based augmented reality. This type of AR application scans the environment for a marker - a distinct and easily identifiable geometric pattern, like this. This marker provides crucial information about the marked object’s location and orientation. Using this information, the software overlays additional 3D elements onto the image, creating a realistic augmented view. The fundamental steps involved are:
- Accessing the Camera: In traditional desktop applications, the operating system grants I/O access to a significant portion of the device’s hardware. However, web applications operate differently. Browsers were initially designed as secure environments (or “sandboxes”) for running JavaScript code downloaded from the internet. Direct interaction with most device hardware was not part of their initial scope. WebRTC transcends this limitation by utilizing HTML5’s media capture capabilities. This enables the browser to access various hardware components, including the device camera and its stream.
- Analyzing the Video Stream: Once we have the video stream, the next step is to analyze it. Each frame needs to be examined to detect markers and determine their positions within the reconstructed 3D environment. This intricate task is handled by NyARToolkit.
- Augmenting the Video: The final step involves enhancing the original video with superimposed synthetic 3D objects. For rendering this final augmented scene onto the webpage, we employ WebGL.
Utilizing HTML5’s APIs with GWT
JavaScript APIs like WebGL and WebRTC open up possibilities for innovative and unconventional interactions between the browser and the user.
For instance, WebGL enables hardware-accelerated graphics rendering. When combined with the capabilities of the typed array specification, it empowers the JavaScript engine to perform computationally intensive tasks with near-native performance. Similarly, WebRTC allows the browser to directly access video (and other data) streams from the computer’s hardware.
Both WebGL and WebRTC are JavaScript libraries that need to be integrated into the web browser. A majority of modern HTML5 browsers offer at least partial support for these APIs (as evident here and here)). However, the question arises: how do we harness these tools within the Java-based GWT framework? Fortunately, [discussed in the previous post, GWT’s interoperability layer, JsInterop (officially released in GWT 2.8) simplifies this process significantly.
Integrating JsInterop in GWT 2.8 is remarkably straightforward. It involves adding -generateJsInteropExports as an argument to the compiler. The necessary annotations are defined within the jsinterop.annotations package, which is included in gwt-user.jar.
WebRTC
Let’s illustrate with an example. Using WebRTC’s getUserMedia function in Chrome with GWT requires minimal coding effort. It can be achieved by simply writing:
| |
The Navigator class can be defined as:
| |
Noteworthy here is the definition of the SuccessCallback and ErrorCallback interfaces. Both are implemented using lambda expressions in the previous code snippet and are defined in Java using the @JsFunction annotation:
| |
Finally, the URL class definition closely resembles that of Navigator, and similarly, the Configs class can be defined as:
| |
The actual execution of these functionalities occurs within the browser’s JavaScript engine.
The code for this example can be found on GitHub here.
For simplicity, this example uses the deprecated navigator.getUserMedia() API because it’s the only option that functions seamlessly without polyfilling in the current stable release of Chrome. In a production environment, adapter.js would be a more suitable choice for accessing the stream. It utilizes the newer navigator.mediaDevices.getUserMedia() API, ensuring consistent behavior across different browsers. However, exploring this aspect further is beyond the scope of this article.
WebGL
Using WebGL from GWT is quite similar to using WebRTC, but the inherent complexity of the OpenGL standard makes it slightly more involved.
We adopt an approach similar to the one described in the previous section. The outcome of this wrapping process is evident in the GWT WebGL implementation used in Picshare. You can find this implementation here and an example of GWT-generated output here.
It’s important to understand that simply enabling WebGL doesn’t automatically equip us with 3D graphics capabilities. As As Gregg Tavares writes points out:
Contrary to common perception, WebGL is fundamentally a 2D API, not a 3D one.
The responsibility of handling 3D calculations falls on other parts of the code. These calculations are then translated into a 2D representation for WebGL to render. Several excellent GWT libraries are available for working with 3D graphics in WebGL. Personally, I favor Parallax. However, for the initial version of Picshare, we opted for a more hands-on approach. We developed a lightweight library designed for rendering basic 3D meshes. This library enables us to define a perspective camera and manage a scene populated with objects. Feel free to explore it further here.
Integrating Third-Party Java Libraries with GWT: The Case of NyARToolkit
NyARToolkit is a pure-Java implementation of ARToolKit. It serves as a software library for developing augmented reality applications and was created by Japanese developers at Nyatla. While the original ARToolKit and its Nyatla counterpart have evolved along different paths since the initial port, NyARToolkit remains actively maintained and improved.
Marker-based AR is a specialized domain that demands proficiency in computer vision, digital image processing, and mathematics. The following examples illustrate this:
Reproduced from ARToolKit documentation.

Reproduced from ARToolKit documentation.
Although the algorithms employed by the toolkit are well-documented and understood, rewriting them from scratch is a time-consuming and error-prone endeavor. Therefore, leveraging an existing and proven toolkit like ARToolKit is the preferred approach. However, finding such a toolkit specifically designed for web development poses a challenge. Most sophisticated and advanced toolkits lack JavaScript implementations. JavaScript’s primary use case has traditionally revolved around manipulating HTML documents and data. This is where GWT demonstrates its exceptional value. It empowers us to effortlessly transpile NyARToolkit into JavaScript, making it readily usable in web applications with minimal friction.
Compiling with GWT
Given that a GWT project is fundamentally a Java project, integrating NyARToolkit is as straightforward as importing its source files into your project’s source path. However, it’s crucial to remember that GWT’s code transpilation from Java to JavaScript happens at the source code level. Consequently, you’ll need the NyARToolkit source files rather than just a JAR file containing the compiled classes.
The library utilized by Picshare can be found here. Its dependencies are limited to packages located within lib/src and lib/src.markersystem from the NyARToolkit build, archived here. These packages need to be copied and imported into our GWT project.
While it’s good practice to maintain separation between these third-party packages and our own implementation, “GWT-izing” NyARToolkit requires us to create an XML configuration file. This file guides the GWT compiler, specifying where to locate the source files. Within the jp.nyatla.nyartoolkit package, we introduce a file named NyARToolkit.gwt.xml:
| |
Next, within our main package, com.jooink.gwt.nyartoolkit, we create the primary configuration file, GWT_NyARToolKit.gwt.xml. This file instructs the compiler to include Nyatla’s source files in the classpath by inheriting from its XML file:
| |
Remarkably simple, isn’t it? In most scenarios, this would suffice. However, our journey isn’t quite over yet. If we attempt to compile or run the project through Super Dev Mode at this juncture, we encounter an unexpected error:
| |
This error arises because NyARToolkit (being a Java library designed for standard Java projects) utilizes classes from the Java Runtime Environment (JRE) that are not supported by GWT’s Emulated JRE](https://developers.google.com/web-toolkit/doc/latest/RefJreEmulation). We [touched upon this briefly in the previous post.
The root cause, in this instance, lies with the InputStream class and other related IO classes. In our specific case, we don’t even require most of these classes. Nevertheless, we need to provide some form of implementation to satisfy the compiler. While we could embark on a tedious manual process of removing these references from the NyARToolkit source code, GWT offers a more elegant solution: the <super-source> XML tag. It allows us to supply our own implementations for the unsupported classes.
Leveraging <super-source>
As elucidated in the official documentation:
The
<super-source>tag serves as a directive to the compiler, prompting it to re-root a source path. This proves particularly beneficial when there’s a need to reuse an existing Java API within a GWT project, but the original source code is either inaccessible or not suitable for transpilation. This situation commonly arises when attempting to emulate portions of the JRE that are not implemented in GWT.
In essence, <super-source> is precisely what we need.
Within the GWT project, we can create a directory named jre. This directory will house our custom implementations for the problematic classes:
| |
Except for java.lang.reflect.Array, the rest of these classes are actually unused in our context. Consequently, we only need to provide rudimentary implementations. For instance, our simplified FileInputStream implementation would look like this:
| |
The Window.alert statement within the constructor serves as a helpful debugging aid during development. While it’s essential to ensure the class compiles without errors, we want to prevent its accidental usage. This alert mechanism will notify us if the class is inadvertently invoked.
Unlike the others, the java.lang.reflect.Array class is actively used in our required code. Therefore, we need to provide a somewhat more functional implementation. This is what our code looks like:
| |
Finally, by adding <super-source path="jre"/> within the GWT_NyARToolkit.gwt.xml module file, we can confidently compile and utilize NyARToolkit in our project!
Bringing It All Together with GWT
With all the necessary components in place, let’s recap:
- We have WebRTC, enabling us to capture a stream from the webcam and render it within a
<video>tag. - We have WebGL, providing the ability to manipulate hardware-accelerated graphics within an HTML
<canvas>. - We have NyARToolkit, a Java library capable of analyzing an image (represented as an array of pixels), detecting markers within it, and if found, providing a transformation matrix that precisely defines the marker’s position in 3D space.
The remaining challenge lies in seamlessly integrating these technologies.

Delving into the intricacies of this integration process is beyond the scope of this article. In essence, the core idea involves utilizing the video imagery as the backdrop for our scene. This is akin to applying a texture to the “far” plane in the aforementioned illustration. Simultaneously, we construct a 3D data structure that enables us to project this image into 3D space using the transformation matrix provided by NyARToolkit.
This construction provides us with the appropriate framework to interface with NyARToolkit’s marker recognition capabilities. It also allows us to render the 3D model precisely over the marker, within the live video stream, achieving a convincing augmentation effect.
However, there are subtleties involved in utilizing the camera stream. Video data can only be drawn onto a <video> element, which, by default, is opaque. We cannot directly extract image data from it. To overcome this, we employ an indirect approach:
- Copy the video content onto an intermediate
<canvas>element. - Extract the image data from the
<canvas>. - Transform this data into an array of pixels.
- Finally, feed this pixel array into NyARToolkit’s
Sensor.update()method.
With this pixel data, NyARToolkit can perform its magic. It identifies the marker in the image and returns a transformation matrix that corresponds to the marker’s position within our defined 3D space. This enables us to superimpose a synthetic object precisely over the real-world marker, creating a convincing illusion of the object existing in the 3D scene captured by the camera! GWT’s impressive performance ensures that we have ample computational resources to spare. We can even apply video effects like sepia or blur to the canvas before using it as the background for our WebGL scene.
The following condensed code snippet illustrates the essence of this process:
| |
By employing this technique, we can achieve results like these:
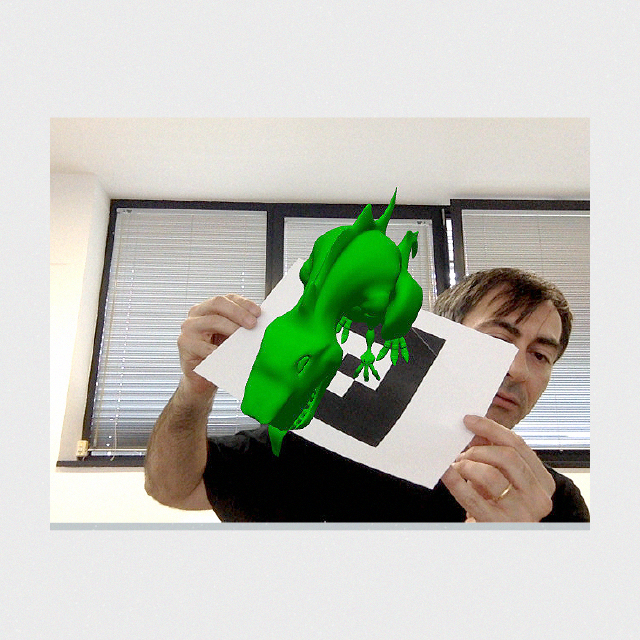
This process formed the foundation for our Picshare application. You’re invited to try it out! print out a marker or display it on your mobile to experience the magic of marker-based AR directly in your browser. Enjoy!
Concluding Thoughts
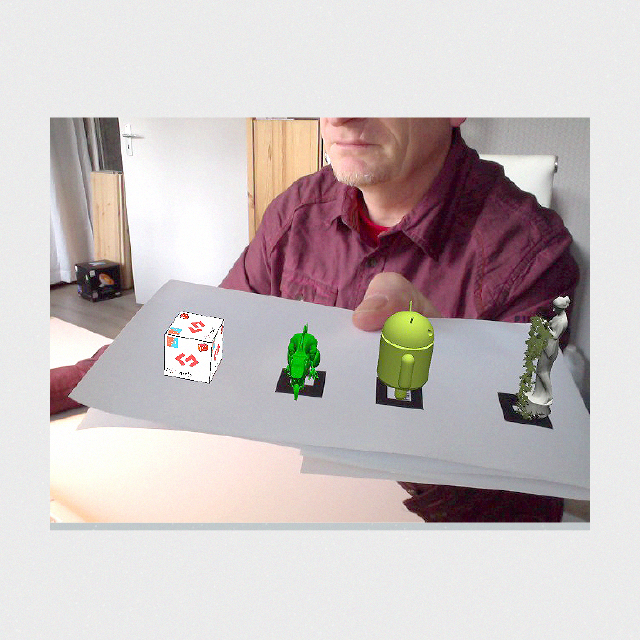
Picshare represents an ongoing and evolving project for us at Jooink. Its initial implementation dates back several years, and even then, its speed was notably impressive. Take a look at one of our earlier experiments, hosted this link. It was compiled back in 2012 and has remained untouched since then. Observe that only one <video> element is present in the sample. The other two windows are, in fact, <canvas> elements displaying the processed output.
Even in 2012, GWT proved to be a remarkably capable framework. The release of GWT 2.8 introduced a significantly enhanced interoperability layer through JsInterop, further boosting performance. To the delight of many developers, including myself, it also brought a vastly improved development and debugging environment in the form of Super Dev Mode. And let’s not forget the welcome addition of Java 8 support.
We eagerly anticipate the arrival of GWT 3.0!