There’s a surge of interest in Flutter right now, and it’s about time! This open-source SDK from Google is incredibly versatile, working seamlessly with https://trends.google.com/trends/explore?date=today%205-y&q=%2Fg%2F11f03_rzbg,%2Fg%2F11h03gfxy9,%2Fm%2F0gtv959,Cordova,%2Fg%2F1q6l_n0n0)—and. What’s even better is that you only need a single codebase to support all these platforms. Unit testing plays a crucial role in building robust and reliable Flutter apps. By catching errors early on, it helps improve the code quality before the app is even put together.
This Flutter testing tutorial is your guide to optimizing your unit testing workflow. We’ll start with a basic Flutter unit test example and then dive into more intricate test cases and libraries.
How Unit Testing Works in Flutter
Unit testing in Flutter follows a similar pattern to other tech stacks:
- Analyze the code.
- Set up data mocking.
- Define the test group(s).
- Outline test function signatures for each test group.
- Write the tests.
To illustrate the process of running Flutter tests, I’ve created a sample Flutter project](https://github.com/dacianf/flutter_rxdart_state_management) that you’re welcome to use. This project focuses on [test the code at your leisure. The project uses an external API and allows filtering by country.
Here’s a peek into Flutter’s inner workings: When a project is created, Flutter automatically loads the flutter_test library to facilitate testing. This library allows Flutter to read, run, and analyze your unit tests. It also automatically creates a test folder for storing your tests. It’s vital not to rename or move this folder, as it would disrupt the testing functionality. Similarly, always use the _test.dart suffix in your test file names, as Flutter uses this to identify test files.
Structuring Your Test Directory
To streamline unit testing in our project, we’ve adopted MVVM with clean architecture and dependency injection (DI)](https://stackify.com/dependency-injection/), as reflected in our source code subfolders. Using both [MVVM and DI ensures that:
- Each class in the project has a single, well-defined purpose.
- Each function within a class operates solely within its intended scope.
We’ll organize our test files in a way that mirrors our source code structure within the test folder. This means that tests for Model classes will go into a folder named model, much like how you would organize your belongings.

This structured approach enhances project transparency and allows the team to easily identify which parts of the code have corresponding tests.
Now, let’s put unit testing into practice.
A Simple Flutter Unit Test Example
Starting with the model classes in the data layer of our source code, we’ll focus on the ApiUniversityModel model class for this example. This class has two main functions:
- Initializing the model by mimicking a JSON object using a
Map. - Building the
Universitydata model.
We’ll follow our five-step process to test each function:
- Evaluate the code.
- Set up data mocking: We’ll simulate the server response to our API call.
- Define the test groups: One for each function.
- Define test function signatures for each test group.
- Write the tests.
With the code evaluation done, let’s move on to data mocking. For the fromJson function (initializing the model with a Map), we’ll create two Map objects to simulate input data. We’ll also create two corresponding ApiUniversityModel objects to represent the expected output.
To mock the toDomain function (building the University data model), we’ll create two University objects representing the expected outcome after running this function on the previously created ApiUniversityModel objects:
| |
Next, let’s define our test groups and function signatures:
| |
We’ve now defined the signatures for two tests to verify the fromJson function and two more for the toDomain function.
To write the actual tests, we’ll use the expect method from the flutter_test library to compare the function outputs with our expectations:
| |
With all five steps completed, we can run our tests, either from our IDE or the command line.
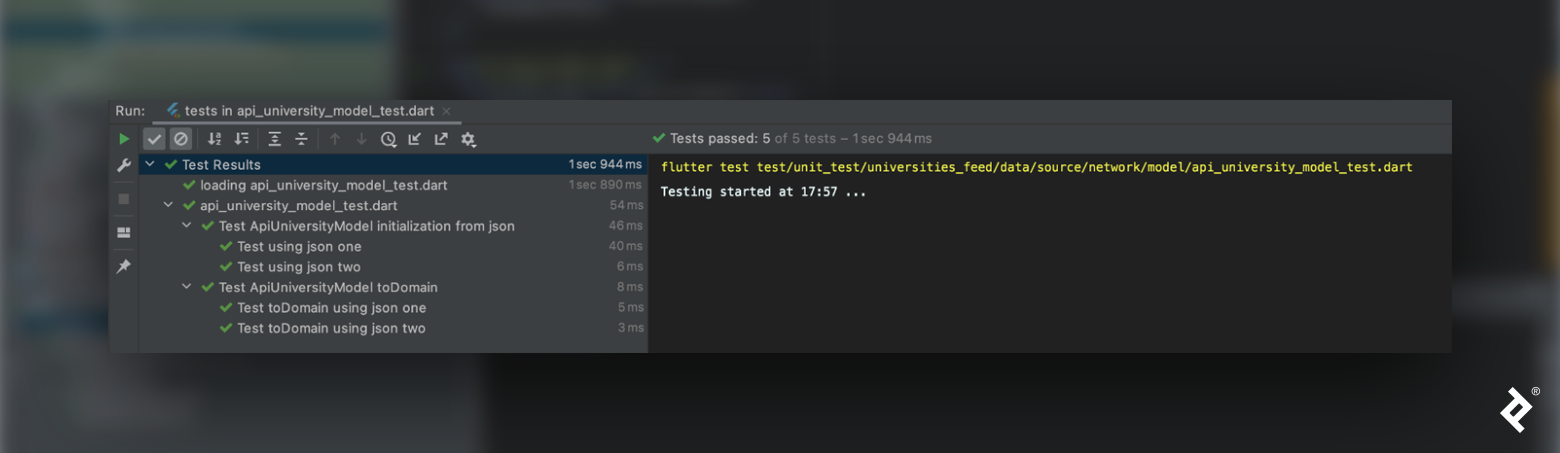
To run all tests within the test folder from a terminal, use the flutter test command. You’ll see that our tests pass.
To run a specific test or test group, use flutter test --plain-name "ReplaceWithName", replacing ReplaceWithName with the name of your test or test group.
Testing an Endpoint in Flutter
Let’s move on to a more engaging Flutter unit test example. This time, we’ll test the endpoint class, which handles:
- Making an API call to the server.
- Converting the API’s JSON response into a different format.
After evaluating the code, we’ll use the setUp method from flutter_test library to initialize the classes within our test group:
| |
For API requests, I prefer using retrofit library, as it automates much of the code generation. To test the UniversityEndpoint class effectively, we’ll manipulate the dio library (used by Retrofit for API calls) to return our desired result. We’ll achieve this by mocking the Dio class’s behavior using a custom response adapter.
Mocking Network Responses With a Custom Interceptor
This mocking is possible because we built the UniversityEndpoint class with DI. (If it directly initialized a Dio class, mocking wouldn’t be possible.)
To mock the Dio class, we need to know which Dio methods the Retrofit library uses. However, we lack direct access to Dio. So, we’ll mock it using a custom network response interceptor:
| |
With our interceptor ready, let’s define our test groups and function signatures.
Since we only need to test the getUniversitiesByCountry function, we’ll create a single test group with tests for three scenarios:
- Does
getUniversitiesByCountryactually call theDioclass’s function? - What happens if our API request returns an error?
- What happens if our API request returns the expected result?
Here’s our test group and function signatures:
| |
For each test case, we’ll create a DioMockResponsesAdapter instance with the appropriate configuration:
| |
Now that we’ve thoroughly tested our endpoint, let’s move on to the UniversityRemoteDataSource data source class. We know that the UniversityEndpoint class is part of the UniversityRemoteDataSource({UniversityEndpoint? universityEndpoint}) constructor. This tells us that UniversityRemoteDataSource relies on UniversityEndpoint, making it the ideal candidate for mocking.
Mocking With Mockito
In the previous example, we manually mocked our Dio client’s request adapter. Now, we’re mocking an entire class. Doing this manually would be tedious. Thankfully, mock libraries can generate mock classes with minimal effort. We’ll be using mockito library, the go-to library for mocking in Flutter.
To use Mockito, add the @GenerateMocks([class_1,class_2,…]) annotation before the test code (above void main() {}). Replace class_1,class_2… with a list of class names.
Next, run Flutter’s flutter pub run build_runner build command. This generates mock class code in the same directory as the test file. The generated file will be named <test_file_name>.mocks.dart, and it will contain mock classes prefixed with Mock (e.g., UniversityEndpoint becomes MockUniversityEndpoint).
Import this newly created file (university_remote_data_source_test.dart.mocks.dart) into your test file (university_remote_data_source_test.dart).
In the setUp function, mock UniversityEndpoint using MockUniversityEndpoint and initialize the UniversityRemoteDataSource class:
| |
With UniversityEndpoint mocked and UniversityRemoteDataSource initialized, let’s define our test groups and function signatures:
| |
Our mocking, test groups, and function signatures are ready. Time to write the tests!
Our first test checks if the getUniversitiesByCountry function calls its counterpart within the UniversityEndpoint class. We start by defining how each class should behave when its functions are called. Since we mocked UniversityEndpoint, we’ll use it with the when( function_that_will_be_called ).then( what_will_be_returned ) structure.
As we’re testing asynchronous functions (returning a Future), we’ll use when(function name).thenAnswer( (_) {modified function result} ) to manipulate the results.
To see if getUniversitiesByCountry calls the UniversityEndpoint function, we’ll use when(...).thenAnswer( (_) {...} ) to mock the getUniversitiesByCountry function within the UniversityEndpoint class:
| |
With our response mocked, we call the data source function and use the verify function to check if the UniversityEndpoint function was called:
| |
Following the same principles, we can write more tests to verify that our function correctly transforms endpoint results into the appropriate data streams:
| |
We’ve covered various Flutter unit tests and mocking approaches. Feel free to experiment with my sample Flutter project for further testing.
Flutter Unit Tests: Enhance Your User Experience
Whether you’re already familiar with unit testing in Flutter or just starting, this article provided insights and techniques to enhance your workflow. We’ve demonstrated how to apply unit testing best practices to your next Flutter project and tackle complex testing scenarios. Now, skipping unit tests might be a thing of the past!
A special thanks to Matija Bečirević and Paul Hoskins from the Toptal Engineering Blog editorial team for reviewing the code samples and technical content in this article.