The speed at which your Magento store loads is crucial. A faster website leads to more sales, making a well-tuned Magento setup vital for your online business’s success.
This guide provides Magento developers with effective methods to optimize their Magento 2 installation, covering:
- Pinpointing issues with third-party modules
- Activating and properly using full-page cache
- Utilizing Varnish instead of files for caching
- Troubleshooting common full-page cache problems
- Switching to Production mode
- Making CSS and JavaScript files smaller
- Enabling Flat tables for faster data retrieval
- Choosing the best hosting plan for your needs
- Optimizing images for web performance
- Scheduling Magento indexer updates
- Implementing GZIP compression
- Integrating Elasticsearch for improved search
- Eliminating unnecessary Ajax calls
- Employing Redis for enhanced cache and session handling
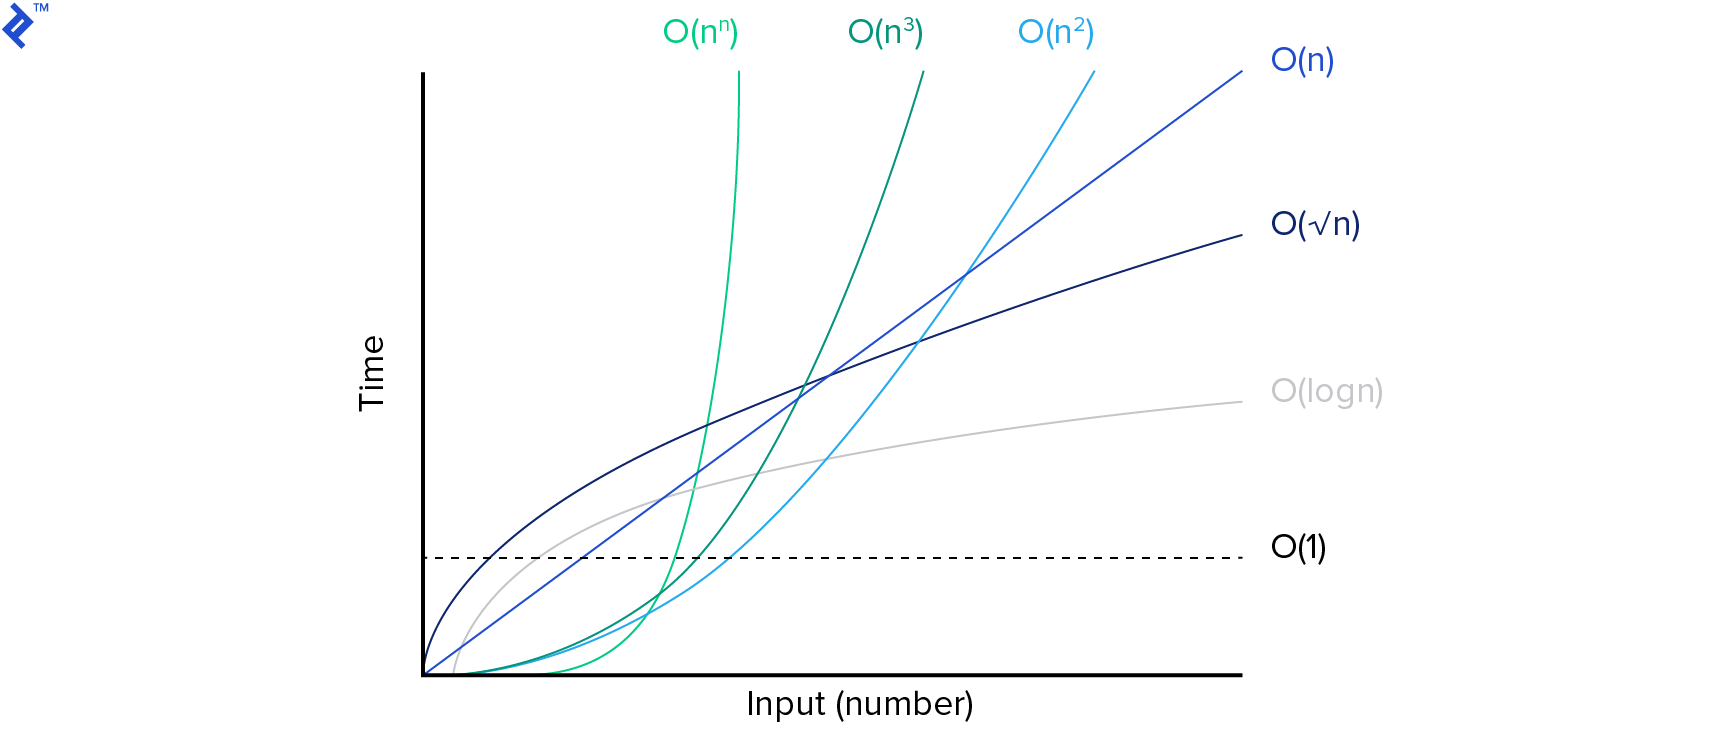
Identifying Bottlenecks in Third-party Modules
Many third-party modules available for Magento might contain poorly written code, use outdated methods, or conflict with the current Magento version. To find resource-intensive requests, utilize a profiler to analyze the number and type of MySQL queries on a page. Identifying redundant queries allows you to combine them, boosting Magento’s speed.
Avoid loading models within loops, a common error among less experienced Magento developers. Instead, load the entire collection with necessary data first, then iterate through it. Always consider the efficiency of your code and strive for optimized algorithms.
Analyze your layout’s loading process to pinpoint the slowest template blocks. Investigate their code and examine the Model CRUD metrics for insights into load calls within loops.
Leveraging Full-page Cache in Magento
Each time a user visits your store, their browser sends a request to the server, which processes it, executes database queries, and sends back the HTML code to display. Full-page cache saves this HTML response, enabling subsequent identical requests to bypass the back-end processing and database queries, leading to significantly faster page loads.
Utilizing full-page cache is a powerful optimization technique that can dramatically improve your Magento store’s speed. It creates cached versions of your pages, delivering them directly to users instead of running queries on every request. However, dynamic pages or sections, such as the shopping cart, are not cached because they contain user-specific information.
Enable Magento full-page cache using the following CLI command:
php bin/magento cache:enable full_page
Activate specific cache types with:
php bin/magento cache:enable
Alternatively, enable cache types from the Magento Admin panel:
- Navigate to System > Tools > Cache Management
- Choose the desired Cache Type
- Select Enable from the Actions dropdown and click Submit

Utilizing Varnish for Full-page Cache Management
When implementing full-page cache, choose Varnish over file-based storage. Magento highly recommends using Varnish (or Redis) in production environments. Compared to the built-in file system or database caching, Varnish offers superior performance and is designed to optimize HTTP traffic.
A detailed guide on how to install and configure Varnish can be found in the official Magento 2 documentation.
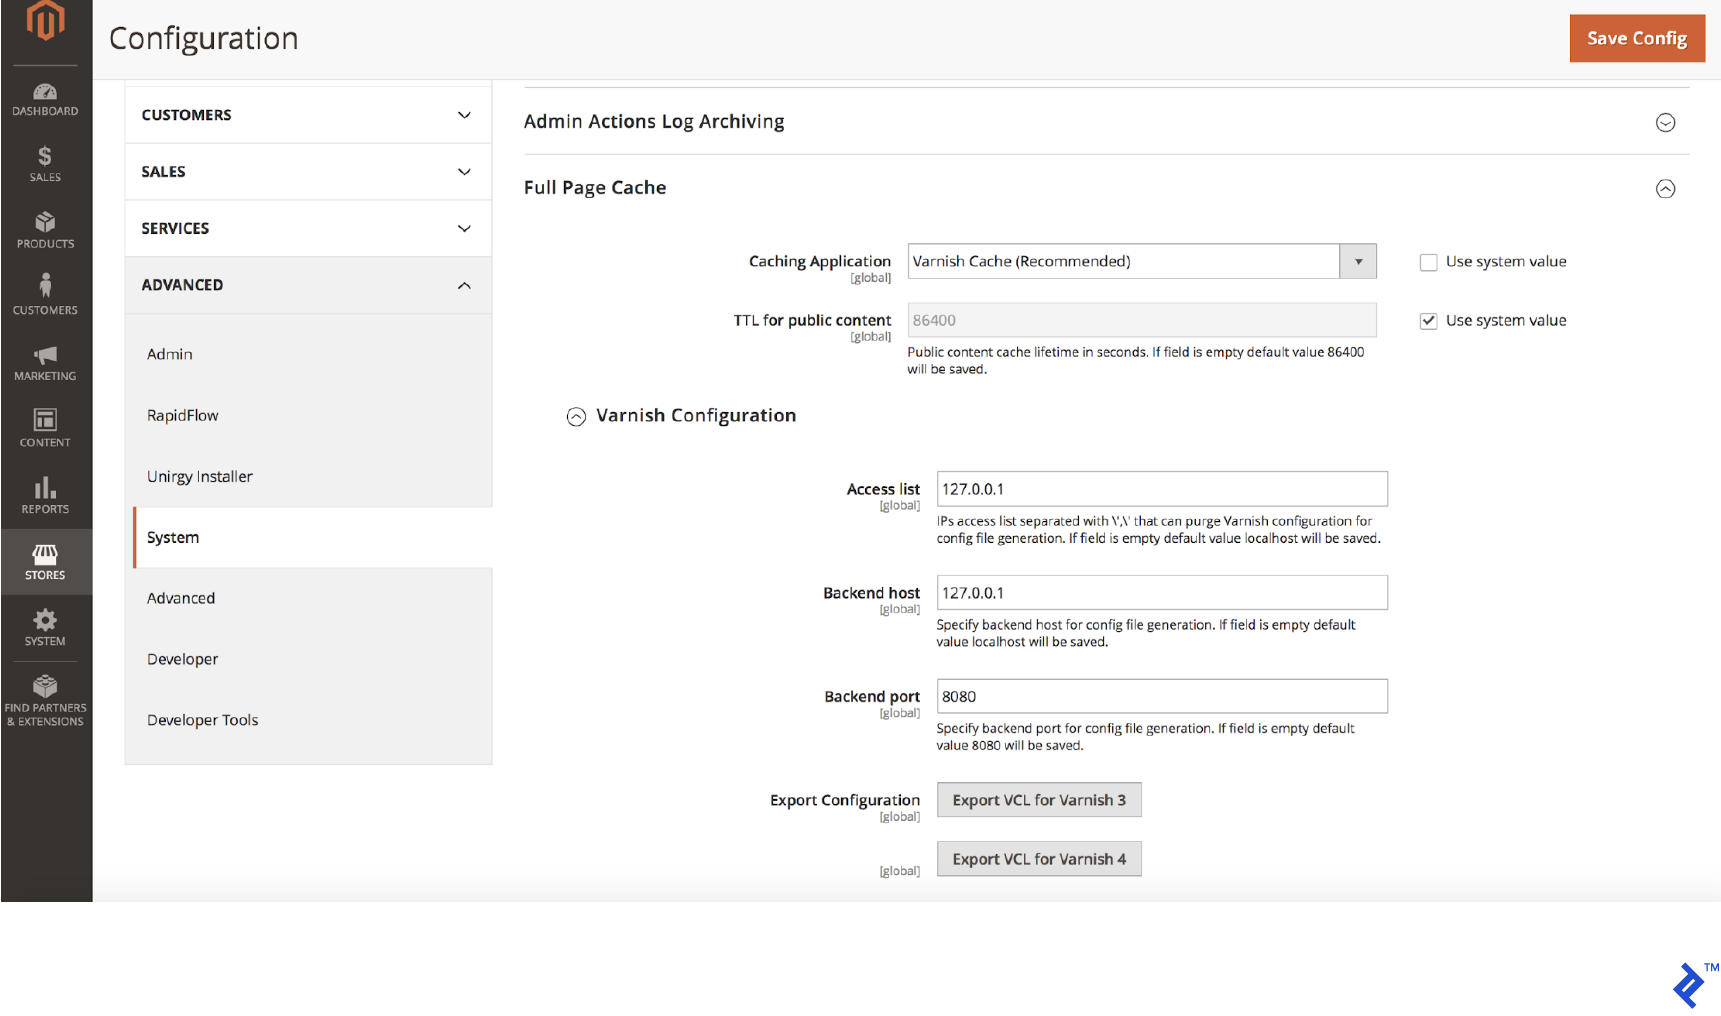
To configure Varnish for your Magento store:
- Access the Magento Admin panel and go to Stores > Configuration > Advanced > System > Full Page Cache
- Choose Varnish Caching from the Caching Application list
- Specify the TTL for public content
- Expand the Varnish Configuration section and enter your Varnish server details
Ensuring Full-page Cache Functionality: Avoiding Common Issues
Magento 2’s full-page cache can be easily disrupted. For instance, avoid using the cacheable="false" attribute in XML layouts to exclude specific blocks from caching. This will disable caching for the entire page, not just the intended block.
To identify potential caching problems, review your layouts for the cacheable="false" attribute and verify on which blocks and pages they are applied.
You can manually test if a page is cached:
- Enable Developer Mode on your local or staging environment
- Clear Magento cache
- Load the desired page in your browser
- Open your browser’s network inspection tool and examine the page headers
- Look for the
X-Magento-Cache-Debugheader. It should displayMISSinitially
Refresh the page; the header should now show HIT, indicating successful caching. If it remains MISS, the cache is not functioning correctly.
Activating Production Mode for Live Deployments
Magento operates in three modes: default, developer, and production.
Production mode is specifically designed for live websites. It conceals errors, serves static files exclusively from cache, and disables cache management from the Magento Admin panel. Automatic code compilation is also disabled in this mode.
Developer mode, used during development, should always be switched to production mode when deploying your store to the live server.
Use the following CLI commands to manage Magento modes:
- Display current mode:
php bin/magento deploy:mode:show - Switch to production mode:
php bin/magento deploy:mode:set production - Switch to developer mode:
php bin/magento deploy:mode:set developer
Detailed information about Magento modes can be found here.
Minifying CSS and JavaScript Files
Minifying CSS and JS files is crucial for optimizing your Magento 2 store’s speed. This process removes unnecessary characters such as spaces, tabs, and newlines, resulting in smaller file sizes that download faster.
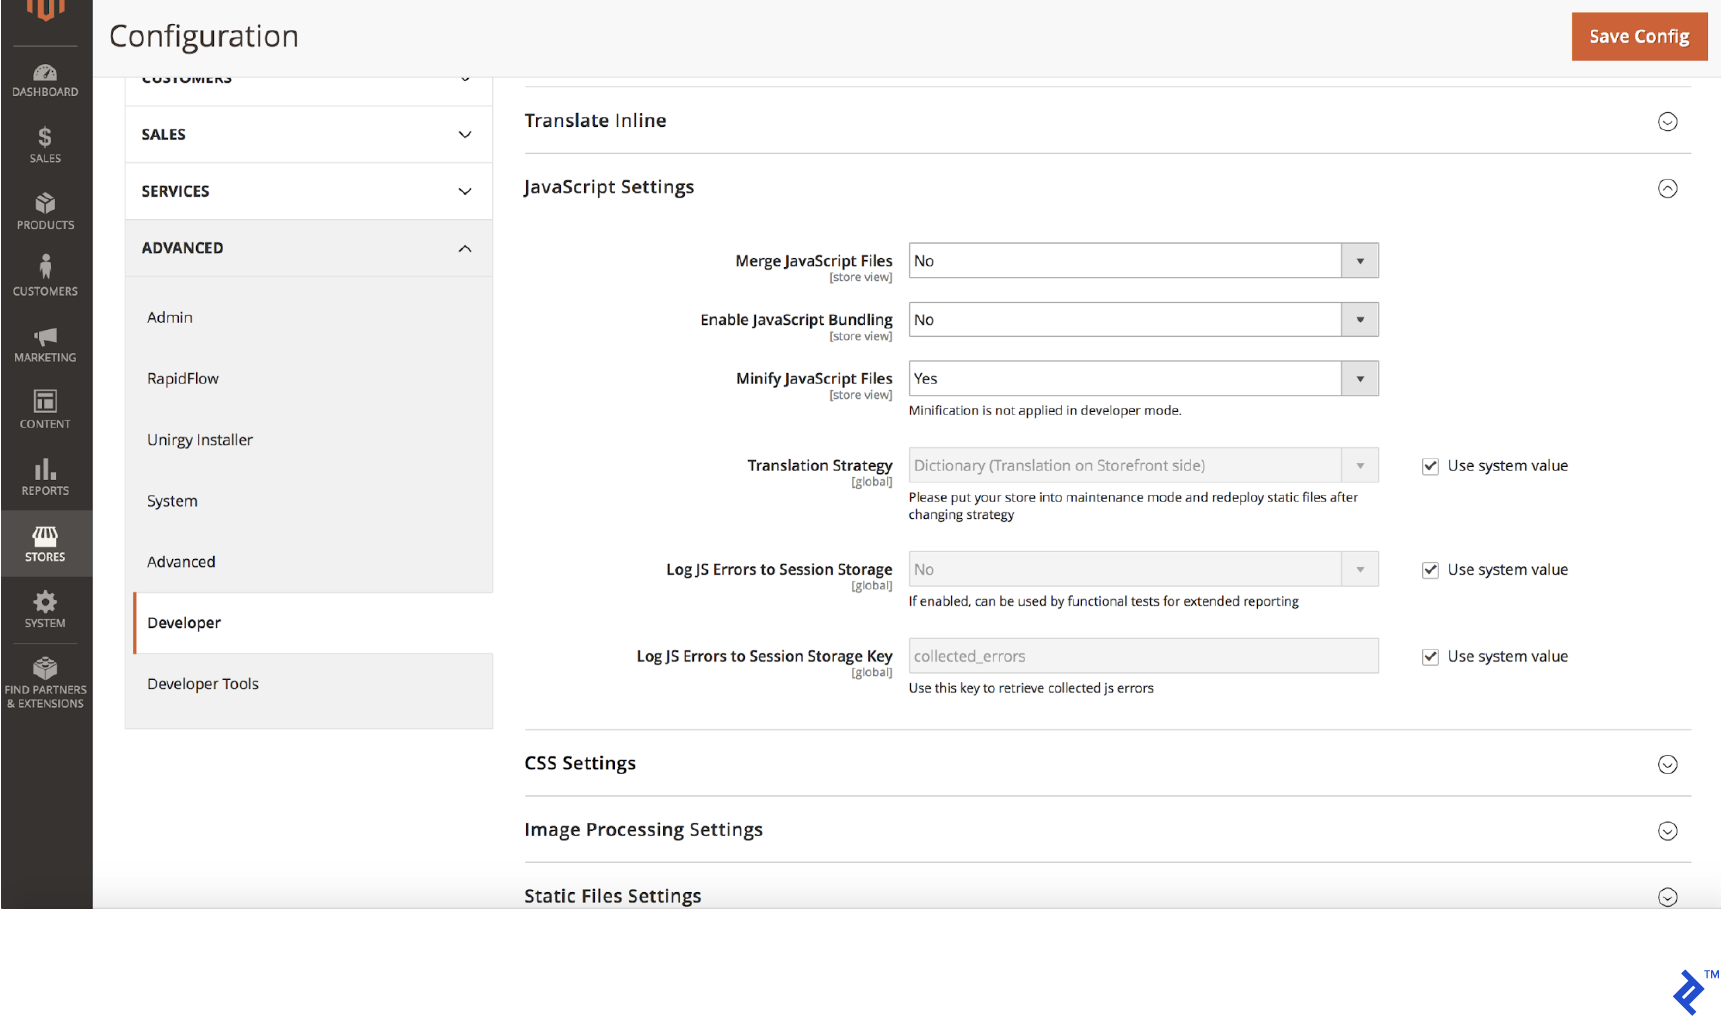
Magento offers built-in minification. To enable JavaScript minification:
- Put Magento in production mode
- Navigate to Stores > Configuration > Advanced > Developer
- Set Minify Javascript Files to Yes
- Save the configuration
- Flush the cache at System > Cache Management
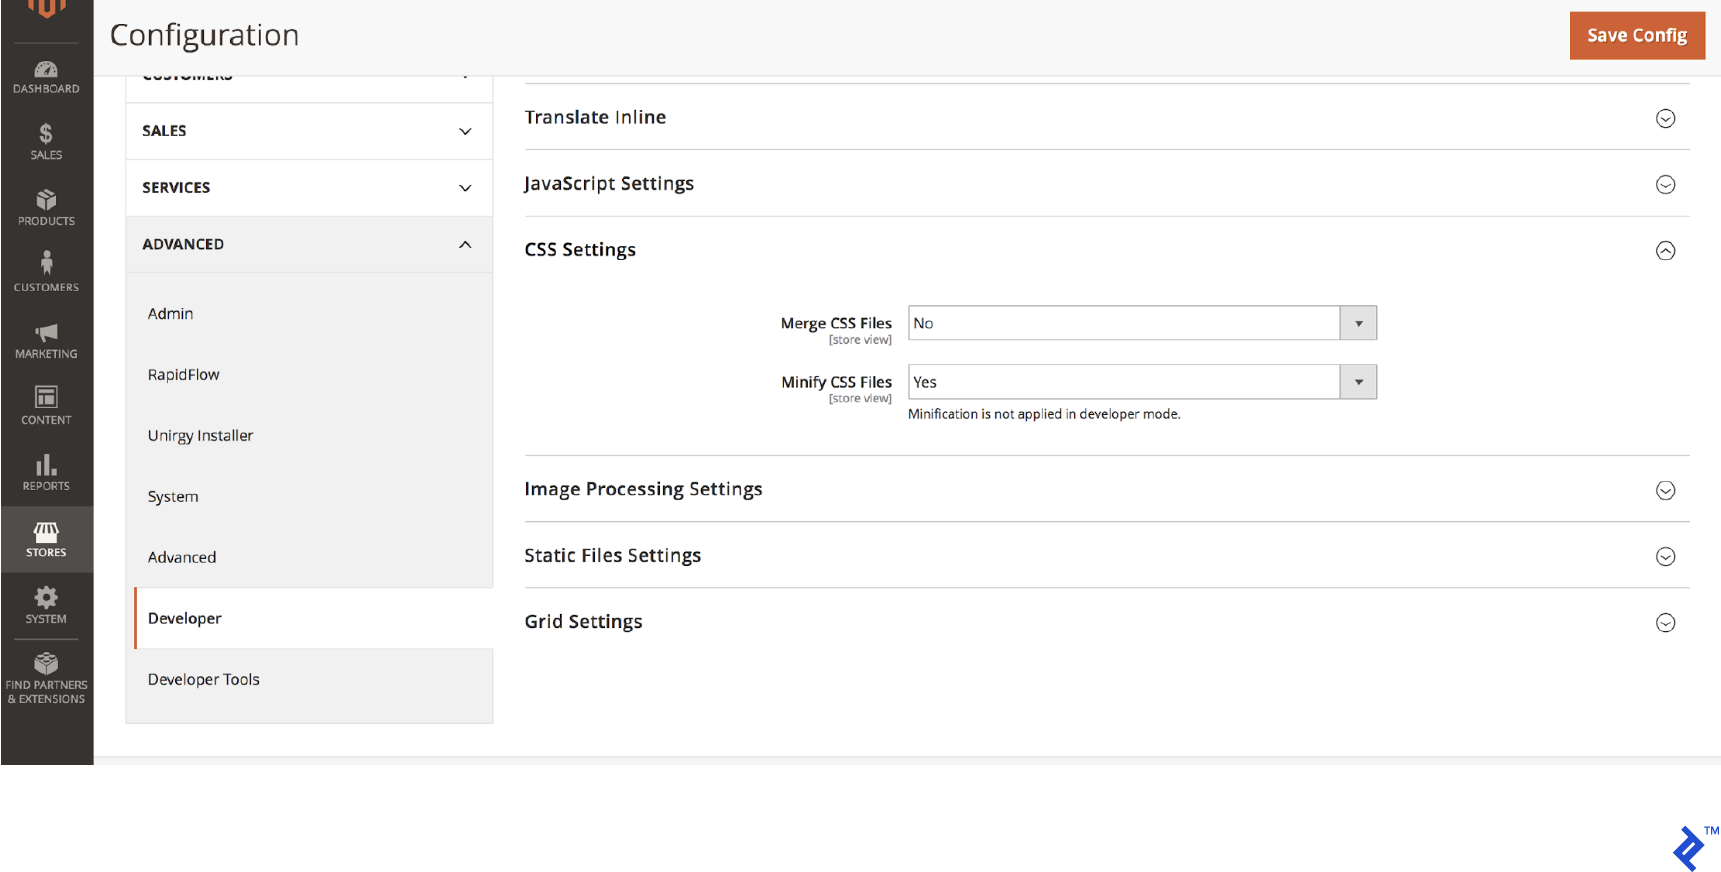
Enable CSS minification by:
- Putting Magento in production mode
- Going to Stores > Configuration > Advanced > Developer > CSS Settings
- Setting Minify CSS Files to Yes
- Saving the configuration
- Flushing the cache at System > Cache Management
Important: Minify JS files individually; do not merge them.
Leveraging Flat Tables for Enhanced Data Retrieval
Magento uses the EAV (entity attribute value) model, storing entity attributes in multiple tables based on their data types. Retrieving this data requires joining multiple tables, which can slow down queries.
To address this, Magento offers the option to utilize flat tables for catalog and product data. These tables combine all attributes of an entity into a single table, simplifying data retrieval and improving query performance.
Enable flat tables in Magento Admin:
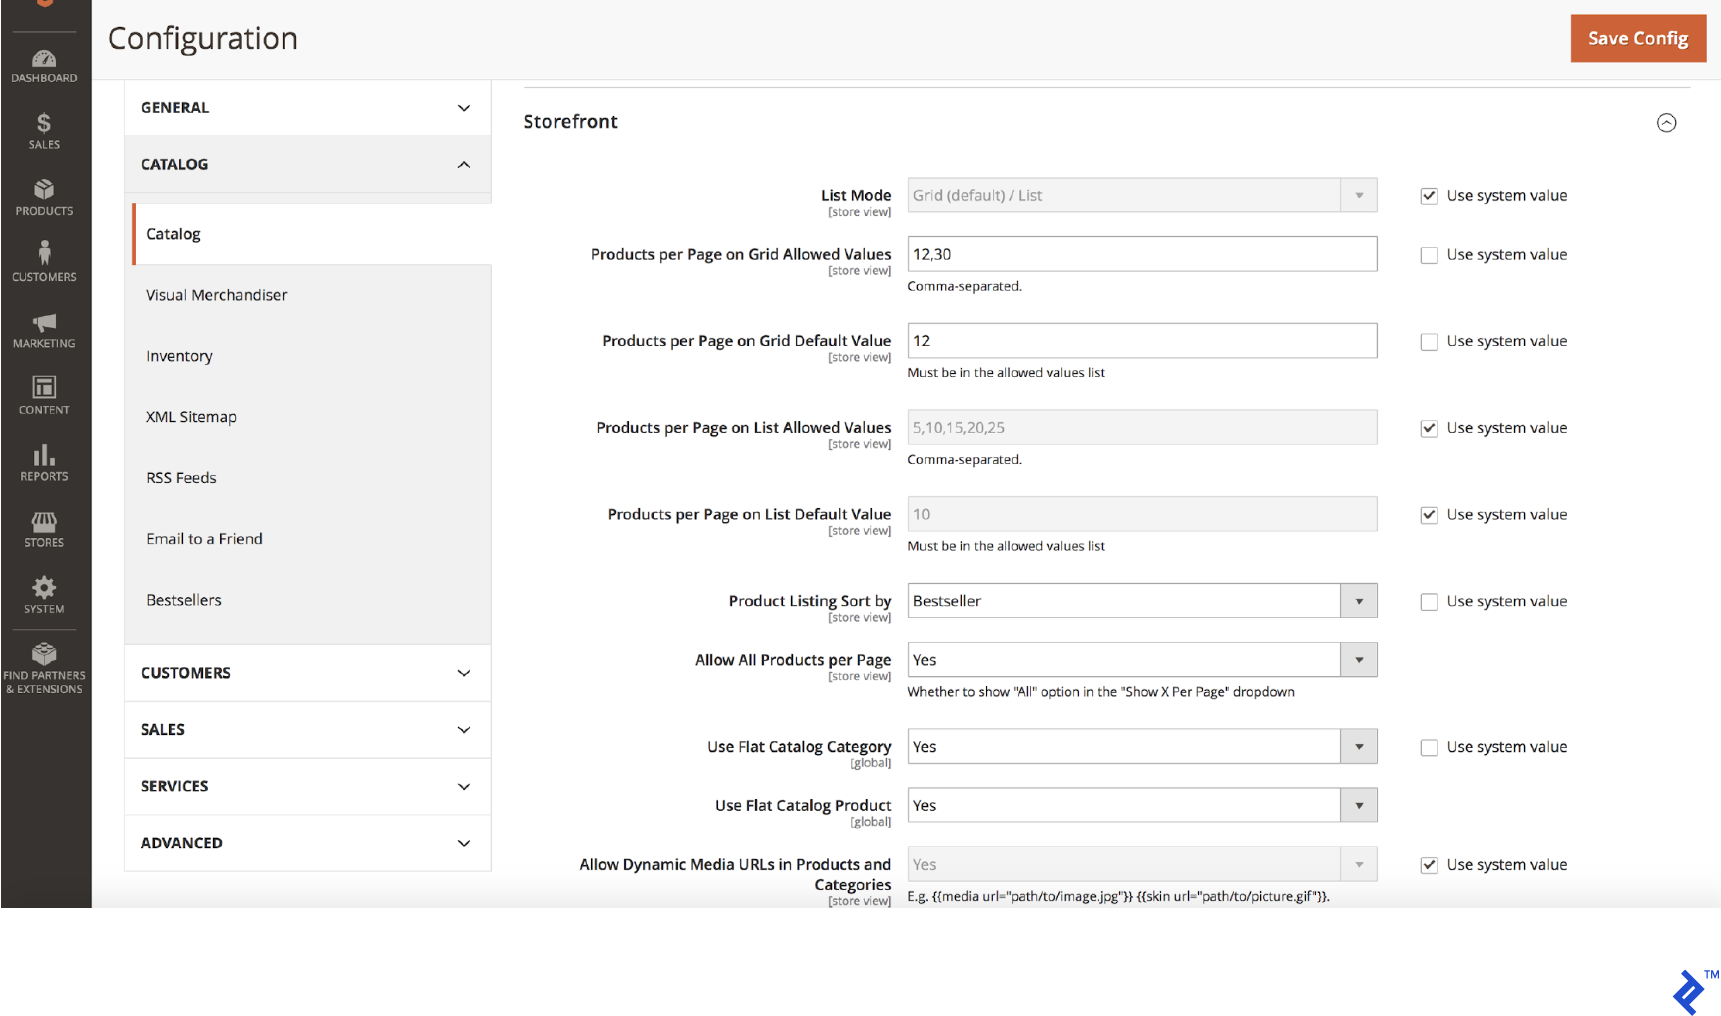
- Go to Stores > Configuration > Catalog > Catalog > Storefront
- Set Use Flat Catalog Category to Yes
- Set Use Flat Catalog Product to Yes
- Save the configuration
Selecting a High-Performance Magento Hosting Solution
Ensure your server meets the minimum system requirements for Magento 2. The official Magento 2.2.x technology stack requirements can be found here.
The hosting environment significantly impacts Magento 2 performance. While dedicated Magento hosting services exist, carefully evaluate their offerings and avoid marketing hype.
Prioritize the fastest hosting solution that aligns with your budget and project requirements.
Optimizing Images for Improved Magento Performance
Image size directly affects website speed. For instance, a catalog page with 20 products, each having a 1MB image, will require downloading 20MB of data, potentially impacting loading times, especially on mobile devices or slow connections.
Ensure your images are appropriately optimized, balancing quality and file size. Avoid resizing images using CSS; instead, resize them beforehand.
Consider implementing lazy loading, which defers image loading until after the main content has loaded or as the user scrolls down the page.
Utilizing AWS or a CDN can significantly accelerate content delivery. Let’s explore the differences between traditional hosting, CDNs, and AWS for image optimization.
Traditional Hosting
This approach involves storing all website content, including images, on a single server. This can lead to increased disk space usage, bandwidth consumption, and server load, potentially creating scalability issues.
Content Delivery Network (CDN)
CDNs offload some of the website’s content, distributing it across multiple servers geographically. This reduces server load, improves performance through faster content delivery, and enhances availability.
Amazon CloudFront
Amazon CloudFront is a highly secure CDN offering both network and application-level protection. To learn how to get started with AWS and deliver content faster, refer to the provided tutorial.
AWS also enables dynamic image resizing based on query parameters. This tutorial provides more information on Resizing Images with Amazon CloudFront and Lambda@Edge.
Scheduling Magento Indexer Updates
Magento indexers can operate in two modes: “Update on Save” and “Update on Schedule.”
In “Update on Save” mode, every product, attribute, or category modification triggers index updates, potentially consuming significant server resources.
It’s recommended to use “Update on Schedule” mode, allowing indexers to run during off-peak hours via cron jobs, minimizing performance impact.
To check the current indexer mode, use the command:
php bin/magento indexer:show-mode
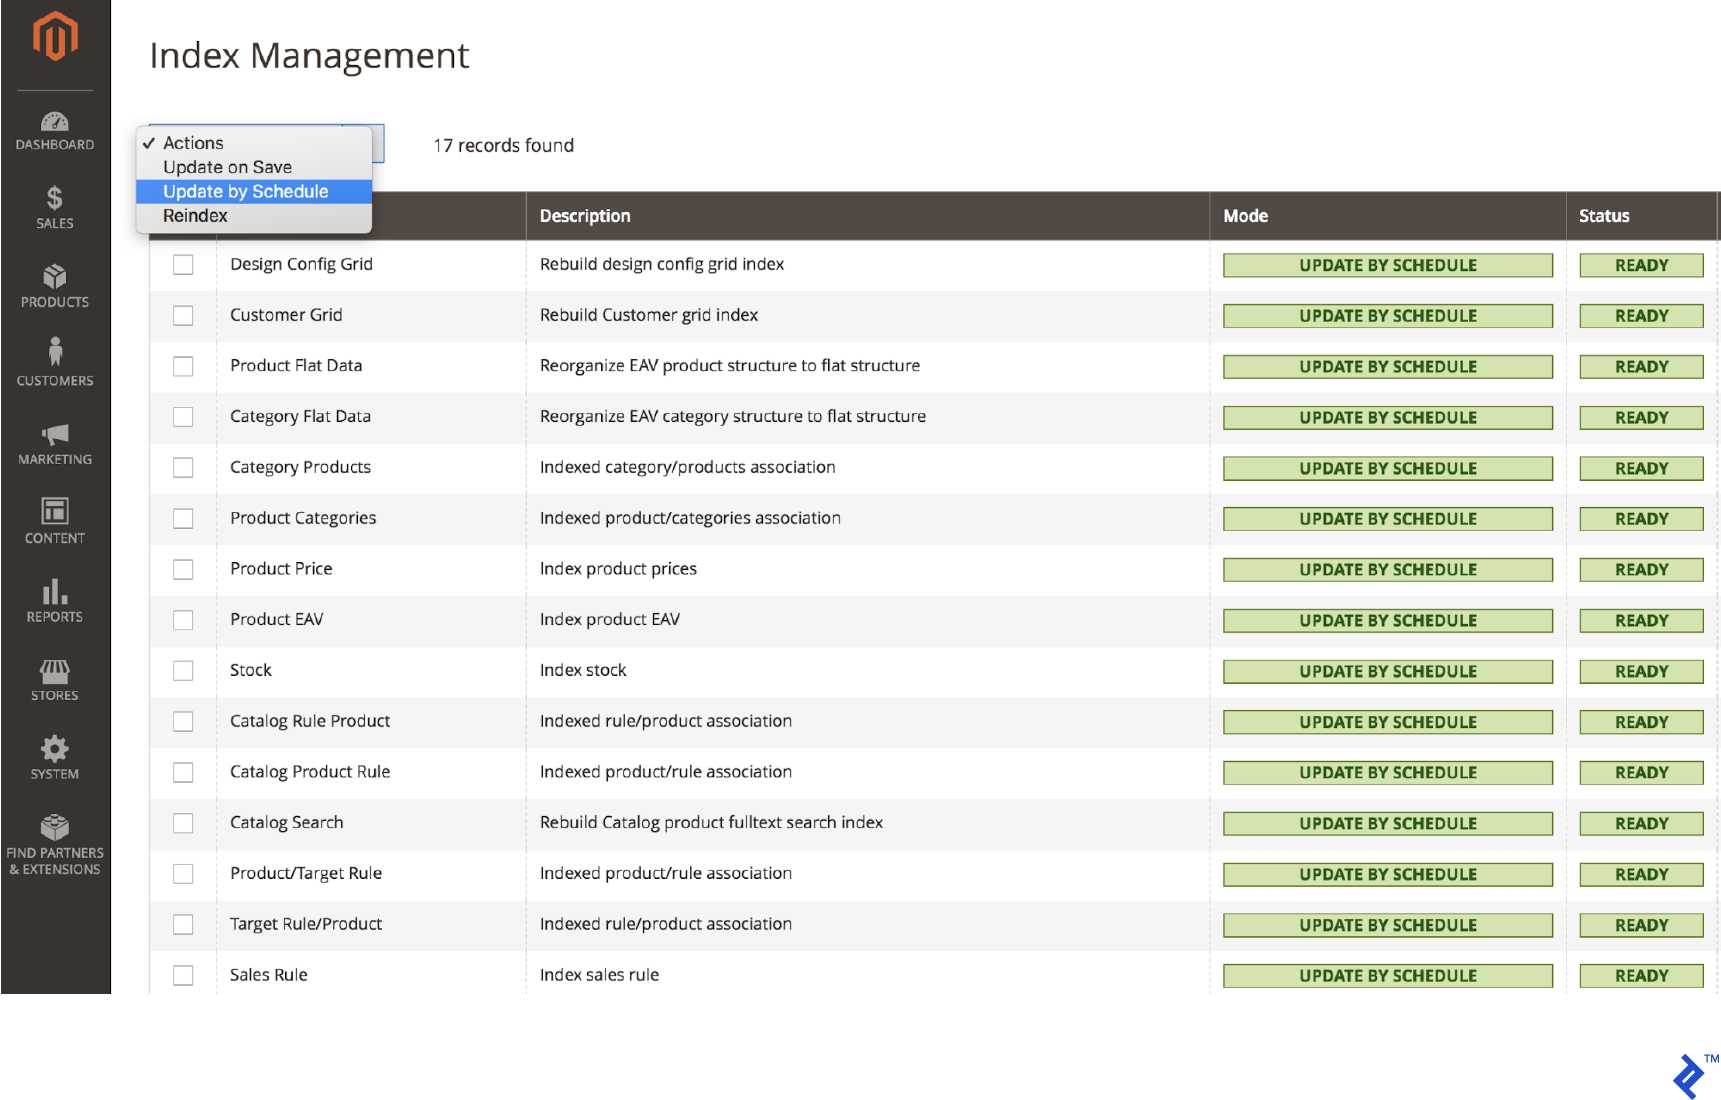
Alternatively, navigate to System > Index Management in Magento Admin.
Change the indexer mode with the following commands:
- “Update on Schedule”:
php bin/magento indexer:set-mode schedule - “Update on Save”:
php bin/magento indexer:set-mode realtime
You can also change the indexer mode in Magento Admin:
- Go to System > Index Management
- Select all indexers
- Choose “Update on Schedule” from the Actions dropdown
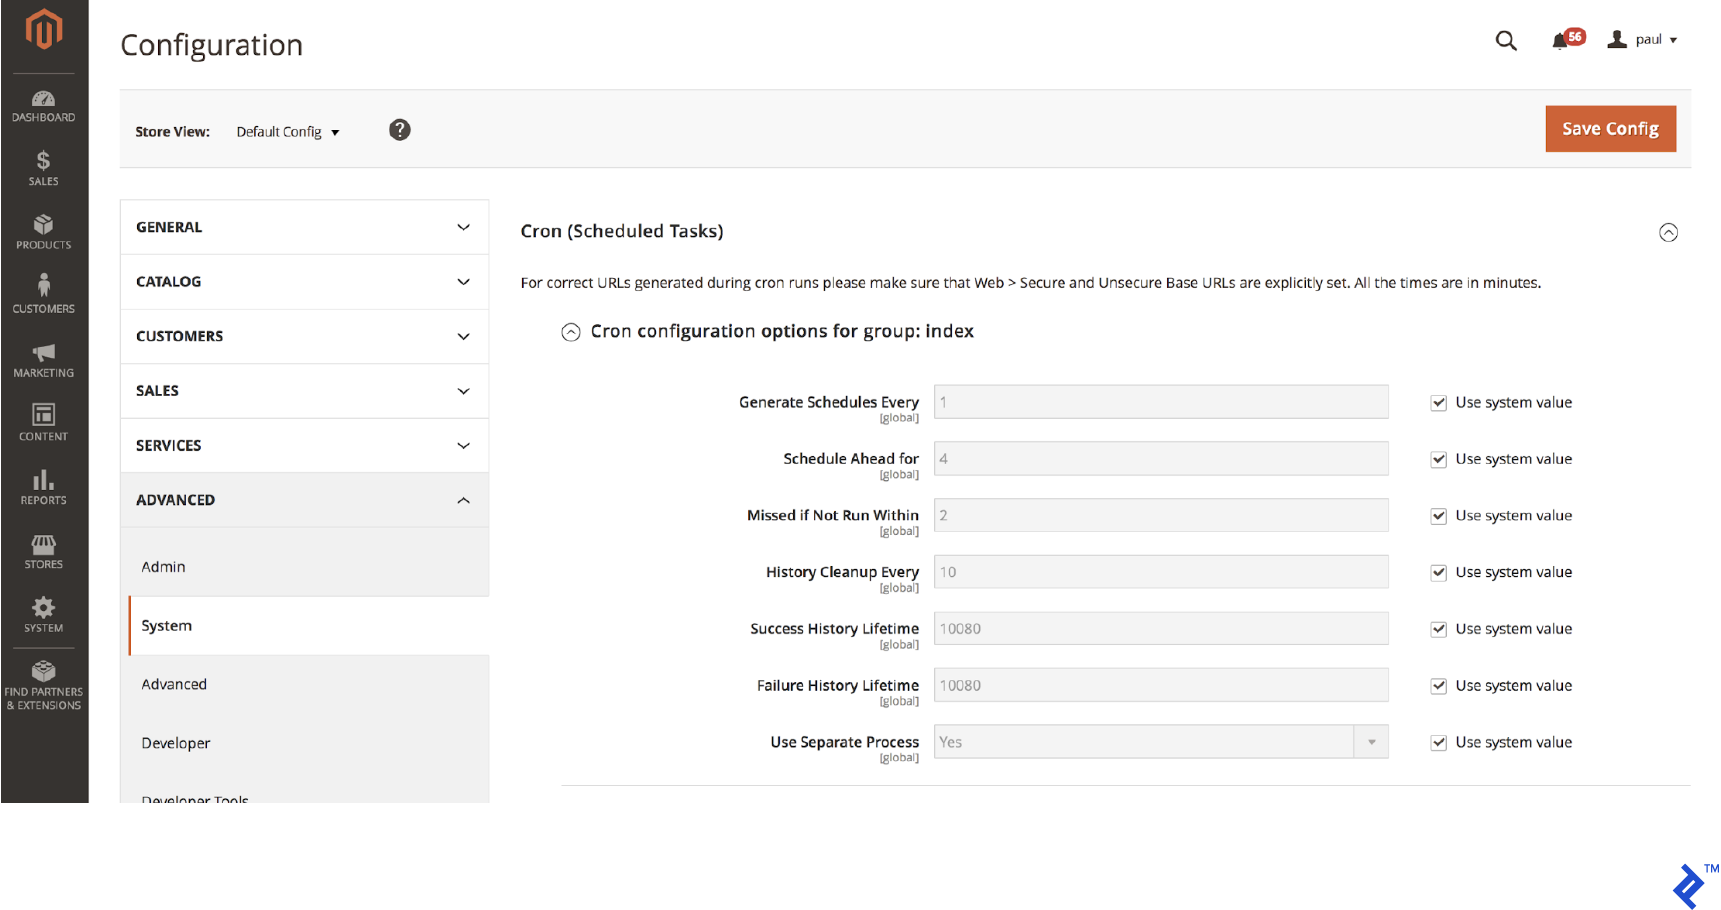
To configure scheduled tasks, go to:
Store > Settings > Configuration > Advanced > System > Cron (Scheduled Tasks)
Expand the “Cron configuration options for group: index” section.
Implementing GZIP Compression
GZIP compression reduces file sizes for faster network transfers. While compressing files adds CPU load, the bandwidth savings often outweigh this cost. GZIP offers compression levels ranging from 1 (fastest but least effective) to 9 (slowest but most effective).
To enable GZIP compression in Apache, uncomment the appropriate lines in your .htaccess file to activate the mod_deflate module, which compresses static resources before sending them to the browser.
| |
Integrating Elasticsearch for Enhanced Search Functionality
Improve your website speed by using Elasticsearch for catalog pages and search results. Set up an Elasticsearch server and connect your Magento store to it, significantly enhancing search speed.
This official guide provides instructions on configuring Magento with Elasticsearch.
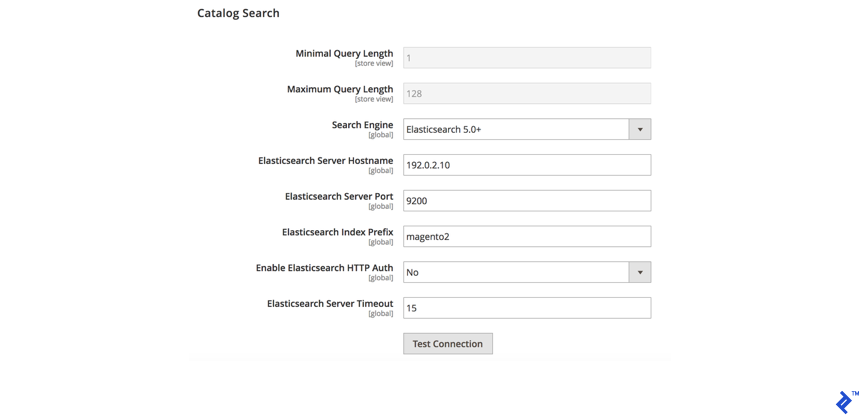
To configure Elasticsearch in Magento Admin:
- Go to Stores > Settings > Configuration > Catalog > Catalog > Catalog Search.
- Choose either Elasticsearch or Elasticsearch 5.0+ (depending on your Magento version) from the Search Engine list.
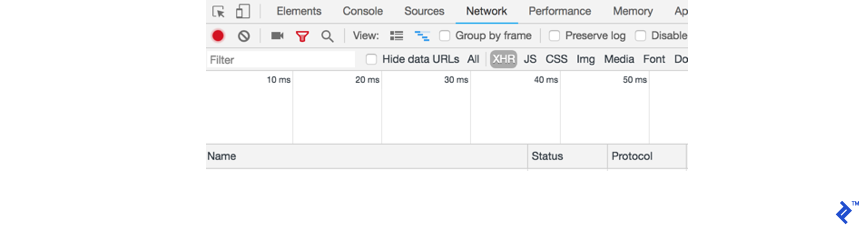
Identifying and Reducing Unnecessary Ajax Calls
Ajax calls after page load can lead to session locks. Analyze your page’s Ajax activity using Chrome DevTools:
- Right-click on the page and select “Inspect” to open DevTools
- Navigate to the “Network” tab
- Filter requests by “XHR” to view all Ajax calls
- Review each Ajax request and determine if it’s essential for the page’s functionality
Using Redis for Page Cache and Session Storage
Redis is an alternative back-end caching solution that can replace Magento 2’s default Zend_Cache_Backend_File.
Benefits of Redis
- Can replace memcached for both page caching and PHP session storage
- Supports data persistence and master/slave replication for high availability
- Efficient tag-based cache invalidation
- Avoids full cache scans for tag operations
Drawback of Redis
- Limited by RAM capacity as it’s an in-memory data store
Configuring Redis for Session Storage
Add the following configuration to your <your Magento install dir>app/etc/env.php file:
| |
For detailed information on the parameters and verifying your Redis installation, refer to here.
Configuring Redis for Page and Default Cache
You can configure Redis for page and default cache by either manually editing the <Magento install dir>app/etc/env.php file or using the command line, which is the recommended method as it includes validation.
For the default cache, run:
php bin/magento setup:config:set --cache-backend=redis --cache-backend-redis-<parameter_name>=<parameter_value>...
Replace <parameter_name> and <parameter_value> with the appropriate Redis configuration parameters.
For the page cache, run:
php bin/magento setup:config:set --page-cache=redis --page-cache-redis-server=redis.example.com --page-cache-redis-db=1
This enables Redis for page caching, sets the Redis server host, and assigns the database number. Detailed information can be found in the Magento DevDocs.
Magento Performance Optimization: Conclusion
We’ve covered various approaches to optimize Magento 2 performance. By identifying and resolving bottlenecks, implementing full-page caching with Varnish, utilizing production mode, minifying files, enabling flat tables, optimizing images, scheduling indexer updates, activating GZIP compression, integrating Elasticsearch, reducing Ajax calls, and employing Redis, you can significantly improve your Magento store’s speed and enhance user experience, ultimately leading to increased conversions and business growth.