When it comes to web application development, the decisions you make regarding language, framework, hosting, and database are crucial and can significantly impact your application’s future.
One pivotal decision is choosing between a service-based application using Service Oriented Architecture (SOA) or a traditional monolithic structure. This architectural choice is common for startups, growing businesses, and large corporations.
Major tech companies like Google, Facebook, Twitter, Instagram, and Uber utilize Service Oriented Architecture. While this pattern seems effective for them, the question remains: is it the right fit for your project?
This article delves into Service Oriented architecture and explores how AWS Lambda, combined with Python, can be used to construct scalable and cost-efficient services. We’ll illustrate these concepts by creating a straightforward image uploading and resizing service using Python, AWS Lambda, Amazon S3, and other relevant tools.
Understanding Service Oriented Architecture
Service Oriented Architecture (SOA) is not a new concept, with origins tracing back several decades. Its popularity has surged recently due to the numerous advantages it offers for web applications.
Essentially, SOA involves deconstructing a large application into smaller, interconnected applications. This aligns with software engineering best practices, such as decoupling, separation of concerns, and single-responsibility architecture.
The level of granularity in SOA implementations varies. Some may have a few services covering broad functionalities, while others adopt a “microservice” architecture with numerous smaller applications. Regardless of the granularity, SOA practitioners agree that it’s not a simple solution. Similar to many beneficial software engineering practices, it demands meticulous planning, development, and testing.
Exploring AWS Lambda
AWS Lambda, a service provided by Amazon Web Services, allows you to upload code that runs on demand within Amazon-managed containers. AWS Lambda takes care of server provisioning and management, leaving you to focus on your code and configuration settings. These managed applications are known as Lambda functions.
AWS Lambda operates in two primary modes:
Asynchronous/Event-driven:
Lambda functions can respond to events asynchronously. This means that event sources like S3 or SNS won’t be blocked, and Lambda functions can capitalize on this for tasks like setting up processing pipelines. Events can be pushed to a Lambda function from the source or polled by AWS Lambda, depending on the source.
Synchronous/Request->Response:
Lambda can operate synchronously for applications requiring a direct response. This mode is typically used with API Gateway to send HTTP responses from AWS Lambda to the end user. Lambda functions can also be called synchronously directly.
AWS Lambda functions are uploaded as zip files containing handler code and dependencies. Once uploaded, AWS Lambda executes this code when necessary and scales the number of servers up or down automatically, without any intervention needed from you.
Lambda Functions: An Evolution in SOA
Basic SOA structures your codebase into smaller applications to achieve the benefits mentioned earlier. This naturally leads to the question of how these applications communicate. Event-driven SOA (SOA 2.0) not only facilitates traditional direct communication between services (SOA 1.0) but also allows for event propagation across the architecture to convey changes.
Event-driven architecture promotes loose coupling and composability. By generating and responding to events, services can be effortlessly added to introduce new features or combined to create richer functionality.
AWS Lambda excels as a platform for building SOA 2.0 applications. The variety of triggers for Lambda functions, from traditional message queues like Amazon SNS to events like file uploads to Amazon S3 or emails sent via Amazon SES, makes it incredibly versatile.
Constructing a Basic Image Uploading Service
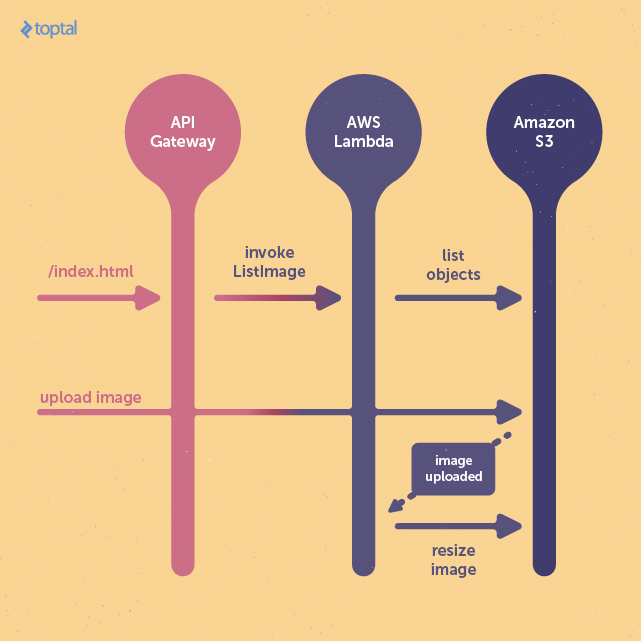
We’ll create a simple application using the AWS stack for image uploading and retrieval. This project consists of two lambda functions: one operating in request-response mode to serve a simple web frontend, and another triggered by file uploads to resize images.
The first lambda function, running asynchronously, will be triggered when an image is uploaded to the S3 bucket designated for storage. It will then resize the image to fit within a 400x400 pixel dimension.
The second lambda function will serve the HTML page, enabling users to view the resized images and providing an interface for uploading new images.
Initial AWS Setup
Before proceeding, we need to configure essential AWS services like IAM and S3 through the AWS web console. However, most of the configuration can also be achieved using the AWS command-line utility, which we will employ later.
Creating S3 Buckets
Amazon S3 (Simple Storage Service) offers dependable and budget-friendly object storage for any data. We’ll use S3 to store both the uploaded images and their resized versions.
In the AWS console, navigate to the S3 service under “Storage & Content Delivery” within the “Services” dropdown. When creating a bucket, you’ll be asked to provide a unique bucket name and select a region. Choosing a region geographically closer to your users helps optimize latency, cost, and address any regulatory concerns. For this example, we’ll choose the “US Standard” region, which we’ll also use for hosting our AWS Lambda functions.
Keep in mind that S3 bucket names must be globally unique. If the chosen name is already taken, you’ll need to select a different one.
For this project, we’ll create two buckets: “test-upload” and “test-resized.” “test-upload” will hold the raw uploaded images before processing and resizing, while “test-resized” will store the final resized images after the original uploads are removed.
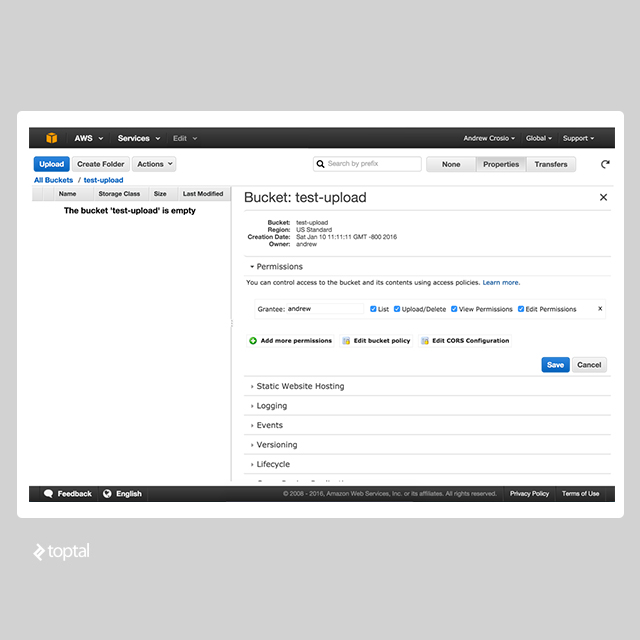
Configuring S3 Upload Permissions
By default, S3 permissions are strict, preventing external and even non-administrative users from accessing or modifying buckets and objects. To change this, we need to log in with an account that has bucket permission management rights.
In the AWS console, select the upload bucket, click on “Properties,” and open the “Permissions” section.
To enable anonymous uploads, we’ll edit the bucket policy using a JSON-based configuration policy, a common approach across AWS in conjunction with the IAM service. Click on “Edit Bucket Policy” and paste the following text to grant public image upload permissions:
| |
Verify the bucket policy by attempting an image upload using the following cURL command:
| |
A successful upload, indicated by a 200-range response, confirms that the upload bucket is correctly configured. We’ll revisit S3 later to connect image upload events to our resizing function.
Setting Up IAM Permissions for Lambda
Lambda functions operate within a permission context defined by an IAM “role.” This role outlines the permissions granted to the Lambda function during its execution. For this project, we’ll create a generic role for both Lambda functions. However, in production, finer-grained permissions are recommended to isolate potential security vulnerabilities.
Within the “Services” dropdown, locate the IAM service under “Security & Identity.” The IAM service is a powerful tool for managing AWS access, but its interface can be initially overwhelming.
On the IAM dashboard, navigate to the “Roles” subsection. Click on “Create New Role” to initiate the role creation wizard. We’ll name our generic permission “lambda_role.”
After specifying the name, you’ll need to select a role type. Choose “AWS Service Roles” and then “AWS Lambda” within the selection box, as we only need S3 access. You’ll be presented with a list of policies to attach to this role. Select “AmazonS3FullAccess” and proceed to confirm the role creation.
Take note of the created role’s name and ARN (Amazon Resource Name), as you’ll need this when creating Lambda functions.
Note: AWS Lambda automatically logs function output to Cloudwatch. For this functionality, recommended for production, your role needs permission to write to a Cloudwatch log stream.
Diving into the Code
Overview
Let’s start coding, assuming you’ve set up the “awscli” command. If not, you can find instructions at https://aws.amazon.com/cli/ to install “awscli” on your system.
Note: The code snippets here are condensed for brevity. Refer to the repository at https://github.com/gxx/aws-lambda-python/ for the complete version.
We’ll begin by setting up a basic project structure:
| |
Each subdirectory, representing a Lambda function, contains three common files: handler.py, Makefile, and requirements.txt.
- handler.py: Contains the entry point for each Lambda function, defining the method to be called upon invocation.
- requirements.txt: Lists the dependencies for easy management and updates.
- Makefile: Provides commands for interacting with “awscli,” simplifying Lambda function creation and updates.
The .pydistutils.cfg file in the project root is crucial if you’re using Python under Homebrew. It’s necessary due to the Lambda function deployment method (covered later). More details are available in the repository.
Resize Image Lambda Function
Code
Starting with the resize_image function, we’ll freeze the Wand dependency (our image processing library) by adding Wand==0.4.2 to requirements.txt. This function, located in resize.py, takes an image resource from the Wand library and resizes it based on provided width and height parameters. We’ll utilize a “best-fit” resizing algorithm to maintain the aspect ratio while fitting within the specified dimensions.
| |
Next, we need a handler function to process the S3 image upload event, pass the image to the resize_image function, and save the resized image.
| |
Deployment
We’ll use the Makefile to deploy the Lambda function definition.
| |
The “create” and “update” functions in the Makefile package the current directory, install dependencies listed in requirements.txt, and zip the contents for upload using the “awscli” command. This Makefile can be adapted for other Lambda function definitions.
Configure the following variables in the Makefile:
ROLE_ARN: The ARN of the IAM role for the Lambda function.FUNCTION_NAME: The name of the Lambda function.REGION: The AWS region for deployment.TIMEOUT: Invocation timeout in seconds.MEMORY_SIZE: Memory allocated to the function in megabytes.ZIPFILE_NAME: The name of the zipped package.HANDLER: The absolute import path (dot-notation) of the handler function.
Running make create should produce output similar to:
| |
Testing
After creation, you can test the function via the AWS console. In the Lambda dashboard (under “Compute”), select the newly created function. Click on “Configure Test Event” under the “Actions” dropdown.
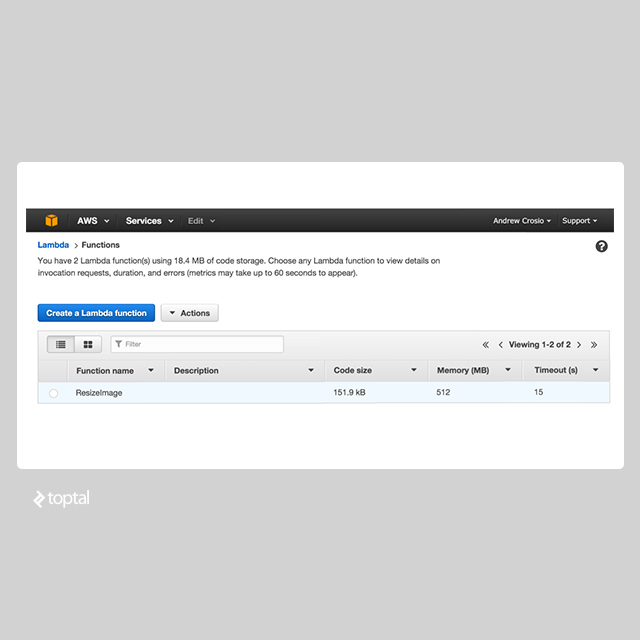
Choose the “S3 Put” example and replace the bucket name with your configured bucket. The “Test” button on the function’s page will then simulate the configured event.
You can monitor logs and error traces in Cloudwatch. A new log group is created alongside the Lambda function, which can be integrated with other services.
Connecting to S3 Events
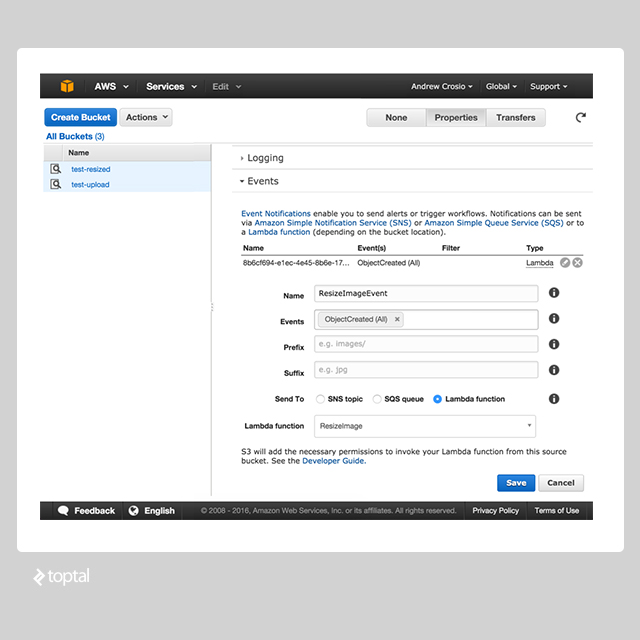
Back in the S3 dashboard, go to the “Properties” menu, expand the “Events” section, and access the “Event Notifications” form.
Choose “Object Created (All)” under “Events” to capture all upload events. Under “Send To,” select “Lambda function” and choose the “ResizeImage” function. After saving, any “Object Created” event will trigger the “ResizeImage” Lambda function.
Now, test the core functionality by uploading an image using cURL and check if it appears in the “test-resized” bucket.
| |
The resized image should appear in the “test-resized” bucket within a short delay (50-1000ms), depending on whether the Lambda function was already “warmed up.”
List Image Lambda Function
Code
The ListImage Lambda function fetches a list of resized images and displays them on an HTML page, also providing an interface for user uploads. We’ll use Jinja2 to render HTML from a template, adding this requirement to requirements.txt.
| |
| |
We can reuse the modified Makefile and the “create” command to deploy this function.
API Gateway Configuration
Since Lambda functions can only be triggered by events or programmatically, we’ll use Amazon API Gateway to make the ImageList function accessible to users. You can find API Gateway under “Application Services.”
API Gateway allows you to model endpoints as a collection of resources and methods, essentially creating a REST interface. In addition to request validation and transformation, it provides features like rate limiting.
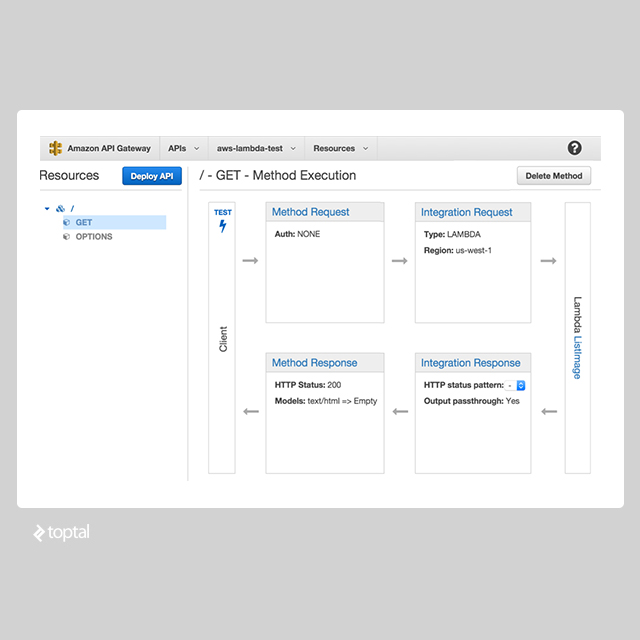
In the API Gateway dashboard, create a new API for serving the ListImage function. The name and description can be customized. Once created, access the API details by clicking on its name. Create a new resource for the root URL “/”, which will serve our HTML page.
Within the root resource, add a GET method. Set the “Integration Type” to “Lambda Function,” choose your region (“us-west-1” in our example), and specify the “ListImage” function name.
To map the response to HTML output, we need to define a “model” that outlines the response schema and maps it to a content type. In the API’s “Models” section, create a new model named “HTML” with a content type of “text/html” and the following schema:
| |
Navigate back to the API dashboard, select the created resource, and go to the “Integration Response” section, which handles response transformations before forwarding them to the final step.
Within “Mapping Templates,” add a new “Content Type” for “text/html” and remove the existing one. On the right, switch from “Output Passthrough” to “Mapping template,” allowing us to modify the raw JSON response. Use “$input.htmlContent” as the template to extract the HTML content from our response. Lastly, in “Method Response,” replace “application/json” with “text/html” under “Response Models for 200.”
Finally, deploy the API using the “Deploy API” button, selecting a deployment stage (staging by default). The provided URL points to the deployed API. Congratulations, the example is complete! You can now test by uploading files and viewing the resized images.
Conclusion
AWS offers a vast ecosystem of services, and AWS Lambda, despite vendor lock-in concerns, provides a streamlined service with extensive configuration options. Leveraging AWS services effectively can lead to highly scalable and maintainable applications. AWS Lambda, in particular, presents an elegant, scalable, and cost-effective solution backed by a robust platform trusted by numerous users. “Serverless” applications are gaining momentum, and AWS Lambda is at the forefront of this movement. Feel free to share your thoughts and experiences in the comments below!