With support across all modern web browsers, WebAssembly (Wasm) is revolutionizing web user experiences. It provides a streamlined binary format for running libraries, or entire programs, written in diverse programming languages directly within a web browser.
Developers are always seeking ways to boost productivity, such as:
- Creating a single application codebase that performs seamlessly across multiple platforms
- Delivering a smooth and visually appealing user experience on both desktop and mobile devices
- Leveraging open-source libraries to prevent redundant development efforts
WebAssembly empowers front-end developers with all three, offering a path to web app UIs that rival native mobile or desktop experiences. It even enables the use of libraries written in languages beyond JavaScript, including C++ or Go!
This Wasm/Rust tutorial guides you through building a simple pitch-detector application, similar to a guitar tuner. This application utilizes the inherent audio capabilities of web browsers and maintains a consistent 60 frames per second (FPS) performance, even on mobile devices. Familiarity with JavaScript is assumed, but prior knowledge of the Web Audio API or Rust is not required.
Note: Currently, the Web Audio API technique employed in this article is not compatible with Firefox. Therefore, Chrome, Chromium, or Edge are recommended for this tutorial, despite Firefox’s strong Wasm and Web Audio API support.
Exploring This WebAssembly/Rust Tutorial
- Learn to create a basic function in Rust and invoke it from JavaScript through WebAssembly
- Utilize the browser’s modern
AudioWorkletAPI for high-performance audio processing - Establish communication channels between JavaScript workers
- Combine these elements within a minimal React application
Note: If you’re more interested in the practical implementation, feel free to skip ahead to the tutorial.
Why Choose Wasm?
Several compelling reasons justify incorporating WebAssembly into your projects:
- Execute code within the browser that was written in virtually any programming language.
- This includes integrating existing libraries (numerical, audio processing, machine learning, etc.) written in languages other than JavaScript.
- Depending on the language, Wasm can achieve near-native execution speeds. This has the potential to bring web application performance much closer to native experiences for both mobile and desktop.
When Wasm Might Not Be the Best Fit
While WebAssembly’s popularity is undeniable, it’s not a one-size-fits-all solution for every web development scenario:
- For simple projects, sticking with JavaScript, HTML, and CSS is likely to be faster.
- Older browsers like Internet Explorer lack native Wasm support.
- Using WebAssembly typically introduces additional tools, such as language compilers, into your development workflow. This might not align with teams prioritizing simplicity in their development and CI/CD processes.
Why This Wasm/Rust Tutorial?
Among the many languages that compile to Wasm, Rust was chosen for this example. Created by Mozilla in 2010, Rust’s popularity is steadily increasing. In Stack Overflow’s 2020 developer survey, Rust secured the top spot spot for “most-loved language.” However, its appeal for this Wasm tutorial extends beyond mere trends:
- Rust’s small runtime minimizes the code transmitted to the browser, resulting in a smaller website footprint.
- Excellent Wasm support in Rust ensures seamless interoperability with JavaScript.
- Rust delivers near C/C++-level performance while maintaining a highly secure memory model. Unlike some languages, Rust’s compiler performs rigorous safety checks during compilation, greatly reducing the risk of crashes due to empty or uninitialized variables. This often translates to simpler error handling and a higher likelihood of preserving a positive UX, even when unexpected issues arise.
- Rust is not garbage-collected. This grants Rust code full control over memory allocation and deallocation, leading to consistent performance—a crucial aspect in real-time applications.
Despite its benefits, Rust has a steep learning curve. Selecting the right programming language ultimately hinges on various factors, including the expertise and preferences of the development team responsible for maintaining the codebase.
Maintaining Smooth Web Apps with WebAssembly
Since we’re working with WebAssembly and Rust, how can we leverage Rust’s capabilities to achieve the performance gains that initially drew us to Wasm? For an application with a dynamic, frequently updating GUI to feel “smooth,” it needs to refresh the display in sync with the screen’s refresh rate. Typically, this is 60 FPS, meaning our application must redraw its user interface within approximately 16.7 ms (1,000 ms / 60 FPS).
Our application needs to detect and display the current pitch in real time, implying that the combined computation for detection and drawing should ideally remain within this 16.7 ms per-frame budget. In the upcoming section, we’ll explore how to leverage browser support for offloading audio analysis to a separate thread, allowing the main thread to proceed with its tasks. This separation is a significant performance win, as both computation and drawing then have the full 16.7 ms timeframe available.
Understanding Web Audio Fundamentals
Our application will utilize a high-performance WebAssembly audio module for pitch detection, ensuring this computation doesn’t burden the main thread.
Why not simplify things and perform pitch detection on the main thread?
- Audio processing tends to be computationally intensive due to the sheer volume of samples processed each second. Reliable audio pitch detection, for instance, often involves analyzing the spectra of 44,100 samples per second.
- JavaScript’s JIT compilation and garbage collection occur on the main thread, and we aim to prevent these from impacting the audio processing code to maintain consistent performance.
- If audio frame processing consumes a significant portion of the 16.7 ms frame budget, the UX will suffer, resulting in choppy animations.
- We want our app to run without hiccups, even on less powerful mobile devices.
Web Audio worklets enable applications to maintain a smooth 60 FPS because audio processing is offloaded and cannot impede the main thread. If audio processing lags, it might lead to audio delays, but the UX will remain responsive.
WebAssembly/Rust Tutorial: Getting Started
This tutorial requires Node.js and npx to be installed. If you don’t have npx, use npm (included with Node.js) to install it:
| |
Setting Up Our Web App
We’ll use React for this Wasm/Rust tutorial.
In your terminal, execute the following commands:
| |
This utilizes npx to run the create-react-app command (provided by Facebook’s corresponding package) to set up a new React application in the wasm-audio-app directory.
The create-react-app CLI simplifies the process of generating React-based single-page applications (SPAs), making it easy to initiate new React projects. However, the generated project includes boilerplate code that needs modification.
While unit testing throughout development is recommended, it falls outside this tutorial’s scope. Therefore, we’ll remove src/App.test.js and src/setupTests.js.
Application Structure Overview
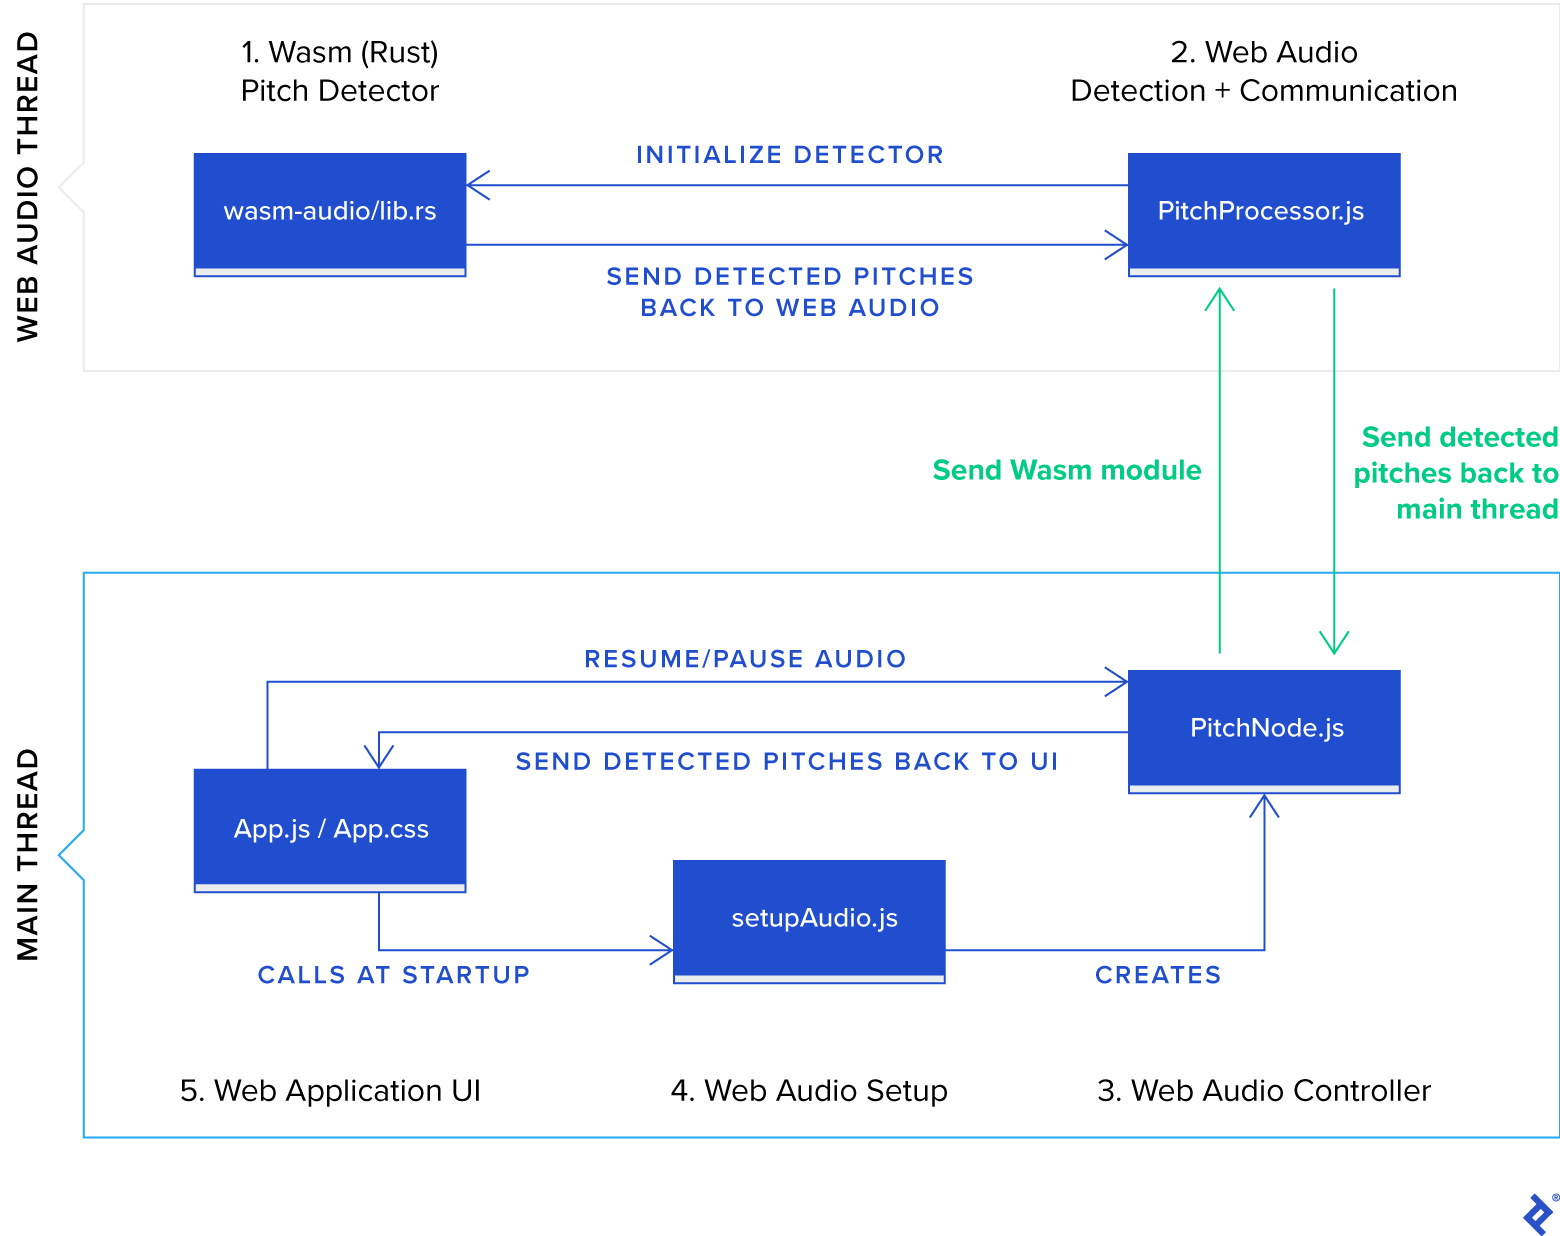
Our application will consist of five primary JavaScript components:
public/wasm-audio/wasm-audio.js: Houses JavaScript bindings for the Wasm module responsible for pitch detection.public/PitchProcessor.js: This is where audio processing happens. It executes in the Web Audio rendering thread and interacts with the Wasm API.src/PitchNode.js: Implements a Web Audio node, which connects to the Web Audio graph and runs on the main thread.src/setupAudio.js: Uses web browser APIs to obtain access to an available audio recording device.src/App.jsandsrc/App.css: These files constitute the user interface of the application.
Let’s dive directly into the core of our application and define the Rust code for the Wasm module. We’ll then proceed to code the different Web Audio-related JavaScript components and conclude with the UI.
1. Implementing Pitch Detection with Rust and WebAssembly
Our Rust code will determine the musical pitch from an array of audio samples.
Obtaining Rust
Follow the instructions on the these instructions to set up the Rust development environment.
Installing Tools for WebAssembly Development in Rust
wasm-pack enables building, testing, and publishing Rust-generated WebAssembly components. If you haven’t already, install wasm-pack.
We’ll utilize cargo-generate to bootstrap a basic audio analyzer in Rust, accessible through WebAssembly in the browser. cargo-generate streamlines creating new Rust projects by using existing Git repositories as templates.
Use the cargo tool that comes with your Rust installation to install cargo-generate:
| |
Once the installation completes (which may take a while), you’re ready to create the Rust project.
Creating the WebAssembly Module
From your app’s root directory, clone the project template:
| |
When prompted for a project name, enter wasm-audio.
A Cargo.toml file should now be present in the wasm-audio directory, containing:
| |
Cargo.toml defines a Rust package (or “crate” in Rust terminology), similar to what package.json does for JavaScript applications.
The [package] section defines metadata that is used when publishing the package to the official package registry of Rust.
The [lib] section specifies the output format for the Rust compilation process. “cdylib” instructs Rust to generate a dynamic system library loadable from other languages (JavaScript in this case), while “rlib” includes a static library with metadata about the generated library. Although not strictly necessary for our purpose, “rlib” can be helpful when developing additional Rust modules that depend on this crate.
The [features] section enables the optional console_error_panic_hook feature, which translates Rust’s unhandled error mechanism (panic) into console errors viewable in browser developer tools for easier debugging.
Finally, [dependencies] lists the crates this package depends on. The only dependency initially present is wasm-bindgen, which automates generating JavaScript bindings for our Wasm module.
Pitch Detection in Rust
Our app aims to detect a musician’s voice or an instrument’s pitch in real time. To maximize speed, we’ll offload the pitch calculation to a WebAssembly module. We’ll use the “McLeod” pitch method, implemented in the existing Rust pitch-detection library, for single-voice pitch detection.
Similar to Node.js’s npm, Rust has its own package manager called Cargo. This simplifies installing packages from the Rust crate registry.
Add the pitch-detection dependency by modifying the Cargo.toml file, adding the relevant line to the dependencies section:
| |
This tells Cargo to download and install the pitch-detection dependency during the next cargo build, or in our case, the next wasm-pack build since we’re targeting WebAssembly.
Creating a JavaScript-Callable Pitch Detector in Rust
First, let’s add a file containing a utility function that will be useful later:
Create wasm-audio/src/utils.rs and paste the contents of the contents of this file into it.
Replace the generated code in wasm-audio/lib.rs with the following code, which performs pitch detection using a fast Fourier transform (FFT) algorithm:
| |
Let’s break down the code:
| |
wasm_bindgen is a Rust macro that facilitates binding between JavaScript and Rust. When compiled to WebAssembly, this macro instructs the compiler to generate JavaScript bindings that act as lightweight wrappers for calling into and out of the Wasm module. This minimal abstraction layer, coupled with the shared memory between JavaScript and Wasm, contributes to Wasm’s impressive performance.
| |
Rust doesn’t have the concept of classes. Instead, an object’s the data of an object is defined using a struct, and its its behaviour are defined through impl blocks or traits.
We expose the pitch-detection functionality through an object rather than a simple function to initialize the internal data structures of the McLeodDetector only once during the WasmPitchDetector creation. This approach avoids costly memory allocation during operation, ensuring the detect_pitch function remains fast.
| |
The panic! macro in Rust signals an unrecoverable error, prompting Rust to report the error and terminate the application. Using panic! can be particularly beneficial during early development before error handling is fully implemented, as it helps identify incorrect assumptions quickly.
Calling utils::set_panic_hook() once during setup guarantees that panic messages appear in the browser’s developer tools.
Next, we define fft_pad, representing the zero-padding applied to each analysis FFT. Padding, along with the windowing function employed by the algorithm, helps smooth the results as the analysis moves across the incoming audio samples. A pad length equal to half the FFT length is suitable for many instruments.
Finally, Rust automatically returns the result of the last statement. Consequently, the WasmPitchDetector struct statement serves as the return value for new().
The remaining Rust code in the impl WasmPitchDetector block defines the API for pitch detection:
| |
This snippet demonstrates a member function definition in Rust. It adds a public detect_pitch member function to WasmPitchDetector. The first argument is a mutable reference (&mut) to an instance of the same type, automatically passed when the function is called.
Additionally, our member function accepts an array of 32-bit floating-point numbers of arbitrary size and returns a single number representing the calculated pitch in Hz.
| |
This part checks if enough samples are provided for a valid pitch analysis. If not, the panic! macro is invoked, terminating Wasm execution and logging the error message to the browser console.
| |
This invokes the third-party library to calculate the pitch from the provided audio samples. You can adjust POWER_THRESHOLD and CLARITY_THRESHOLD to fine-tune the algorithm’s sensitivity.
The function implicitly returns a floating-point value using the match keyword, which functions similarly to a switch statement in other languages. Some() and None allow us to gracefully handle cases without encountering null pointer exceptions.
Building WebAssembly Applications
While cargo build is typically used to build Rust applications, we’ll use wasm-pack for generating our Wasm module as it offers a more convenient syntax for targeting Wasm. Additionally, it allows publishing the resulting JavaScript bindings to the npm registry, which is beyond the scope of this tutorial.
wasm-pack supports various build targets. We’ll use the web target since we’re consuming the module directly from a Web Audio worklet. Other targets include bundlers like webpack or Node.js environments. Execute the following command from the wasm-audio/ subdirectory:
| |
If successful, this creates an npm module under ./pkg.
This newly generated module comes with its own auto-generated package.json file. You could publish this to the npm registry. For simplicity, we’ll directly copy this pkg directory into our project under the public/wasm-audio folder:
| |
This completes our Rust Wasm module, which is now ready to be used by our web application, specifically by PitchProcessor.
2. Implementing the PitchProcessor Class (Extending Native AudioWorkletProcessor)
This application leverages a recently standardized audio-processing approach with broad browser support: the Web Audio API. We’ll perform computationally intensive tasks within a custom AudioWorkletProcessor and create a corresponding custom AudioWorkletNode class (named PitchNode) to bridge back to the main thread.
Create a new file called public/PitchProcessor.js and add the following code:
| |
The PitchProcessor works in tandem with PitchNode but operates on a separate thread to avoid blocking the main thread during audio processing.
Here are the PitchProcessor’s primary responsibilities:
- Handles the
"send-wasm-module"event fromPitchNodeby compiling and loading the Wasm module within the worklet. It then notifiesPitchNodeof completion by sending a"wasm-module-loaded"event. This asynchronous callback-based communication is necessary due to the thread boundary betweenPitchNodeandPitchProcessor. - Responds to the
"init-detector"event fromPitchNodeby configuring theWasmPitchDetector. - Processes audio samples received from the browser’s audio graph, delegates pitch detection to the Wasm module, and sends back any detected pitch to
PitchNode, which then forwards it to the React layer through itsonPitchDetectedCallback. - Registers itself under a unique name. This allows the browser to identify and instantiate our
PitchProcessorlater whenPitchNodeis constructed, guided byPitchNode’s base class, the nativeAudioWorkletNode. This process is further illustrated insetupAudio.js.
The following diagram illustrates the event flow between PitchNode and PitchProcessor:

3. Integrating Web Audio Worklet Code
The PitchNode.js file provides an interface to our custom pitch-detection audio processing. The PitchNode object facilitates the delivery of detected pitches from the WebAssembly module operating within the AudioWorklet thread to the main thread and subsequently to React for rendering.
In src/PitchNode.js, we’ll subclass the built-in AudioWorkletNode from the Web Audio API:
| |
PitchNode performs the following crucial tasks:
- Sends the WebAssembly module as a byte stream, received from
setupAudio.js, to thePitchProcessorrunning in theAudioWorkletthread. This allows thePitchProcessorto load the pitch-detection Wasm module. - Handles the event emitted by
PitchProcessorupon successful Wasm compilation and sends another event to configure pitch detection. - Receives detected pitches from the
PitchProcessorand forwards them to the UI functionsetLatestPitch()viaonPitchDetectedCallback().
Note: This code executes on the main thread, so refrain from performing extensive processing on detected pitches within this object to prevent frame rate drops.
4. Setting Up Web Audio
To enable our web application to access and process live microphone input from the client machine, we need to:
- Obtain user permission for browser microphone access
- Access the microphone output as an audio stream object
- Attach code to process the incoming audio stream, producing a sequence of detected pitches
We’ll accomplish these steps in src/setupAudio.js. Additionally, we’ll asynchronously load the Wasm module to initialize our PitchNode before attaching it:
| |
This assumes the WebAssembly module is located at public/wasm-audio, which we set up earlier in the Rust section.
5. Creating the Application UI
Let’s define a basic user interface for our pitch detector. Replace the contents of src/App.js with the following code:
| |
And replace App.css with some basic styles:
| |
With that, our app should be ready to run, but there’s a potential issue we need to address first.
WebAssembly/Rust Tutorial: Addressing a Final Hurdle
Upon running yarn followed by yarn start, switching to the browser (using Chrome or Chromium with developer tools open), and attempting to record audio, we encounter errors:

The first error, TextDecoder is not defined, arises when the browser attempts to execute wasm_audio.js. This, in turn, prevents the Wasm JavaScript wrapper from loading, leading to the second error in the console.
The root cause is that the Wasm package generator in Rust expects TextDecoder (and TextEncoder) to be globally available. This assumption holds true for modern browsers when the Wasm module runs on the main thread or even a worker thread. However, worklets (like the AudioWorklet context used here) don’t yet include TextDecoder and TextEncoder in their specification and are therefore unavailable.
The Rust Wasm code generator relies on TextDecoder to convert the flat, packed, shared-memory representation of Rust strings into the string format JavaScript uses. In essence, to handle strings produced by the Wasm code generator, we need to TextEncoder and TextDecoder must be defined.
This issue highlights the relative novelty of WebAssembly. As browser support matures and common WebAssembly patterns are natively supported, such issues are likely to disappear.
For now, we can work around this by providing a polyfill for TextDecoder.
Create a new file named public/TextEncoder.js and import it into public/PitchProcessor.js:
| |
Ensure this import statement precedes the wasm_audio import.
Finally, paste the contents of this implementation into TextEncoder.js (code courtesy of @Yaffle on GitHub).
The Firefox Question
As mentioned earlier, the way we combine Wasm with Web Audio worklets in our app will not work in Firefox. Even with the above shim, clicking the “Start Listening” button will result in this:
Unhandled Rejection (Error): Failed to load audio analyzer WASM module. Further info: Failed to load audio analyzer worklet at url: PitchProcessor.js. Further info: The operation was aborted.
That’s because Firefox doesn’t yet support importing modules from AudioWorklets—for us, that’s PitchProcessor.js running in the AudioWorklet thread.
Our Completed Application
Reload the page. The app should now load without errors. Click “Start Listening” and grant browser permission to access your microphone. You’ll now have a functional, albeit basic, pitch detector written in JavaScript using Wasm:

Programming with WebAssembly and Rust: A Real-time Web Audio Solution
This tutorial guided you through building a web application from scratch that performs computationally demanding audio processing using WebAssembly. WebAssembly allowed us to leverage Rust’s near-native performance for pitch detection. Furthermore, this processing was offloaded to a separate thread, freeing the main JavaScript thread to concentrate on rendering and ensuring smooth frame rates, even on mobile devices.
Key Takeaways: Wasm/Rust and Web Audio
- Modern browsers provide high-performance APIs for capturing and processing audio (and video) within web applications.
- Rust’s combination of performance, safety, and great tooling for Wasm makes it a strong contender for projects integrating WebAssembly.
- Wasm enables efficient execution of compute-intensive tasks within the browser.
While advantageous, Wasm also presents a couple of challenges:
- Tooling for Wasm within worklets is still under development. As seen in our example, we had to implement our own versions of
TextEncoderandTextDecoderfor communication between JavaScript and Wasm within theAudioWorkletcontext. Additionally, importing JavaScript bindings for Wasm modules within anAudioWorkletis not yet supported in Firefox. - Although our application was relatively simple, setting up and loading the WebAssembly module from the
AudioWorkletinvolved a fair amount of configuration. Integrating Wasm into projects does introduce additional tooling complexity, which is crucial to consider.
For your convenience, this GitHub repo contains the complete project code. If you’re interested in back-end development, you might also find it valuable to explore using Rust with WebAssembly within Node.js.