In the world of game development, creating an engaging experience for players often involves crafting believable interactions with non-player characters (NPCs). Developers achieve this interactivity through various AI techniques, with finite-state machines (FSMs) being a classic and effective method.
While AI trends have evolved, FSMs remain a cornerstone of game development, found in some form within almost every game.
Anatomy of an FSM
An FSM models computation where only one predefined state is active at any given time. These machines transition between states based on specific conditions or inputs. The key elements of an FSM consist of:
| Component | Description |
|---|---|
| State | One of a finite set of options indicating the current overall condition of an FSM; any given state includes an associated set of actions |
| Action | What a state does when the FSM queries it |
| Decision | The logic establishing when a transition takes place |
| Transition | The process of changing states |
While our focus is on FSMs for AI implementation, it’s worth noting that concepts like animation state machines and general game states are also rooted in FSM principles.
Visualizing an FSM
To illustrate, let’s consider the iconic arcade game Pac-Man. Initially, the ghosts (NPCs) are in a “chase” state, relentlessly pursuing the player. When the player consumes a power pellet, the ghosts transition into an “evade” state, turning blue and avoiding contact. Once the power-up effect ends, they revert to their “chase” state with their original behaviors and colors restored.
Therefore, a Pac-Man ghost constantly exists in one of two states: chase or evade. This necessitates two transitions—one for each direction:

By design, the finite-state machine continuously queries its current state, which in turn dictates its decisions and actions. The following diagram showcases our Pac-Man example, illustrating a decision point based on the player’s power-up status. The NPCs transition between the chase and evade states depending on the presence or absence of the power-up.

Scalability
FSMs empower developers to build AI modularly. Adding a new action easily translates into a new behavior for an NPC. For example, we could enable a Pac-Man ghost to consume power pellets while in its evade state. Existing actions, decisions, and transitions could be reused to support this new behavior.
With minimal resources required to create unique NPCs, developers are well-equipped to handle evolving project needs. However, a word of caution: an excessive number of states and transitions can lead to a “spaghetti-state machine”—an FSM with convoluted connections that hinders debugging and maintenance.
Implementing an FSM in Unity
Let’s demonstrate FSM implementation in Unity by crafting a simple stealth game. Our structure will utilize ScriptableObjects, which act as data containers, facilitating information sharing throughout the application. ScriptableObjects possess limited processing capabilities, allowing them to trigger actions and query decisions. In addition to Unity’s official documentation, the older Game Architecture with Scriptable Objects talk can be a valuable resource for deeper exploration.
Before adding AI to this initial ready-to-compile project, let’s outline the intended architecture:

In our game, the enemy (a blue capsule) patrols the environment. When it spots the player (a gray capsule), it starts following them:

Unlike in Pac-Man, the enemy will not revert to patrolling once it engages in pursuit.
Creating Classes
Let’s start building our classes. Within a new scripts folder, we’ll add all the proposed components as C# scripts.
Implementing the BaseStateMachine Class
The BaseStateMachine class is our sole MonoBehavior for accessing AI-enabled NPCs. For brevity, we’ll keep it streamlined. However, it could be extended with an inherited custom FSM to hold additional parameters and references. Note that the code won’t compile until we introduce the BaseState class later in the tutorial.
The BaseStateMachine code interacts with the current state to execute actions and check for transitions:
| |
Implementing the BaseState Class
The BaseState, derived from ScriptableObject, includes a single method, Execute, which receives the BaseStateMachine as input and passes actions and transitions to it. Here’s how it appears:
| |
Implementing the State and RemainInState Classes
Next, we derive two classes from BaseState. The State class stores references to actions and transitions, maintains lists for both, and overrides the base Execute method to call actions and transitions:
| |
Meanwhile, the RemainInState class signals the FSM to stay in its current state and avoid transitions:
| |
Keep in mind that these classes won’t compile until we define the FSMAction, Decision, and Transition classes.
Implementing the FSMAction Class
In our architecture diagram, the base FSMAction class is labeled as “Action.” However, we’ll use the name FSMAction in our code to avoid conflicts with the existing .NET System.Action type.
Being a ScriptableObject, FSMAction cannot independently process functions, so we define it as an abstract class. As development progresses, a single action might be needed across multiple states. Fortunately, we can associate FSMAction with any number of states within various FSMs.
Here’s the structure of the FSMAction abstract class:
| |
Implementing the Decision and Transition Classes
To finalize our FSM, let’s define two more classes. Decision serves as an abstract class from which all specific decision logic will inherit:
| |
The Transition class holds the Decision object and two states:
- The target state if the
Decisionevaluates to true. - The target state if the
Decisionevaluates to false.
It looks like this:
| |
At this stage, Everything we have built should compile without errors. If you encounter issues, verify your Unity Editor version, ensure all files are correctly copied from the project folder, and confirm that publicly accessed variables are not declared private.
Creating Custom Actions and Decisions
With the foundational elements in place, let’s implement custom actions and decisions within a new scripts folder.
Implementing the Patrol and Chase Classes
Analyzing our stealth game FSM, we see that the NPC can be in one of two states:
- Patrol state: This state involves:
- An action: The NPC moves between predefined patrol points.
- A transition: The NPC checks if the player is within sight and transitions to the chase state if true.
- A decision: The NPC determines if the player is within its line of sight.
- Chase state: This state comprises:
- An action: The NPC follows the player.
We can reuse our existing transition implementation through Unity’s GUI, which we’ll cover later. This leaves us with two actions (PatrolAction and ChaseAction) and one decision to code.
The patrol state action, extending the base FSMAction, overrides the Execute method to obtain two components:
PatrolPoints, responsible for managing patrol point locations.NavMeshAgent, Unity’s built-in component for 3D navigation.
The override then checks if the AI agent has reached its current destination. If so, it sets the next destination from the list of patrol points. The code looks like this:
| |
For efficiency, we might consider caching the PatrolPoints and NavMeshAgent components. Caching would allow us to share ScriptableObjects between different agents without the overhead of calling GetComponent every time the FSM runs.
However, we cannot cache component instances directly within the Execute method. Instead, we can introduce a custom GetComponent method within BaseStateMachine. This custom method would cache the instance on the first call and return the cached instance on subsequent calls. For reference, here’s the modified BaseStateMachine with caching:
| |
Similar to PatrolAction, the ChaseAction class overrides the Execute method to access the PatrolPoints and NavMeshAgent components. However, instead of moving to the next patrol point, ChaseAction sets the destination to the player’s current position:
| |
Implementing the InLineOfSightDecision Class
The final piece is the InLineOfSightDecision class, which inherits from the base Decision class. This class utilizes the EnemySightSensor component to check if the player is within the enemy’s line of sight:
| |
Attaching Behaviors to States
We are now equipped to attach specific behaviors to the Enemy agent within the Unity Editor.
Adding the Patrol and Chase States
Let’s create two states named “Patrol” and “Chase”:
- Right Click > Create > FSM > State
While we’re at it, let’s also create a RemainInState object:
- Right Click > Create > FSM > Remain In State
Now, let’s create the actions we’ve coded:
- Right Click > Create > FSM > Action > Patrol
- Right Click > Create > FSM > Action > Chase
Next, let’s code the Decision:
- Right Click > Create > FSM > Decisions > In Line of Sight
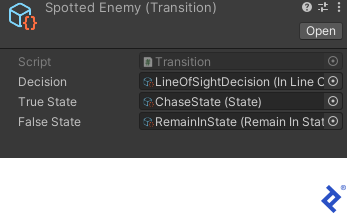
To enable a transition from PatrolState to ChaseState, let’s create the transition scriptable object:
- Right Click > Create > FSM > Transition
- Choose a suitable name for your transition. For this example, let’s call it “Spotted Enemy.”
We’ll populate the resulting inspector window as follows:
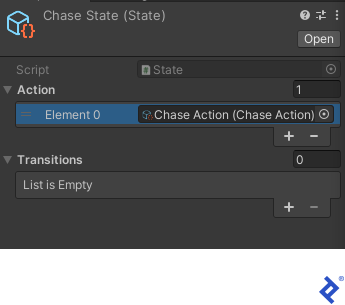
Next, let’s configure the Chase State inspector dialog like this:
Now, let’s set up the Patrol State dialog:

Finally, let’s add the BaseStateMachine component to the enemy object: In the Unity Editor’s Project window, open the SampleScene asset. Select the Enemy object in the Hierarchy panel. In the Inspector window, select Add Component > Base State Machine:

If you encounter any issues, double-check that your game objects are set up correctly. For instance, ensure that the Enemy object has the PatrolPoints script component and the Point1, Point2, etc. objects attached. This information can be lost if there are discrepancies in editor versions.
You are now ready to play the sample game. Observe how the enemy starts following the player once they enter its line of sight.
Using FSMs to Create a Fun, Interactive User Experience
In this tutorial, we built a modular FSM-based AI system (along with its corresponding GitHub repo) that can be reused in future projects. This modularity allows for easy expansion of the AI’s capabilities by introducing new components.
Furthermore, our architecture lays the groundwork for a graphical FSM design approach, which can greatly enhance the development workflow. This approach enables developers to create in-game FSMs more efficiently and with greater creative precision.