Microservice architecture is a widely adopted approach for designing and implementing highly scalable web applications. In monolithic applications, communication between components typically occurs through method or function calls within the same process. Conversely, a microservices-based application operates as a distributed system across multiple machines.
Effective communication between these microservices is crucial for maintaining system stability and scalability. Among the various approaches available, message-based communication offers a reliable solution.
Messaging enables components to interact asynchronously by exchanging messages through designated channels.
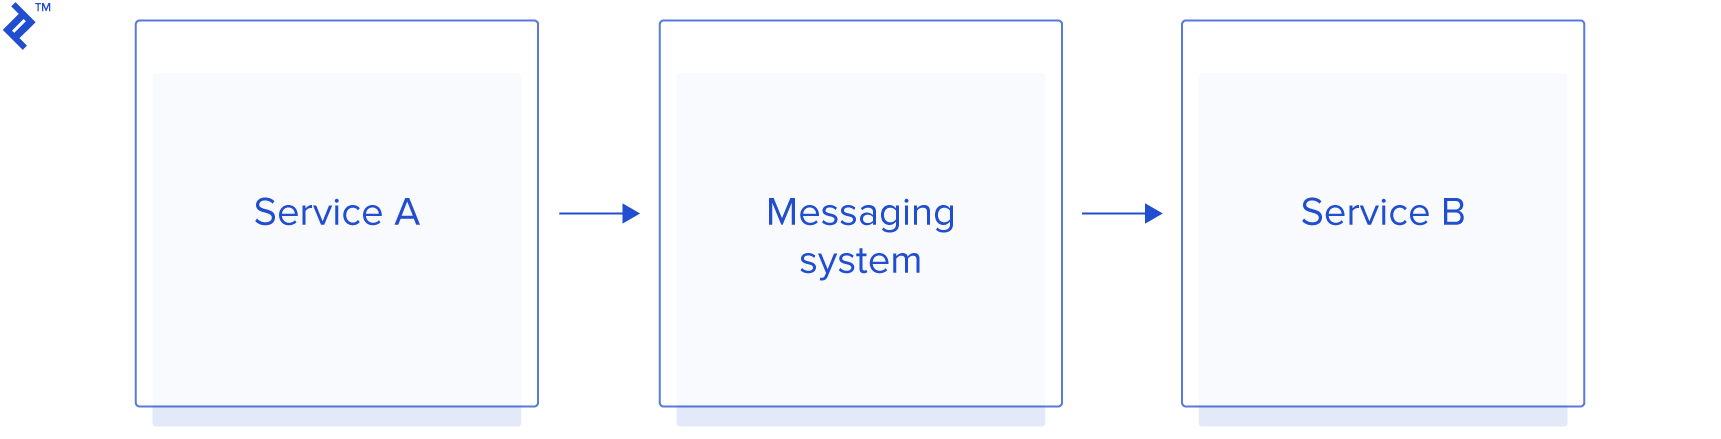
Instead of directly communicating, Service A sends its message to a specific channel when it needs to interact with Service B. Service B then retrieves the message from that particular channel when it’s ready to process it.
This Spring Integration tutorial will guide you through implementing messaging in a Spring application using Redis. You’ll work with an example application where one service publishes events to a queue, and another service processes these events sequentially.
Spring Integration
Spring Integration extends the Spring framework by providing messaging support between or within Spring-based applications, enabling components to be interconnected via the messaging paradigm. This allows individual components to remain unaware of other application components.
Spring Integration offers various mechanisms for communication with external systems. Channel adapters facilitate one-way integration (send or receive), while gateways handle request/reply scenarios (inbound or outbound).
Although Apache Camel is a widely used alternative, Spring Integration is often preferred in existing Spring-based services due to its seamless integration with the Spring ecosystem.
Redis
Redis is an exceptionally fast in-memory data store with optional disk persistence. It supports various data structures, including simple key-value pairs, sets, and queues.
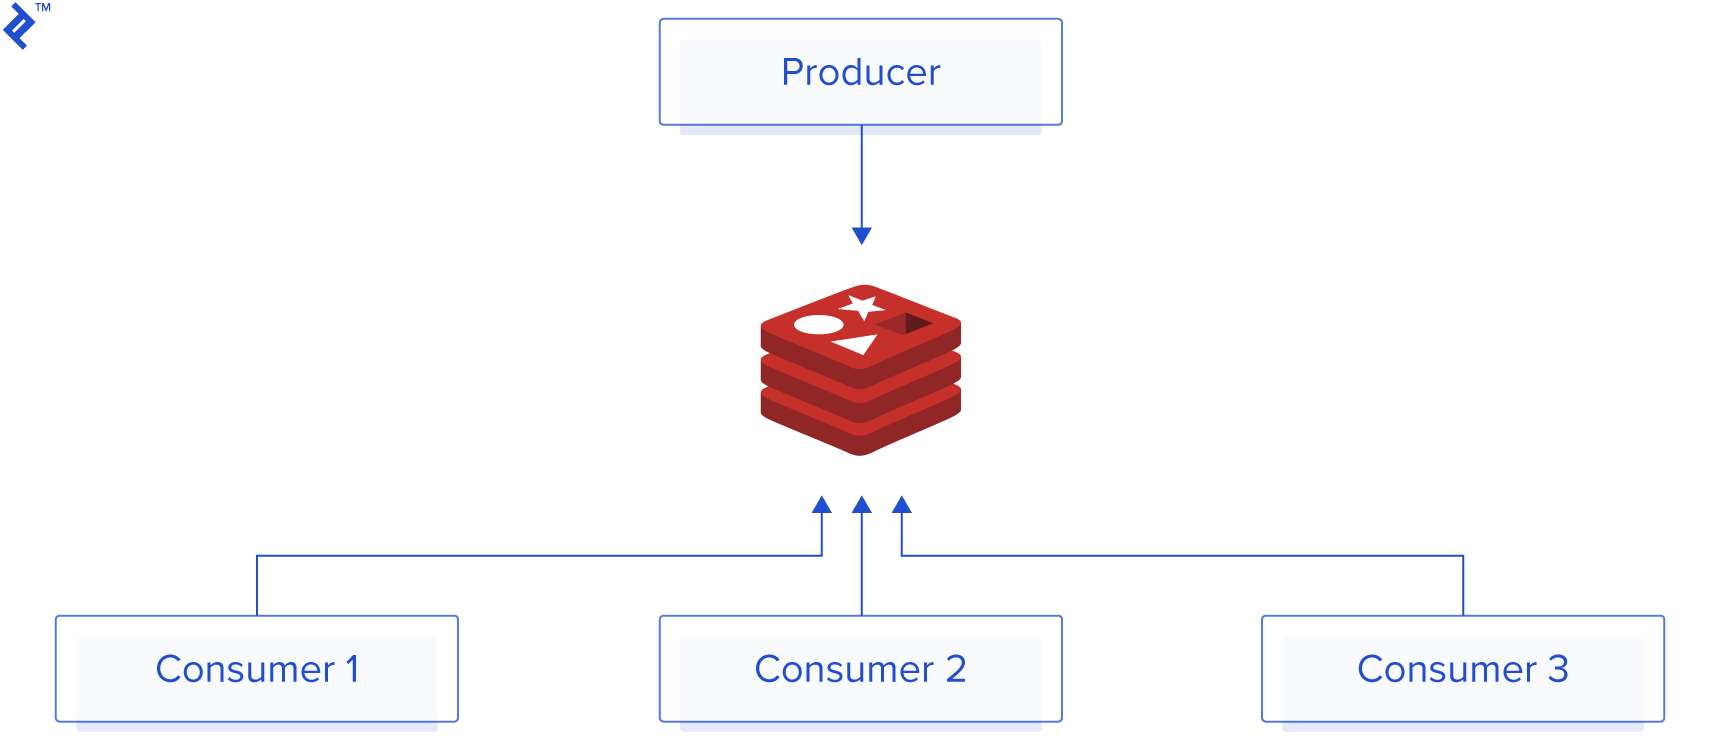
Utilizing Redis as a queue simplifies data sharing between components and facilitates horizontal scaling. Producers (one or multiple) can push data to the queue, while consumers (one or multiple) can pull and process the data/events.
Each event can only be consumed once, preventing multiple consumers from processing the same event.
Benefits of using Redis as a message queue include:
- Non-blocking parallel execution of discrete tasks
- Exceptional performance
- Enhanced stability
- Simplified monitoring and debugging
- Straightforward implementation and usage
Key rules:
- Adding tasks to the queue should be faster than processing them.
- Consuming tasks should be faster than producing them (if not, add more consumers).
Spring Integration with Redis
Let’s explore a sample application to demonstrate how to utilize Spring Integration with Redis.
Imagine an application where users can publish posts and a follow feature is desired. Each time a user publishes a post, all their followers should be notified through a communication channel like email or push notification.
One approach is to send an email to each follower upon post publication. However, this becomes challenging with a large number of followers (e.g., 1,000 followers per user) and frequent posts (e.g., 1,000 users publishing posts within 10 seconds). Additionally, making the publisher wait for all emails to be sent is not ideal.
Distributed systems offer solutions to these challenges.
This specific problem can be addressed using a queue. Service A (the producer), responsible for publishing posts, would simply publish the post and push an event containing the post details and the list of users to be notified. Although Service B could fetch the user list, for simplicity, we’ll send it from Service A.
This asynchronous operation allows the publishing service to proceed without waiting for email delivery.
Service B (the consumer) would then pull the event from the queue and process it, enabling easy service scaling and the use of multiple consumers (n) for sending emails (processing events).
Let’s begin with the implementation in the producer service. The required dependencies are:
| |
These three Maven dependencies are essential:
- Jedis, a Redis client.
- Spring Data Redis, which simplifies Redis usage in Java by providing familiar Spring concepts like a template class for core API interaction and lightweight repository-style data access.
- Spring Integration Redis, an extension of the Spring programming model that provides support for the widely used Enterprise Integration Patterns.
Next, we’ll configure the Jedis client:
| |
The @Value annotation instructs Spring to inject the values defined in the application properties into the corresponding fields. This means that redis.host and redis.port values should be defined in the application properties.
Now, let’s define the message structure for the queue. A basic example message could be:
| |
Note: Project Lombok (https://projectlombok.org/](https://projectlombok.org/)) provides annotations like @Getter, @Setter, @Builder to streamline code by reducing boilerplate code for getters, setters, and other trivial elements. Learn more about it from [this Toptal article.
The message will be stored in JSON format within the queue. Each event published to the queue will be serialized to JSON, and deserialized when consumed from the queue.
With the message defined, we need to set up the queue itself. Spring Integration simplifies this process through an .xml configuration file located in the resources/WEB-INF directory.
| |
The configuration includes the “int-redis:queue-outbound-channel-adapter” element with the following properties:
- id: The component’s bean name.
- channel: The
MessageChannelfrom which this endpoint receives messages. - connection-factory: A reference to a
RedisConnectionFactorybean. - queue: The name of the Redis list for the queue-based push operation to send Redis messages (mutually exclusive with
queue-expression). - queue-expression: A SpEL expression to determine the Redis list name dynamically using the incoming message as the
#rootvariable (mutually exclusive withqueue). - serializer: A
RedisSerializerbean reference (defaults toJdkSerializationRedisSerializer, but usesStringRedisSerializerforStringpayloads if no serializer is provided). - extract-payload: Specifies whether to send only the payload or the entire message to the Redis queue (defaults to
true). - left-push: Specifies whether to use left push (
true) or right push (false) to write messages to the Redis list (defaults totrue, making the Redis list behave as a FIFO queue when used with a default Redis queue inbound channel adapter).
Next, we define the gateway mentioned in the .xml configuration. We’ll use the RedisChannelGateway class from the org.toptal.queue package for this purpose.
StringRedisSerializer handles message serialization before saving to Redis. The .xml configuration also defines the gateway and sets RedisChannelGateway as the gateway service, allowing the RedisChannelGateway bean to be injected into other beans. We define the default-request-channel property, as per-method channel references can be provided using the @Gateway annotation. Class definition:
| |
To integrate this configuration into our application, we import it using the SpringIntegrationConfig class.
| |
The @ImportResource annotation imports Spring .xml configuration files into the @Configuration class, while @AutoConfigureAfter hints that this auto-configuration should be applied after other specified auto-configuration classes.
Now, let’s create a service and implement the method to enqueue events to the Redis queue.
| |
| |
With this, we can easily send messages to the queue using the enqueue method from QueueService.
Redis queues are essentially lists with one or more producers and consumers. Producers use the LPUSH Redis command to publish messages to a queue. Monitoring Redis (hint: use redis-cli monitor) reveals that the message is added to the queue:
| |
Next, we’ll create a consumer application to pull these events from the queue and process them. The consumer service requires the same dependencies as the producer service.
We can reuse the PostPublishedEvent class for deserializing messages.
Similar to the producer, we need to create the queue configuration within the resources/WEB-INF directory. The queue configuration content is:
| |
In the .xml configuration, int-redis:queue-inbound-channel-adapter supports these properties:
- id: The component’s bean name.
- channel: The
MessageChannelto send messages to from this endpoint. - auto-startup: A
SmartLifecycleattribute controlling whether this endpoint starts automatically after the application context starts (defaults totrue). - phase: A
SmartLifecycleattribute specifying the phase for starting this endpoint (defaults to0). - connection-factory: A reference to a
RedisConnectionFactorybean. - queue: The name of the Redis list for the queue-based pop operation to retrieve Redis messages.
- error-channel: The
MessageChannelto sendErrorMessageswithExceptionsfrom the listening task of theEndpoint(by default, the underlyingMessagePublishingErrorHandleruses the defaulterrorChannelfrom the application context). - serializer: A
RedisSerializerbean reference (can be an empty string, signifying no serializer, in which case, the rawbyte[]from the inbound Redis message is sent to the channel as theMessagepayload; defaults toJdkSerializationRedisSerializer). - receive-timeout: The timeout (in milliseconds) for the pop operation to wait for a Redis message from the queue (defaults to 1 second).
- recovery-interval: The time (in milliseconds) for the listener task to sleep after exceptions during the pop operation before restarting (defaults to 1 second).
- expect-message: Specifies whether this endpoint expects data from the Redis queue to contain entire messages (defaults to
false; iftrue, the serializer cannot be an empty string, as messages require deserialization, which is JDK serialization by default). - task-executor: A reference to a Spring
TaskExecutor(or standard JDK 1.5+ Executor) bean, used for the underlying listening task (defaults to aSimpleAsyncTaskExecutor). - right-pop: Specifies whether this endpoint uses right pop (
true) or left pop (false) to read messages from the Redis list (defaults totrue, making the Redis list behave as a FIFO queue when used with a default Redis queue outbound channel adapter).
The crucial part is the “service activator,” which designates the service and method for processing the event.
The json-to-object-transformer requires a type attribute to transform JSON into objects, set above to type="com.toptal.integration.spring.model.PostPublishedEvent".
We’ll reuse the SpringIntegrationConfig class for wiring this configuration. Finally, we need a service to handle the event processing.
| |
Running the application, you’ll observe the following in Redis:
| |
Conclusion
Building a Spring microservices application becomes less daunting with Spring Integration and Redis. Minimal configuration and boilerplate code are needed to establish the foundation of a microservice architecture.
Even without completely overhauling an existing Spring project to adopt a new architecture, leveraging Redis queues can lead to substantial performance improvements.