The IT industry is constantly changing, and its rapid progress never ceases to amaze us. It’s been over two decades since the revolutionary concept of “Write once, run anywhere” emerged, setting a new standard for software development. This concept led to an explosion of tools that have significantly expanded the possibilities for Java development and software development in general.
Modern methodologies like Agile, DevOps, and Continuous Integration and Deployment, coupled with the rise of microservices, have dramatically improved the efficiency of software development. The process has become more streamlined and enjoyable than ever before, thanks to automation and the use of appropriate tools that simplify the development and delivery of software products.
This article explores this new era from the viewpoint of a Java developer venturing into the world of DevOps, seeking to optimize product development and delivery.
While terms like Spring Boot, Docker, Cloud, Amazon Web Services, and Continuous Delivery are frequently used, they are not always fully understood. This article provides a simple explanation of these technologies and terms through a tutorial where we’ll build a small software application and prepare it for production using these tools.

Reasons for Choosing These Tools
Effortless Deployments with Docker
The “Write once, run anywhere” concept brought us technologies like the Java Virtual Machine (JVM), allowing code to run on various platforms. Now, two decades later, Docker has emerged as a valuable tool for the IT industry. Docker provides a contained environment where software can run smoothly on almost any platform.
Java developers familiar with the JVM might question the need for Docker, considering the JVM’s reputation as a portable solution. However, while the “Write once, run anywhere” concept sounds ideal, it often faces challenges in reality. Different JVM vendors, Java versions, operating systems, and their numerous combinations can lead to a shift from the elegant “Write once, run anywhere” to the less efficient “Write once, debug everywhere” scenario.
Docker comes to the rescue in such situations, simplifying the development, testing, and delivery of software. By placing the software to be tested within a Docker container, it becomes easy to run and install for everyone involved.
Accelerated Development with Spring Boot
The Spring framework emerged less than a decade after the “run anywhere” slogan, and the Spring ecosystem continues to thrive, giving rise to valuable Spring-based projects, with Spring Boot being a prime example. As stated on the Spring Boot website:
Spring Boot simplifies the creation of stand-alone, production-ready Spring-based applications that are easy to run.
Spring Boot enables rapid application setup and deployment, allowing developers to focus on coding while the tool handles the configuration process.
We’ll be using Spring Boot to develop our microservice in this tutorial.
Continuous Integration (CI) with Jenkins
The DevOps movement, characterized by close collaboration between software development and IT operations teams, aims to optimize the software development and delivery lifecycle, benefiting developers, system administrators, testers, and end-users.
Continuous Integration (CI) is a key principle in DevOps. It involves automatically testing and packaging code for delivery (deployment) to production whenever a developer commits code to the repository.
CI goes hand-in-hand with:
- Continuous Delivery – Automatic preparation of the package for end-user business testing, with manual triggering for production deployment.
- Continuous Deployment – Automatic deployment of the packaged product directly to production.
Various tools are available for implementing CI, and Jenkins, an open-source CI tool, is among the most popular. With its extensive plugin library and a large community, Jenkins is an excellent choice for organizations looking to implement continuous integration, delivery, or deployment.
In this tutorial, we’ll use Jenkins to deliver our product to the Amazon Web Services (AWS) cloud.
Cloud Computing with AWS
Imagine a scenario where system administrators are relieved of some of their infrastructure management burdens. With applications to deploy and an estimate of their resource requirements, traditional setups often involve guesswork in hardware sizing. Deploying to the cloud, however, offers flexibility. Systems can be deployed and scaled as needed without concerns about resource limitations or idle resources.
While choosing a cloud provider can be a challenge, we’ll opt for Amazon Web Services (AWS) due to its widespread adoption and market share.
One of the advantages of AWS is the extensive range of services available, including:
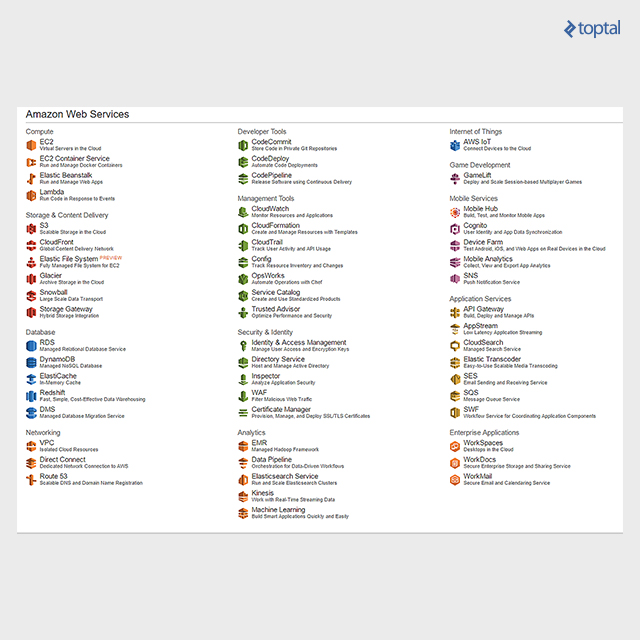
This tutorial utilizes two specific AWS services: Elastic Compute Cloud EC2 (specifically, Amazon EC2 Container Registry or Amazon ECR) and Amazon S3 (Simple Storage Services).
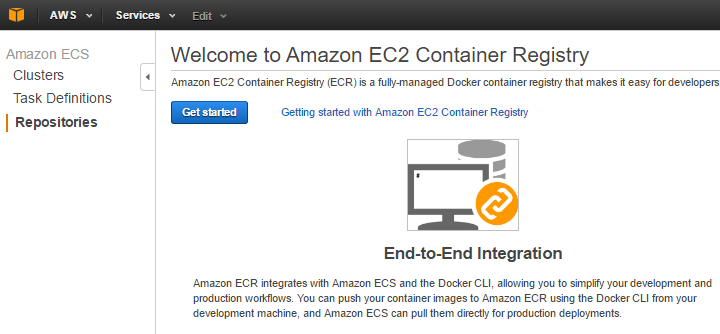
Amazon ECR
We need a place to store our Docker images, and Amazon ECR, a managed AWS Docker registry service, provides the solution. As stated on the Amazon ECR web site:
…it simplifies the process of storing, managing, and deploying Docker container images. Amazon ECR integrates seamlessly with Amazon EC2 Container Service (ECS), streamlining the development-to-production workflow. With Amazon ECR, there’s no need to manage your own container repositories or worry about scaling the underlying infrastructure.
Amazon S3
Our Spring Boot microservice will be uploading files to Amazon S3. As described on the Amazon S3 web site:
…it provides developers and IT teams with a secure, durable, and highly scalable cloud storage solution. Amazon S3 offers a user-friendly object storage service with a simple web service interface for storing and retrieving any amount of data from anywhere on the web.
A Practical Tutorial
The goal is to prepare a Spring Boot microservice for deployment. This microservice will be designed to upload files to Amazon S3. The steps involved are:
- Microservice development
- Defining the build process, including Docker image creation
- Using Bitbucket for Git code repository hosting
- Integrating Bitbucket with Jenkins for application packaging using Gradle
- Pushing the package to a remote Amazon ECR repository
This tutorial provides a step-by-step guide for setting up the necessary components:
- A Spring Boot example application (microservice packaged and dockerized using Gradle)
- Jenkins installation on a fresh Ubuntu server
- Bitbucket integration with Jenkins via webhook
- Jenkins job configuration
- Using Amazon ECR to store Docker images containing our application
Prerequisites
Using AWS cloud resources requires creating an register at Amazon account. Registration provides access to a Free Tier usage plan, offering hands-on experience for 12 months.
We’ll be utilizing Amazon S3 and Amazon ECR, both of which require access keys for connection.
After signing up with AWS, navigate to Security credentials within your account, select Access keys, and click on “Create New Access Key.” This generates a key and its corresponding ID. Make sure to store these credentials securely as we’ll need them later for configuring AWS Jenkins integration and developing the S3 file upload functionality.

We’ll need an Amazon S3 bucket (storage container) for our Spring Boot service to upload and download files. Creating a bucket is a straightforward process that can be completed with a few clicks. A detailed guide on creating an S3 bucket can be found in the Create a Bucket documentation.
We’ll also be utilizing Bitbucket for code hosting and triggering Jenkins requests, so a Bitbucket account is necessary. Bitbucket is a great choice for developers, offering unlimited private repositories as one of its key benefits.
Application Development
Rather than delving into the intricacies of Spring annotations, this section focuses on the more challenging aspects from a developer’s perspective, particularly the installation and configuration of Linux, Jenkins, and other tools required for CI. All code examples used in this tutorial, including the Spring Boot microservice application, are available on Bickbucket repository for the project.
Our application has a simple structure. We have the Spring Boot application entry point in the StorageWebserviceApplication.java file. File upload and download logic is handled by StorageService.java, while StorageController.java acts as a REST controller, containing API endpoints for file upload and download operations. Below is the project hierarchy:

We’ve chosen Gradle as our build tool. It will handle packaging our application and building the Docker image. Let’s now examine the Gradle build file, service component, and Dockerfile.
To interact with the AWS API, we need to include dependencies in our build file, as outlined in the AWS documentation for using Gradle.
In summary, the AWS dependency configuration section of our Gradle script will look like this:
| |
When uploading files to Amazon S3, they are uploaded to a specific S3 bucket.
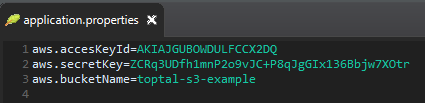
To connect to the bucket, our Amazon S3 client needs credentials, which are the access keys we generated earlier. We define the access key ID and value in the application.properties file. Our bucket is named toptal-s3-example.
Our main service component now looks like this:
| |
The StorageService component reads credentials from the application.properties file, uses them to create a BasicAWSCredentials object, and subsequently instantiates the AmazonS3Client object. From there, file upload and download are simply a matter of invoking putObject and getObject methods, respectively, on the AmazonS3Client object.
Our service will run inside a Docker container, and the Docker image will be built during the Gradle build process. This is achieved by configuring the build.gradle file as follows:
| |
The Buildscript section and the apply plugin line are standard configurations. We’ve also defined a buildDocker task to read the Docker configuration from the src/main/docker/Dockerfile file and copy the JAR file to the Docker build context.
The Dockerfile contains a series of Docker commands that define our image:
| |
Running our application requires a Java Virtual Machine (JVM). Docker Hub provides a variety of images with Java pre-installed. We’ll choose a minimal image based on Alpine Linux for its small size (around 5MB). The frolvlad/alpine-oraclejdk8 image fits our needs and is relatively compact (around 170MB).
The FROM command specifies this image as the base for our custom image. We ADD the built JAR file to the container’s filesystem as storageService.jar. The EXPOSE command instructs the Docker container to listen on port 8080 at runtime. However, this doesn’t automatically enable communication to port 8080 from the host. When running the image, we’ll need to publish the container’s port using a command like docker run -p 8080:8080 amazonRepository/storageservice, where amazonRepository is a repository we’ll configure later in this tutorial. The CMD command defines the command to be executed when running the container. The values within the brackets of the CMD command indicate that the following will be executed:
| |
We include the -Djava.security.egd=file:/dev/./urandom option to address potential JVM delays during startup. Without it, the application might experience slow startup times due to the random number generation process during boot.
This completes the “Application development” phase. Our service is now configured to start automatically when we run the Docker container. Next, we’ll move on to installing and configuring the other tools required for our continuous integration process.
Application and System Operations
First, we need a clean Linux server to set up the Jenkins CI tool. The following instructions are specific to Ubuntu 14.04, and the process might differ slightly for other Linux distributions. We’re using Jenkins version 2.7.1, so screens and instructions may vary depending on the Jenkins version.
Let’s access our Linux server console and begin installing the prerequisites.
JDK Prerequisite
We need a JDK installed. The following instructions cover installing JDK 8.
| |
Install Docker
To enable Jenkins to trigger Docker builds, we need to install docker-engine:
| |
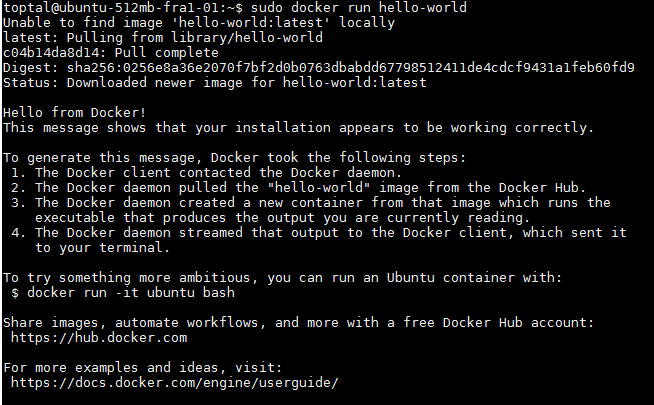
Now that Docker engine is installed, let’s verify its functionality by running a “hello-world” Docker image.
| |
You should see an output similar to this, confirming that the Docker engine is operational:
Install AWS Command Line Interface (CLI)
Next, we install the AWS CLI, which we’ll use later in the Jenkins job configuration for AWS authentication and pushing Docker images to the Amazon EC2 container registry.
Follow the detailed guidelines on the Amazon CLI documentation to install the AWS CLI.
We’ll choose the installation method using Pip, a package management system for installing and managing Python programs. Installing Pip and the AWS CLI can be done by running the following three commands:
| |
AWS ECR
As the final step in our build process, we’ll be pushing our Docker image to the Amazon container registry. In the Amazon Web Services console, navigate to the AWS EC2 Container Service.
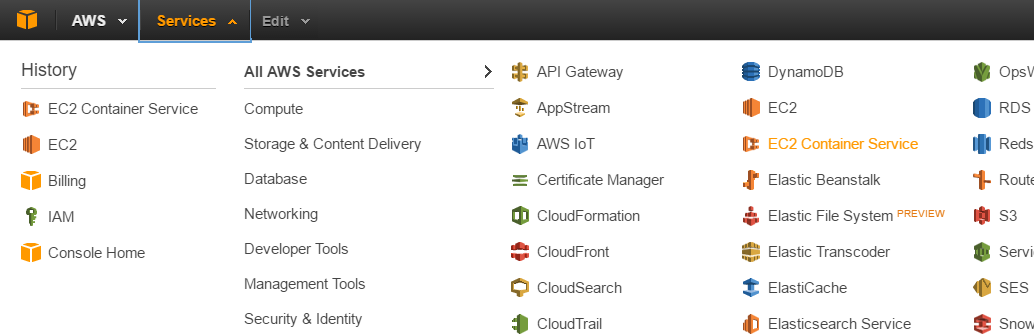
Select the Repositories submenu on the left and click on Get started.
Enter the desired repository name in the provided field and click on the Next Step button.

The next screen will display instructions on pushing images to the repository.
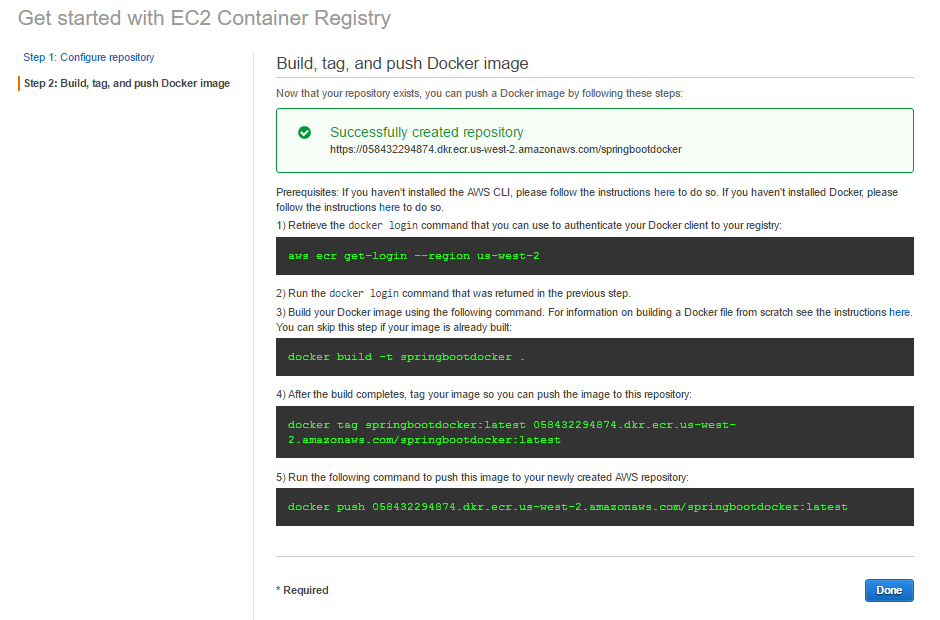
While you’ll see an example of building and pushing a Docker image to the registry, you can disregard it for now. We’ve successfully created our repository.
Install and Configure Jenkins
To install Jenkins, execute the following commands in the shell:
| |
Jenkins will start automatically after installation. Verify the service status with the following command:
| |
Since Jenkins will interact with the Bitbucket Git repository, we need to install Git:
| |
Jenkins will trigger the Gradle build process, which involves creating a Docker image. To enable this, add the Jenkins user to the docker user group:
| |
During the build process, Jenkins will push Docker images to Amazon ECR. To facilitate this, configure AWS credentials for the Jenkins user.
First, switch to the jenkins user. We need to set a password for this user:
| |
After entering the aws configure command, input the generated secret access key and key ID (the credentials created earlier). If your account’s region is different, substitute it accordingly (e.g., us-east-1). Set the default output format for AWS commands to JSON.

Now, let’s proceed to configure Jenkins through the web console at accessible on port 8080.
You’ll be greeted with the Getting started screen:
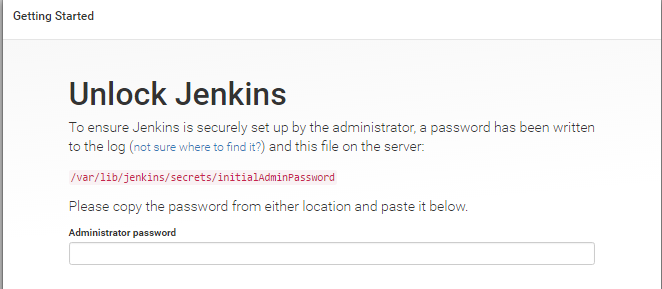
Enter the password as instructed on the screen. The setup wizard will then prompt you to:
- Choose plugins to install - select Install suggested plugins.
- Create the first admin user by providing user credentials.
Once done, click Save and Finish to complete the basic Jenkins setup.
Before defining our build job, we need to add a few more plugins. Go to Manage Jenkins and select Manage plugins. In the Available tab, locate the Bitbucket plugin, check the box next to it, and click Download and install after restart.
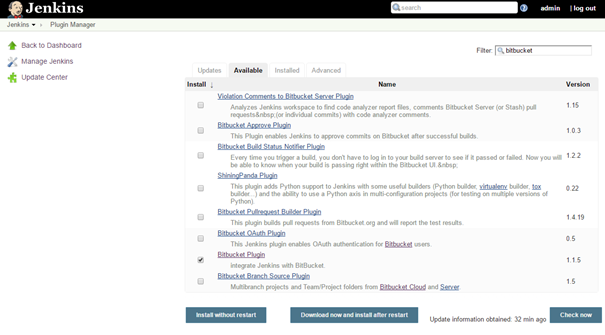
You’ll see a screen similar to the one below:
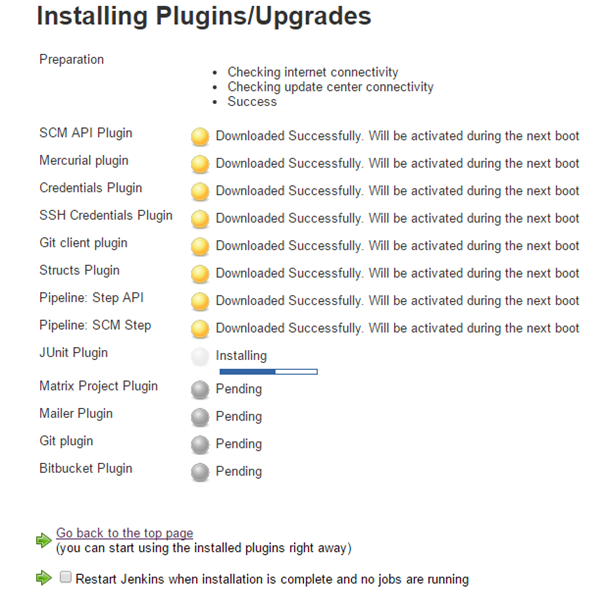
After the plugin installation, repeat the process for these additional plugins required for our setup:
- Gradle plugin
- Docker build step plugin
- Cloudbees Docker custom build environment plugin
- Amazon ECR plugin
The Docker build step plugin will communicate with the Docker daemon. Enable the TCP socket on port 2375 by modifying the Docker configuration file at etc/default/docker:
| |
Add the following line to the configuration:
| |
Save the file, exit, and restart both the Docker and Jenkins services:
| |
After Jenkins restarts, access the Jenkins console and navigate to Manage Jenkins > Configure System.
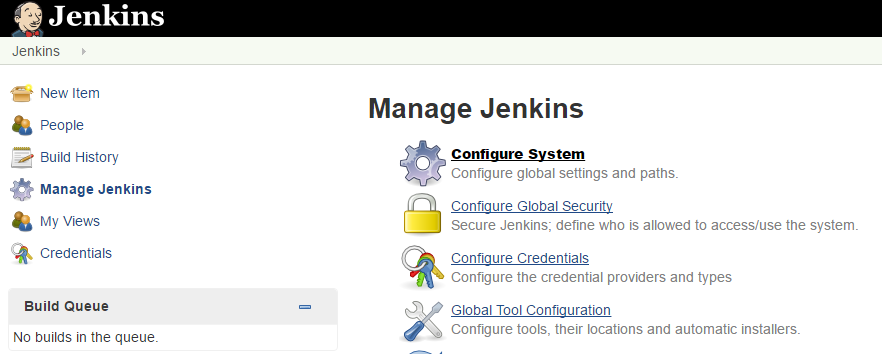
Locate the Docker builder section and enter http://localhost:2375 for the REST API URL. Click Apply to save the change, then click Test Connection to ensure everything is configured correctly.
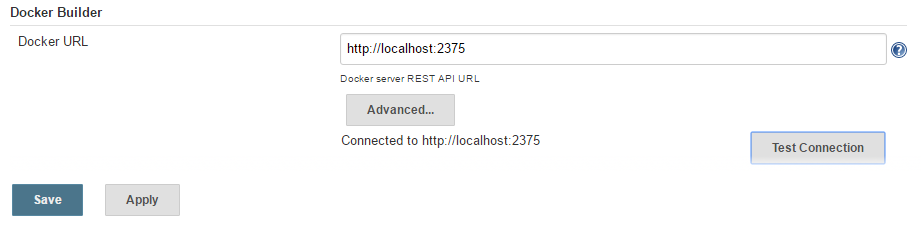
Save the configuration and move on to configuring the Jenkins job.
Job Configuration
Go to the Jenkins home page and click on New Item.
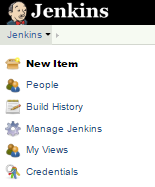
Choose Freestyle project and enter the project name, as shown in the following screen:

Click OK to proceed to the job configuration page. We want the project to build automatically whenever new code is pushed to our Bitbucket Git repository.
Step 1: Source Code Management
Under Source Code Management, choose Git and enter the URL of your Bitbucket repository. The URL follows the format: https://bitbucket.org/bitbucketUsername/repositoryName.
Jenkins will attempt to test the connection. As we haven’t provided credentials yet, it will display an error.

Click on the Add drop-down list and select Jenkins under the Credentials section.
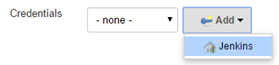
Enter the username and password for your Bitbucket account on the following screen:

After adding the new credentials record, select it in the Credentials drop-down list. This completes the Source Code Management configuration.
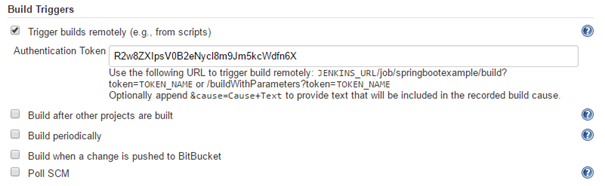
Step 2: Build Triggers
Check the box for Trigger builds remotely and define an authentication token. Make sure the token is random and secure.
Step 3: Bitbucket Webhook
Jenkins provides the URL we’ll use in Bitbucket. Go to your Bitbucket repository page, navigate to Settings, and click on Webhooks. Click on Add webhook.
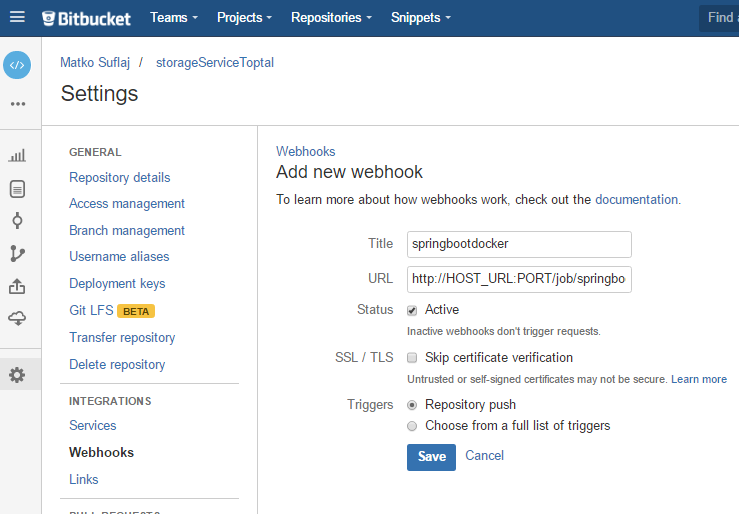
The URL field should follow this structure: http://JENKINS_URL _HOST:PORT/job/JOB_NAME/build?token=TOKEN.
Replace the placeholders with your Jenkins URL, the port it’s running on, the name of the Jenkins job, and the token you defined earlier.
After saving the webhook, you’ll see the following screen. You can edit it if necessary or view requests generated with each code push.
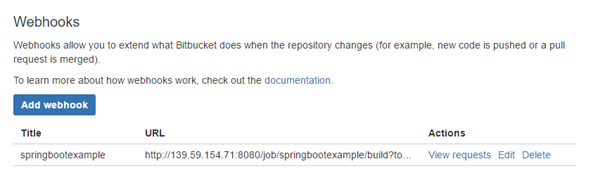
With this configuration, the webhook triggers on every push to the repository, regardless of the branch. We can refine this in Jenkins to trigger builds for specific branches.
To enable Bitbucket to push code to Jenkins, reconfigure Jenkins global security to allow anonymous read access. Additionally, disable the default Jenkins Cross-Site Request Forgery (CSRF) protection for our setup.
Go to Manage Jenkins > Configure Global Security. Check Allow anonymous read access and uncheck Prevent Cross Site Request Forgery exploits. Save the configuration.
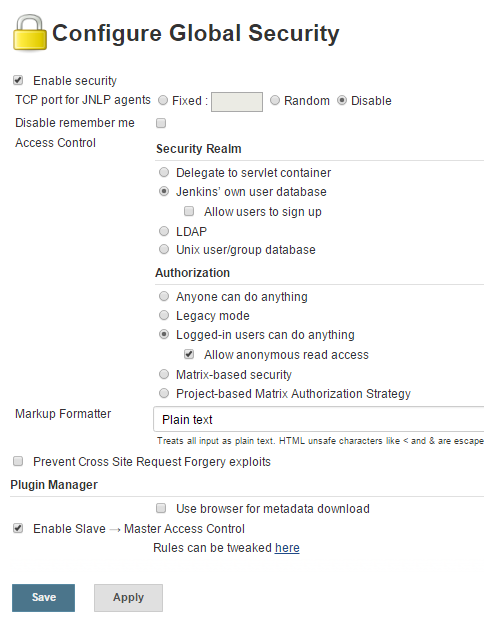
Note: This is simplified for this tutorial. In a production environment, enhance security by placing Jenkins behind a reverse proxy like Nginx, enforcing TLS connections, and enabling CSRF prevention.
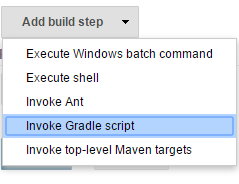
Step 4: Gradle Build
Back in the Jenkins job configuration, add a build step: Invoke Gradle script.
Configure the build step as follows:
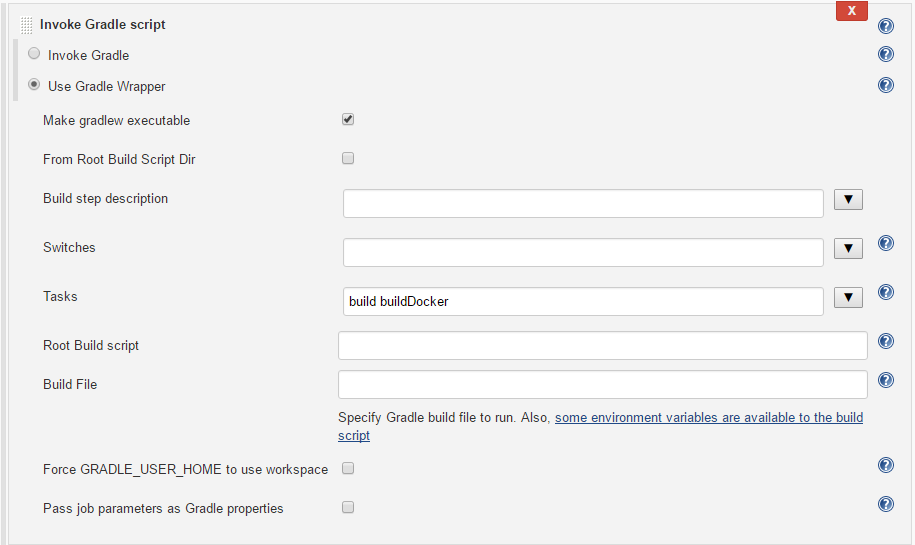
As indicated, we’re using the Gradle wrapper, eliminating the need for a local Gradle installation. Check the Make gradlew executable box.
In the Tasks field, enter build and buildDocker.
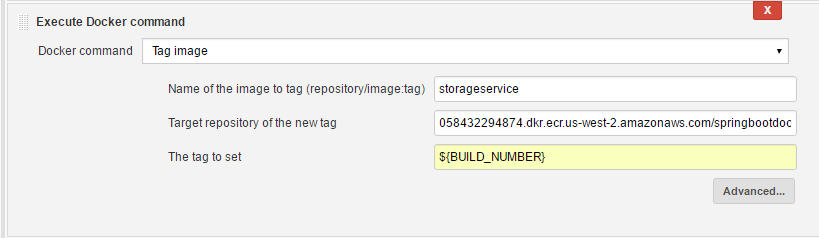
Step 5: Docker Tag Image
This build step tags the Docker image created by the Gradle dockerBuild task. Add another build step to the job: Execute Docker command. Choose Tag image from the command options and set the image name, target repository (where we’ll push the image), and tag:
Step 6: Docker Push to Amazon ECR
Finally, define how to push our image to Amazon ECR. Add an Execute shell build step and specify the commands for AWS authentication and pushing the Docker image to Amazon ECR:
| |

Our build process is now complete. After pushing code to the repository, this job will trigger, and a new Docker image will be built and uploaded to the Amazon ECR repository automatically.
You can now pull and run the image on any machine with docker-engine installed using the following command:
| |
This command starts our Spring Boot microservice, exposing the following endpoints for uploading and downloading files to and from the S3 bucket:
http://hostnameURL:8080/api/storage/uploadhttp://hostnameURL:8080/api/storage/download?fileName=xyz
Next Steps with Java and Continuous Integration
There’s always more we can do. This tutorial covered a lot, but it’s just the beginning. Consider enhancing the setup by placing Jenkins behind a web proxy server like Nginx, establishing TLS connections, and exploring further automation possibilities.
Our Docker image, now available in Amazon ECR, is ready for deployment. While manual deployment is an option, a more robust approach involves further automation through Continuous Delivery, which builds upon CI. Additionally, consider high availability. Amazon AWS EC2 offers features for registering containers in a clustered environment, which is crucial for production-grade services. A good example of implementing a continuous delivery pipeline can be found here: AWS blog post.
Conclusion
We’ve successfully established a streamlined and efficient software development process by leveraging available tools to create an infrastructure that maximizes productivity. By utilizing Spring Boot, we can focus solely on service logic without worrying about complex configuration. Jenkins automates the process of building a new Docker image whenever code is pushed to our Bitbucket Git repository. Finally, we leverage the cloud for storing Docker images and files, freeing us from operating system constraints when deploying our Dockerized service (as long as the target system has docker-engine installed).