Discussions that are critical of Python often mention how challenging it is to use it for multithreaded tasks. They point to the global interpreter lock, often called the GIL](https://opensource.com/article/17/4/grok-gil), as the culprit. The GIL prevents multiple threads of Python code from executing simultaneously. Because of this, the Python multithreading module doesn’t function as someone familiar with languages like C++ or Java might expect. It’s crucial to understand that developers can still write concurrent or parallel code in Python that significantly improves performance, as long as they consider a few factors. If you haven’t already, I recommend reading Eqbal Quran’s article about concurrency and parallelism in Ruby, available here on the Toptal Engineering Blog.
To illustrate concurrency in Python, we’ll create a script to download popular images from Imgur. We’ll begin with a version that downloads images sequentially, one at a time. Before we start, you’ll need to register an application on Imgur. If you don’t have an Imgur account, please create one.
The Python multithreading examples in this article are compatible with Python 3.6.4. They should work with Python 2 with minor adjustments, mainly related to the urllib library, which has changed considerably between these versions.
Getting Started with Python Multithreading
Let’s create a Python module called download.py. This file will contain all the functions we need to retrieve the list of images and download them. We’ll divide this functionality into three separate functions:
get_linksdownload_linksetup_download_dir
The purpose of the setup_download_dir function is to create a directory for downloaded images if one doesn’t exist.
Imgur’s API requires a client ID to be included in the Authorization header of all HTTP requests. You can find this ID on the dashboard of the application you registered on Imgur. The API’s response will be in JSON format, and we can use Python’s built-in JSON library to decode it. Downloading an image is even more straightforward: we just retrieve it using its URL and write it to a file.
The script looks like this:
| |
Now we need to write a module that uses these functions to download the images sequentially. We’ll call this module single.py. It will contain the main function for the initial, basic version of our Imgur image downloader. The module will access the Imgur client ID stored in the IMGUR_CLIENT_ID environment variable. It will call the setup_download_dir function to create the download destination directory. Finally, it will fetch a list of images using the get_links function, exclude all GIF and album URLs from this list, and use the download_link function to download and save each remaining image to disk.
Here is the single.py script:
| |
On my laptop, this script downloaded 91 images in 19.4 seconds. It’s important to note that this may vary depending on your network speed. While 19.4 seconds is not too long, imagine downloading 900 images instead of 90. With an average download time of 0.2 seconds per image, downloading 900 pictures would take about 3 minutes, and 9,000 pictures would take 30 minutes. The good news is that we can significantly reduce this time by implementing concurrency or parallelism.
From this point onward, the provided code examples will only include import statements that are new and specific to those examples. For your convenience, you can find all of the Python scripts used in this article in this GitHub repository.
Parallelism and Concurrency in Python: A Multithreading Example
One of the most popular ways to achieve parallelism and concurrency in Python is through threading, a feature usually managed by the operating system. Threads are more lightweight than processes and share the same memory space.
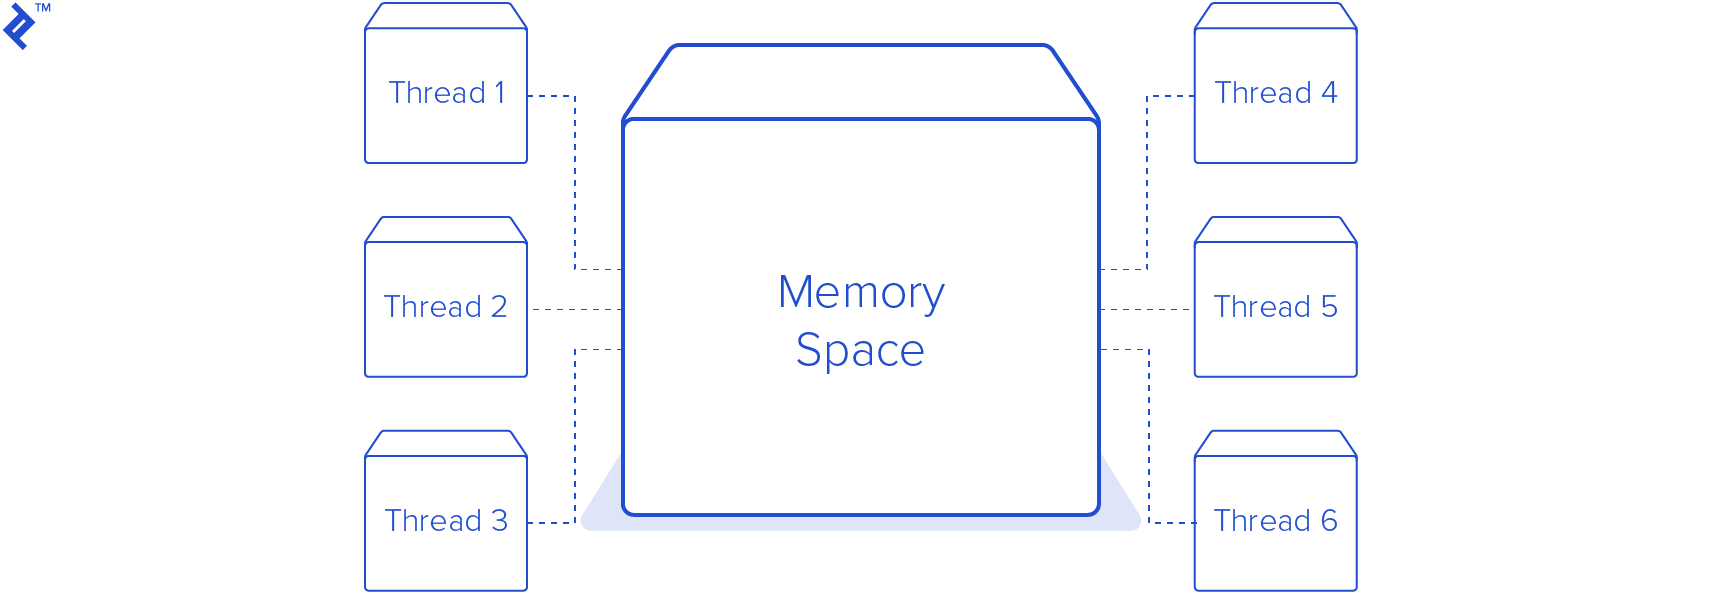
In this Python multithreading example, we’ll create a new module to replace single.py. This module will generate a pool of eight threads, resulting in a total of nine threads, including the main thread. I chose eight worker threads because my computer has eight CPU cores, and assigning one worker thread per core seemed like a reasonable starting point. In real-world scenarios, this number is carefully chosen based on various factors, such as other applications or services running on the same machine.
This module is very similar to the previous one. The main difference is the new DownloadWorker class, which inherits from Python’s Thread class. We’ve overridden the run method, which now executes an infinite loop. In each iteration, it calls self.queue.get() to retrieve a URL from a thread-safe queue. This call blocks until an item is available for processing. Once the worker thread receives an item from the queue, it calls the download_link method, the same one used in the previous script, to download the image to the designated images directory. After the download is complete, the worker thread notifies the queue that the task is finished. This step is crucial because the Queue tracks the number of tasks that were added. Without the worker signaling completion, the queue.join() call in the main thread would block indefinitely.
| |
Running this Python multithreading example on the same computer as before resulted in a download time of 4.1 seconds! This is 4.7 times faster than the previous version. Although considerably faster, it’s essential to remember that because of the GIL, only one thread was actively running at any given time. This means the code is concurrent but not parallel. The performance improvement comes from the fact that downloading images is an IO-bound operation. The processor isn’t under heavy load during the download process; most of the time is spent waiting for data from the network. This is where Python multithreading can significantly enhance speed. When one thread is waiting for network data, the processor can switch to another thread that’s ready to work. However, using the threading module in Python, or any interpreted language with a GIL, can sometimes decrease performance. If your code is performing a CPU-bound task, like decompressing GZIP files, using the threading module will slow down execution. For genuinely parallel execution of CPU-bound tasks, we can utilize the multiprocessing module.
It’s worth noting that while CPython, the primary Python implementation, has a GIL, this isn’t true for all Python implementations. For instance, IronPython, a Python implementation based on the .NET framework, does not have a GIL. Neither does Jython, a Java-based implementation. You can find a list of available Python implementations here.
Python Multiprocessing: Creating Multiple Processes
Compared to the threading module, the Python multiprocessing module is simpler to integrate. We don’t need to create a new class like we did in the Python multithreading example. The only changes we need to make are in the main function.

To leverage multiple processes, we create a multiprocessing.Pool. We then use its map method to provide a list of URLs to the pool. This action creates eight new processes, utilizing each to download the images in parallel. This is true parallelism, but it comes with a trade-off: the script’s entire memory footprint is duplicated in each new subprocess. While this might not be an issue in this straightforward example, it can quickly become significant overhead in more complex programs.
| |
Distributing Tasks to Multiple Workers
Python’s multithreading and multiprocessing modules are efficient for scripts running on your local machine. However, what if you want to execute tasks on a different machine or need to scale beyond the processing power of a single computer? A prime example is handling long-running background tasks for web applications. It’s not ideal to create numerous subprocesses or threads on the same machine running your application code for these tasks. Doing so would degrade the application’s performance for all users. A better solution is to offload these tasks to another machine, or even multiple machines.
An excellent Python library for this is RQ, a straightforward yet powerful tool. We can use this library to add a function and its arguments to a queue. This process pickles the function call, which is then appended to a Redis list. While queuing a task is the first step, it doesn’t trigger its execution. We need at least one worker process monitoring that job queue.
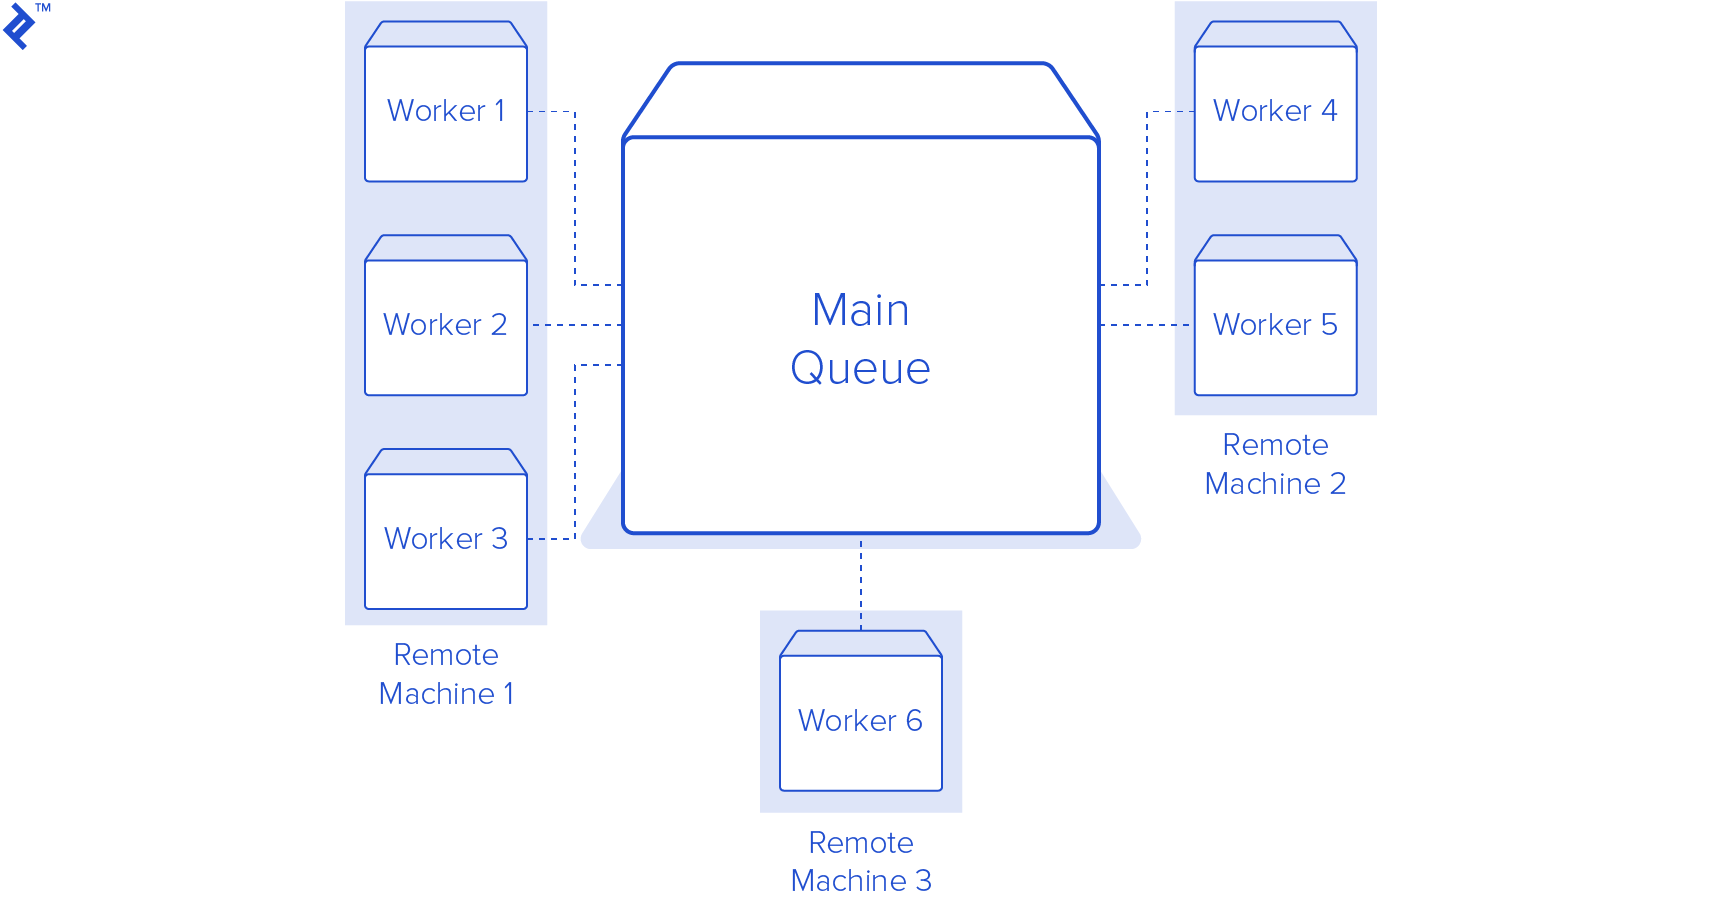
Before proceeding, you’ll need to install and run a Redis server on your machine or have access to one that’s already running. Once that’s done, we only need to make a few minor adjustments to our existing code. First, we create an instance of an RQ Queue and provide it with an instance of a Redis server from the redis-py library. Next, instead of directly calling our download_link method, we call q.enqueue(download_link, download_dir, link). The enqueue method takes a function as its first argument, and any subsequent arguments or keyword arguments are passed to that function when the job is executed.
The final step is to start some worker processes. RQ offers a convenient script for running workers on the default queue. By executing rqworker in a terminal window, a worker process will start listening on the default queue. Ensure that your current working directory is the same as the one containing the scripts. If you want to monitor a different queue, you can run rqworker queue_name, replacing queue_name with the desired queue’s name.
RQ’s advantage is its scalability. As long as you can establish a connection to Redis, you can run as many worker processes as needed on any number of machines. This makes scaling up as your application grows remarkably easy. Here’s the RQ version of our script:
| |
It’s important to note that RQ is not the only Python job queue solution available. While RQ is user-friendly and excels in handling simple use cases, if you require more advanced features, you can explore other Python 3 queue solutions like Celery.
Multiprocessing vs. Multithreading in Python: Choosing the Right Approach
If your code is IO-bound, both multiprocessing and multithreading in Python can be beneficial. While Python multiprocessing is generally easier to implement than threading, it has a larger memory footprint. If your code is CPU-bound, multiprocessing is usually the preferred option, especially when the target machine has multiple cores or CPUs. For web applications and scenarios where you need to distribute work across several machines, RQ is the superior choice.
Update
Enhancing Concurrency in Python 3.2+ with concurrent.futures
The concurrent.futures package, introduced in Python 3.2, provides another way to implement parallelism and concurrency in Python. It was not covered in the original article.
In the original article, I stated that the Python multiprocessing module is simpler to integrate than the threading module. This was because using the Python 3 threading module required creating a subclass of the Thread class and setting up a Queue for threads to monitor for new tasks.
However, using a concurrent.futures.ThreadPoolExecutor makes the Python threading example almost as straightforward as using the multiprocessing module.
| |
Now that we have downloaded all these images using our Python ThreadPoolExecutor, we can utilize them to test a CPU-bound task. Let’s create thumbnail versions of all images, initially with a single-threaded, single-process script, and then compare its performance to a multiprocessing-based solution.
For resizing images, we’ll use the Pillow library.
Here’s our initial script:
| |
This script iterates through the image file paths in the “images” folder. For each path, it calls the create_thumbnail function, which uses Pillow to open the image, generate a thumbnail, and save the resized image using the same name as the original, but with “_thumbnail” appended to it.
Running this script on 160 images, totaling 36 megabytes, takes 2.32 seconds. Now, let’s see if we can improve this using a ProcessPoolExecutor.
| |
The create_thumbnail method remains identical to the previous script. The primary difference is the creation of a ProcessPoolExecutor. We use the executor’s map method to create thumbnails in parallel. The ProcessPoolExecutor creates one subprocess for each CPU core by default. Running this script on the same set of 160 images took 1.05 seconds—a 2.2 times speed improvement!
Async/Await (Python 3.5+ only)
One of the most frequent requests in the comments on the original article was for an example using Python 3’s asyncio module. This approach introduces some new Python syntax and concepts that might be unfamiliar to many developers. Additionally, Python’s built-in urllib module is not asynchronous, which adds a layer of complexity. To fully utilize asyncio, we need to use an asynchronous HTTP library. For this purpose, we’ll use aiohttp.
Let’s dive into the code, and a detailed explanation will follow.
| |
There’s quite a bit to unpack here. Let’s start with the main entry point of our program. The first thing we do with the asyncio module is acquire the event loop. The event loop manages the execution of our asynchronous code. We then run the loop until it’s complete, providing it with the main function. You’ll notice new syntax in the definition of the main function: async def. You’ll also see await and with async used within the code.
The async/await syntax was introduced in PEP492. The async def syntax designates a function as a coroutine. Coroutines are internally based on Python generators, but they are not exactly the same. Similar to generators returning a generator object, coroutines return a coroutine object. To obtain the result of a coroutine, we use the await expression. When a coroutine calls await, its execution is suspended until the awaited task is complete. This suspension allows other tasks to run while the coroutine is waiting for a result. This result is typically some form of I/O operation, like a database request or, in our case, an HTTP request.
The download_link function required significant modification. Previously, it relied on urllib to handle most of the image reading process. To make our method compatible with asynchronous programming, we’ve introduced a while loop that reads chunks of the image and suspends execution while waiting for the I/O operation to finish. This approach enables the event loop to cycle through downloading multiple images, switching between them as new data becomes available during download.
There Should Be One—and Preferably Only One—Obvious Way to Do It
Although the zen of Python emphasizes having one clear way to accomplish a task, Python provides numerous approaches to incorporating concurrency into our programs. The most suitable method depends on your specific needs. Asynchronous programming scales better than threading or multiprocessing for highly concurrent workloads, such as web servers. However, to fully leverage its benefits, your code and its dependencies need to be asynchronous.
This article and its updated examples aim to guide you in understanding concurrency options within the Python standard library. I hope they provide a starting point for adding concurrency to your Python projects.