In recent times, mobile phone capabilities have grown considerably. Processing power and memory have reached a point where complex tasks are easily handled. Despite this progress, mobile platforms still require further advancements, particularly with the rise of augmented reality, virtual reality, and artificial intelligence.
A significant hurdle in computer vision is object detection within images. Although the human visual system performs this effortlessly, replicating it in machines remains a challenge. Nonetheless, decades of research have yielded approaches to simulate this process, and progress is evident.
This tutorial explores an algorithm for detecting blobs in images. We’ll utilize this algorithm, provided by the open source library OpenCV, to implement a prototype iPhone application that utilizes the rear-facing camera to capture images and identify objects within them.
OpenCV Tutorial
OpenCV is an open source library containing implementations of prominent computer vision and machine learning algorithms. Whether you’re building applications for facial recognition, card detection in games, or image effects, OpenCV proves to be an excellent choice.
Written in C/C++, OpenCV offers wrapper libraries for major platforms, simplifying its integration with iOS. To incorporate it into an Objective-C iOS app, download the OpenCV iOS Framework from the official website. It’s crucial to utilize OpenCV for iOS version 2.4.11 (as assumed in this article) because the latest version, 3.0, introduces header file organization changes that might cause compatibility issues. Detailed installation instructions are available documented on its website.
MSER
MSER, an abbreviation for Maximally Stable Extremal Regions, is a prevalent method for blob detection in images. In essence, this algorithm identifies connected groups of pixels where the outer boundary pixels have intensities exceeding those of the inner boundary pixels by a specific threshold. These regions are considered maximally stable if they remain relatively unchanged across varying intensity levels.
While alternative blob detection algorithms exist, MSER’s selection stems from its relatively low runtime complexity of O(n log(log(n))), where n represents the total image pixels. Moreover, its resilience to blur and scale variations proves beneficial when handling real-time image sources like mobile phone cameras.
This tutorial focuses on designing an application to detect the Toptal logo. The symbol’s sharp corners might suggest employing corner detection algorithms. While effective for objects that stand out against their backgrounds (e.g., black on white), real-time detection of the Toptal logo in real-world images, where corner detection algorithms would constantly identify numerous corners, would prove challenging.
Strategy

Each image frame captured by the application undergoes grayscale conversion. This simplifies processing and reduces data volume without sacrificing logo visibility.
Subsequently, OpenCV’s implementation of the algorithm extracts all MSERs. Each MSER is normalized by transforming its bounding rectangle into a square. This step ensures tolerance to perspective distortions arising from varying capture angles and distances.
Several properties are then computed for each MSER:
- Hole count
- Ratio of MSER area to its convex hull area
- Ratio of MSER area to its minimum bounding rectangle area
- Ratio of MSER skeleton length to MSER area
- Ratio of MSER area to the area of its largest contour
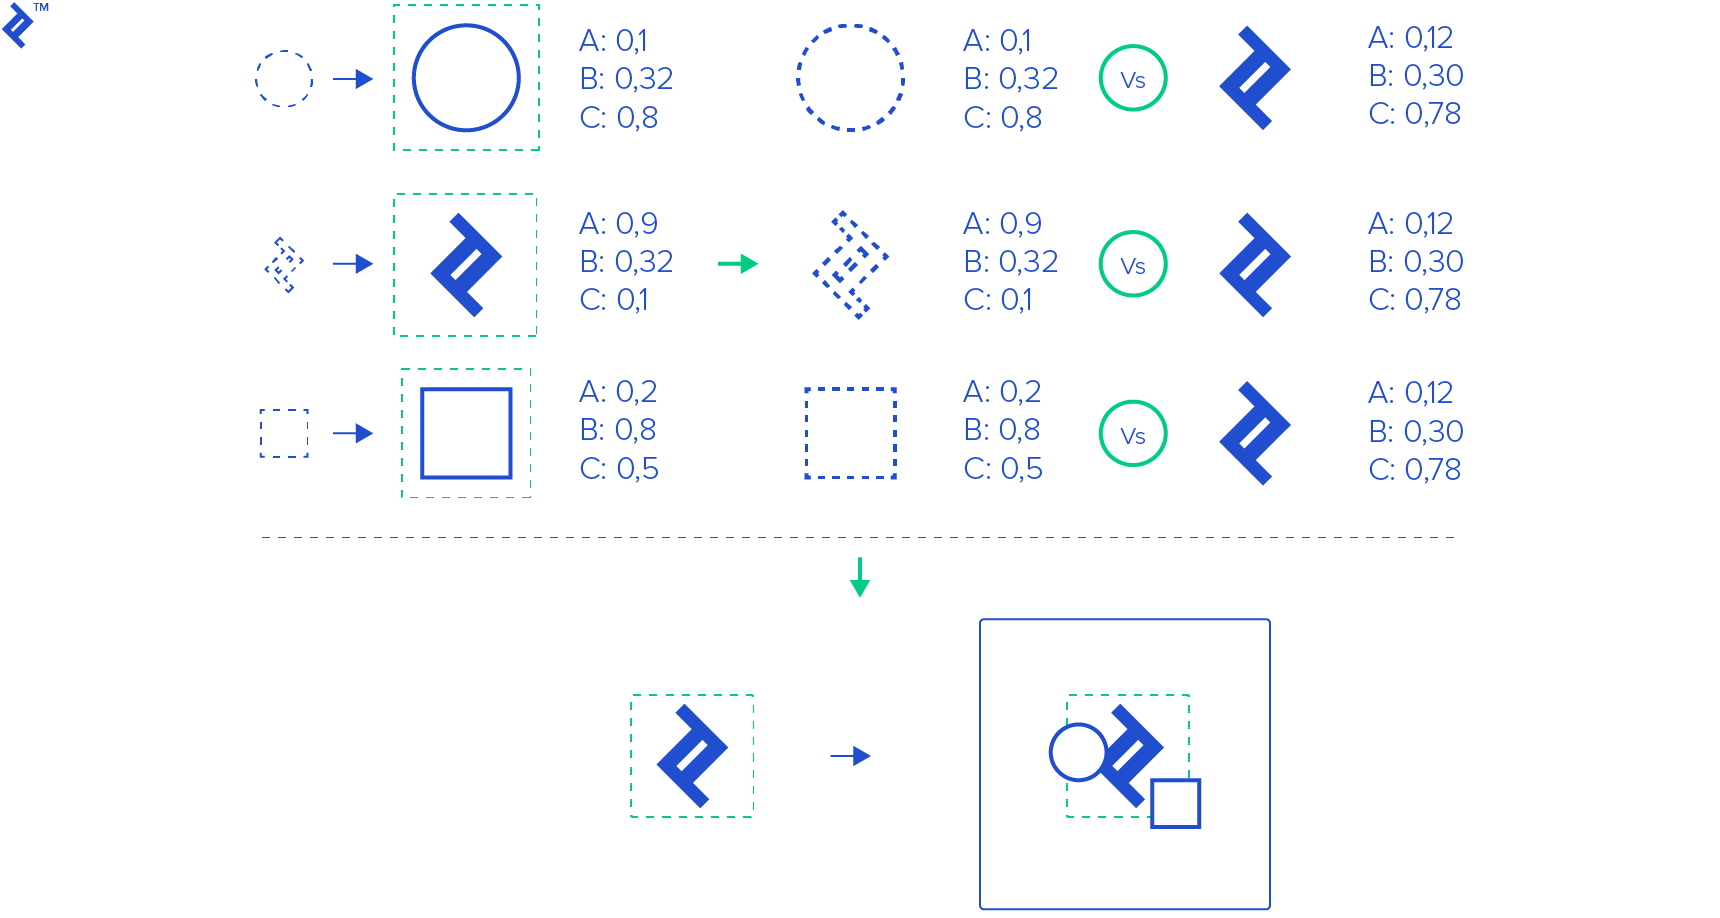
To identify the Toptal logo, the properties of all MSERs are compared against those of a pre-learned logo template. In this tutorial, empirically determined maximum permissible differences are employed for each property.
The region exhibiting the highest similarity is selected as the result.
iOS Application
Integrating OpenCV with iOS is straightforward. For those new to the process, here’s a condensed guide to setting up Xcode for creating an iOS app using OpenCV:
Create a new project named “SuperCool Logo Detector.” Choose Objective-C as the language.
Create a new Prefix Header (.pch) file and name it PrefixHeader.pch
Navigate to the “SuperCool Logo Detector” Build Target, and within the Build Settings tab, locate the “Prefix Headers” setting under the LLVM Language section.
Set the “Prefix Headers” setting to “PrefixHeader.pch”
If not already installed, install OpenCV for iOS 2.4.11.
Drag and drop the downloaded framework into the project. Ensure “Linked Frameworks and Libraries” is checked within your Target Settings (this should happen automatically).
Link these additional frameworks:
- AVFoundation
- AssetsLibrary
- CoreMedia
Open “PrefixHeader.pch” and add:
1
2
3
#ifdef __cplusplus #include <opencv2/opencv.hpp> #endif”Change the extensions of automatically generated code files from “.m” to “.mm” to indicate the use of Objective-C++, as OpenCV is written in C++.
Import “opencv2/highgui/cap_ios.h” in ViewController.h and make ViewController conform to the CvVideoCameraDelegate protocol:
1#import <opencv2/highgui/cap_ios.h>Add a UIImageView to the initial view controller in Main.storyboard.
Create an outlet named “imageView” in ViewController.mm.
Create a “CvVideoCamera *camera;” variable in ViewController.h or ViewController.mm, and initialize it with a reference to the rear camera:
1
2
3
4
5
6
7
camera = [[CvVideoCamera alloc] initWithParentView: _imageView]; camera.defaultAVCaptureDevicePosition = AVCaptureDevicePositionBack; camera.defaultAVCaptureSessionPreset = AVCaptureSessionPreset640x480; camera.defaultAVCaptureVideoOrientation = AVCaptureVideoOrientationPortrait; camera.defaultFPS = 30; camera.grayscaleMode = NO; camera.delegate = self;Building the project at this point will trigger a warning about the unimplemented “processImage” method from CvVideoCameraDelegate. For simplicity, we’ll acquire images and overlay them with text:
In “viewDidAppear,” add:
[camera start];
1
2
3
4
5
6
7
8
- Running the app will prompt for camera access, followed by a live camera feed. - Within the “processImage” method, add: ```mm const char* str = [@"Toptal" cStringUsingEncoding: NSUTF8StringEncoding]; cv::putText(image, str, cv::Point(100, 100), CV_FONT_HERSHEY_PLAIN, 2.0, cv::Scalar(0, 0, 255));
With that, you have a rudimentary app overlaying camera images with “Toptal.” We’ll now build upon this to create our logo detector. For brevity, this article focuses on crucial code segments. The GitHub code includes detailed comments.
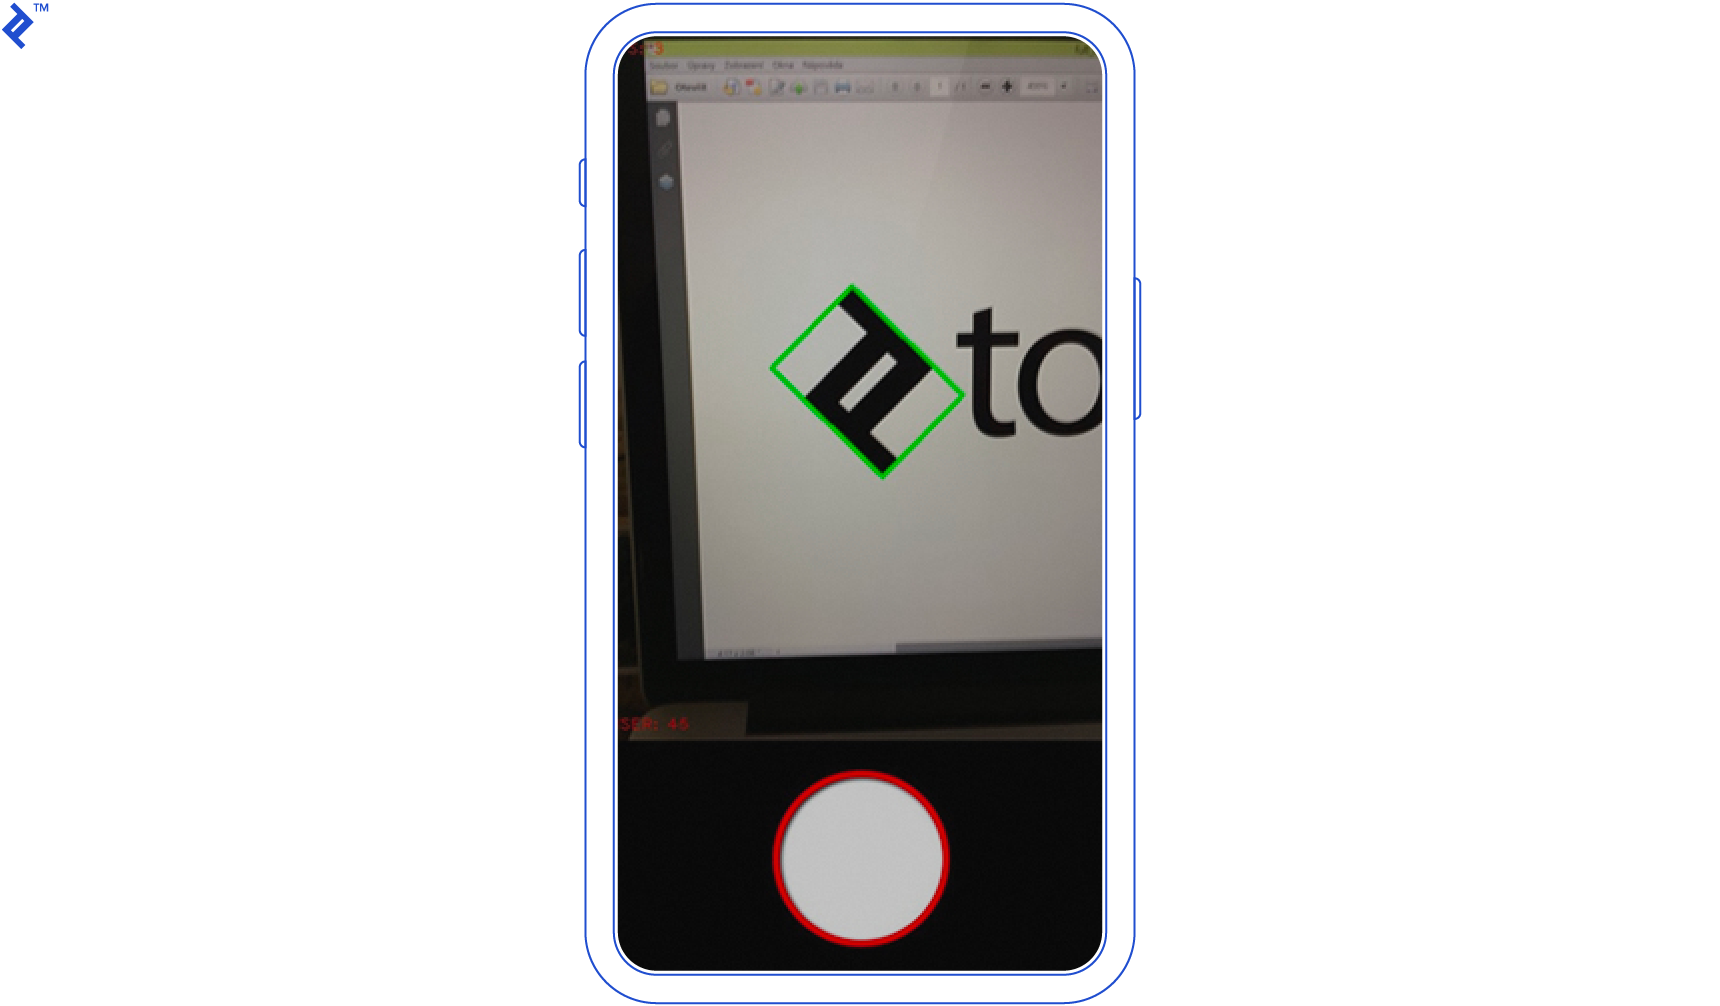
Upon launch, the app extracts MSER features from the logo template and stores them in memory:
| |
The single-screen app features a Start/Stop button. Information like FPS and detected MSER count is overlaid on the image. While running, the following processImage method is called for each camera frame:
| |
This method generates a grayscale copy of the original image, identifies all MSERs, extracts their relevant features, compares each MSER to the template, and selects the best match. It then draws a green boundary around the chosen MSER and overlays the image with metadata.
Definitions for key classes and methods used in the app are provided below, with their purposes explained through comments.
GeometryUtil.h
| |
MSERManager.h
| |
MLManager.h
| |
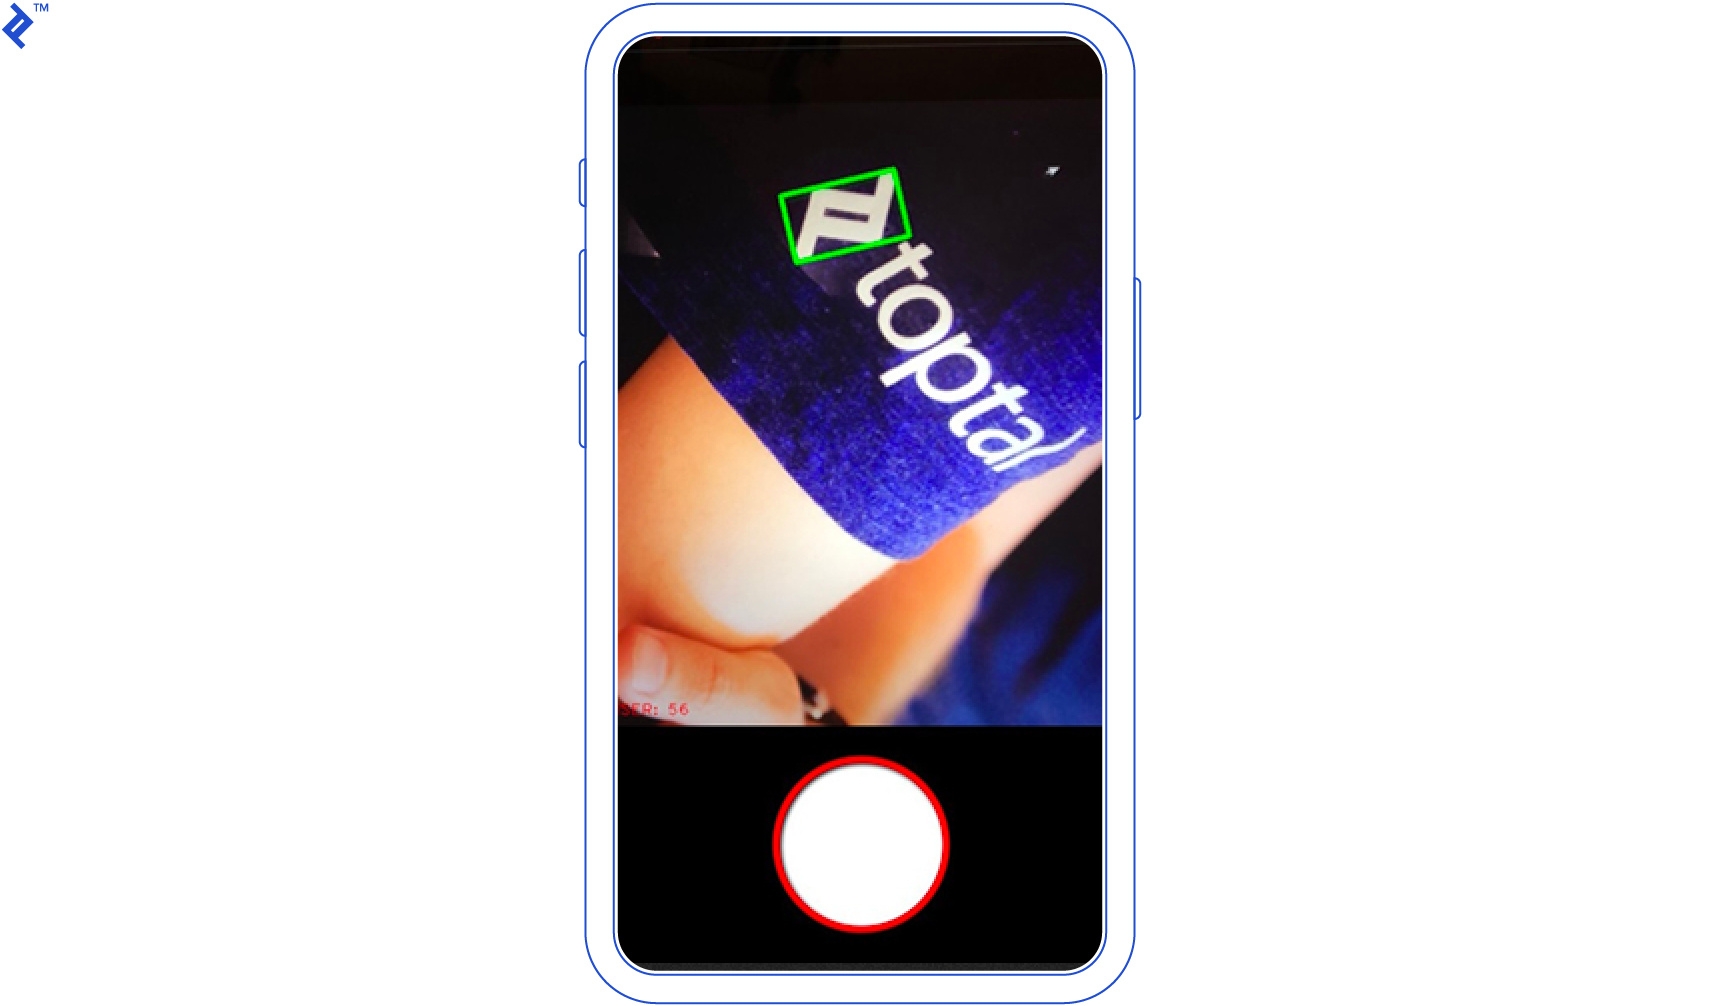
With everything interconnected, you can now utilize your iOS device’s camera to detect the Toptal logo from various angles and orientations.
Conclusion
This article demonstrated the ease of detecting simple objects within images using OpenCV. The complete code is available available on GitHub. Feel free to fork and submit pull requests; contributions are appreciated.
As with any machine learning task, this logo detection app’s accuracy can be enhanced using different features or classification methods. However, this article serves as a starting point for object detection using MSER and broader applications of computer vision techniques.
Further Reading
- J. Matas, O. Chum, M. Urban, and T. Pajdla. “Robust wide baseline stereo from maximally stable extremal regions.”
- Neumann, Lukas; Matas, Jiri (2011). “A Method for Text Localization and Recognition in Real-World Images”