The widespread adoption of Android devices is undeniable. Google’s open-source platform powers countless smartphones, tablets, smart TVs, and many other devices. Moreover, Google’s investment in wearable computing is pushing technological boundaries. Google Glass, in particular, has the potential to revolutionize how we engage with technology. For too long, we’ve been glued to our small phone screens, heads bowed. Google Glass allows us to interact with our technology while standing tall and proud.
Initially, Android development was restricted to developers proficient in Java. A vast community of developers accustomed to building web applications using other platforms struggled to transition to Android development. While some cross-platform solutions emerged, offering web developers a way into Android development without requiring Java or Android SDK expertise, the ideal scenario would be to develop for Google Glass using existing web development skills, wouldn’t it? The good news is, it’s entirely possible!
Google has introduced cloud-based RESTful services, collectively known as the Mirror API, enabling web developers to create Glassware solely through interaction with Google-hosted and managed web services. The beauty of this approach is its platform independence. You don’t even need a Google Glass device to start using the Mirror API, although some advanced features might require one.
You only need to grasp two key concepts:
- Obtain an Authentication Token by executing an OAuth 2.0 request
- Send HTTP requests to designated endpoints
This Google Glass development guide will introduce you to the techniques involved in building applications for Glass.
If you’re new to Google Glass, I recommend watching these two videos to familiarize yourself with the basics of its user interface.
Additional helpful videos on setup and navigation are available here, along with more detailed information about the user interface here.
While there are notable differences between developing with the Mirror API and native Google Glass development, this tutorial focuses on providing web developers with a practical understanding of Google Glass and how to get started quickly.
Understanding the Mirror API’s Functionality
The fundamental principle is that you’re building a conventional web application. It will reside on a web server and won’t directly interact with a Google Glass device. Instead, your application communicates with the Mirror API services. Notably, Mirror API-based applications don’t require any installation on the Glass device itself; all necessary services are integrated into the Glass OS.

Synchronization between your application and the Google Glass device is handled by the device’s built-in sync services, which push and pull content through the Mirror API.
It’s important to note that you have no control over the frequency at which Google Glass checks for updates on the Mirror API, and this “middleman” approach does have implications. This architecture inherently introduces a delay between your application’s requests and their execution on the Glass device, precluding real-time interaction.
Setting Up and Authenticating Your Application
Before you can leverage the Mirror API for web development, you’ll need to establish an application identity on the Google Developers Console. Navigate to the Google APIs console and sign in using your Google account.
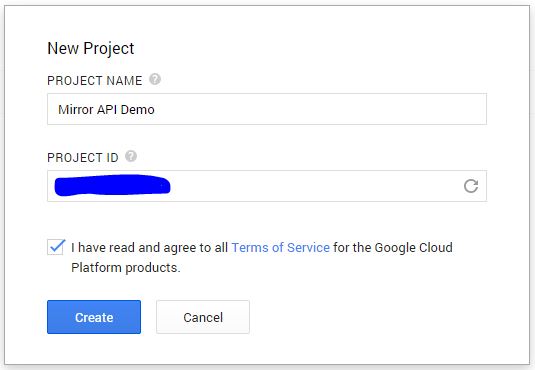
Once you’re logged in, proceed to create a new project. Let’s call it “Mirror API Demo”.
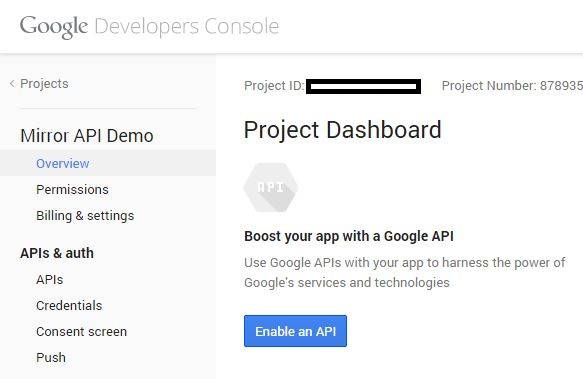
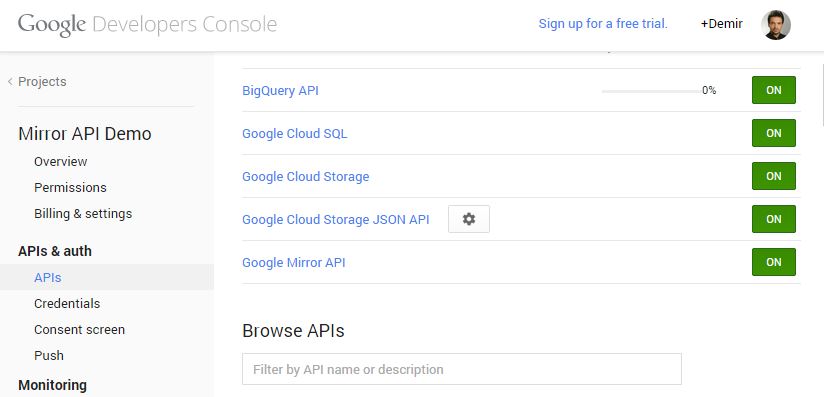
Now, you need to enable the Mirror API for your Glass web application. This can be done by clicking the “Enable an API” button located on the project overview page. Locate the Mirror API in the list and toggle it to the ON position.
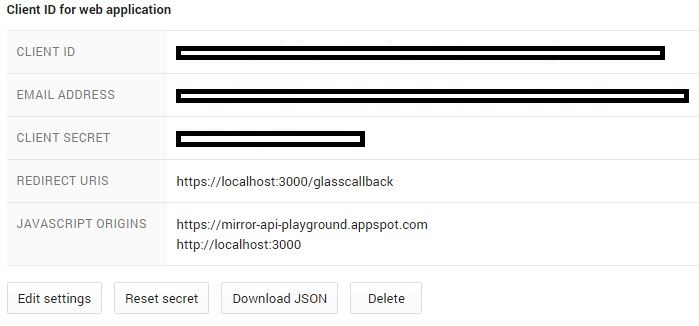
Next, we need to create a Client ID specifically for our Glass web application. Click the “Create New Client ID” button found within the Credentials screen.
Note: You might be prompted to provide details for the “Consent screen.” This information is displayed to users when they grant your application access to their data.
For this demonstration, we’ll be using the Google Glass Playground to test our Mirror API integration. To enable the Playground, you’ll need to authorize https://mirror-api-playground.appspot.com as a trusted origin for incoming HTTP requests. Since we won’t be utilizing OAuth redirection in this demo, you can leave the “Redirect URIs” field empty.
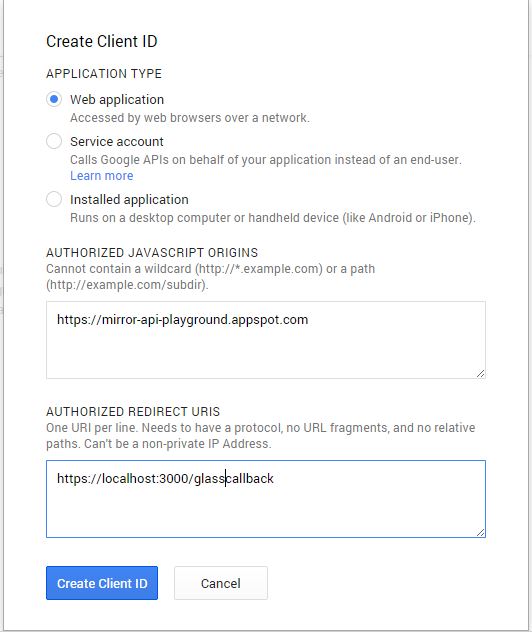
Finally, click “Create Client ID,” and you’re ready to make your inaugural Mirror API request!
Authenticating Your Mirror API Application
Important: It’s crucial to differentiate between your Mirror API Developer account and your Google Glass owner account. While you can complete this exercise using a single account that serves both purposes, understanding the distinction between these roles is key.
Every HTTP request originating from your Glass web application to the Mirror API must be authorized. The Mirror API employs the standard “Bearer Authentication” mechanism, meaning you need to include a token with each request. These tokens are issued by the Google API through the standard OAuth 2.0 protocol.
Here’s a breakdown of the authentication flow:
- The user (Glass Owner) visits your web application and initiates the login process by clicking “Login.”
- Your application sends a request to the Google API, triggering a consent screen (typically a popup window) generated by the Google API.
- If the user grants the necessary access permissions to your application, the Google API issues a token, which you will then use for subsequent calls to the Mirror API.
Exploring the Mirror API Playground
The Google Glass Playground provides a sandbox environment to experiment with how content is rendered on Glass. You can use it to push content to your Glass, and even if you don’t own a device, you can preview how the content would appear on the Glass display.
You can access the Mirror API Playground at this URL.
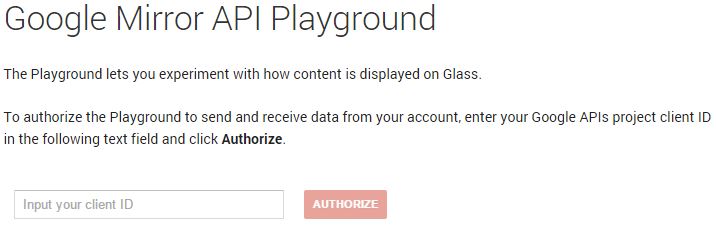
As we’ve already whitelisted the Mirror API Playground endpoint as a valid origin for HTTP requests, all that’s left is to “identify the Mirror API Playground as your application.” You achieve this by providing your Client ID, which you can find on the Google Developers Console.

Clicking “Authorize” will prompt an OAuth 2.0 consent screen, similar to the one shown below. Ensure you log in using your “Glass Owner” account, as these are the credentials used for interacting with the Glass.
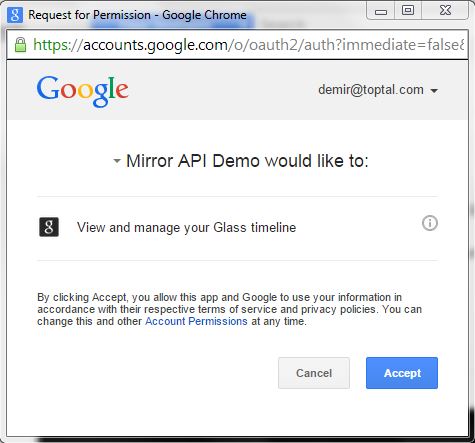
Once you grant access by clicking “Accept,” the Mirror API Playground will be recognized as your application. This grants it access to the User’s Glass Timeline, allowing you to interact with the Google Glass device directly from the Playground.
Sending Your First Message: “Hello Glass Explorers!”
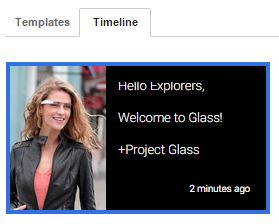
The Mirror API Playground offers a range of pre-built templates you can leverage to explore the API’s capabilities. Browse the list and select the “Hello Explorers” card example.
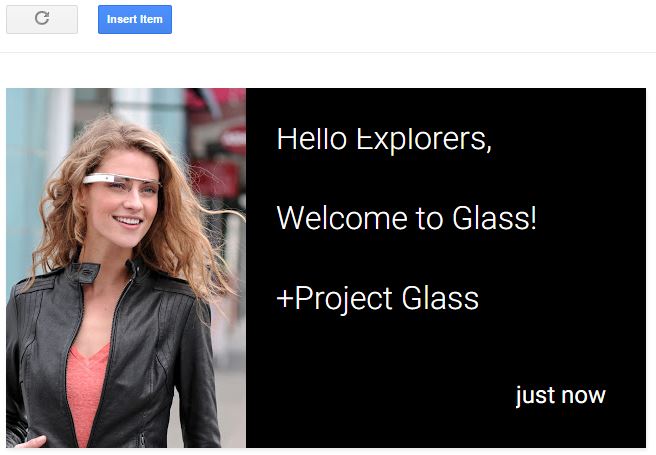
The selected template will be displayed in the Playground, along with the corresponding HTTP Request Body content used to structure its layout.
| |
Feel free to customize the request to your liking. Once you’re satisfied with the design, hit the “Insert Item” button to push it to your timeline. Upon successful processing, your “Timeline” will be updated. If you own a Glass device, the item will also appear on its timeline.
Building Your Own Mirror API Web Application
Congratulations! You’ve successfully executed your first Mirror API request and delivered a message to your Google Glass, all without writing a single line of code.
Let’s take things a step further and replace the Mirror API Playground with our own custom application.
First, we need to ensure that the Google API accepts requests originating from our application. Go back to the Google Developers Console and add your application’s URL to the list of authorized JavaScript origins. For demonstration purposes, I’ll use http://localhost:3000, but you should replace it with your own setup.
Obtaining the Authorization Token
We’ll be using Google API JavaScript Client Library to handle the OAuth 2.0 request and acquire an authorization token from the Google API.
Start by creating a basic HTML page with the following content. Make sure to replace CLIENT ID with your application ID:
| |
When you run your Google Glass application (ensuring it’s hosted at the URL specified as the authorized JavaScript origin in the Google Developers Console) and click “Authorize,” you initiate the OAuth 2.0 flow. Log in with your Google account, and the generated token will be displayed in your browser’s console.
With your token in hand, you’re now equipped to start posting to the Mirror API! Your token will remain valid for 60 minutes, which should be ample time to complete this demonstration. If it expires, simply click “Authorize” again to obtain a new one.
The concepts of RESTful services and HTTP requests are universal among web developers, regardless of their chosen development platform or programming language. To follow along with this demo, you’ll need to send standard HTTP requests to the designated Mirror API endpoints. I’ll be using Postman for this purpose, but feel free to adapt the request details to your preferred programming language and HTTP client tool, such as Postman.
Fetching Your Timeline Items
You can retrieve a list of items you’ve pushed to Glass by sending an HTTP GET request to https://www.googleapis.com/mirror/v1/timeline.
Remember that every request to the Mirror API requires authorization. The authorization token is included as the value of the Authorization HTTP header, prefixed with the word “Bearer.”
In Postman, it would look something like this:

Upon executing the request, you should receive a response similar to this:
| |
Examining the response content reveals the item you previously posted from the Playground.
Adding a New Item to Your Timeline
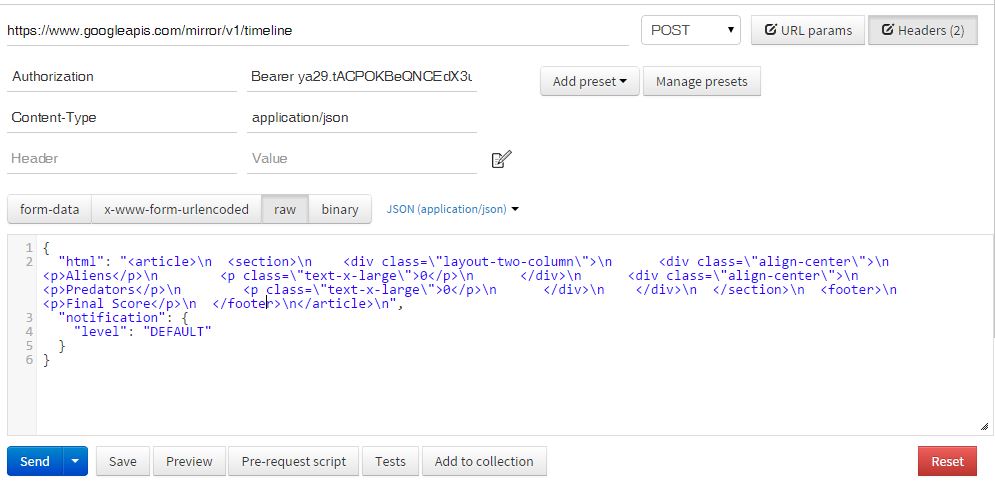
To create and insert a new item into your timeline, you send a POST request to https://www.googleapis.com/mirror/v1/timeline. Ensure that you set the Content-Type header to application/json and include the Authorization header, just like in the previous example.
Imagine you’re an avid sports fan, and your favorite team, the Aliens, is facing off against the Predators. You want to use the Mirror API to keep all the fans updated on the score.
Your request body should resemble this:
| |
And the Postman setup should look something like this:
Executing this request should result in a response from the Mirror API similar to:
| |
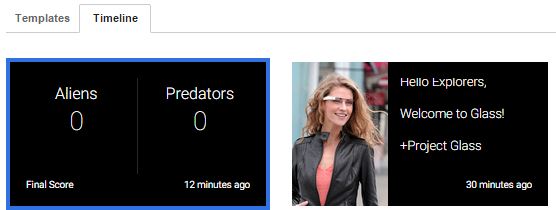
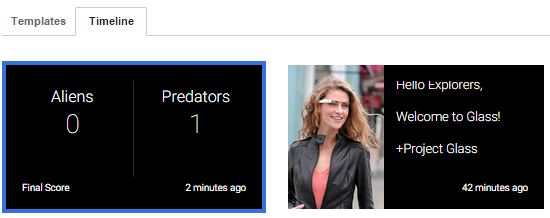
Even without a Google Glass device, you can return to the Mirror API Playground and click the “Reload Timeline Items” button to see the updated timeline. It will display both items, reflecting how they would appear on an actual Glass display. You’ll also see both items if you execute the GET request to list your timeline items.
If you analyze the response content from the previous example, you’ll come across a line similar to:
| |
The Mirror API assigns a globally unique ID to each item upon insertion. This ID is returned in the response after a successful POST request and is included in the item details when you perform a GET request to retrieve the timeline items.
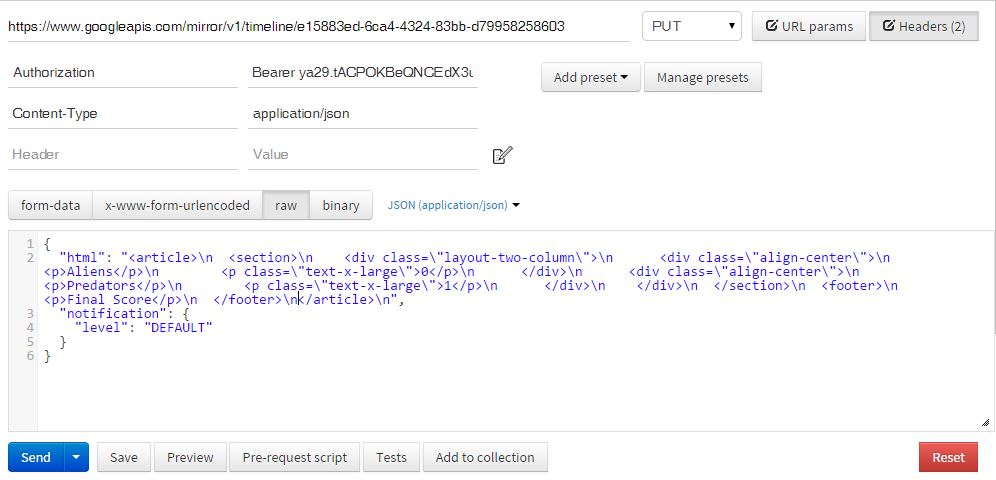
Let’s say the Predators take the lead and score a point. To update the score, you would send a PUT request to https://www.googleapis.com/mirror/v1/timeline followed by the item ID.
It would look something like this:
| |
Modify the item content to reflect the updated score:
| |
The Postman configuration for this update should resemble this:
After executing the request and checking the contents of your timeline, you’ll observe that the Predators are now winning 1:0.
Adding Interactivity with Menus
Until now, we’ve focused on pushing content to Glass without any user interaction or feedback. Unfortunately, simulating user interaction isn’t possible in this context. To try out this next example, you’ll need an actual Glass device.
As the game progresses, the Aliens manage to even the score, making it 1:1. We want to introduce a simple “I Like” feature that allows users to interact with the timeline item displaying the score.
The first step is to add a menu to our scorecard. Following the previous example, update the timeline item with the following content:
| |
Upon executing this request, the user will see the updated score of 1:1. Moreover, tapping the Glass will now reveal a menu.
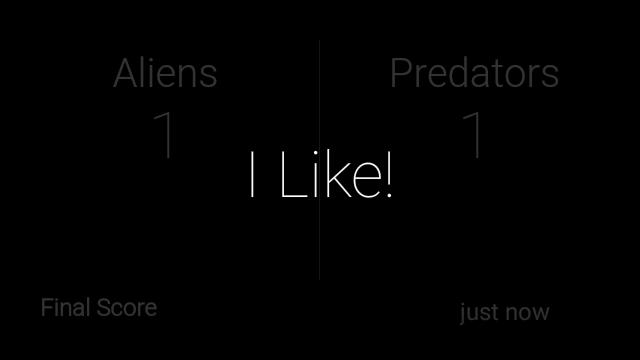
At this point, tapping “I Like” won’t have any noticeable effect.
Recall the earlier mention of a “middleman” between your application and the Glass device. When the user selects “I Like,” the Glass device sends this information to the Mirror API, but we haven’t yet specified where the Mirror API should forward this event data.
This is where Subscriptions come into play. You need to subscribe to receive notifications from the Mirror API whenever your user performs an action.
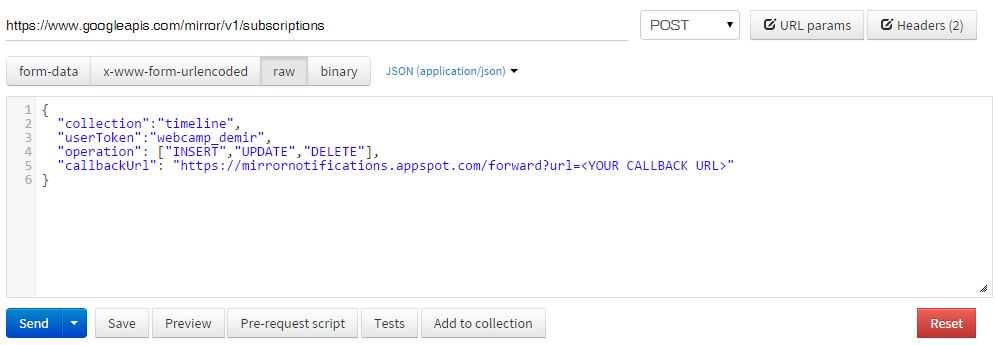
To create a subscription, you send a POST request to https://www.googleapis.com/mirror/v1/subscriptions.
Your request body should resemble this:
| |
The callbackUrl specifies the endpoint where you want to receive the event data.
Note: The Mirror API mandates SSL encryption for the URL where event data is sent. However, for testing purposes, Google provides a proxy at https://mirrornotifications.appspot.com/forward.
When an event occurs, the Mirror API will send a POST request to the URL specified in your subscription. You’ll need to set up a handler for this URL using your preferred development environment. Below is a simple JavaScript (NodeJS/ExpressJS) example that simply outputs the content of the incoming request.
| |
Concluding Thoughts
The Google Glass Mirror API stands out for its unique approach. Designed to empower web developers to delve into Glass development without any specialized knowledge, it’s tightly integrated into the Glass OS and operates independently of third-party tools. As a managed service within the Google API platform, the Mirror API guarantees stability and scalability, relieving developers of those concerns.
If you’re a web developer who’s been hesitant to explore the Mirror API due to perceived barriers like requiring a Glass device or extensive learning, I hope this tutorial has helped dispel those notions and encouraged you to give it a try.
Wearable technology is here to stay, and Google Glass is at the forefront of this revolution. Every developer should have the opportunity to contribute to this exciting field, and the Mirror API makes it readily accessible.
This article has equipped you with the knowledge and tools to authenticate your Mirror API applications, retrieve data from Google Glass, send data to Google Glass, and even receive user feedback. To further your understanding of the Mirror API and its capabilities, I encourage you to explore the comprehensive documentation available at Mirror API Guides.