Although the Web Audio API is gaining traction, particularly among developers creating HTML5 games, the Web MIDI API remains relatively unknown in the frontend development community. This obscurity likely stems from its limited browser compatibility and the scarcity of accessible documentation. Currently, only Google Chrome, with a specific flag enabled, supports the Web MIDI API. The prioritization of this API by browser developers remains low, as its integration into the ES7 standard is anticipated.
MIDI, an abbreviation for Musical Instrument Digital Interface, emerged in the early 1980s as a standardized communication protocol for electronic music devices, thanks to the collaborative efforts of music industry stakeholders. Despite the subsequent emergence of alternative protocols like OSC, MIDI has maintained its position as the dominant communication standard in the audio hardware industry for over three decades. It’s challenging to find a contemporary music producer without at least one MIDI device in their studio setup.
With the Web Audio API experiencing rapid development and widespread adoption, we are entering an era where browser-based applications can seamlessly bridge the gap between the digital realm and the tangible world. The Web MIDI API empowers us to not only craft synthesizers and audio effects but also to embark on the development of browser-based DAWs (Digital Audio Workstations). These DAWs possess the potential to rival their current Flash-based counterparts in both functionality and performance, as exemplified by Audiotool.
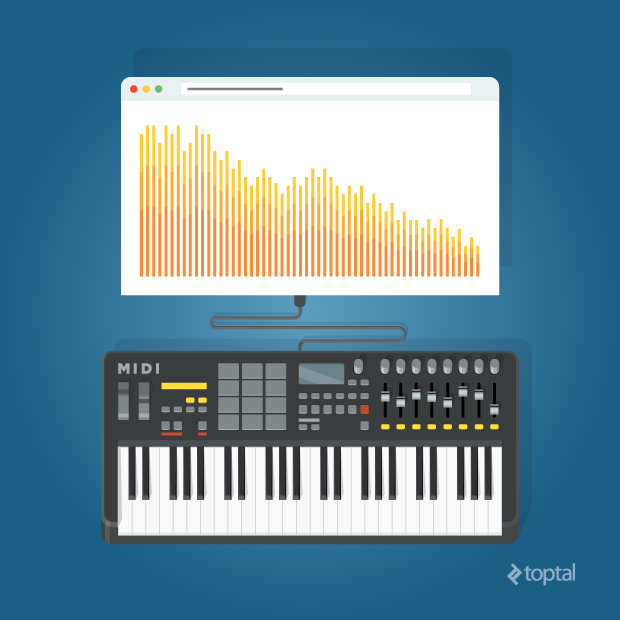
This MIDI tutorial aims to provide a foundational understanding of the Web MIDI API. Together, we’ll construct a straightforward monosynth that you can control using your preferred MIDI device. The complete source code for this project is accessible here, and a live demonstration is available for you to explore*. For those without a MIDI device, this tutorial remains accessible. By utilizing the ‘keyboard’ branch within the GitHub repository, you can simulate basic MIDI functionality using your computer keyboard to play notes and adjust octaves. This keyboard-controlled version is also featured in the live demo. It’s worth noting that due to hardware constraints, velocity and detune functionalities are deactivated when using your computer keyboard to interact with the synthesizer. A comprehensive key/note mapping is provided in the readme file on GitHub for your reference.
* Please note: The demo is no longer functional, as Heroku discontinued its free hosting services following the publication of this tutorial.
Essential Preparations for the MIDI Tutorial
Before delving into the tutorial, ensure you have the following:
- Google Chrome (version 38 or higher) with the
#enable-web-midiflag activated. - (Optional) A MIDI device, capable of triggering notes, connected to your computer.
To provide our application with a degree of organization, we’ll be employing Angular.js. Therefore, a basic familiarity with this framework is assumed.
Embarking on Our Journey
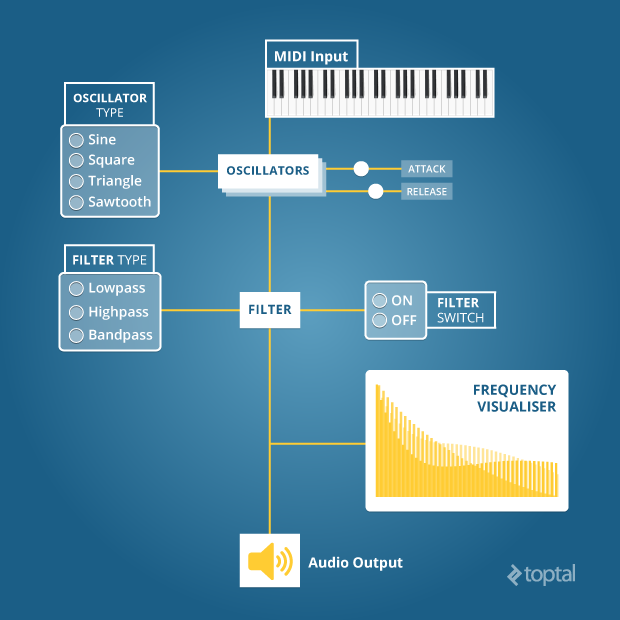
Our approach to building this MIDI application will be modular. We’ll divide it into three distinct modules:
- WebMIDI: Responsible for managing the various MIDI devices linked to your computer.
- WebAudio: Serving as the sound generation engine for our synthesizer.
- WebSynth: Bridging the gap between the web interface and the audio engine.
User interaction with the web interface will be handled by an ‘App’ module. A visual representation of our application’s structure is shown below:
| |
Furthermore, the following libraries should be installed to aid in the construction of your application: Angular.js, Bootstrap, and jQuery. Utilizing Bower is likely the most efficient method for installation.
The WebMIDI Module: Forging a Connection with the Physical Realm
Let’s begin our exploration of MIDI by establishing a connection between our MIDI devices and the application. This will involve creating a basic factory that returns a single method. The navigator.requestMIDIAccess method, part of the Web MIDI API, is instrumental in establishing communication with our MIDI devices:
| |
And with that, the connection is established!
The requestMIDIAccess method returns a promise. We can directly return this promise and then manage its resolution within our app’s controller:
| |
As previously mentioned, the requestMIDIAccess method returns a promise, which, upon fulfillment, passes an object containing two properties to the then method: inputs and outputs.
In prior iterations of Chrome, these properties were methods used to directly retrieve arrays of input and output devices. However, recent updates have transitioned these properties into objects. This change is significant, as it necessitates invoking the values method on either the inputs or outputs object to obtain the corresponding device list. The values method acts as a generator function, yielding an iterator. Given that this API is intended for inclusion in ES7, the implementation of generator-like behavior is logical, even if it introduces a level of complexity compared to the original approach.
The size property of the iterator object provides us with the device count. If at least one device is detected, we iterate through the results obtained by calling the iterator object’s next method. Each device is then added to an array defined within the $scope. On the frontend, we can create a basic select box to display all available input devices, allowing us to designate the active device for controlling our web synth:
| |
This select box is bound to a $scope variable named activeDevice, which we’ll later employ to link the selected device to our synthesizer.
The WebAudio Module: Generating Sound
The WebAudio API empowers us to not only work with audio files but also to synthesize sounds by replicating fundamental components of synthesizers, including oscillators, filters, and gain nodes amongst others.
Creating an Oscillator
Oscillators are tasked with producing waveforms. While numerous waveform types exist, the WebAudio API supports four primary ones: sine, square, triangle, and sawtooth. These waveforms “oscillate” at specific frequencies. When within the audible range of human hearing, these oscillations are perceived as sound. It’s also possible to define custom wavetables for specialized needs. Oscillators oscillating at low frequencies can be used to create LFOs (“low-frequency oscillators”), enabling sound modulation, a topic we won’t delve into in this particular tutorial.
To initiate sound creation, we begin by instantiating a new AudioContext:
| |
With our AudioContext, we can instantiate any of the components the WebAudio API offers. Since we might need multiple instances of these components, it’s wise to establish services to generate new, unique instances as needed. Let’s start by crafting a service dedicated to creating new oscillators:
| |
Now we can freely instantiate oscillators, providing the previously created AudioContext instance as an argument. For convenience, we’ll add some wrapper methods—purely for syntactic sugar—and return the Oscillator function:
| |
Creating a Multipass Filter and a Volume Control
Our rudimentary audio engine requires two additional components: a multipass filter, allowing us to shape our sound, and a gain node, enabling volume control and muting capabilities. We can create these components using the same approach employed for the oscillator: crafting services that return functions equipped with wrapper methods. The AudioContext instance is supplied, and the appropriate method is invoked.
Invoking the createBiquadFilter method of the AudioContext instance allows us to create a filter:
| |
Similarly, for a gain node, the createGain method is used:
| |
The WebSynth Module: Connecting the Dots
With our components in place, we’re nearing the point where we can construct our synth interface and link MIDI devices to our audio source. The initial step involves interconnecting our audio engine and preparing it to receive MIDI notes. Connecting the audio engine is a matter of instantiating the necessary components and then chaining them together using the connect method available to instances of each component. The connect method takes a single argument: the component to which you wish to connect the current instance. This method facilitates the creation of more elaborate component chains, allowing for scenarios like cross-fading and beyond.
| |
We’ve successfully established the internal connections of our audio engine. Feel free to experiment with different wiring configurations; however, exercise caution with the volume to protect your hearing. Now, let’s integrate the MIDI interface into our application and enable the transmission of MIDI messages to our audio engine. We’ll establish a watcher on the device select box to simulate the “plugging in” of our MIDI device to the synth. This watcher will listen for incoming MIDI messages from the device and relay this information to the audio engine:
| |
In this code snippet, we are actively listening for MIDI events originating from the device. The data embedded within the MidiEvent Object is analyzed, and this information is subsequently passed to the appropriate method, either noteOn or noteOff. This decision is made based on the event code (144 for noteOn, 128 for noteOff). We can now add the necessary logic to the corresponding methods within the audio module to trigger sound generation:
| |
Let’s dissect the events transpiring within this code. The noteOn method initiates by adding the current note to an array dedicated to storing notes. Although our focus is on building a monosynth, capable of playing a single note at any given time, it’s possible to press multiple keys simultaneously. Therefore, these notes need to be queued, ensuring that when a key is released, the subsequent note in the queue is played. Next, we halt the oscillator to assign the new frequency, which is converted from a MIDI note value (ranging from 0 to 127) to an actual frequency value. This conversion is accomplished using a bit of math:
| |
Shifting our attention to the noteOff method, we first locate the corresponding note within the array of active notes and remove it. If this note was the sole entry in the array, we simply mute the volume.
The setVolume method’s second argument governs the transition time. In musical terms, this equates to the attack time when a note is triggered and the release time when a note is released.
The WebAnalyser Module: Visualizing Sound
To enhance our synth’s capabilities further, we can incorporate an analyzer node. This node grants us the ability to visually represent our sound’s waveform using canvas for rendering. The creation of an analyzer node is slightly more involved compared to other AudioContext objects, as it requires the instantiation of a scriptProcessor node to perform the analysis. We begin by selecting the canvas element from the DOM:
| |
Next, we introduce a connect method, within which we’ll create both the analyzer and the script processor:
| |
Our first step is to create a scriptProcessor object and link it to the destination. Subsequently, we create the analyzer itself, feeding it with the audio output from either the oscillator or filter. It’s crucial to note that we must still connect the audio output to the destination to ensure audibility. Additionally, we define the gradient colors for our graph by invoking the createLinearGradient method associated with the canvas element.
The scriptProcessor will trigger an ‘audioprocess’ event at regular intervals. Upon each trigger, we calculate the average frequencies captured by the analyzer, clear the canvas, and redraw the frequency graph by calling the drawSpectrum method:
| |
Lastly, we need to make adjustments to our audio engine’s wiring to accommodate this new component:
| |
We now have a functional visualiser that dynamically displays the waveform of our synth! Although the setup required a bit of effort, the results are insightful, particularly when experimenting with filters.
Expanding Our Synth’s Horizons: Adding Velocity & Detune
Our synth is quite impressive, but it currently plays all notes at a uniform volume. This stems from our use of a fixed volume value of 1.0 instead of incorporating velocity data. Let’s rectify this and then explore how to enable the detune wheel commonly found on MIDI keyboards.
Enabling Velocity
For those unfamiliar with the concept of velocity, it essentially refers to how forcefully a key is pressed on a keyboard. The velocity value influences the perceived loudness or softness of the generated sound.
Within our MIDI tutorial synth, we can simulate this behavior by manipulating the gain node’s volume. This requires some mathematical calculation to convert the MIDI data into a float value between 0.0 and 1.0, suitable for the gain node:
| |
MIDI devices have a velocity range of 0 to 127. By dividing this value by 127, we obtain a float value, rounded to two decimal places. Now, let’s modify the _noteOn method to pass this calculated value to the gain node:
| |
And there you have it! Our synth now responds to key pressure, with volume variations reflecting how hard or soft keys are pressed.
Enabling the Detune Wheel on your MIDI Keyboard
The detune wheel, a feature found on most MIDI keyboards, provides the ability to subtly adjust the frequency of a note, resulting in an effect known as ‘detune’. Implementing this functionality is fairly straightforward in our context, as the detune wheel also emits a MidiMessage event with its unique event code (224). We can listen for this event and respond by recalculating the frequency value and updating the oscillator accordingly.
First, let’s equip our synth to capture this event. We’ll add an additional case to the switch statement we established within the _onmidimessage callback:
| |
Next, we define the detune method within our audio engine:
| |
The default detune value is set at 64, signifying no detune. In this scenario, we pass the current frequency directly to the oscillator.
Finally, we need to update the _noteOff method to factor in the detune value in case other notes are queued:
| |
Creating the Interface
Thus far, our interface consists solely of a select box for choosing the MIDI device and a waveform visualiser. We lack the ability to directly manipulate the sound through interaction with the web page. Let’s construct a basic interface using standard form elements and link them to our audio engine.
Creating a Layout for the Interface
Our interface will incorporate various form elements for controlling our synth’s sound:
- A radio button group to select the oscillator type.
- A checkbox to enable or disable the filter.
- A radio button group for filter type selection.
- Two range sliders to adjust the filter’s frequency and resonance.
- Two range sliders to fine-tune the attack and release characteristics of the gain node.
Here’s an example of an HTML document for our interface:
| |
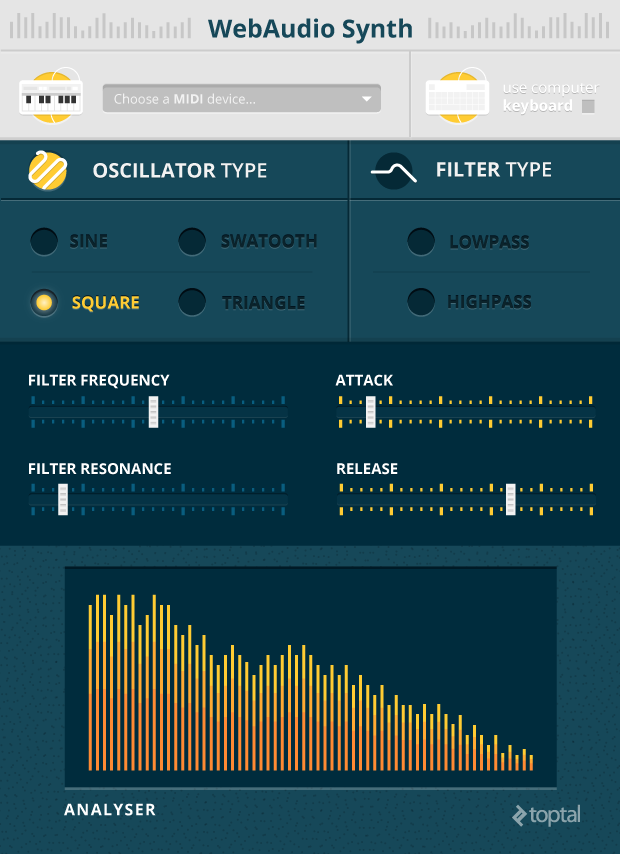
While aesthetic embellishment is beyond the scope of this basic MIDI tutorial, feel free to enhance the user interface further. Here’s an example of a more polished look:
Binding the Interface to the Audio Engine
We need to define a set of methods to establish the connection between these controls and our audio engine.
Controlling the Oscillator
A single method is all that’s needed to manage the oscillator type:
| |
Controlling the Filter
Three controls are required for the filter: one for type selection, one for frequency adjustment, and one for resonance control. We can also link the _connectFilter and _disconnectFilter methods to the state of the checkbox.
| |
Controlling the Attack and Resonance
To add depth to our sound, we can manipulate the attack and release parameters of the gain node. This necessitates two methods:
| |
Setting Up Watchers
The final step involves setting up a few watchers within our app’s controller and binding them to the methods we’ve defined:
| |
Conclusion
This MIDI tutorial has covered a substantial amount of ground, primarily focusing on demystifying the WebMIDI API—an API with limited documentation beyond the official W3C specification. Google Chrome’s implementation is relatively straightforward, though the transition to an iterator object for handling input and output devices might require some refactoring of legacy code.
The WebAudio API, in contrast, is very well-documented, especially on resources like the Mozilla Developer Network. It’s a rich API, and we’ve only scratched the surface of its capabilities. The Mozilla Developer Network is an invaluable resource, offering a wealth of code examples and detailed breakdowns of arguments and events for each component, aiding you in building custom, browser-based audio applications.
The continued evolution of both APIs promises to unlock exciting possibilities for JavaScript developers. We’re on the cusp of an era where fully-fledged, browser-based DAWs can rival their Flash-based predecessors. For desktop developers, tools like node-webkit](https://github.com/rogerwang/node-webkit) open doors to creating cross-platform applications. This progress has the potential to foster a new generation of music tools, empowering audiophiles by bridging the gap between the physical and digital realms.