As mobile development and JavaScript frameworks become increasingly popular, a RESTful API is emerging as the top choice for creating a unified interface between data and client applications.
Laravel](https://laravel.com/) is a PHP framework designed specifically to boost developer productivity. Developed and maintained by Taylor Otwell, this opinionated framework prioritizes convention over configuration to streamline development. Laravel also keeps pace with web evolution, incorporating cutting-edge features like job queues, built-in API authentication, real-time communication, and more.
This tutorial will guide you through building and testing a robust, authenticated API using Laravel. We’ll be working with Laravel 5.4, and you can find the complete codebase on GitHub.
Understanding RESTful APIs
Before diving in, let’s define what constitutes a RESTful API. REST, short for REpresentational State Transfer, is an architectural style for application communication over a network. It relies on a stateless protocol, typically HTTP, for interaction.
HTTP Verbs as Actions
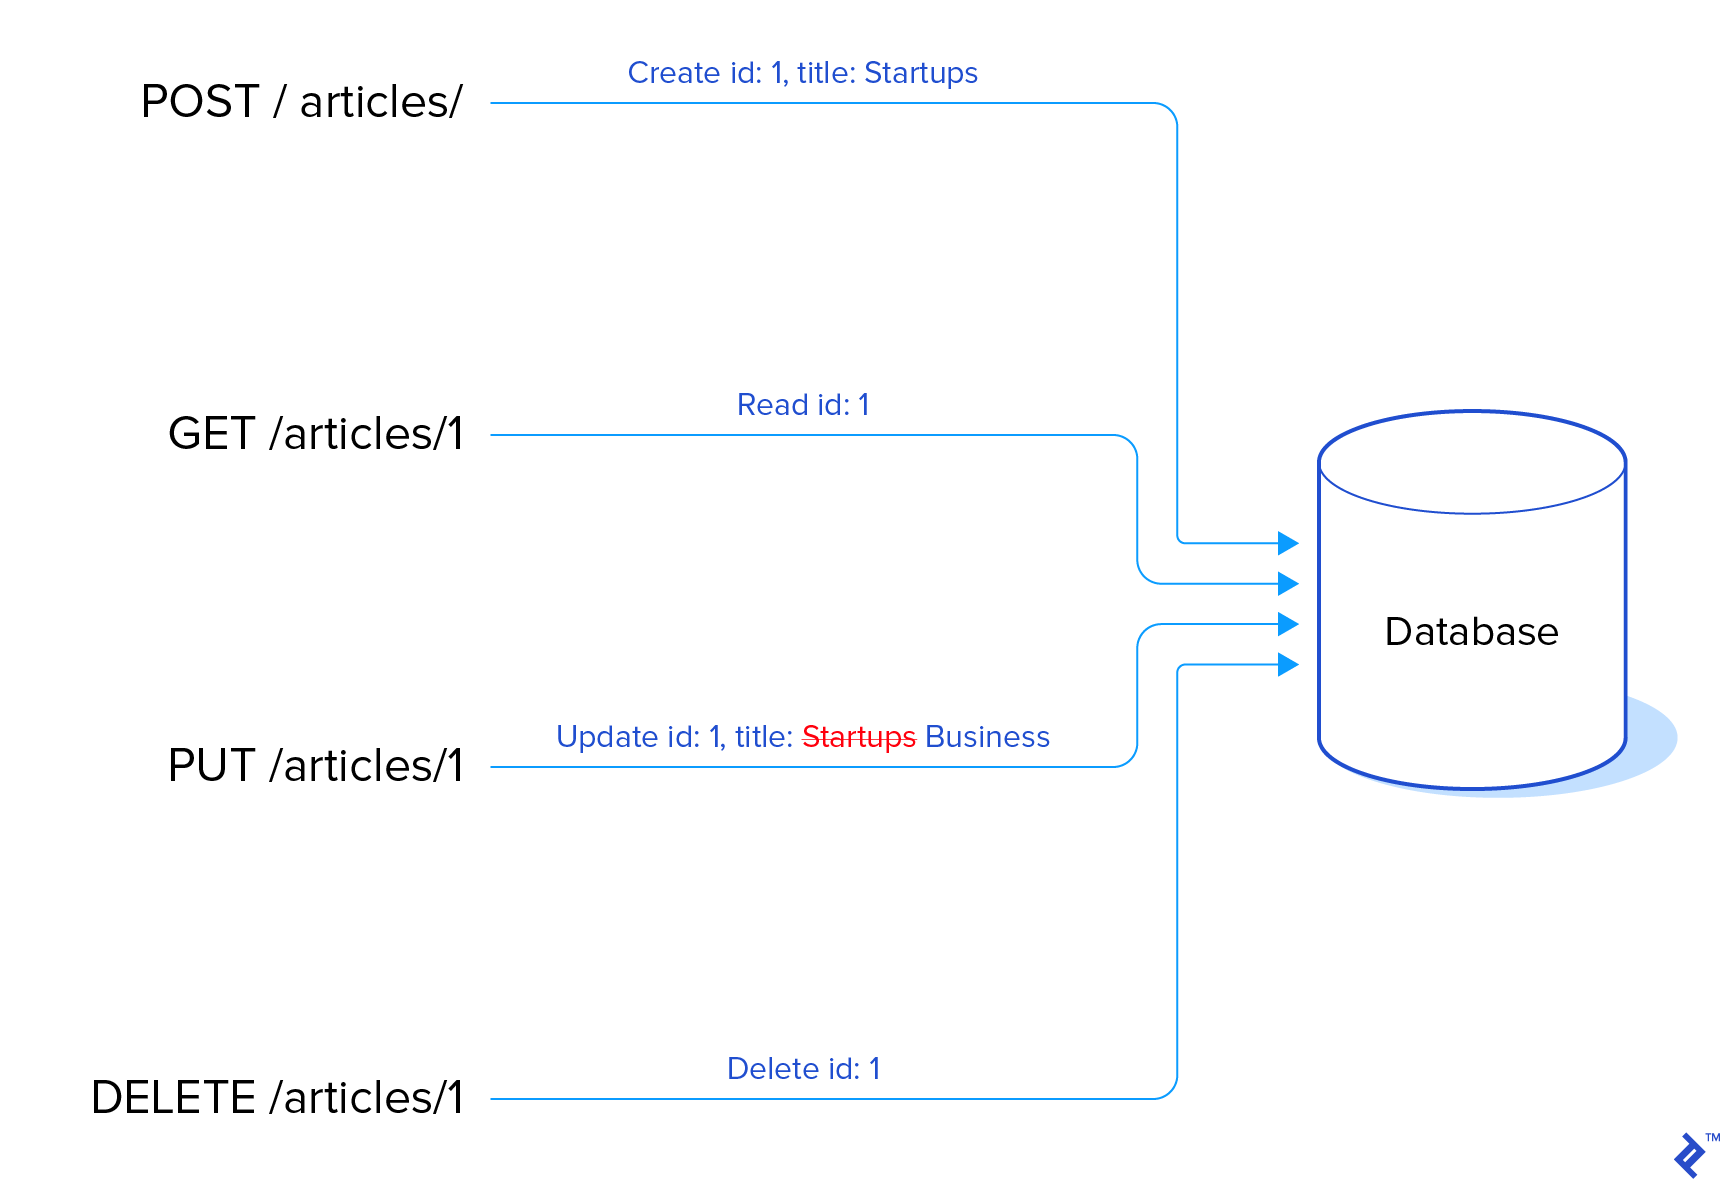
In RESTful APIs, HTTP verbs represent actions performed on resources, which are represented by endpoints. Here’s a breakdown:
GET: Retrieve resourcesPOST: Create resourcesPUT: Update resourcesDELETE: Delete resources
PUT vs. POST for Updates
The use of POST, PATCH, or PUT for updates, and even PUT for creation, sparks debate within the RESTful API community. This article will utilize PUT for updates, aligning with the HTTP RFC, where PUT signifies resource creation or update at a specific location. PUT also requires idempotence, meaning repeated requests yield the same outcome: a single updated resource in the database.
Resources and Endpoints
Resources, in our case Articles and Users, are the entities being acted upon and have dedicated endpoints:
This Laravel API tutorial maintains a 1:1 mapping between resources and data models, although this isn’t mandatory. You can have resources spanning multiple data models (or none at all), and models entirely inaccessible to users. The architecture of resources and models should suit your application’s specific needs.
Consistency is Key
The beauty of conventions like REST lies in the enhanced usability and development experience they offer. Straightforward endpoints like those used in this tutorial contribute to a cleaner and more maintainable API compared to convoluted alternatives like GET /get_article?id_article=12 and POST /delete_article?number=40. Trust me, I’ve been there, built that, and regretted it ever since.
However, adhering strictly to the Create/Retrieve/Update/Delete schema might not always be feasible. Remember that URLs should be verb-free, and resources don’t always directly correspond to database rows. Also, you’re not obligated to implement every action for every resource.
Setting Up Our Laravel Project
As is standard with modern PHP frameworks, we’ll use Composer for installation and dependency management. After downloading and adding it to your path environment variable, install Laravel:
1
| $ composer global require laravel/installer
|
Once installed, scaffold a new application:
This assumes ~/composer/vendor/bin is in your $PATH. Alternatively, use Composer directly:
1
| $ composer create-project --prefer-dist laravel/laravel myapp
|
Start the server to ensure everything is running smoothly:
1
2
| $ php artisan serve
Laravel development server started: <http://127.0.0.1:8000>
|
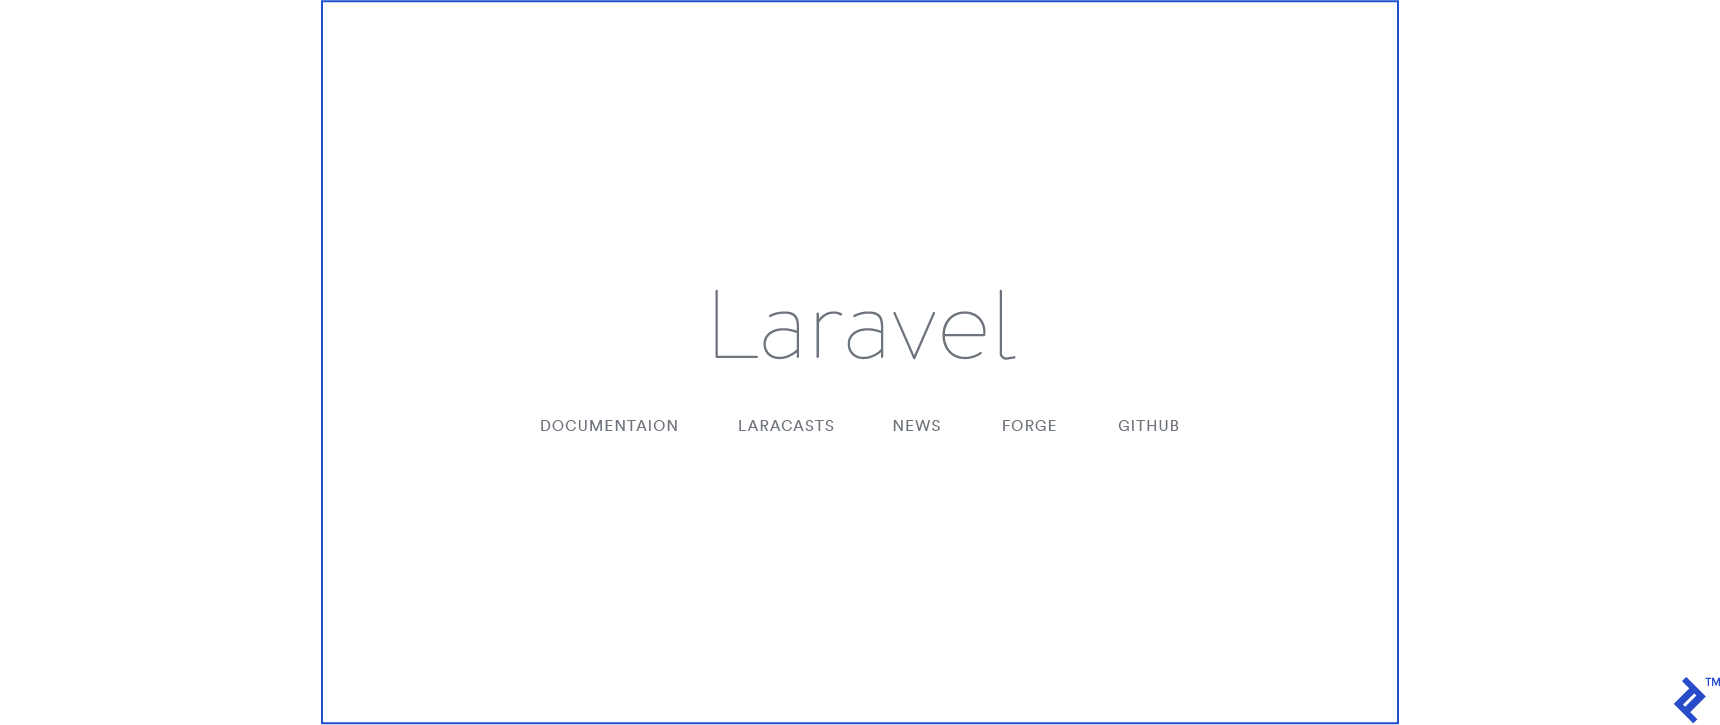
When you open localhost:8000 on your browser, you should see this sample page.
Migrations and Models: Building Our Foundation
Before creating migrations, ensure you have a database set up for the application and add its credentials to the .env file in the project root.
1
2
3
4
5
6
| DB_CONNECTION=mysql
DB_HOST=127.0.0.1
DB_PORT=3306
DB_DATABASE=homestead
DB_USERNAME=homestead
DB_PASSWORD=secret
|
While Homestead, a Laravel-tailored Vagrant box, is an option, it falls outside this article’s scope. Learn more refer to the Homestead documentation.
Let’s start with our Article model and migration. The article will have title and body fields and a creation date. Laravel’s command-line tool, Artisan, provides helpful commands for generating files in their respective directories. To create the Article model and migration, run:
1
| $ php artisan make:model Article -m
|
The -m flag, short for --migration, instructs Artisan to generate a migration file. Here’s what it looks like:
 1
 2
 3
 4
 5
 6
 7
 8
 9
10
11
12
13
14
15
16
17
18
19
20
21
22
23
24
25
26
27
28
29
30
31
| <?php
use Illuminate\Support\Facades\Schema;
use Illuminate\Database\Schema\Blueprint;
use Illuminate\Database\Migrations\Migration;
class CreateArticlesTable extends Migration
{
/**
* Run the migrations.
*
* @return void
*/
public function up()
{
Schema::create('articles', function (Blueprint $table) {
$table->increments('id');
$table->timestamps();
});
}
/**
* Reverse the migrations.
*
* @return void
*/
public function down()
{
Schema::dropIfExists('articles');
}
}
|
Let’s break it down:
- The
up() and down() methods handle migration and rollback actions, respectively. $table->increments('id') creates an auto-incrementing integer primary key named id.$table->timestamps() automatically adds created_at and updated_at timestamps, which Laravel manages behind the scenes.Schema::dropIfExists() drops the table if it exists during a rollback.
Now, let’s add the title and body fields to the up() method:
1
2
3
4
5
6
7
8
9
| public function up()
{
Schema::create('articles', function (Blueprint $table) {
$table->increments('id');
$table->string('title');
$table->text('body');
$table->timestamps();
});
}
|
The string() method creates a VARCHAR equivalent column, while text() creates a TEXT equivalent. Now, let’s run the migration:
You can use the --step option to batch migrations, allowing individual rollbacks if needed.
Laravel ships with two default migrations: create_users_table and create_password_resets_table. While we won’t be using password_resets, the existing users table will be handy.
In our Article model, we’ll add the title and body attributes to the $fillable property, enabling mass assignment using Eloquent’s create() and update() methods:
1
2
3
4
| class Article extends Model
{
protected $fillable = ['title', 'body'];
}
|
The $fillable property specifies which fields can be mass-assigned. Alternatively, use $guarded to exclude specific fields from mass assignment.
Database Seeding: Populating with Dummy Data
Database seeding involves populating the database with dummy data for testing purposes. Laravel integrates with Faker, a powerful library for generating realistic dummy data. Let’s create our first seeder:
1
| $ php artisan make:seeder ArticlesTableSeeder
|
Seeders reside in the /database/seeds directory. Here’s our ArticleSeeder, configured to create sample articles:
 1
 2
 3
 4
 5
 6
 7
 8
 9
10
11
12
13
14
15
16
17
18
| class ArticlesTableSeeder extends Seeder
{
public function run()
{
// Let's truncate our existing records to start from scratch.
Article::truncate();
$faker = \Faker\Factory::create();
// And now, let's create a few articles in our database:
for ($i = 0; $i < 50; $i++) {
Article::create([
'title' => $faker->sentence,
'body' => $faker->paragraph,
]);
}
}
}
|
Now, run the seed command:
1
| $ php artisan db:seed --class=ArticlesTableSeeder
|
Repeat the process for a Users seeder:
 1
 2
 3
 4
 5
 6
 7
 8
 9
10
11
12
13
14
15
16
17
18
19
20
21
22
23
24
25
26
27
28
29
30
| class UsersTableSeeder extends Seeder
{
public function run()
{
// Let's clear the users table first
User::truncate();
$faker = \Faker\Factory::create();
// Let's make sure everyone has the same password and
// let's hash it before the loop, or else our seeder
// will be too slow.
$password = Hash::make('toptal');
User::create([
'name' => 'Administrator',
'email' => 'admin@test.com',
'password' => $password,
]);
// And now let's generate a few dozen users for our app:
for ($i = 0; $i < 10; $i++) {
User::create([
'name' => $faker->name,
'email' => $faker->email,
'password' => $password,
]);
}
}
}
|
For convenience, add both seeders to the main DatabaseSeeder class within database/seeds:
1
2
3
4
5
6
7
8
| class DatabaseSeeder extends Seeder
{
public function run()
{
$this->call(ArticlesTableSeeder::class);
$this->call(UsersTableSeeder::class);
}
}
|
Now, $ php artisan db:seed will execute all seeders called within the run() method.
Routes and Controllers: Defining API Endpoints
Let’s create the fundamental endpoints: create, retrieve all, retrieve one, update, and delete. In routes/api.php, we can define these routes:
 1
 2
 3
 4
 5
 6
 7
 8
 9
10
11
12
13
14
15
16
17
18
19
20
21
22
23
24
25
26
27
28
| Use App\Article;
Route::get('articles', function() {
// If the Content-Type and Accept headers are set to 'application/json',
// this will return a JSON structure. This will be cleaned up later.
return Article::all();
});
Route::get('articles/{id}', function($id) {
return Article::find($id);
});
Route::post('articles', function(Request $request) {
return Article::create($request->all);
});
Route::put('articles/{id}', function(Request $request, $id) {
$article = Article::findOrFail($id);
$article->update($request->all());
return $article;
});
Route::delete('articles/{id}', function($id) {
Article::find($id)->delete();
return 204;
})
|
Routes within api.php are automatically prefixed with /api/ and have API throttling middleware applied. Edit the RouteServiceProvider class in /app/Providers/RouteServiceProvider.php to modify the prefix.
Let’s move this logic to a dedicated controller:
1
| $ php artisan make:controller ArticleController
|
Here’s our ArticleController.php:
 1
 2
 3
 4
 5
 6
 7
 8
 9
10
11
12
13
14
15
16
17
18
19
20
21
22
23
24
25
26
27
28
29
30
31
32
33
34
35
| use App\Article;
class ArticleController extends Controller
{
public function index()
{
return Article::all();
}
public function show($id)
{
return Article::find($id);
}
public function store(Request $request)
{
return Article::create($request->all());
}
public function update(Request $request, $id)
{
$article = Article::findOrFail($id);
$article->update($request->all());
return $article;
}
public function delete(Request $request, $id)
{
$article = Article::findOrFail($id);
$article->delete();
return 204;
}
}
|
And the updated routes/api.php:
1
2
3
4
5
| Route::get('articles', 'ArticleController@index');
Route::get('articles/{id}', 'ArticleController@show');
Route::post('articles', 'ArticleController@store');
Route::put('articles/{id}', 'ArticleController@update');
Route::delete('articles/{id}', 'ArticleController@delete');
|
We can enhance these endpoints using implicit route model binding. This allows Laravel to inject the Article instance directly into our methods and automatically return a 404 response if the resource isn’t found. Modify both the routes file and the controller:
1
2
3
4
5
| Route::get('articles', 'ArticleController@index');
Route::get('articles/{article}', 'ArticleController@show');
Route::post('articles', 'ArticleController@store');
Route::put('articles/{article}', 'ArticleController@update');
Route::delete('articles/{article}', 'ArticleController@delete');
|
1
2
3
4
5
6
7
8
9
10
11
12
13
14
15
16
17
18
19
20
21
22
23
24
25
26
27
28
29
30
31
32
33
| class ArticleController extends Controller
{
public function index()
{
return Article::all();
}
public function show(Article $article)
{
return $article;
}
public function store(Request $request)
{
$article = Article::create($request->all());
return response()->json($article, 201);
}
public function update(Request $request, Article $article)
{
$article->update($request->all());
return response()->json($article, 200);
}
public function delete(Article $article)
{
$article->delete();
return response()->json(null, 204);
}
}
|
Note the use of response()->json() in our endpoints. This explicitly returns JSON data and allows us to send specific HTTP status codes for client-side parsing. Here are some common codes:
200: OK - Success, the default response.201: Created - Resource created successfully.204: No Content - Action successful, but no content to return.206: Partial Content - Used for paginated responses.400: Bad Request - Validation errors.401: Unauthorized - Authentication required.403: Forbidden - User lacks permission.404: Not Found - Resource not found.500: Internal Server Error - Unexpected server error.503: Service Unavailable - Self-explanatory, usually not returned explicitly.
Handling 404 Errors Gracefully
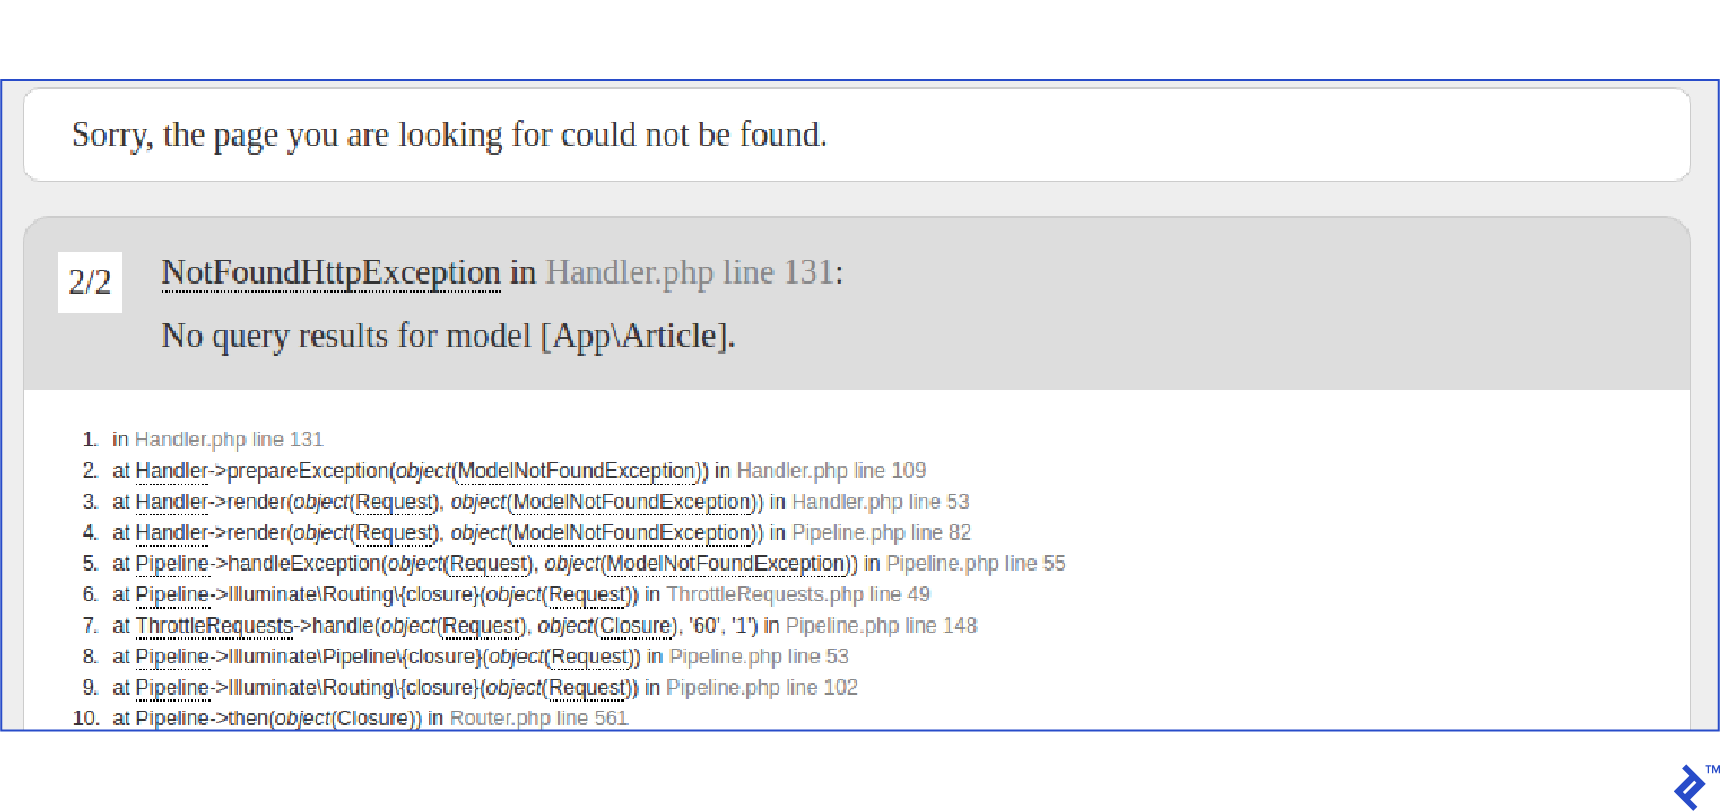
Trying to access a non-existent resource currently throws an exception with a full stack trace:
To fix this, modify the exception handler class (app/Exceptions/Handler.php) to return a JSON response:
1
2
3
4
5
6
7
8
9
10
11
12
| public function render($request, Exception $exception)
{
// This will replace our 404 response with
// a JSON response.
if ($exception instanceof ModelNotFoundException) {
return response()->json([
'error' => 'Resource not found'
], 404);
}
return parent::render($request, $exception);
}
|
Here’s how the response looks now:
1
2
3
| {
data: "Resource not found"
}
|
If Laravel serves other pages, adjust the code to handle the Accept header; otherwise, regular 404 errors will also return JSON.
1
2
3
4
5
6
7
8
9
10
11
12
13
14
| public function render($request, Exception $exception)
{
// This will replace our 404 response with
// a JSON response.
if ($exception instanceof ModelNotFoundException &&
$request->wantsJson())
{
return response()->json([
'data' => 'Resource not found'
], 404);
}
return parent::render($request, $exception);
}
|
With this change, API requests need the Accept: application/json header.
Authentication: Securing Our API
Laravel offers various API authentication methods, including Passport for OAuth2 implementation. However, we’ll take a simplified approach here.
First, add an api_token field to the users table:
1
| $ php artisan make:migration --table=users adds_api_token_to_users_table
|
Then, run the migration:
1
2
3
4
5
6
7
8
9
10
11
12
13
| public function up()
{
Schema::table('users', function (Blueprint $table) {
$table->string('api_token', 60)->unique()->nullable();
});
}
public function down()
{
Schema::table('users', function (Blueprint $table) {
$table->dropColumn(['api_token']);
});
}
|
Registration Endpoint
We’ll leverage the RegisterController (in the Auth folder) to handle registration responses. Laravel’s built-in authentication requires some tweaking for our API.
The controller uses the RegistersUsers trait. Here’s how it works:
1
2
3
4
5
6
7
8
9
10
11
12
13
14
15
16
17
18
19
20
21
22
| public function register(Request $request)
{
// Here the request is validated. The validator method is located
// inside the RegisterController, and makes sure the name, email
// password and password_confirmation fields are required.
$this->validator($request->all())->validate();
// A Registered event is created and will trigger any relevant
// observers, such as sending a confirmation email or any
// code that needs to be run as soon as the user is created.
event(new Registered($user = $this->create($request->all())));
// After the user is created, he's logged in.
$this->guard()->login($user);
// And finally this is the hook that we want. If there is no
// registered() method or it returns null, redirect him to
// some other URL. In our case, we just need to implement
// that method to return the correct response.
return $this->registered($request, $user)
?: redirect($this->redirectPath());
}
|
We’ll implement the registered() method in our RegisterController to customize the response. This method receives the $request and the registered $user. Here’s the updated method:
1
2
3
4
5
6
| protected function registered(Request $request, $user)
{
$user->generateToken();
return response()->json(['data' => $user->toArray()], 201);
}
|
Link it in the routes file:
1
| Route::post('register', 'Auth\RegisterController@register');
|
We use a method in the User model to generate the token, ensuring consistency. Add this method to your User model:
1
2
3
4
5
6
7
8
9
10
11
| class User extends Authenticatable
{
...
public function generateToken()
{
$this->api_token = str_random(60);
$this->save();
return $this->api_token;
}
}
|
That’s it! Laravel’s validation handles required fields (name, email, password, password_confirmation) and provides automatic feedback. Check the validator() method in RegisterController to see the validation rules.
Here’s the response from the registration endpoint:
1
2
3
4
| $ curl -X POST http://localhost:8000/api/register \
-H "Accept: application/json" \
-H "Content-Type: application/json" \
-d '{"name": "John", "email": "john.doe@toptal.com", "password": "toptal123", "password_confirmation": "toptal123"}'
|
1
2
3
4
5
6
7
8
9
10
| {
"data": {
"api_token":"0syHnl0Y9jOIfszq11EC2CBQwCfObmvscrZYo5o2ilZPnohvndH797nDNyAT",
"created_at": "2017-06-20 21:17:15",
"email": "john.doe@toptal.com",
"id": 51,
"name": "John",
"updated_at": "2017-06-20 21:17:15"
}
}
|
Login Endpoint
Similar to registration, we’ll modify the LoginController (Auth folder) to accommodate our API authentication. Override the login method from the AuthenticatesUsers trait:
1
2
3
4
5
6
7
8
9
10
11
12
13
14
15
| public function login(Request $request)
{
$this->validateLogin($request);
if ($this->attemptLogin($request)) {
$user = $this->guard()->user();
$user->generateToken();
return response()->json([
'data' => $user->toArray(),
]);
}
return $this->sendFailedLoginResponse($request);
}
|
And link it in the routes file:
1
| Route::post('login', 'Auth\LoginController@login');
|
Assuming the seeders have run, here’s the response from a POST request to the login endpoint:
1
2
3
4
| $ curl -X POST localhost:8000/api/login \
-H "Accept: application/json" \
-H "Content-type: application/json" \
-d "{\"email\": \"admin@test.com\", \"password\": \"toptal\" }"
|
1
2
3
4
5
6
7
8
9
10
| {
"data": {
"id":1,
"name":"Administrator",
"email":"admin@test.com",
"created_at":"2017-04-25 01:05:34",
"updated_at":"2017-04-25 02:50:40",
"api_token":"Jll7q0BSijLOrzaOSm5Dr5hW9cJRZAJKOzvDlxjKCXepwAeZ7JR6YP5zQqnw"
}
}
|
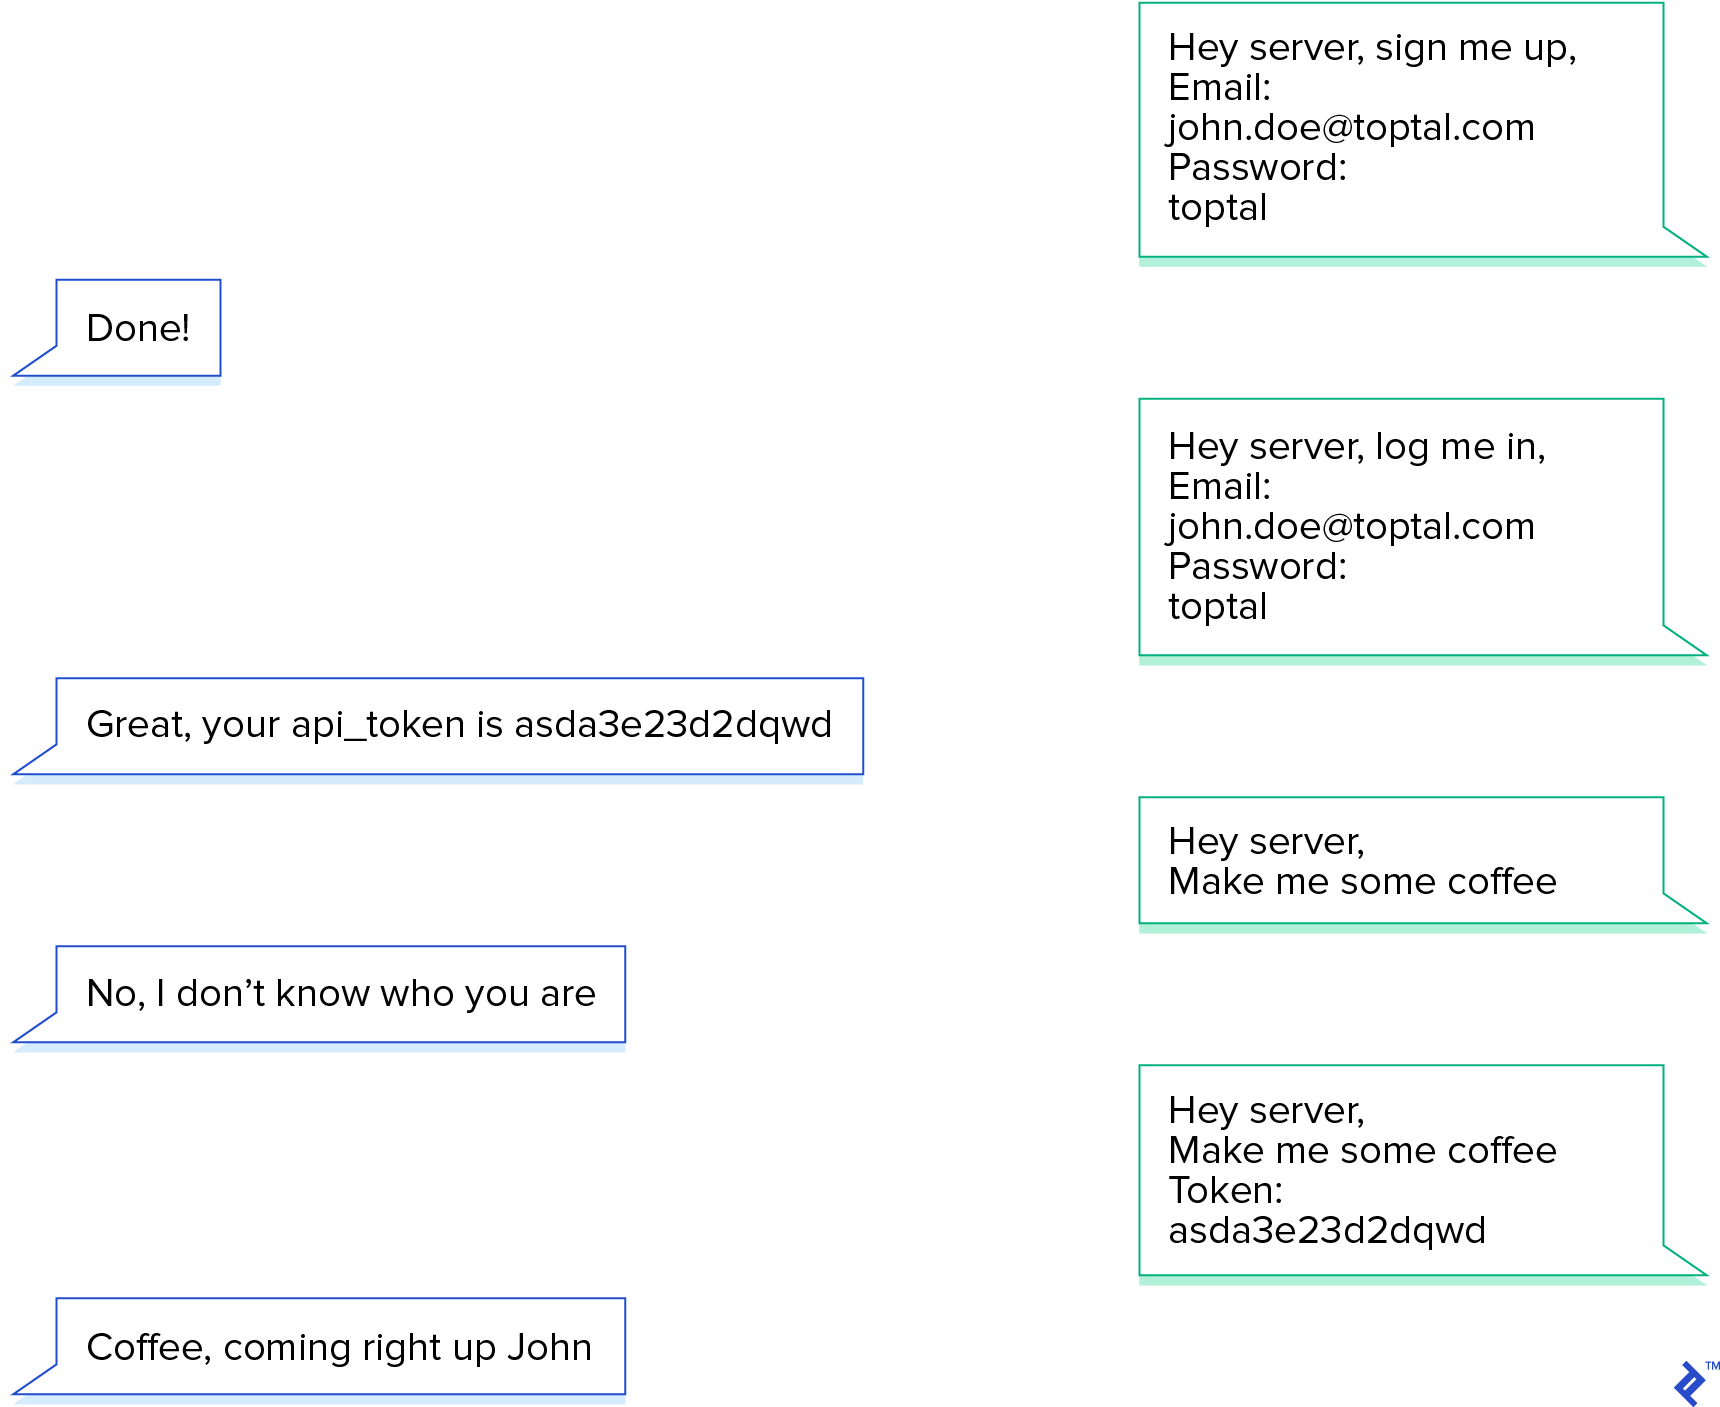
Send the token in requests using an api_token attribute in the payload or as a bearer token in the headers: Authorization: Bearer Jll7q0BSijLOrzaOSm5Dr5hW9cJRZAJKOzvDlxjKCXepwAeZ7JR6YP5zQqnw.
Logging Out
With our current setup, invalid or missing tokens result in an unauthenticated response (which we’ll implement shortly). For a simple logout endpoint, we’ll receive the token and remove it from the database.
routes/api.php:
1
| Route::post('logout', 'Auth\LoginController@logout');
|
Auth\LoginController.php:
1
2
3
4
5
6
7
8
9
10
11
| public function logout(Request $request)
{
$user = Auth::guard('api')->user();
if ($user) {
$user->api_token = null;
$user->save();
}
return response()->json(['data' => 'User logged out.'], 200);
}
|
This approach invalidates the user’s current token, denying further API access. Coordinate this with your front-end to prevent users from remaining logged in without access to content.
Middleware for Access Control
With the api_token in place, we can enable the authentication middleware in our routes:
1
2
3
4
| Route::middleware('auth:api')
->get('/user', function (Request $request) {
return $request->user();
});
|
Access the current user using $request->user() or the Auth facade:
1
2
3
| Auth::guard('api')->user(); // instance of the logged user
Auth::guard('api')->check(); // if a user is authenticated
Auth::guard('api')->id(); // the id of the authenticated user
|
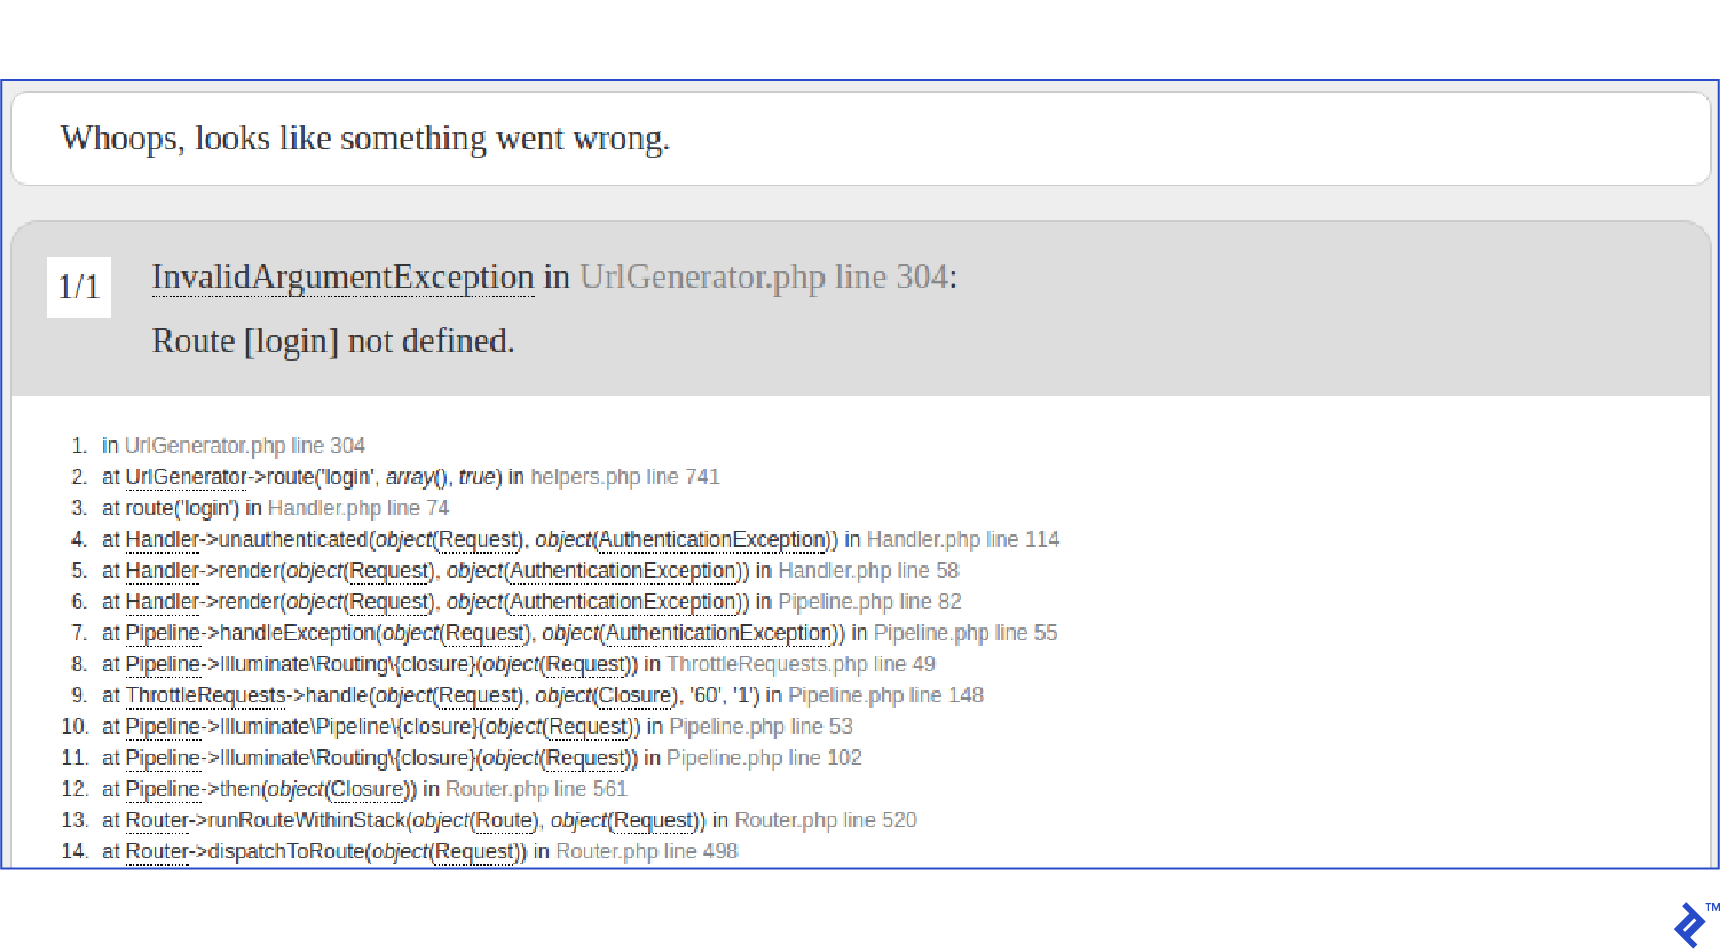
However, you might encounter an error:
This occurs because the current unauthenticated method in the Handler class returns JSON only if the request has the Accept: application/json header. Let’s modify it:
1
2
3
4
| protected function unauthenticated($request, AuthenticationException $exception)
{
return response()->json(['error' => 'Unauthenticated'], 401);
}
|
Now, we can wrap our article endpoints in the auth:api middleware using route groups:
1
2
3
4
5
6
7
| Route::group(['middleware' => 'auth:api'], function() {
Route::get('articles', 'ArticleController@index');
Route::get('articles/{article}', 'ArticleController@show');
Route::post('articles', 'ArticleController@store');
Route::put('articles/{article}', 'ArticleController@update');
Route::delete('articles/{article}', 'ArticleController@delete');
});
|
This keeps our routes DRY (Don’t Repeat Yourself) and improves maintainability as the project grows.
Testing: Ensuring Our API’s Reliability
Laravel seamlessly integrates with PHPUnit, providing a pre-configured phpunit.xml. It also offers helpful assertions and tools for streamlined API testing.
While external tools exist, testing within Laravel offers advantages. We can test API structure and responses while maintaining full database control. For instance, we can use factories to generate test data and assert that the response for the list endpoint contains those resources.
To begin, we’ll configure our tests to use an in-memory SQLite database. This speeds up tests significantly but might not support all migration commands (e.g., constraints). Consider switching from SQLite if you encounter migration errors or require more robust tests.
We’ll also run migrations before each test, creating a clean database for each test and preventing dependencies.
In config/database.php, set the database field within the sqlite configuration to :memory::
1
2
3
4
5
6
7
8
9
10
11
| ...
'connections' => [
'sqlite' => [
'driver' => 'sqlite',
'database' => ':memory:',
'prefix' => '',
],
...
]
|
Enable SQLite in phpunit.xml by adding the DB_CONNECTION environment variable:
1
2
3
4
5
6
7
| <php>
<env name="APP_ENV" value="testing"/>
<env name="CACHE_DRIVER" value="array"/>
<env name="SESSION_DRIVER" value="array"/>
<env name="QUEUE_DRIVER" value="sync"/>
<env name="DB_CONNECTION" value="sqlite"/>
</php>
|
Finally, configure our base TestCase class to use migrations and seed the database before each test. Add the DatabaseMigrations trait and an Artisan call in the setUp() method:
1
2
3
4
5
6
7
8
9
10
11
12
13
14
| use Illuminate\Foundation\Testing\DatabaseMigrations;
use Illuminate\Foundation\Testing\TestCase as BaseTestCase;
use Illuminate\Support\Facades\Artisan;
abstract class TestCase extends BaseTestCase
{
use CreatesApplication, DatabaseMigrations;
public function setUp()
{
parent::setUp();
Artisan::call('db:seed');
}
}
|
For convenience, add the test command to composer.json:
1
2
3
4
5
6
| "scripts": {
"test" : [
"vendor/bin/phpunit"
],
...
},
|
Now, run tests using:
Factories for Test Data Generation
Factories facilitate the creation of test objects with appropriate data. They reside in the database/factories folder. Laravel comes with a factory for the User class. Let’s add one for Article:
1
2
3
4
5
6
| $factory->define(App\Article::class, function (Faker\Generator $faker) {
return [
'title' => $faker->sentence,
'body' => $faker->paragraph,
];
});
|
The Faker library is available to generate various formats of random data.
Writing Our First Tests
We can use Laravel’s assert methods to send requests to endpoints and evaluate responses. Let’s create our first test for the login endpoint:
1
| $ php artisan make:test Feature/LoginTest
|
Here’s our test:
 1
 2
 3
 4
 5
 6
 7
 8
 9
10
11
12
13
14
15
16
17
18
19
20
21
22
23
24
25
26
27
28
29
30
31
32
33
34
35
36
37
| class LoginTest extends TestCase
{
public function testRequiresEmailAndLogin()
{
$this->json('POST', 'api/login')
->assertStatus(422)
->assertJson([
'email' => ['The email field is required.'],
'password' => ['The password field is required.'],
]);
}
public function testUserLoginsSuccessfully()
{
$user = factory(User::class)->create([
'email' => 'testlogin@user.com',
'password' => bcrypt('toptal123'),
]);
$payload = ['email' => 'testlogin@user.com', 'password' => 'toptal123'];
$this->json('POST', 'api/login', $payload)
->assertStatus(200)
->assertJsonStructure([
'data' => [
'id',
'name',
'email',
'created_at',
'updated_at',
'api_token',
],
]);
}
}
|
These tests cover basic scenarios. The json() method sends a JSON request, and the other assertions are self-explanatory. Note that assertJson() converts the response to an array, so the order of assertions matters.
Next, create tests for the registration endpoint:
1
| $ php artisan make:test RegisterTest
|
 1
 2
 3
 4
 5
 6
 7
 8
 9
10
11
12
13
14
15
16
17
18
19
20
21
22
23
24
25
26
27
28
29
30
31
32
33
34
35
36
37
38
39
40
41
42
43
44
45
46
47
48
49
50
51
| class RegisterTest extends TestCase
{
public function testsRegistersSuccessfully()
{
$payload = [
'name' => 'John',
'email' => 'john@toptal.com',
'password' => 'toptal123',
'password_confirmation' => 'toptal123',
];
$this->json('post', '/api/register', $payload)
->assertStatus(201)
->assertJsonStructure([
'data' => [
'id',
'name',
'email',
'created_at',
'updated_at',
'api_token',
],
]);;
}
public function testsRequiresPasswordEmailAndName()
{
$this->json('post', '/api/register')
->assertStatus(422)
->assertJson([
'name' => ['The name field is required.'],
'email' => ['The email field is required.'],
'password' => ['The password field is required.'],
]);
}
public function testsRequirePasswordConfirmation()
{
$payload = [
'name' => 'John',
'email' => 'john@toptal.com',
'password' => 'toptal123',
];
$this->json('post', '/api/register', $payload)
->assertStatus(422)
->assertJson([
'password' => ['The password confirmation does not match.'],
]);
}
}
|
And finally, tests for the logout endpoint:
1
| $ php artisan make:test LogoutTest
|
1
2
3
4
5
6
7
8
9
10
11
12
13
14
15
16
17
18
19
20
21
22
23
24
25
26
27
28
29
30
| class LogoutTest extends TestCase
{
public function testUserIsLoggedOutProperly()
{
$user = factory(User::class)->create(['email' => 'user@test.com']);
$token = $user->generateToken();
$headers = ['Authorization' => "Bearer $token"];
$this->json('get', '/api/articles', [], $headers)->assertStatus(200);
$this->json('post', '/api/logout', [], $headers)->assertStatus(200);
$user = User::find($user->id);
$this->assertEquals(null, $user->api_token);
}
public function testUserWithNullToken()
{
// Simulating login
$user = factory(User::class)->create(['email' => 'user@test.com']);
$token = $user->generateToken();
$headers = ['Authorization' => "Bearer $token"];
// Simulating logout
$user->api_token = null;
$user->save();
$this->json('get', '/api/articles', [], $headers)->assertStatus(401);
}
}
|
Note: During testing, Laravel doesn’t reinstantiate the application for each request. When hitting the authentication middleware, it caches the current user in the TokenGuard instance to avoid redundant database calls. While efficient, this requires splitting the logout test to prevent issues with the cached user.
Testing the Article endpoints follows a similar pattern:
 1
 2
 3
 4
 5
 6
 7
 8
 9
10
11
12
13
14
15
16
17
18
19
20
21
22
23
24
25
26
27
28
29
30
31
32
33
34
35
36
37
38
39
40
41
42
43
44
45
46
47
48
49
50
51
52
53
54
55
56
57
58
59
60
61
62
63
64
65
66
67
68
69
70
71
72
73
74
75
76
77
78
79
80
81
82
83
| class ArticleTest extends TestCase
{
public function testsArticlesAreCreatedCorrectly()
{
$user = factory(User::class)->create();
$token = $user->generateToken();
$headers = ['Authorization' => "Bearer $token"];
$payload = [
'title' => 'Lorem',
'body' => 'Ipsum',
];
$this->json('POST', '/api/articles', $payload, $headers)
->assertStatus(200)
->assertJson(['id' => 1, 'title' => 'Lorem', 'body' => 'Ipsum']);
}
public function testsArticlesAreUpdatedCorrectly()
{
$user = factory(User::class)->create();
$token = $user->generateToken();
$headers = ['Authorization' => "Bearer $token"];
$article = factory(Article::class)->create([
'title' => 'First Article',
'body' => 'First Body',
]);
$payload = [
'title' => 'Lorem',
'body' => 'Ipsum',
];
$response = $this->json('PUT', '/api/articles/' . $article->id, $payload, $headers)
->assertStatus(200)
->assertJson([
'id' => 1,
'title' => 'Lorem',
'body' => 'Ipsum'
]);
}
public function testsArtilcesAreDeletedCorrectly()
{
$user = factory(User::class)->create();
$token = $user->generateToken();
$headers = ['Authorization' => "Bearer $token"];
$article = factory(Article::class)->create([
'title' => 'First Article',
'body' => 'First Body',
]);
$this->json('DELETE', '/api/articles/' . $article->id, [], $headers)
->assertStatus(204);
}
public function testArticlesAreListedCorrectly()
{
factory(Article::class)->create([
'title' => 'First Article',
'body' => 'First Body'
]);
factory(Article::class)->create([
'title' => 'Second Article',
'body' => 'Second Body'
]);
$user = factory(User::class)->create();
$token = $user->generateToken();
$headers = ['Authorization' => "Bearer $token"];
$response = $this->json('GET', '/api/articles', [], $headers)
->assertStatus(200)
->assertJson([
[ 'title' => 'First Article', 'body' => 'First Body' ],
[ 'title' => 'Second Article', 'body' => 'Second Body' ]
])
->assertJsonStructure([
'*' => ['id', 'body', 'title', 'created_at', 'updated_at'],
]);
}
}
|
What’s Next?
That concludes the basics of building and testing a Laravel API without external packages. Of course, there’s always room for improvement. Consider implementing OAuth2 using the Passport package, integrating pagination and transformation layers (Fractal is recommended), and more.
Laravel has significantly improved my PHP development experience, and its testing capabilities have solidified my preference for the framework. It’s not perfect, but its flexibility allows you to overcome any obstacles.
If you’re designing a public API, be sure to check out these 5 Golden Rules for Great Web API Design.