As the use of single page applications, mobile applications, and RESTful APIs continues to grow, the way developers write back-end code has undergone significant changes. Technologies like AngularJS and BackboneJS have shifted the focus from building markup to building APIs consumed by front-end applications. Back-end development now centers around business logic and data, with presentation logic moving to the front-end or mobile applications. This shift has brought about new methods for implementing authentication in contemporary applications.
Authentication is a crucial aspect of any web application. While cookies and server-based authentication were the go-to solutions for decades, modern mobile and single page applications require a more robust approach. OAuth 2.0 and JSON Web Token (JWT) have emerged as the leading solutions for API authentication challenges.
Before delving into this JWT tutorial, let’s clarify what a JWT is.
What is a JSON Web Token?
A JSON Web Token securely transmits verifiable information using a digital signature. It consists of a compact, URL-safe JSON object cryptographically signed to ensure authenticity. The payload can be encrypted to safeguard sensitive information.
Due to its compact nature, JWT is commonly used in HTTP Authorization headers or URL query parameters.
Structure of a JSON Web Token
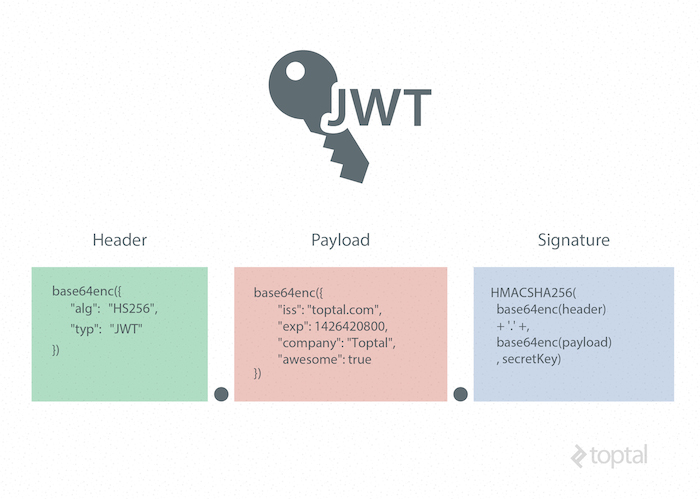
A JWT is represented as a series of base64url encoded values delimited by periods.
Here’s an example of a JWT:
| |
Header
The header provides metadata about the token, including the signature type and encryption algorithm. (A JSON formatter can be used to enhance the readability of the JSON object.)
Example Header
| |
This JWT header indicates that the encoded object is a JSON Web Token signed using the HMAC SHA-256 algorithm.
Base64 encoding this header yields the first part of our JWT.
| |
Payload (Claims)
In JWT, a claim is a statement about an entity, usually the user, along with additional metadata about the token. It contains the information to be transmitted, which the server uses for JWT authentication. Claims can be registered, public, or private.
Registered JWT Claims
These are claims registered in the IANA JSON Web Token Claims registry and serve as a starting point for a set of useful, interoperable claims. They are not mandatory but recommended.
Some registered claims include:
- iss: Token issuer
- sub: Token subject
- aud: Token audience
- exp: JWT expiration time (Unix time)
- nbf: “Not before” time, specifying when the JWT becomes valid
- iat: “Issued at” time (Unix time)
- jti: Unique JWT identifier
Public Claims
Public claims require collision-resistant names, typically URIs or URNs, to avoid collisions in open networks.
An example of a public claim name could be: https://www.toptal.com/jwt_claims/is_admin. It’s best practice to provide documentation for the claim at this location.
Private Claims
Private claim-names are used within closed systems, such as enterprises, where JWTs are exchanged between known entities. These claims, like user IDs, user roles, or other custom information, are defined by the system.
Caution should be exercised with private claim-names, as using names with conflicting meanings outside the closed system can lead to collisions.
It’s important to keep the web token concise, so only essential data should be included in public and private claims.
JWT Example Payload
| |
This example payload demonstrates two registered claims, a public claim, and two private claims. Base64 encoding this payload forms the second part of our JWT.
| |
Signature
The JWT standard adheres to the JSON Web Signature (JWS) specification to create the final signed token. The signature is generated by combining the encoded JWT Header and Payload and signing them using a robust encryption algorithm like HMAC SHA-256. The server securely stores the signature’s secret key, enabling it to verify existing tokens and sign new ones.
| |
This process completes the generation of our JWT.
| |
JWT Security and Encryption
Using TLS/SSL alongside JWT is crucial to prevent man-in-the-middle attacks. This generally suffices for encrypting the JWT payload containing sensitive data. However, an additional layer of protection can be achieved by encrypting the JWT payload itself using the JSON Web Encryption (JWE) specification.
Alternatively, to avoid the overhead of JWE, sensitive information can be stored in the database, and the token can be used for subsequent API calls to access this data.
Why Use Web Tokens?
To appreciate the benefits of JWT authentication, we need to examine traditional authentication methods.
Server-Based Authentication
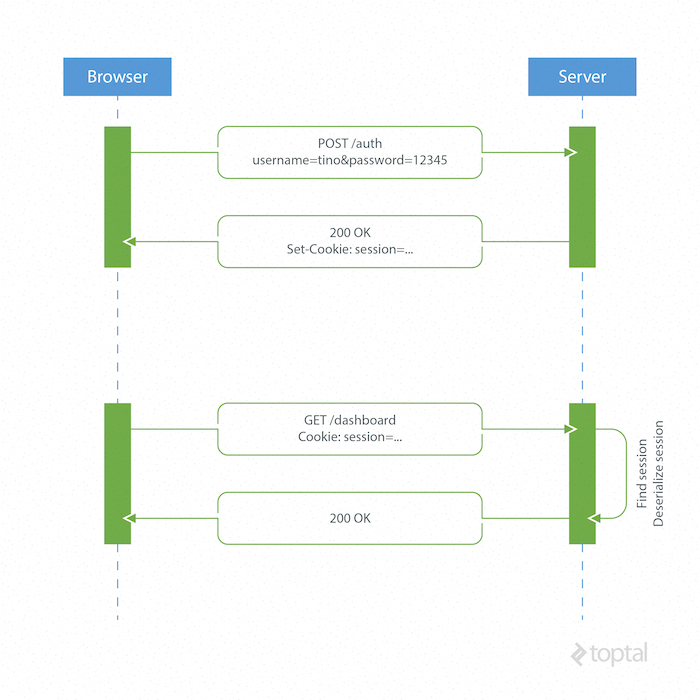
HTTP’s stateless nature necessitates a mechanism for storing user information and authenticating users for each subsequent request after login. Most websites achieve this using cookies to store a user’s session ID.
How it Works
- The browser sends a POST request with the user’s credentials to the server.
- The server responds with a cookie containing a session ID, which is stored in the user’s browser.
- For all subsequent requests, the server retrieves and deserializes the session associated with the session ID, as user data is stored server-side.
Drawbacks of Server-Based Authentication
Scalability Issues: The server has to manage and persist user sessions, which can be stored in memory or a database. Distributed systems require separate, decoupled session storage.
Cross-Origin Resource Sharing (CORS) Complications: AJAX calls to resources on different domains can lead to forbidden requests, as cookies are not included in cross-origin requests by default.
Framework Dependency: Server-based authentication ties the application to a specific framework’s authentication scheme, making it challenging to share session data across different frameworks or programming languages.
Token-Based Authentication
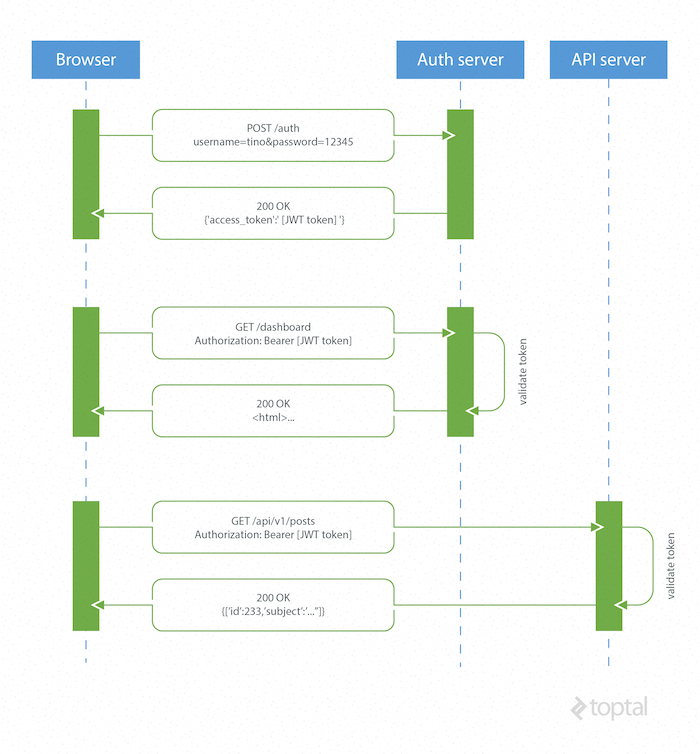
Token-based or JWT authentication is stateless, eliminating the need to store user information in sessions. This enables scalable applications without session management concerns. The same token can be used seamlessly for accessing secure resources across different domains.
How JSON Web Tokens Work
- The browser or mobile client sends a request with user login information to the authentication server.
- The authentication server generates and sends a new JWT access token back to the client.
- For every request to a restricted resource, the client includes the access token in the query string or
Authorizationheader. - The server validates the token and, if valid, grants access to the secure resource.
The authentication server can sign the token using various secure methods. Symmetric key algorithms like HMAC SHA-256 can be used when a secure channel exists for sharing the secret key. Alternatively, asymmetric public-key systems like RSA eliminate the need for key sharing.
Advantages of Token-Based Authentication
Statelessness and Scalability: Tokens contain all necessary user information, eliminating session state management. Load balancers can distribute traffic to any server without session affinity.
Reusability: Multiple servers, platforms, and domains can share the same token for user authentication. This facilitates building applications that share permissions.
Enhanced Security: The absence of cookies mitigates the risk of Cross-Site Request Forgery (CSRF) attacks. However, encrypting tokens using JWE is recommended for sensitive information, and HTTPS should be used for transmission to prevent man-in-the-middle attacks.
Improved Performance: Server-side session lookup and deserialization are eliminated. Only token validation using HMAC SHA-256 and content parsing are required.
A JSON Web Token Example using Laravel 5 and AngularJS
This JWT tutorial demonstrates basic authentication with JSON Web Tokens using Laravel 5 for the backend and AngularJS for a frontend Single Page Application (SPA) example. (The source code can be found in this GitHub repository.)
This example omits encryption for simplicity. While TLS/SSL encryption often suffices, encrypting the token using JWE is recommended when transmitting sensitive information.
Laravel Backend Example
We’ll use Laravel to handle user registration, data persistence, and providing restricted data for the Angular app. An example API subdomain will simulate Cross-Origin Resource Sharing (CORS).
Installation and Project Setup
Laravel requires the Composer package manager. Laravel Homestead, a pre-packaged Vagrant environment, provides a convenient development setup.
The Laravel Installer Composer package simplifies project bootstrapping.
| |
Create a new Laravel project using laravel new jwt.
Refer to the official Laravel documentation for detailed instructions.
After creating the Laravel 5 application, configure folder mappings and domains in Homestead.yaml.
Example Homestead.yaml configuration:
| |
Boot the Vagrant box with vagrant up and log in using vagrant ssh. Navigate to the project directory (e.g., /home/vagrant/coding/jwt) and run php artisan migrate to create database tables.
Installing Composer Dependencies
Leveraging community-maintained Laravel packages enhances development. We’ll use tymon/jwt-auth by Sean Tymon for server-side token handling and barryvdh/laravel-cors by Barry vd. Heuvel for CORS support.
jwt-auth
- Add the
tymon/jwt-authpackage tocomposer.jsonand update dependencies.
| |
- Register the
JWTAuthServiceProviderin theprovidersarray inapp/config/app.php.
| |
- Add the
JWTAuthfacade to thealiasesarray inapp/config/app.php.
| |
Publish the package configuration:
php artisan config:publish tymon/jwt-authGenerate a secret key for JWT encryption:
php artisan jwt:generate. The key will be added toconfig/jwt.php. In production, store sensitive data like API keys in environment variables and reference them in configuration files using theenvfunction.
Example:
| |
For detailed package information, refer to on Github.
laravel-cors
- Add the
barryvdh/laravel-corspackage tocomposer.jsonand update dependencies.
| |
- Register the
CorsServiceProviderin theprovidersarray inapp/config/app.php.
| |
- Add the middleware in
app/Http/Kernel.php.
| |
- Publish the configuration:
php artisan vendor:publish
Example cors.php configuration:
| |
Routing and HTTP Request Handling
For conciseness, the code will be in routes.php, which handles Laravel routing. Ideally, dedicated controllers would manage HTTP requests.
Load the AngularJS SPA view:
| |
User Registration
A POST request to /signup with username and password triggers user creation and JWT generation. The JWT is returned in the JSON response.
| |
User Sign In
A POST request to /signin verifies user credentials and returns a JWT.
| |
Fetching Restricted Resources (Same Domain)
After sign-in, the /restricted route simulates a protected resource. The request must include a valid JWT in the Authorization header or query string.
| |
The jwt-auth middleware validates the JWT. Invalid or missing tokens result in an exception, handled in app/Exceptions/Handler.php.
| |
Authenticated requests receive the restricted data in JSON format.
Fetching Restricted Resources (API Subdomain)
This example handles token validation manually. A POST request to api.jwt.dev/v1/restricted is a cross-origin request, requiring CORS, which has been configured in config/cors.php.
| |
AngularJS Frontend Example
The AngularJS frontend interacts with the Laravel backend for authentication and data retrieval. The backend serves the resources/views/spa.blade.php view to bootstrap the Angular application.
Here’s the Angular app’s folder structure:
| |
Bootstrapping the Angular Application
spa.blade.php includes Twitter Bootstrap for styling, a custom theme from Bootswatch, and the angular-loading-bar script for a loading bar during AJAX requests.
Header section with stylesheets:
| |
Footer section with libraries and custom scripts:
| |
The ngStorage library is used to store tokens in local storage for inclusion in requests.
In production, scripts and stylesheets should be minified and combined for performance.
A navigation bar dynamically adjusts visibility based on the user’s sign-in status, determined by the presence of a token variable in the controller’s scope.
| |
Routing
app.js handles frontend routing.
| |
Four routes are defined, managed by HomeController and RestrictedController, each associated with a partial HTML view. Constants store backend URLs.
Request Interceptor
An AngularJS $http interceptor injects the JWT into the Authorization header for authenticated requests and provides global HTTP error handling.
| |
Controllers
controllers.js defines two controllers: HomeController and RestrictedController.
HomeController handles sign-in, sign-up, and logout, passing credentials to the Auth service and managing the token and error responses.
| |
RestrictedController uses the Data service to fetch data.
| |
The backend requires a valid JWT for restricted data access. Unauthorized requests receive a 401 error.
Auth Service
The Auth service handles sign-in and sign-up requests. Successful responses provide a JWT, which is decoded, and the claims are stored in tokenClaims.
| |
Data Service
This service makes requests to both the authentication and API servers for restricted data, delegating success and error handling to the controller.
| |
Beyond This JSON Web Token Tutorial
Token-based authentication enables decoupled systems, independent of specific authentication schemes. JWTs are mobile-friendly, eliminate cookie reliance, and are gaining popularity across programming languages. Supported by companies like Google, Microsoft, and Zendesk, JWTs are governed by IETF standard still in the draft version, which may evolve over time.
This tutorial covers basic JWT usage and advantages. Advanced topics like security best practices and token refresh mechanisms require further exploration.