What is Flutter?
Flutter, Google’s mobile app development SDK, enables your product to run on both Android and iOS without needing separate codebases. Moreover, Flutter apps can also be compiled for Google’s upcoming Fuchsia operating system.
Reaching a significant milestone, Flutter recently launched its stable version 1.0 in London on December 5th, 2018, at the Flutter Live event. Although still considered an early-stage software, this article showcases a proven concept: building a fully functional messaging app for major mobile platforms using Flutter 1.2 and Firebase.
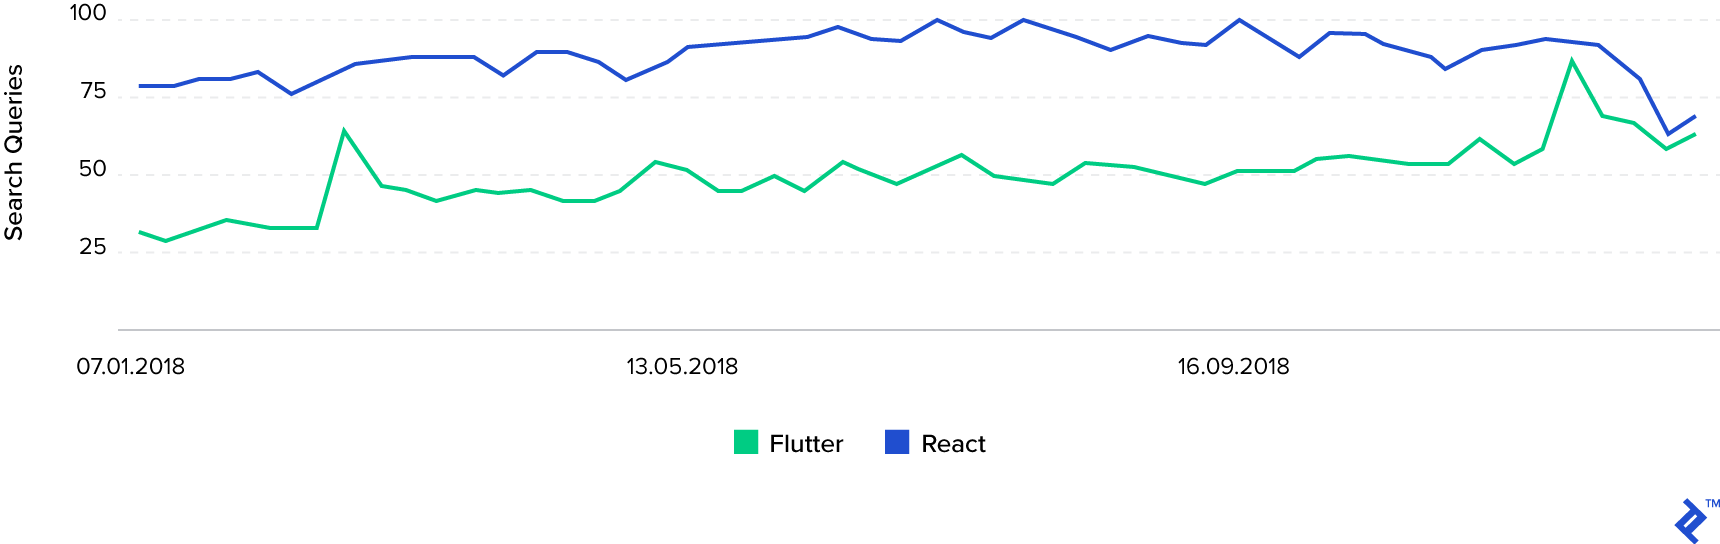
The chart below illustrates Flutter’s growing popularity, with its market share doubling in 2018. Currently on track to outpace React Native in search queries, Flutter’s rise prompted the creation of this new tutorial.
Note: This article highlights specific implementation aspects. The complete source code can be found in this GitHub repo.
Prerequisites
While this article is accessible even for first-time mobile developers, some core, non-Flutter mobile development concepts are used without in-depth explanations for the sake of brevity, aiming for a single-sitting project completion. This article assumes you have a configured development environment with necessary Android Studio plugins and the Flutter SDK.
Firebase Set Up
Setting up Firebase is the only platform-specific task. Begin by creating a new project in the Firebase Dashboard and add Android and iOS applications. Download the generated configuration files: google-services.json (Android) and GoogleService-Info.plist (iOS). Before proceeding, enable Firebase and Google authentication providers in the Authentication section under the Sign-In method tab.
With the dashboard closed, place the downloaded google-services.json file in the $(FLUTTER_PROJECT_ROOT)/android/app folder and the GoogleService-Info.plist file in the $(FLUTTER_PROJECT_ROOT)/ios/Runner directory. Next, set up the required Firebase libraries by adding the following Dart packages to your project’s pubspec.yaml file under dependencies:
1
2
3
4
5
6
| flutter_bloc:
shared_preferences:
firebase_auth:
cloud_firestore:
google_sign_in:
flutter_facebook_login:
|
The first two, while not Firebase-related, will be frequently used. The last two are self-explanatory.
Finally, configure platform-specific project settings for a seamless authentication flow. On Android, add the google-services Gradle plugin to your project-level Gradle configuration by adding the following dependency in the $(FLUTTER_PROJECT_ROOT)/android/build.gradle file:
1
| classpath 'com.google.gms:google-services:4.2.0' // change 4.2.0 to the latest version
|
Apply the plugin by adding this line at the end of $(FLUTTER_PROJECT_ROOT)/android/app/build.gradle:
1
| apply plugin: 'com.google.gms.google-services'
|
Lastly, include your Facebook application parameters in these two files: $(FLUTTER_PROJECT_ROOT)/android/app/src/main/AndroidManifest.xml and $(FLUTTER_PROJECT_ROOT)/android/app/src/main/res/values/strings.xml:
 1
 2
 3
 4
 5
 6
 7
 8
 9
10
11
12
13
14
15
16
17
18
19
20
21
22
23
24
25
26
27
28
29
30
31
32
33
34
35
36
37
| <!-- AndroidManifest.xml -->
<manifest xmlns:android="http://schemas.android.com/apk/res/android>
<!-- … -->
<application>
<!-- … -->
<meta-data android:name="com.facebook.sdk.ApplicationId"
android:value="@string/facebook_app_id"/>
<activity
android:name="com.facebook.FacebookActivity"
android:configChanges="keyboard|keyboardHidden|screenLayout|screenSize|orientation"
android:label="@string/app_name" />
<activity
android:name="com.facebook.CustomTabActivity"
android:exported="true">
<intent-filter>
<action android:name="android.intent.action.VIEW" />
<category android:name="android.intent.category.DEFAULT" />
<category android:name="android.intent.category.BROWSABLE" />
<data android:scheme="@string/fb_login_protocol_scheme" />
</intent-filter>
</activity>
<!-- … -->
</application>
</manifest>
<!-- strings.xml -->
<resources>
<string name="app_name">Toptal Chat</string>
<string name="facebook_app_id">${YOUR_FACEBOOK_APP_ID}</string>
<string name="fb_login_protocol_scheme">${YOUR_FACEBOOK_URL}</string>
</resources>
|
For iOS, modify the $(FLUTTER_PROJECT)ROOT/ios/Runner/Info.plist file by adding the following values (add to the existing CFBundleURLTypes item if it exists):
 1
 2
 3
 4
 5
 6
 7
 8
 9
10
11
12
13
14
15
16
17
18
19
20
21
22
23
24
25
26
27
28
| <key>CFBundleURLTypes</key>
<array>
<dict>
<key>CFBundleURLSchemes</key>
<array>
<string>${YOUR_FACEBOOK_URL}</string>
</array>
</dict>
<dict>
<key>CFBundleTypeRole</key>
<string>Editor</string>
<key>CFBundleURLSchemes</key>
<array>
<string>${YOUR_REVERSED_GOOGLE_WEB_CLIENT_ID}</string>
</array>
</dict>
</array>
<key>FacebookAppID</key>
<string>${YOUR_FACEBOOK_APP_ID}</string>
<key>FacebookDisplayName</key>
<string>${YOUR_FACEBOOK_APP_NAME}</string>
<key>LSApplicationQueriesSchemes</key>
<array>
<string>fbapi</string>
<string>fb-messenger-share-api</string>
<string>fbauth2</string>
<string>fbshareextension</string>
</array>
|
A Word on BLoC Architecture
This architectural standard, detailed in our previous article on BLoC for Flutter and AngularDart code sharing, won’t be extensively covered here.
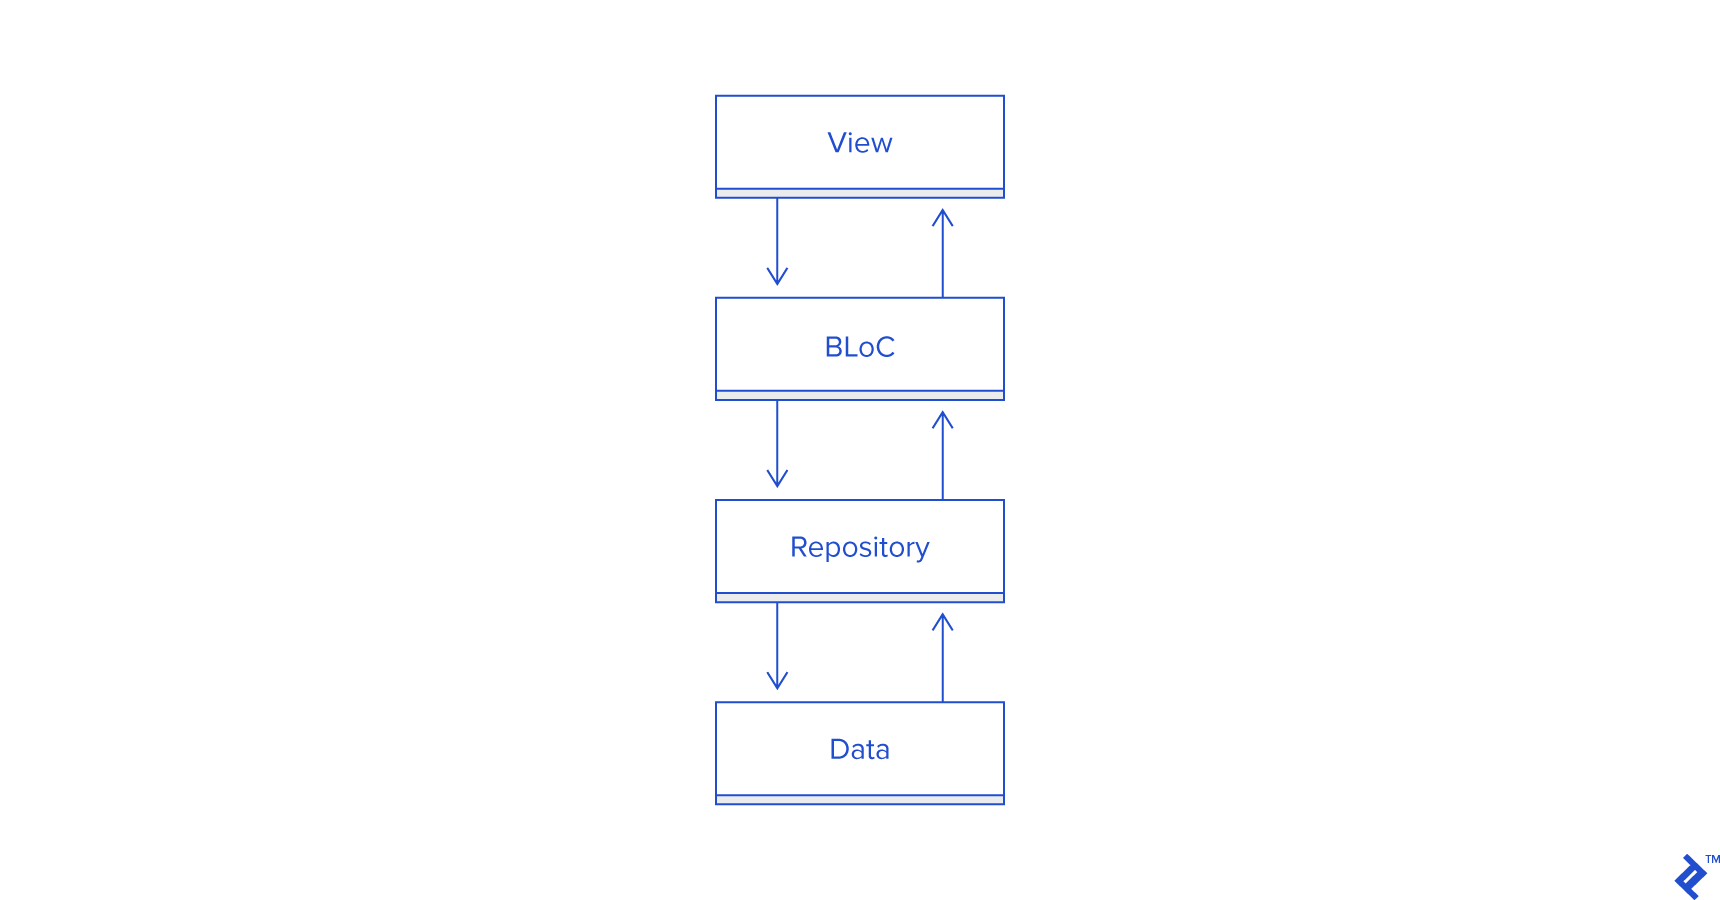
In essence, each screen comprises:
- View: Displays the current state and relays user inputs as events to the bloc.
- State: Represents the dynamic data the user interacts with in the view.
- Bloc: Responds to events, updates the state, and fetches data from local or remote repositories.
- Event: A specific action that may or may not modify the current state.
Visually:
Furthermore, a model directory houses data classes and repositories that generate instances of these classes.
UI Development
Unlike native Android and iOS development with XML-based UI separate from the logic, Flutter UI is built entirely in Dart. This tutorial uses straightforward UI element combinations with components adapting to the current state (e.g., isLoading, isEmpty). Flutter UI revolves around widgets forming a widget tree. Widgets can be stateless or stateful. In stateful widgets, calling setState() triggers a build and draw pass on the next cycle only if the widget is currently displayed (calling it in the constructor or after disposal causes an error).
For brevity, we’ll showcase one UI (view) class:
 1
 2
 3
 4
 5
 6
 7
 8
 9
10
11
12
13
14
15
16
17
18
19
20
21
22
23
24
25
26
27
28
29
30
31
32
33
34
35
36
37
38
39
40
41
42
43
44
45
46
47
48
49
50
51
52
53
54
55
56
57
58
59
60
61
62
63
64
65
66
67
68
69
70
71
72
73
74
75
76
77
78
79
80
81
82
83
84
85
86
| class LoginScreen extends StatefulWidget {
LoginScreen({Key key}) : super(key: key);
@override
State<StatefulWidget> createState() => _LoginState();
}
class _LoginState extends State<LoginScreen> {
final _bloc = LoginBloc();
@override
Widget build(BuildContext context) {
return BlocProvider<LoginBloc>(
bloc: _bloc,
child: LoginWidget(widget: widget, widgetState: this)
);
}
@override
void dispose() {
_bloc.dispose();
super.dispose();
}
}
class LoginWidget extends StatelessWidget {
const LoginWidget({Key key, @required this.widget, @required this.widgetState}) : super(key: key);
final LoginScreen widget;
final _LoginState widgetState;
@override
Widget build(BuildContext context) {
return Scaffold(
appBar: AppBar(
title: Text("Login"),
),
body: BlocBuilder(
bloc: BlocProvider.of<LoginBloc>(context),
builder: (context, LoginState state) {
if (state.loading) {
return Center(
child: CircularProgressIndicator(strokeWidth: 4.0)
);
} else {
return Center(
child: Column(
mainAxisAlignment: MainAxisAlignment.center,
crossAxisAlignment: CrossAxisAlignment.center,
children: <Widget>[
ButtonTheme(
minWidth: 256.0,
height: 32.0,
child: RaisedButton(
onPressed: () => BlocProvider.of<LoginBloc>(context).onLoginGoogle(this),
child: Text(
"Login with Google",
style: TextStyle(color: Colors.white),
),
color: Colors.redAccent,
),
),
ButtonTheme(
minWidth: 256.0,
height: 32.0,
child: RaisedButton(
onPressed: () => BlocProvider.of<LoginBloc>(context).onLoginFacebook(this),
child: Text(
"Login with Facebook",
style: TextStyle(color: Colors.white),
),
color: Colors.blueAccent,
),
),
],
),
);
}
}),
);
}
void navigateToMain() {
NavigationHelper.navigateToMain(widgetState.context);
}
}
|
The remaining UI classes follow similar patterns, potentially with different actions or an empty state widget tree alongside the loading state.
Authentication
As anticipated, we’ll leverage the google_sign_in and flutter_facebook_login libraries for social network-based user authentication. Start by importing these packages into the file handling the login logic:
1
2
| import 'package:flutter_facebook_login/flutter_facebook_login.dart';
import 'package:google_sign_in/google_sign_in.dart';
|
Next, we’ll have two independent parts managing the authentication flow. The first initiates either a Facebook or Google sign-in request:
 1
 2
 3
 4
 5
 6
 7
 8
 9
10
11
12
13
14
15
16
17
18
19
20
21
22
23
| void onLoginGoogle(LoginWidget view) async {
dispatch(LoginEventInProgress());
final googleSignInRepo = GoogleSignIn(signInOption: SignInOption.standard, scopes: ["profile", "email"]);
final account = await googleSignInRepo.signIn();
if (account != null) {
LoginRepo.getInstance().signInWithGoogle(account);
} else {
dispatch(LogoutEvent());
}
}
void onLoginFacebook(LoginWidget view) async {
dispatch(LoginEventInProgress());
final facebookSignInRepo = FacebookLogin();
final signInResult = await facebookSignInRepo.logInWithReadPermissions(["email"]);
if (signInResult.status == FacebookLoginStatus.loggedIn) {
LoginRepo.getInstance().signInWithFacebook(signInResult);
} else if (signInResult.status == FacebookLoginStatus.cancelledByUser) {
dispatch(LogoutEvent());
} else {
dispatch(LoginErrorEvent(signInResult.errorMessage));
}
}
|
The second part is triggered when profile data is received from either provider. This is achieved by having the login handler listen to the firebase_auth onAuthStateChange stream:
 1
 2
 3
 4
 5
 6
 7
 8
 9
10
11
12
13
14
15
16
17
18
19
20
| void _setupAuthStateListener(LoginWidget view) {
if (_authStateListener == null) {
_authStateListener = FirebaseAuth.instance.onAuthStateChanged.listen((user) {
if (user != null) {
final loginProvider = user.providerId;
UserRepo.getInstance().setCurrentUser(User.fromFirebaseUser(user));
if (loginProvider == "google") {
// TODO analytics call for google login provider
} else {
// TODO analytics call for facebook login provider
}
view.navigateToMain();
} else {
dispatch(LogoutEvent());
}
}, onError: (error) {
dispatch(LoginErrorEvent(error));
});
}
}
|
The UserRepo and LoginRepo implementations are omitted here, but you can find the complete reference in the GitHub repo.
Flutter Tutorial: How to Build an Instant Messaging App
Now for the exciting part: achieving near-instantaneous message exchange. Fortunately, cloud_firestore allows interaction with the Firestore instance. Its snapshots() feature provides real-time updates via a data stream.
Most of the chat_repo code is straightforward, except for the startChatroomForUsers method. It creates a new chatroom for two users unless one already exists for that pair, in which case it returns the existing one, preventing duplicates.
Due to Firestore’s design limitations, nested array-contains queries aren’t currently supported, hindering direct retrieval of the desired data stream. As a workaround, we retrieve all chatrooms for the logged-in user and then filter for the one containing the selected user:
 1
 2
 3
 4
 5
 6
 7
 8
 9
10
11
12
13
14
15
16
17
18
19
20
21
22
23
24
25
26
27
28
29
30
| Future<SelectedChatroom> startChatroomForUsers(List<User> users) async {
DocumentReference userRef = _firestore
.collection(FirestorePaths.USERS_COLLECTION)
.document(users[1].uid);
QuerySnapshot queryResults = await _firestore
.collection(FirestorePaths.CHATROOMS_COLLECTION)
.where("participants", arrayContains: userRef)
.getDocuments();
DocumentReference otherUserRef = _firestore
.collection(FirestorePaths.USERS_COLLECTION)
.document(users[0].uid);
DocumentSnapshot roomSnapshot = queryResults.documents.firstWhere((room) {
return room.data["participants"].contains(otherUserRef);
}, orElse: () => null);
if (roomSnapshot != null) {
return SelectedChatroom(roomSnapshot.documentID, users[0].displayName);
} else {
Map<String, dynamic> chatroomMap = Map<String, dynamic>();
chatroomMap["messages"] = List<String>(0);
List<DocumentReference> participants = List<DocumentReference>(2);
participants[0] = otherUserRef;
participants[1] = userRef;
chatroomMap["participants"] = participants;
DocumentReference reference = await _firestore
.collection(FirestorePaths.CHATROOMS_COLLECTION)
.add(chatroomMap);
DocumentSnapshot chatroomSnapshot = await reference.get();
return SelectedChatroom(chatroomSnapshot.documentID, users[0].displayName);
}
}
|
Similarly, Firebase currently lacks support for array updates (inserting into existing array fields) using the special FieldValue.serverTimestamp() value, which populates the field with the server’s timestamp during the transaction. Instead, we use DateTime.now() when creating and inserting the new message object into the chat room messages collection:
 1
 2
 3
 4
 5
 6
 7
 8
 9
10
11
12
13
14
15
16
17
18
| Future<bool> sendMessageToChatroom(String chatroomId, User user, String message) async {
try {
DocumentReference authorRef = _firestore.collection(FirestorePaths.USERS_COLLECTION).document(user.uid);
DocumentReference chatroomRef = _firestore.collection(FirestorePaths.CHATROOMS_COLLECTION).document(chatroomId);
Map<String, dynamic> serializedMessage = {
"author" : authorRef,
"timestamp" : DateTime.now(),
"value" : message
};
chatroomRef.updateData({
"messages" : FieldValue.arrayUnion([serializedMessage])
});
return true;
} catch (e) {
print(e.toString());
return false;
}
}
|
Wrapping Up
Our Flutter messaging app serves as a proof-of-concept rather than a market-ready solution. Future improvements include end-to-end encryption, rich content (group chats, media attachments, URL parsing), and, crucially, push notifications, omitted here for brevity. Additionally, Firestore would benefit from features like nested array-contains queries for simplified and precise data retrieval.
While Flutter recently reached its stable 1.0 release, it continues to evolve, expanding its framework features, development community, and third-party resources. Now is the opportune time to delve into Flutter app development, as it’s undoubtedly here to stay and streamline your mobile development process.
Furthermore, Flutter developers will be equipped to target Google’s emerging OS, Fuchsia, at no extra cost.