This ERC20 token tutorial provides a concise guide on creating an ERC20 token example efficiently.
Let’s begin with the fundamentals: What constitutes an ERC20 token?
The ERC20 token specification has emerged as the leading standard for Ethereum tokens in recent times. Essentially, the majority of Ethereum contracts currently in use adhere to the ERC20 standard. This article will delve into the process of generating your own Ethereum token. However, before proceeding, let’s examine the ERC20 standard in greater detail.

Several factors contribute to the appeal and widespread adoption of ERC20 tokens:
- ERC20 tokens are remarkably straightforward to deploy, as this tutorial will illustrate.
- The ERC20 standard effectively addresses a critical issue by providing blockchain-based marketplaces and crypto-wallets with a unified, standardized set of commands for interacting with the diverse range of tokens they manage. This encompasses interaction protocols between different tokens, along with token acquisition rules.
- It gained prominence as the first widely embraced specification to offer Ethereum token standardization. While not the absolute first, its popularity swiftly propelled it to industry-standard status.
Comparable to other Ethereum tokens, ERC20 token contracts are implemented as smart contracts and executed on the Ethereum Virtual Machine (EVM) in a decentralized fashion.
Solidity: The Language of Smart Contracts
Solidity serves as the programming language for Ethereum smart contracts. Although alternative languages exist, their usage for this purpose is exceedingly rare. Given Solidity’s resemblance to JavaScript, individuals with prior knowledge of JavaScript, Java, or other C-like languages should readily grasp the functionality of Solidity code snippets, even without extensive expertise in Solidity itself.
This marks the exciting part, as you’ll soon be able to effortlessly create a rudimentary ERC20 token contract. The task is remarkably straightforward, and this article will guide you through the process of writing and deploying an ERC20 token in under an hour.
The ERC20 token code we’ll develop in this demonstration represents a barebones implementation, devoid of excessive complexity. Nevertheless, I’ve encountered numerous similarly simplistic tokens in real-world applications, and they often perform admirably.
Exploring the ERC20 Token Standard
Decoding ERC20
In essence, the ERC20 standard establishes a set of functions that all ERC20 tokens must implement to ensure seamless integration with other contracts, wallets, or marketplaces. This function set is intentionally concise and fundamental.
| |
ERC20 functions enable external entities, such as crypto-wallet applications, to retrieve a user’s balance and execute fund transfers between users upon proper authorization.
The ERC20 smart contract defines two specific events:
| |
These events are triggered or emitted when a user is granted permission to withdraw tokens from an account and subsequently when the tokens are effectively transferred.
Beyond the standard ERC20 functions, many ERC20 tokens incorporate supplementary fields, some of which have gained de facto inclusion in the ERC20 standard, even if not explicitly documented. Let’s explore a few examples of such fields.
| |
Here are a few noteworthy points concerning ERC20 and Solidity terminology:
- The
publicdesignation for a function signifies its accessibility from outside the contract itself. - The keyword
viewessentially denotes constancy, implying that the contract’s internal state remains unaltered by the function’s execution. - An
eventin Solidity enables clients, such as your application’s frontend, to receive notifications upon the occurrence of specific actions within the contract.
The majority of Solidity language constructs should be readily comprehensible if you possess a basic understanding of Java or JavaScript.
Crafting an ERC20 Token Using Solidity
With the fundamentals established and the prerequisites for ERC20 token creation elucidated, let’s embark on the coding phase.
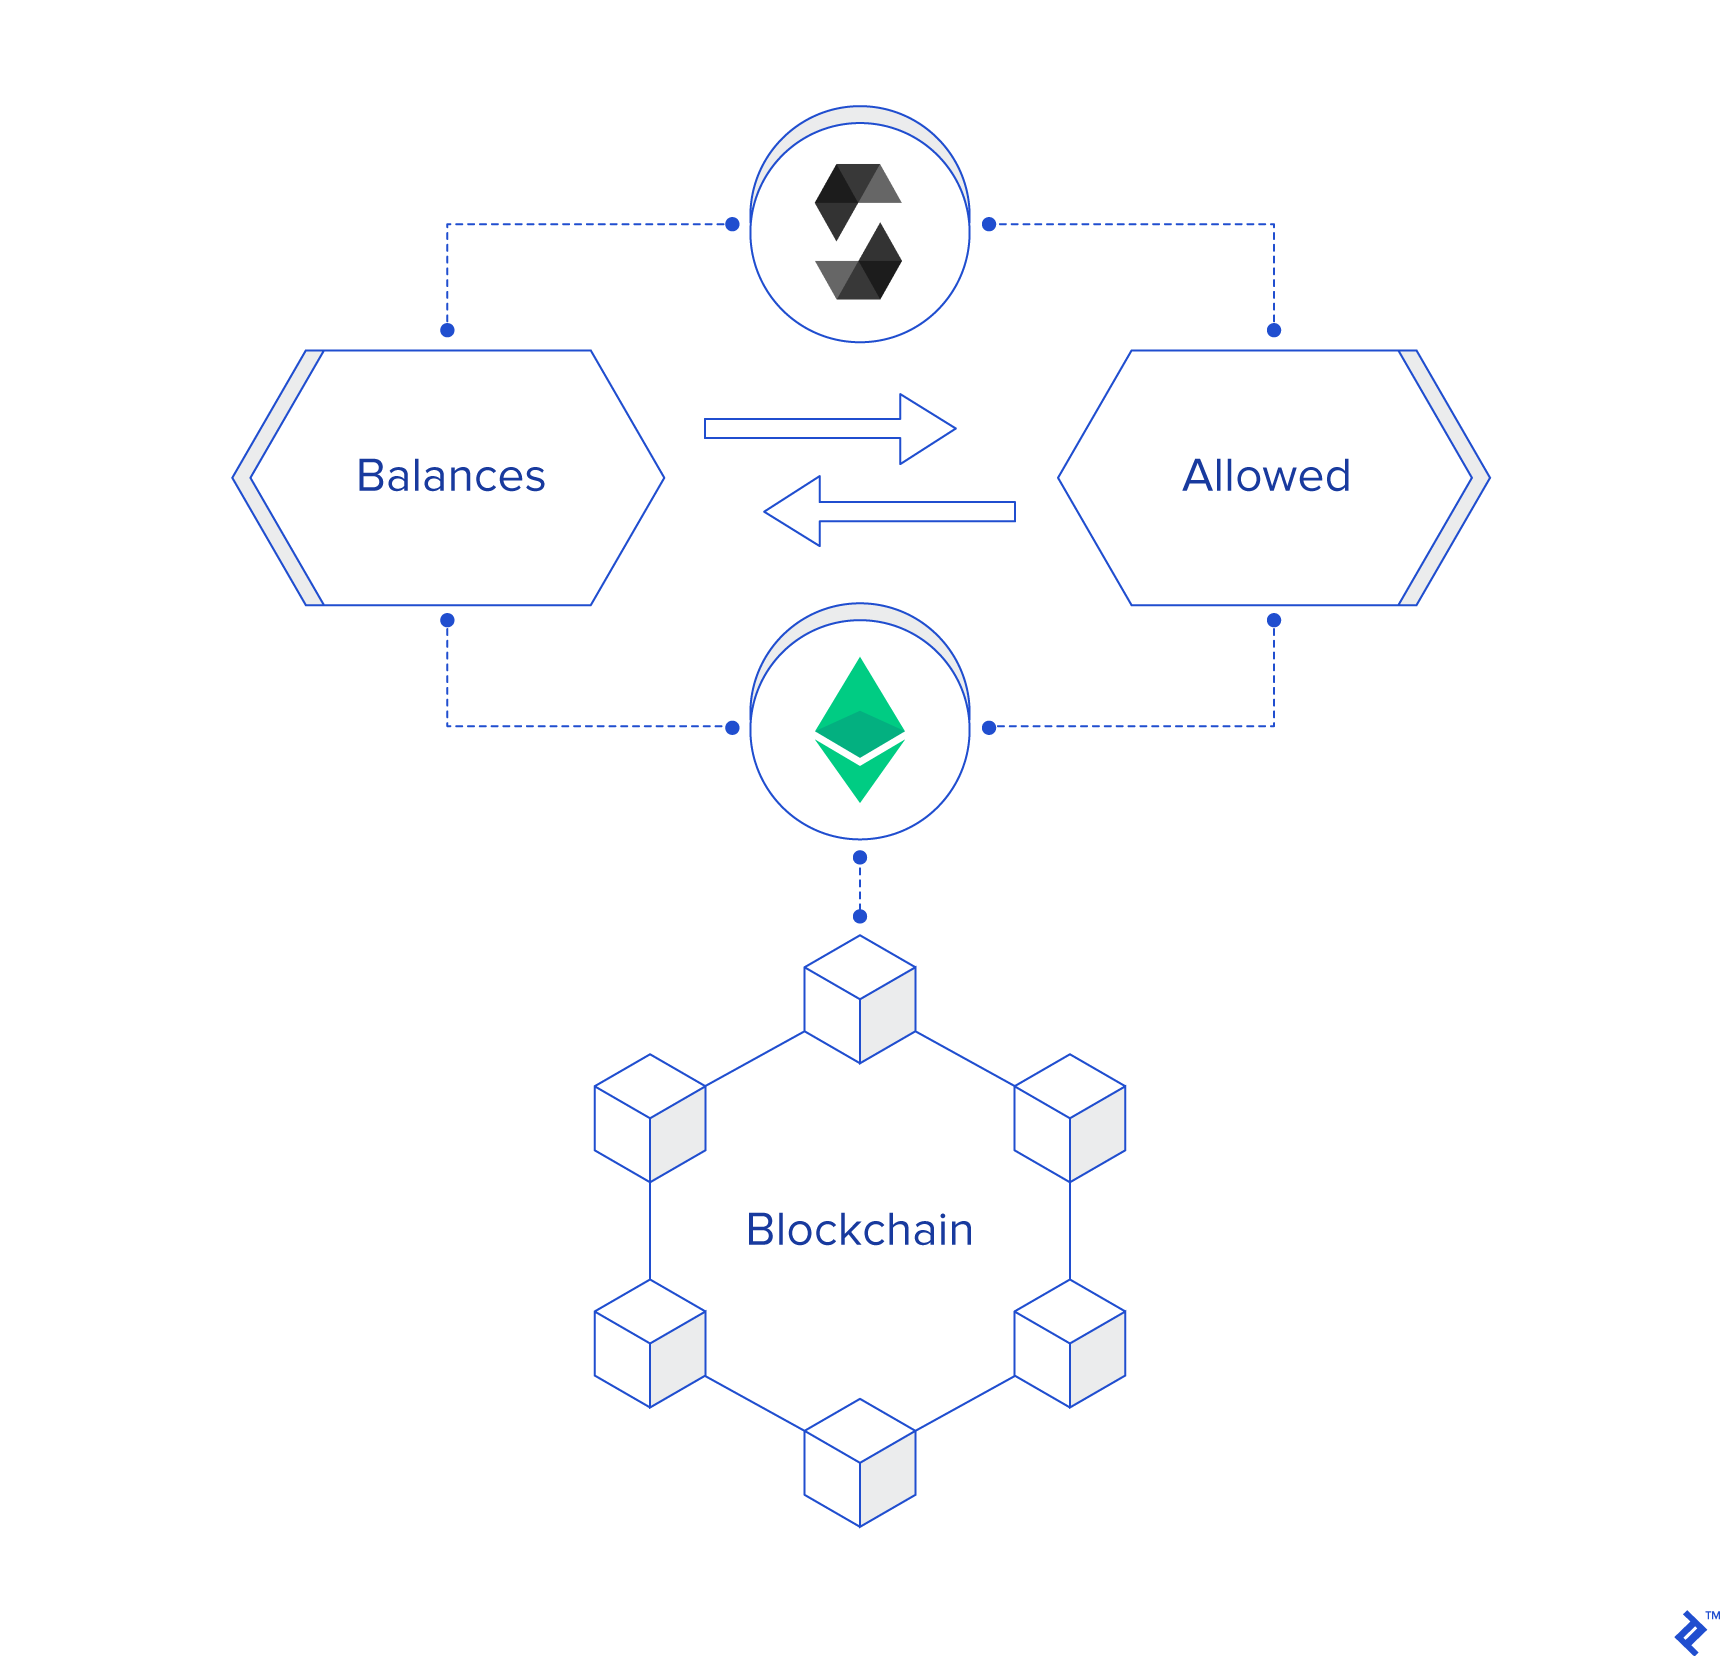
Our initial step involves defining two mapping objects. In Solidity, a mapping object represents an associative or key/value array:
| |
The expression mapping(address => uint256) establishes an associative array. Its keys are of the type address—a numerical representation of account addresses—while its values belong to the type uint256—a 256-bit integer commonly employed for storing token balances.
The first mapping object, balances, will maintain a record of each owner account’s token balance.
The second mapping object, allowed, will encompass all accounts authorized to withdraw from a specific account, along with the corresponding withdrawal limit for each.
As evident, the value field of the allowed mapping itself constitutes a mapping that associates an account address with its approved withdrawal amount.
These mappings, alongside all other contract fields, will be persistently stored on the blockchain and subjected to the mining process, ensuring that any changes are disseminated to all network nodes.
Blockchain storage comes at a premium, and users of your contract will bear the cost in some form. Consequently, minimizing storage consumption and blockchain writes should always be a priority.
Having established the necessary data structures, we can now proceed to implement the ERC20 logic within the appropriate functions.
Establishing the Initial Token Supply
Determining the initial number of ICO tokens presents multiple approaches, each warranting extensive discussion. However, for the purpose of this ERC20 tutorial, we’ll opt for the most straightforward method: setting the total token supply during contract creation and initially assigning all tokens to the “contract owner,” the account responsible for deploying the smart contract:
| |
A constructor, a special function automatically invoked by Ethereum upon contract deployment, typically initializes the token’s state using parameters supplied by the deploying account.
The global variable msg, declared and populated by Ethereum itself, provides crucial data for contract execution. The field msg.sender specifically identifies the Ethereum account currently executing the contract function.
Only the deploying account possesses the authority to invoke a contract’s constructor. During contract initialization, this function allocates the available tokens to the ‘contract owner’ account.
Retrieving the Total Token Supply
| |
This function returns the total number of tokens allocated by this contract, irrespective of ownership.
Fetching an Owner’s Token Balance
| |
The balanceOf function returns the current token balance associated with an account, identified by its owner’s address.
Transferring Tokens
| |
As its name suggests, the transfer function facilitates the movement of numTokens tokens from the owner’s balance to that of another user, designated as the receiver. The transferring owner is represented by msg.sender, indicating that only the token owner possesses the authority to transfer tokens to others.
Solidity utilizes the require statement to assert a condition. In this context, it ensures that the transferring account maintains a sufficient balance to execute the transfer. If a require statement evaluates to false, the transaction is immediately reverted, preventing any modifications to the blockchain.
Prior to termination, the function triggers the ERC20 event Transfer, enabling registered listeners to respond upon its successful completion.
Granting Withdrawal Approval to a Delegate
This particular function finds common application in token marketplace scenarios.
| |
The approve function empowers an owner, identified by msg.sender, to grant a delegate account—potentially the marketplace itself—the authorization to withdraw tokens from their account and transfer them to other accounts.
Essentially, this function caters to situations where owners list tokens for sale on a marketplace, allowing the marketplace to finalize transactions without requiring prior approval.
Upon completion, this function emits an Approval event.
Retrieving Approved Token Withdrawal Allowance
| |
This function returns the current number of tokens an owner has authorized a specific delegate to withdraw, as established by the approve function.
Delegate-Initiated Token Transfer
The transferFrom function serves as the counterpart to the approve function, enabling a delegate with withdrawal approval to transfer owner funds to a third-party account.
| |
The two require statements at the function’s outset ensure the legitimacy of the transaction. They verify that the owner possesses a sufficient token balance for the transfer and that the delegate holds approval for withdrawing at least numTokens.
Apart from transferring the designated numTokens from the owner to the buyer, this function also deducts numTokens from the delegate’s allowance. Consequently, a delegate with a specified allowance can divide it into multiple withdrawals, a common practice in marketplace settings.
While this concludes a valid ERC20 implementation, let’s enhance its robustness further. We’ll augment the code’s security while maintaining the token’s relative simplicity.
Introducing the SafeMath Solidity Library
SafeMath is a Solidity library designed to mitigate integer overflow attacks, a known vulnerability exploited by hackers. In such attacks, malicious actors manipulate contracts into utilizing inaccurate numeric values by supplying parameters that force relevant integers to exceed their maximum values.
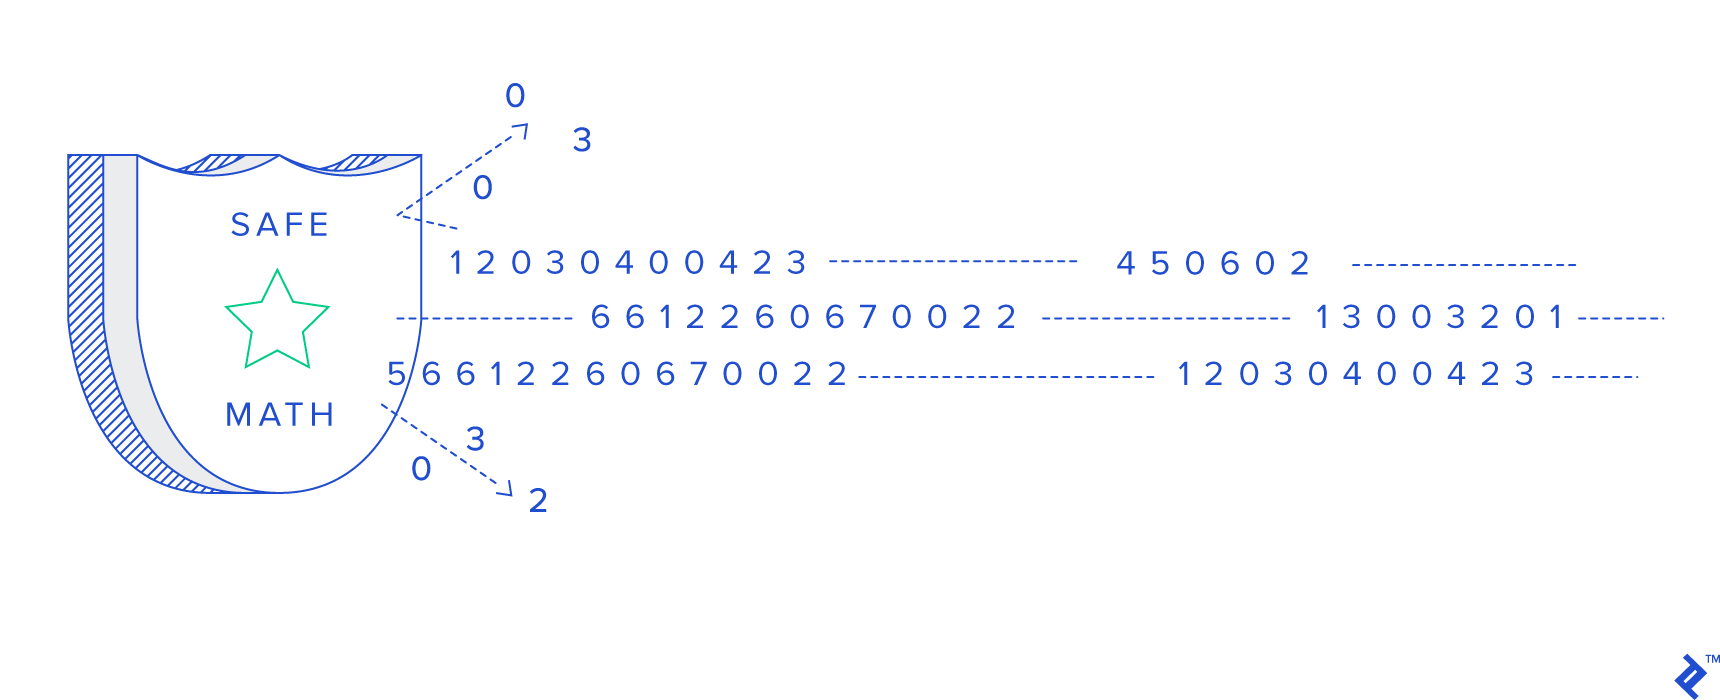
SafeMath provides protection by proactively checking for overflow conditions before executing arithmetic operations, effectively neutralizing the threat of overflow attacks. The library’s minimal size ensures a negligible impact on contract size, incurring no performance overhead and minimal storage costs.
Let’s integrate SafeMath into our code:
| |
SafeMath employs assert statements to validate the correctness of the provided parameters. If an assert statement fails, the function execution is immediately halted, and all blockchain modifications are rolled back.
Next, we’ll include the following statement to introduce the library to the Solidity compiler:
using SafeMath for uint256;
Subsequently, we’ll replace the previously used naive arithmetic operations with their SafeMath counterparts:
| |
Consolidating the Code
In Solidity, a smart contract’s functions and events are encapsulated within an entity known as a contract, analogous to a “blockchain class.” Presented below is the ERC20-compliant contract we’ve constructed, accompanied by a Gist containing our code. The name and symbol fields can be modified as desired. Since most tokens maintain a decimal value of 18, we’ll adhere to this convention.
Deploying the Ethereum Contract
It’s time to deploy our contract to the blockchain. Upon deployment, the contract will be propagated to all participating nodes within the network. Any subsequent modifications to the contract will be disseminated to all these nodes.
Ethereum developers commonly utilize deployment tools such as Truffle. However, for our current needs, even Truffle proves excessive. We’ll leverage a simple online tool called Remix.
Using this tool necessitates the installation of the MetaMask plugin on your browser and a Rinkeby (Ethereum test network) account with a minimal amount of Rinkeby Ether. These steps are relatively straightforward, so we’ll omit the detailed instructions.
Should you require either of these prerequisites, navigate to MetaMask and Rinkeby for download links and comprehensive installation and usage guidelines.
With all the necessary components in place, we’ll proceed to Remix and paste the code provided above, including the pragma line and the SafeMath library, into the online editor.
Next, we’ll switch to the “Run” tab and click on “Deploy.” A MetaMask popup will prompt us to confirm the transaction. Upon approval, the deployment process will commence.
- Green box: Ensure that you are connected to the Rinkeby test network.
- Blue box: Specify the desired total token supply.
- Red box: Initiate the deployment process.
Gist: https://gist.github.com/giladHaimov/8e81dbde10c9aeff69a1d683ed6870be#file-basicerc20-sol
Congratulations! You’ve successfully deployed your inaugural ERC20 token, emulating the prowess of a seasoned Ethereum professional. As promised, the token is characterized by its simplicity, lightweight nature, full functionality, ERC20 standard compliance, and MathSafe-enhanced security. It’s now primed for purchase, payment processing, and seamless transfers across the blockchain.
Delving Deeper into Smart Contracts
This demonstration merely scratches the surface of smart contract development, focusing solely on one facet.
Smart contracts can exhibit significantly greater complexity, contingent upon the intricacies of your business logic, the modeling of user interactions, decisions regarding token minting and burning, the introduction of lifecycle management within the contract, the potential need for administrator-level functionalities often accompanied by an admin-authorized function set, and numerous other factors.
However, replicating the steps outlined here provides a solid foundation upon which to expand your knowledge and confidently tackle more intricate contracts as the need arises.