React 16.8, released in late 2018, introduced Hooks. These functions integrate with functional components, enabling the use of state and component features like componentDidUpdate and componentDidMount, which wasn’t possible before.
Furthermore, hooks facilitate the reuse of component and state logic across various components, a task that was previously quite challenging. Consequently, hooks have significantly transformed React development.
This article delves into testing React Hooks. We’ll select a sufficiently intricate hook and test it thoroughly.
This article assumes you’re an experienced React developer familiar with React Hooks. If you need a refresher, consult our tutorial available at official documentation.
The Hook We’ll Test
This article utilizes the useStaleRefresh hook, which I created for a previous article on Stale-while-revalidate Data Fetching with React Hooks. If you haven’t read it, don’t worry; I’ll provide a recap.
This is the hook we’ll be testing:
| |
As you can see, useStaleRefresh fetches data from a URL while returning a cached version if available. It employs a basic in-memory cache.
Additionally, it returns an isLoading value that indicates whether data or cache is currently available. If not, the client can display a loading indicator. Once cache or a fresh response is ready, isLoading becomes false.

Before we proceed, I encourage you to carefully review the hook’s code to understand its functionality fully.
We’ll explore testing this hook without any libraries (using only React Test Utilities and Jest) and then with the help of react-hooks-testing-library.
Testing without libraries, utilizing only the Jest test runner, demonstrates the fundamental principles of hook testing. This knowledge will empower you to troubleshoot any challenges that may occur when using a library that provides testing abstractions.
Defining Our Test Cases
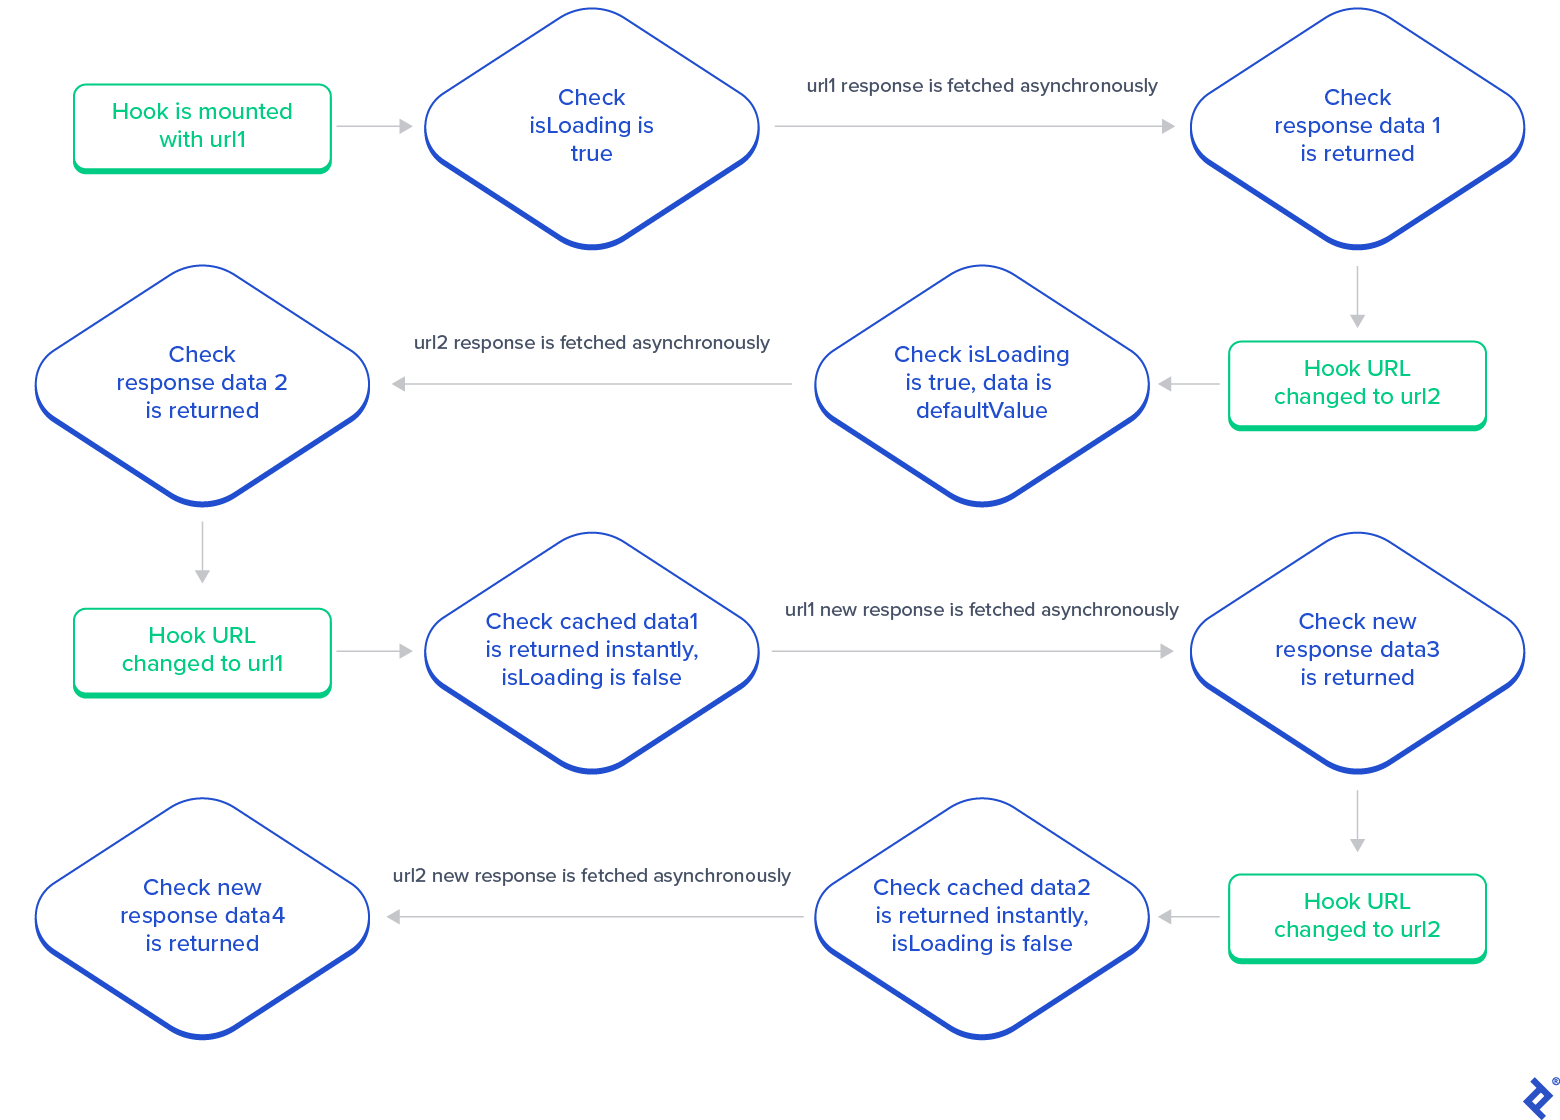
Before diving into testing, let’s outline our test plan based on the hook’s intended behavior. Here’s my eight-step plan:
- Upon mounting the hook with URL
url1,isLoadingshould betrue, and data should bedefaultValue. - After an asynchronous fetch request, the hook should update with data
data1, andisLoadingshould becomefalse. - Changing the URL to
url2should setisLoadingtotrueagain, with data asdefaultValue. - Following another asynchronous fetch, the hook should update with new data
data2. - Switching the URL back to
url1should instantly return cached datadata1withisLoadingasfalse. - After receiving a fresh response from an asynchronous fetch, data should update to
data3. - Reverting the URL to
url2should immediately yield cached datadata2, andisLoadingshould befalse. - A fresh response from a subsequent asynchronous fetch should update the data to
data4.
This test flow defines the hook’s expected behavior. If our tests confirm this flow, we can be confident in the hook’s functionality.
Testing Hooks Without Libraries
This section demonstrates hook testing without external libraries, providing a deep dive into the underlying mechanisms.
First, we’ll mock the fetch function to control the API responses. Here’s the mocked fetch:
| |
This modified fetch assumes JSON responses and returns the provided url as the data value by default. It also introduces a random delay between 200ms and 500ms to simulate real-world conditions.
To modify the response, set the second argument suffix to a non-empty string.
You might wonder about the need for the delay. Why not an immediate response? The delay aims to replicate real-world scenarios more accurately. Testing the hook with instant responses wouldn’t be comprehensive. While we could shorten the delay for faster tests, let’s maintain realism for this article.
With our fetch mock ready, we’ll assign it to the fetch function. We’ll use beforeAll and afterAll for this purpose since the function is stateless and doesn’t require resetting after each test.
| |
Next, we need to mount the hook within a component. Why? Because hooks are simply functions. They require a component context to interact with useState, useEffect, and other React features.
Let’s create a TestComponent to mount our hook:
| |
This simple component either displays the data or a “Loading” message while data is being fetched.
After creating the test component, we need to mount it to the DOM. We’ll employ beforeEach and afterEach to mount and unmount our component before each test to ensure a clean DOM.
| |
Note that container is a global variable, allowing access for test assertions.
With these preparations, let’s write our first test. We’ll render the URL url1, and since fetching takes time (due to fetchMock), it should initially display the “loading” text.
| |
Running the test using yarn test confirms the expected behavior. Here’s the complete code on GitHub.
Now, let’s test the transition from “loading” to the fetched response data, url1.
How? Looking at fetchMock, we see a 200-500 millisecond wait time. What if we introduce a 500-millisecond sleep in the test? This should cover all potential delays.
| |
The test passes, but we encounter an error (code).
| |
This occurs because the state update in the useStaleRefresh hook happens outside act(). For timely DOM updates, React recommends using act() whenever re-renders or UI updates might occur. We’ll wrap our sleep with act to address this.
| |
Running the test again (code on GitHub) should now be error-free.
Let’s test another scenario: changing the URL to url2, verifying the loading screen, awaiting the fetch response, and finally checking for the url2 text. This should be straightforward now that we know how to handle asynchronous changes.
| |
This test also passes. Now, let’s test response data changes and cache behavior.
Our fetchMock function has an additional suffix argument to modify response data. We’ll update fetchMock accordingly.
| |
Now, we can test setting the URL back to url1. It should initially load url1 and then url1__. We can replicate this for url2 without surprises.
| |
Passing all these tests assures us that the hook functions as intended (code). Now, let’s optimize our tests with helper methods.
Optimizing with Helper Methods
While our current approach works, there’s room for improvement. For instance, we’re consistently waiting for 500ms after each fetch, even though requests can complete between 200ms and 500ms, resulting in wasted time. We can optimize this by waiting only as long as each request takes.
How? One technique is to repeatedly execute the assertion until it passes or a timeout is reached. Let’s create a waitFor function for this purpose.
| |
This function runs a callback (cb) within a try...catch block every 10ms. If the timeout is exceeded, it throws an error. This ensures safe assertion execution without infinite loops.
We can now replace our 500ms sleep with waitFor.
| |
Implementing this across our assertions significantly speeds up our tests (code).
While testing through the UI works, we might want to test the hook directly using its return values. How can we achieve this?
It’s relatively simple. We already have access to the hook’s return values within the component. Moving these variables to the global scope would enable direct testing.
Since we’ll be testing via return values instead of the rendered DOM, we can remove the HTML rendering from our component and make it return null. We’ll also remove the destructuring in the hook’s return for increased generality.
Here’s the updated test component:
| |
Now, the global variable result stores the hook’s return value.
| |
After implementing these changes, our tests should still pass (code).
We now have a grasp of testing React Hooks. However, we can still make improvements such as:
- Moving the
resultvariable to a local scope. - Eliminating the need to create a component for each hook we test.
We can achieve this with a factory function that encapsulates a test component and renders the hook within it, providing access to the result variable.
Let’s move TestComponent and result inside a function called renderHook. We’ll also pass the hook and its arguments as function parameters for use within the test component.
| |
We store result as an object with result.current to enable updating return values as the test progresses. Since the hook returns an array, returning it directly would create a copy. Storing it in an object allows us to return a reference, facilitating updates by modifying result.current.
Now, let’s address hook updates. We’ll leverage the closure and add a rerender function.
The final renderHook function:
| |
We can now use this function in our tests. Instead of act and render, we’ll do the following:
| |
We can then assert using result.current and update the hook using rerender:
| |
After applying these changes, our tests should run smoothly (code).
Now we have a much cleaner abstraction for testing hooks. While further refinements are possible (like avoiding the repetitive passing of defaultValue to rerender), we already have a library that significantly enhances this experience.
Let me introduce react-hooks-testing-library.
Testing with React-hooks-testing-library
React-hooks-testing-library handles many tasks we’ve discussed, including container mounting and unmounting, allowing us to focus solely on testing our hooks.
Its renderHook function returns rerender, result, and wait (similar to our waitFor).
Here’s how to render a hook using React-hooks-testing-library. The hook is passed as a callback, executed on every test component re-render.
| |
Testing if the initial render yields isLoading as true and a return value of defaultValue is straightforward.
| |
For asynchronous updates, we utilize the wait method provided by renderHook, which comes pre-wrapped with act().
| |
We can then update the hook with new props using rerender without passing defaultValue again.
| |
The rest of the test follows a similar pattern (code).
Wrapping Up
This article aimed to demonstrate React Hook testing using an asynchronous hook as an example. Hopefully, this equips you to confidently test various hook types, as the approach is generally applicable.
I highly recommend React-hooks-testing-library due to its comprehensiveness and reliability. However, if you encounter issues, the insights gained from this article should enable you to tackle them effectively.