Many mission-critical application functions, such as streaming and e-commerce, have outgrown monolithic architecture. The current need for real-time event data and the widespread adoption of cloud services have led many modern applications, like Netflix and Lyft, to transition to an event-driven microservices approach. This approach uses decoupled microservices that operate independently, improving a codebase’s adaptability and scalability.
This article will explore what an event-driven microservices architecture is and why you should consider using it. We will delve into its fundamental aspects and build a comprehensive blueprint for an event-driven microservices project using Python and Apache Kafka.
Leveraging Event-driven Microservices
Event-driven microservices merge two modern architecture patterns: microservices architectures and event-driven architectures. While microservices can be combined with request-driven REST architectures, event-driven architectures are gaining prominence with the increasing use of big data and cloud platform environments.
What Constitutes a Microservices Architecture?
A microservices architecture is a software development methodology that structures an application’s processes as loosely coupled services. It falls under the umbrella of service-oriented architecture (SOA).
Traditional monolithic structures have all application processes tightly intertwined, so if one component malfunctions, the entire system fails. In contrast, microservices architectures organize application processes into distinct services that communicate using lightweight protocols, resulting in enhanced modularity and improved application maintainability and resilience.

While monolithic applications might appear simpler to develop, debug, test, and deploy, most enterprise-level applications adopt microservices as their preferred standard because it empowers developers to manage components autonomously. Ideally, microservices should be kept as streamlined as possible and interact using messages (events) produced and transmitted to or consumed from an event stream. Popular choices for data serialization include JSON, Apache Avro, and Google Protocol Buffers.
Understanding Event-driven Architecture
An event-driven architecture is a design pattern that structures software such that events dictate the application’s behavior. These events are significant data points generated by actors, which could be human users, external applications, or other services.
Our example project will showcase this architecture, with its core being an event-streaming platform responsible for managing communication in two ways:
- Receiving messages from actors that write them (commonly referred to as publishers or producers)
- Sending messages to actors that read them (commonly referred to as subscribers or consumers)
Technically speaking, our event-streaming platform is software that acts as the communication intermediary between services, allowing them to exchange messages. It can implement various messaging patterns, including publish/subscribe or point-to-point messaging, as well as message queues.

Employing an event-driven architecture with an event-streaming platform and microservices presents numerous advantages:
- Asynchronous communications: The capacity for independent multitasking allows services to respond to events at their own pace without waiting for a previous task to finish before starting the next. Asynchronous communications facilitate real-time data processing and make applications more responsive and maintainable.
- Complete decoupling and flexibility: The separation of producer and consumer components means services only interact with the event-streaming platform and the specific data format they handle. Services can adhere to the single responsibility principle and scale independently. They can even be developed by separate teams using different technology stacks.
- Reliability and scalability: The asynchronous, decoupled nature of event-driven architectures further enhances app reliability and scalability, features that are already inherent advantages of the microservices architecture design.
Event-driven architectures simplify the creation of services that respond to any system event. They also allow for the development of semi-automatic pipelines incorporating manual steps. For instance, a pipeline for automated user payouts could include a manual security check triggered by unusually large payout amounts before any funds are transferred.
Selecting the Project Tech Stack
We will construct our project using Python and Apache Kafka, coupled with Confluent Cloud. Python is a powerful, dependable choice for various software projects, boasting a vast community and a wealth of libraries. It is well-suited for building microservices due to its frameworks designed for REST and event-driven applications, such as Flask and Django. Python-based microservices are frequently used with Apache Kafka.
Apache Kafka is a renowned event-streaming platform employing a publish/subscribe messaging pattern. Its popularity in event-driven architectures stems from its expansive ecosystem, scalability (a result of its fault-tolerance capabilities), storage system, and stream processing capabilities.
Finally, we will utilize Confluent as our cloud platform for its efficient Kafka management and ready-to-use infrastructure. AWS MSK is another excellent choice if you leverage AWS infrastructure. Still, Confluent is more straightforward to set up since Kafka is its central component, and it offers a free tier.
Implementing the Project Blueprint
We will set up our Kafka microservices example in Confluent Cloud, develop a basic message producer, then refine and structure it for optimal scalability. By the end of this tutorial, we will have a functional message producer that seamlessly transmits data to our cloud cluster.
Setting Up Kafka
Our first task is to create a Kafka cluster. Kafka clusters host Kafka servers, which facilitate communication. Producers and consumers interact with these servers using Kafka topics, which are categories for storing records.
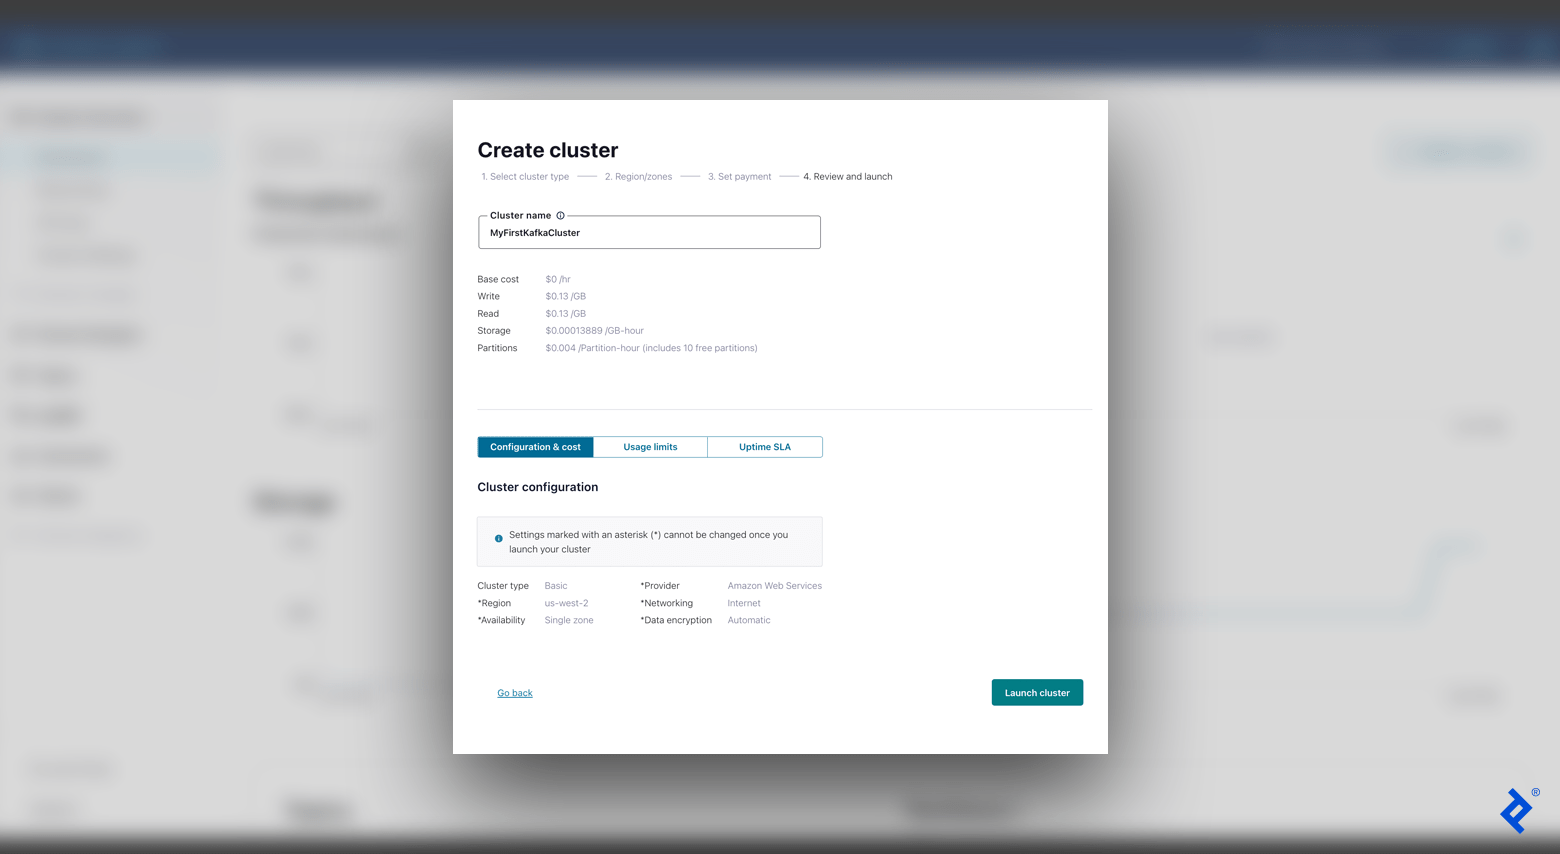
- Begin by signing up for Confluent Cloud. After creating an account, the welcome page displays options to create a new Kafka cluster. Select the Basic configuration.
- Choose your preferred cloud provider and region, optimizing for the best cloud ping results from your location. One approach is to select AWS and conduct a cloud ping test (click HTTP Ping) to determine the optimal region. (For the purpose of this tutorial, we will keep the “Single zone” option selected in the “Availability” field.)
- The subsequent screen will prompt you for payment setup, which can be bypassed since we are using the free tier. Afterward, input your cluster name (for example, “MyFirstKafkaCluster”), confirm the settings, and select Launch cluster.
With a functional cluster in place, we can now create our first topic. In the left-hand menu bar, navigate to Topics and click Create topic. Assign a name to your topic (for instance, “MyFirstKafkaTopic”) and proceed with the default configurations, including setting six partitions.
Before generating our first message, we need to configure our client. This can be easily accomplished by selecting Configure a client from our newly created topic overview (alternatively, navigate to Clients in the left-hand menu bar). We’ll choose Python as our language and then click Create Kafka cluster API key.

At this stage, our event-streaming platform is primed and ready to receive messages from our producer.
Creating a Simple Message Producer
Our producer’s role is to generate events and send them to Kafka. Let’s write some code to create a basic message producer. It’s recommended to use setting up a virtual environment for our project because we will be installing several packages in our environment.
First, we will add our environment variables from the API configuration provided by Confluent Cloud. In our virtual environment, append export SETTING=value for each setting listed below to the end of our activate file (alternatively, add SETTING=value to your .env file):
| |
Ensure that you replace each placeholder with your actual Confluent Cloud values (for example, <sasl.mechanisms> should be replaced with PLAIN). Use your specific API key and secret for the username and password fields. Run source env/bin/activate followed by printenv. You should see the newly added settings, confirming that our variables have been updated correctly.
We will be using two Python packages:
python-dotenvpackage: This package loads and sets environment variables.confluent-kafkapackage: This package provides producer and consumer functionality, essentially acting as our Python client for Kafka.
Install these packages by running the command pip install confluent-kafka python-dotenv. Python offers many other packages for Kafka that might prove beneficial as you further develop your project.
Finally, let’s create our basic producer using our specified Kafka settings. Create a simple_producer.py file and add the following code:
| |
This straightforward code establishes our producer and sends a simple test message. To verify the outcome, run the command python3 simple_producer.py:

Upon checking our Kafka cluster’s dashboard (Cluster Overview > Dashboard), we should observe a new data point on our Production graph, representing the message we just sent.
Building a Custom Message Producer
Now that our producer is operational, let’s restructure our code to enhance its modularity and OOP-friendly. This will simplify the process of adding new services and scaling our project in the future. We will divide our code into four separate files:
kafka_settings.py: This file will house our Kafka configurations.kafka_producer.py: This file will contain a customproduce()method and error handling.kafka_producer_message.py: This file will be responsible for handling different input data types.advanced_producer.py: This file will run our final application using our custom classes.
First, let’s define our KafkaSettings class. This class will encapsulate our Apache Kafka settings, allowing us to access them easily from other files without redundant code:
| |
Next, we’ll create our KafkaProducer class. This class enables us to customize our produce() method with support for various errors (for instance, handling errors when the message size exceeds the limit) and includes automatic message flushes messages after production:
| |
In the try-except block of our example, if a message is too large for the Kafka cluster to consume, we skip over it. However, in a production environment, you should modify your code to handle this error appropriately. The confluent-kafka documentation provides a comprehensive list of error codes.
Now, let’s define our ProducerMessage class. This class handles different input data types and ensures correct serialization. We’ll add support for dictionaries, Unicode strings, and byte strings:
| |
Finally, we can assemble our application using our newly created classes within the advanced_producer.py file:
| |
We now have a clean abstraction layer above the confluent-kafka library. Our custom producer retains the functionality of our simple producer while offering increased scalability and flexibility, making it adaptable to diverse requirements. We could even replace the underlying library if needed, ensuring our project’s long-term success and maintainability.

After executing python3 advanced_producer.py, we can once again confirm that data has been successfully delivered to our cluster by checking the Cluster Overview > Dashboard panel in Confluent Cloud. Having sent one message with the simple producer and another with our custom producer, we should now see two distinct spikes in production throughput and an increase in overall storage utilization.
Next Steps: From Producers to Consumers
Adopting an event-driven microservices architecture can significantly enhance your project by improving its scalability, flexibility, reliability, and asynchronous communication capabilities. This tutorial provided a glimpse into these advantages. With our enterprise-grade producer fully operational, effectively sending messages to our Kafka broker, the next steps would involve creating a consumer to process these messages from other services and integrating Docker into our application.
The editorial team at Toptal Engineering Blog would like to thank E. Deniz Toktay for reviewing the code samples and technical content presented in this article.