Monitoring conversions is crucial yet challenging. The digital world’s evolution, including iOS updates like Safari’s Intelligent Tracking Prevention (ITP) and Enhanced Tracking Protection (ETP), coupled with discussions on phasing out cookies, has made it complex to grasp how online ads influence offline conversions.
A common method for offline conversion tracking has been the Google Click Identifier (GCLID). However, with iOS updates removing key parameters and identifiers from ad clicks, this method’s limitations have become apparent, leading marketers to seek a more robust and sustainable solution.
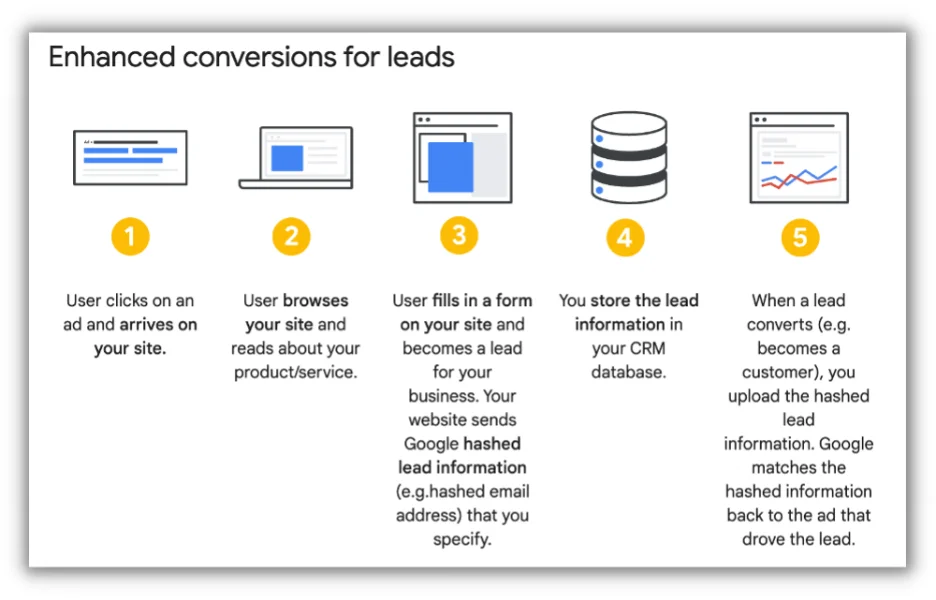
Today, we’ll examine a GCLID-free option – enhanced conversions for leads – a method to track offline conversions without depending on parameters impacted by these changes.
Table of contents
- What are offline conversions?
- Why track offline conversions?
- How to track offline conversions with enhanced conversions for leads
- More ways to track offline conversions
What are offline conversions?
Offline conversions are any conversions originating from online sources that don’t occur online.
Consider a mortgage company running online ads to attract prospective homebuyers. These ads capture the interest of those searching for mortgages, who click to learn more. To stay connected, they often fill out a contact form, providing their email and phone number.
These potential customers might then visit the mortgage company’s local office to consult with a loan officer, discuss options, and begin the application. Some eventually secure mortgages and purchase their dream homes.
While the initial interaction happened online through ad clicks, the final conversion—buying a home—occurred offline.
Why track offline conversions?
Understanding the importance of these offline conversions highlights the need to track them.
Solely depending on online conversion data wouldn’t reveal how online ads lead to real-world actions like mortgage applications and home purchases.
Businesses must measure these offline conversions for a comprehensive view of their advertising’s effectiveness.
 Are your Google Ads efforts optimized for maximum conversions? Discover the answer with a complimentary, immediate audit using our Google Ads Performance Grader!
How to track offline conversions with enhanced conversions for leads
Previously, businesses relied on the Google Click Identifier (GCLID) to track offline conversions. This unique identifier, embedded in ad URLs, linked online ad engagement with subsequent offline activities, like in-person meetings with loan officers and mortgage transactions.
However, with the evolving digital landscape and challenges, the GCLID’s reliability for offline conversion tracking has been questioned, prompting marketers to seek more robust alternatives like enhanced conversions for leads.
Prepare to set up enhanced conversions for leads
Let’s prepare before diving into enhanced conversions for leads. You’ll need:
- A website with a lead form: Firstly, you need a website with a lead form. This is where it all starts. People fill out these forms, and that’s what we’re tracking.
- Google Tag Manager installed: Implement Google Tag Manager (GTM) on your website if you haven’t already. GTM is your tracking assistant, simplifying data management.
- A Google Ads account: Lastly, you’ll need a Google Ads account. This is where you instruct Google on what to track and how.
These elements are crucial because your website is the hub for user interactions, GTM collects the data, and Google Ads analyzes it. They work together to track your ads’ influence on offline conversions. Ensure these are in place before proceeding.
Set up Enhanced Conversions with Leads in Google Ads
Let’s simplify setting up a conversion action in Google Ads:
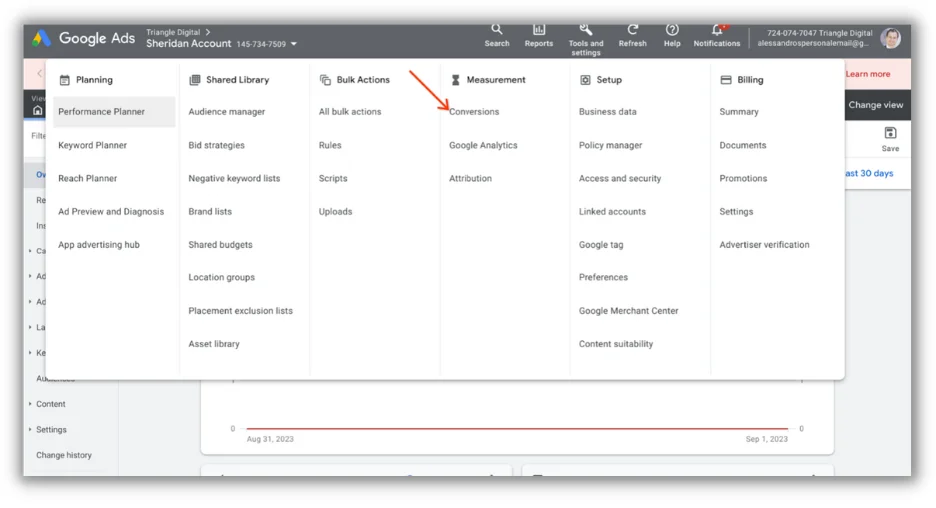
- Navigate to the conversions section in Google Ads:
- Sign in to your Google Ads account.
- Go to “Tools and Settings” in the top right corner.
- Under “Measurement,” choose “Conversions.”
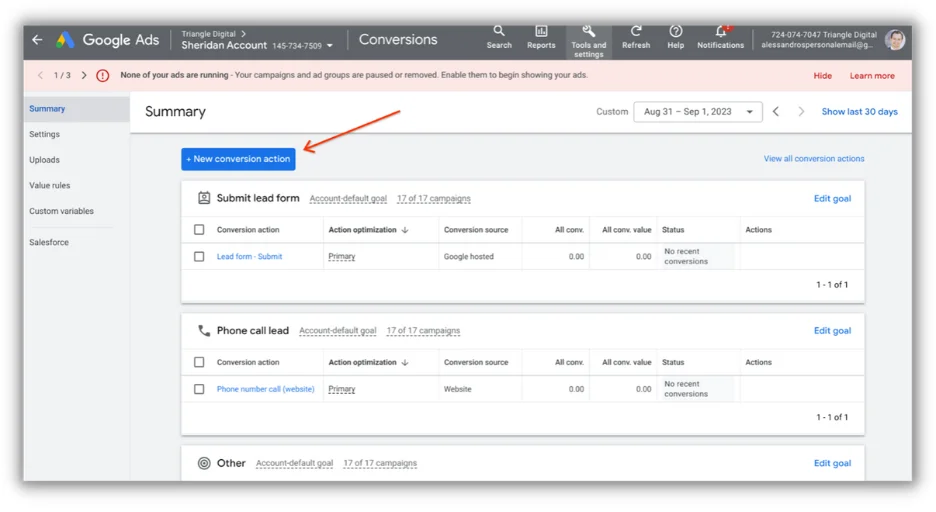
 2. Add a new conversion action: In the Conversions section, click on “New conversion action.”
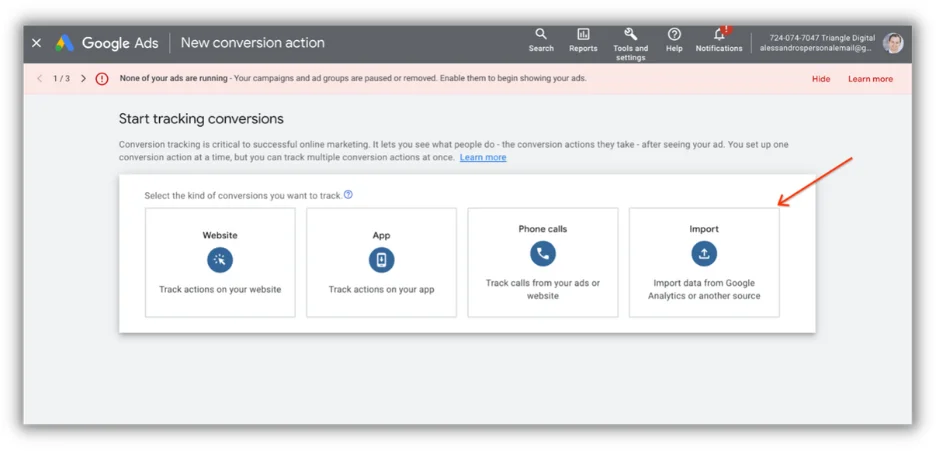
 3. Choose the conversion type (Import): On the “Conversion action” page, select “Import” as the conversion type you want to monitor.
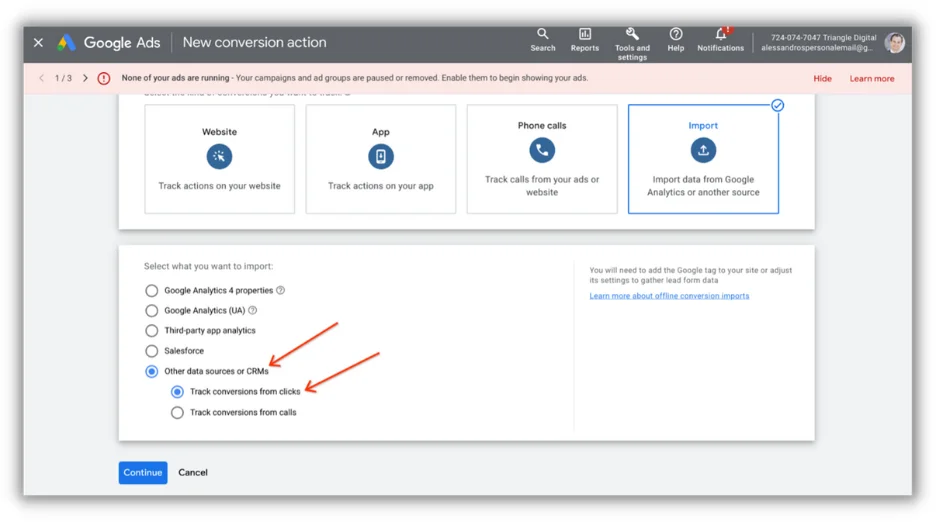
 4. Pick the goal and action optimization category: Select “Other data sources or CRMs,” then choose “Track conversions from clicks.” Continue to the next step.
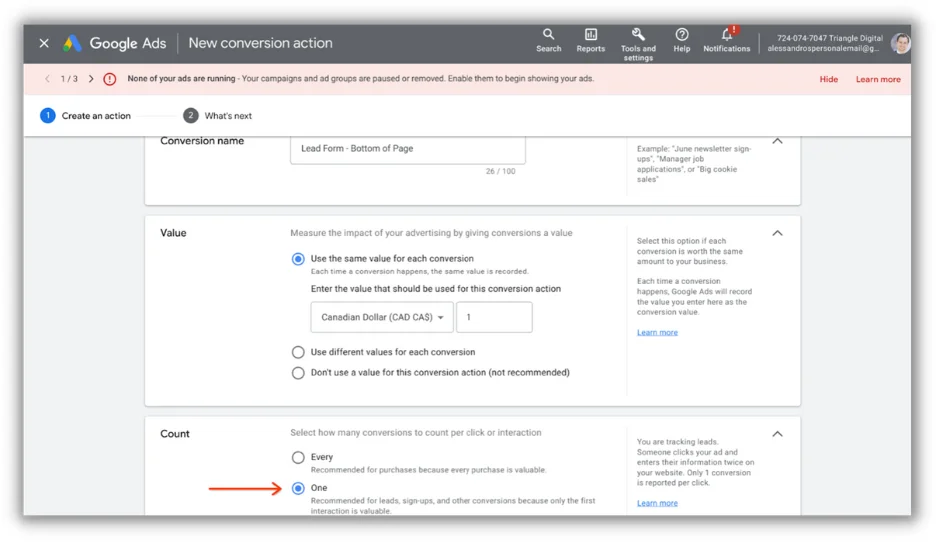
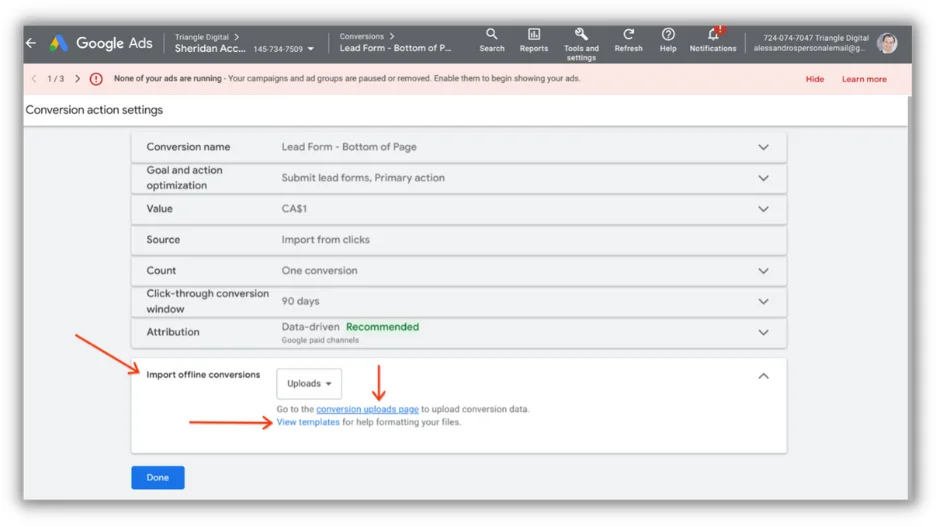
 5. Name the conversion, assign its value, and set conversion counting rules:
- Give your conversion action a descriptive name.
- Assign a value to this conversion. This could be its monetary value or a value representing its importance to your business.
- Decide how many conversions to count per click or interaction.
5. Name the conversion, assign its value, and set conversion counting rules:
- Give your conversion action a descriptive name.
- Assign a value to this conversion. This could be its monetary value or a value representing its importance to your business.
- Decide how many conversions to count per click or interaction.
 6. Finalize the conversion action creation:
- Click “Create and continue.”
- Then, click “Turn on enhanced conversions for leads.”
6. Finalize the conversion action creation:
- Click “Create and continue.”
- Then, click “Turn on enhanced conversions for leads.”

- You can now use your existing Google Tag or Google Tag Manager. Select Google Tag Manager for this demonstration.
This newly created conversion action defines what you want to track. It could be a completed purchase, a lead form submission, or any other valuable action. Google Ads will track this action to measure its performance and optimize your campaigns.
Set up form tracking methods
Collecting user data like email addresses and phone numbers is vital for enhanced conversions because it connects online interactions with offline actions. This is crucial for:
- Matching online and offline interactions: When a user interacts with your ad online and converts offline (e.g., makes an in-store purchase), having their contact information helps connect these interactions, providing a comprehensive understanding of your ad’s impact.
- Customized follow-ups: User data enables more effective follow-ups with potential customers. You can send personalized emails or texts, increasing conversion chances.
- Accurate measurement: Tracking user data ensures accurate offline conversion measurement, leading to better advertising campaign optimization.
You can use different methods to capture user data from your website’s lead forms, including:
- CSS Selectors: Identifying HTML elements by their class or ID attributes.
- Data Layer Variables: Utilizing data stored in your website’s data layer.
- Custom JavaScript Variables: Writing custom JavaScript code to extract the required data.
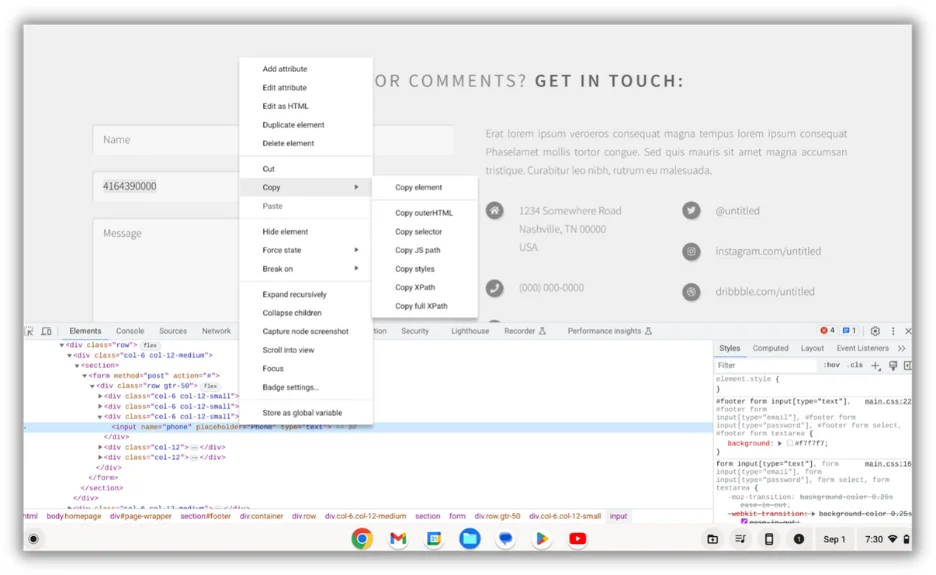
We’ll focus on using CSS Selectors for this guide. To create a DOM Element variable in Google Tag Manager (for phone number and email), follow these steps: Phone number:
- Go to the page with your lead form.
- Right-click on the phone number field and select “Inspect” to access your browser’s developer tools.
- In the “Elements” tab of the developer tools, the phone number field should be highlighted.
- Right-click on the highlighted element, go to “Copy,” and select “Copy selector.”
- In your Google Tag Manager account, go to “Variables” and click on “New.”
- Name the variable (e.g., “Phone Number – DOM Element”).
- For “Variable Configuration,” choose “DOM Element.”
- In the “Selection Method” section, choose “CSS Selector.”
- Paste the copied CSS selector into the “Element Selector” field.
- Optionally, add an attribute name (e.g., “value” for input fields).
- Save the variable.
 Email:
- Follow the steps above, but inspect and copy the CSS selector for the email field in your lead form.
- In Google Tag Manager, create a new variable (e.g., “Email – DOM Element”).
- Configure it as a DOM Element variable using the CSS selector for the email field.
These DOM Element variables will capture the phone number and email address from your lead form based on the provided CSS selectors. You can then use these variables to send this data to your Google Ads account, enabling the tracking of enhanced conversions for leads.
 Is your Google Ads account optimized for success? Download the free guide to discover the answer » The Last Guide to Google Ads Account Structure You’ll Ever Need
Set up the user-provided data event tag
Setting up a Google Ads User-Provided Data Event Tag is key to capturing user data and tracking offline conversions efficiently. Here’s a guide:
- Access Google Tag Manager: Open your GTM container.
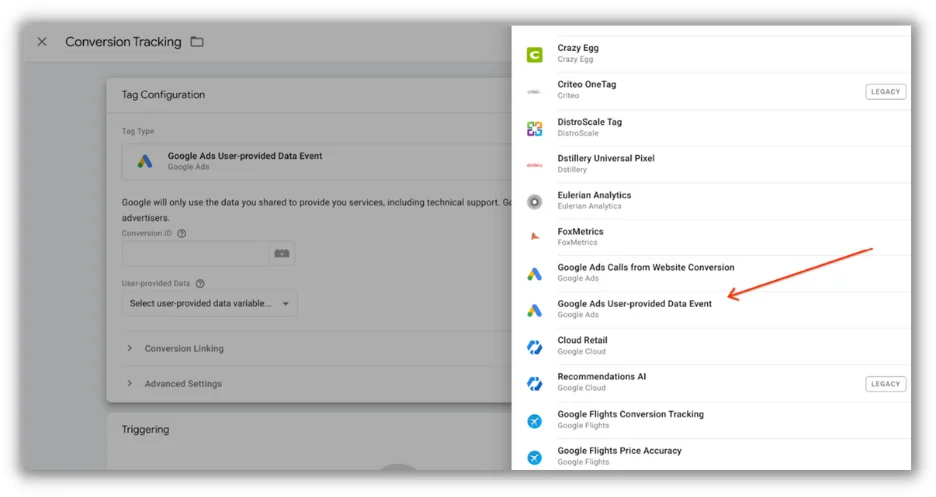
- Create a new tag: In GTM, go to “Tags” and click “New.”
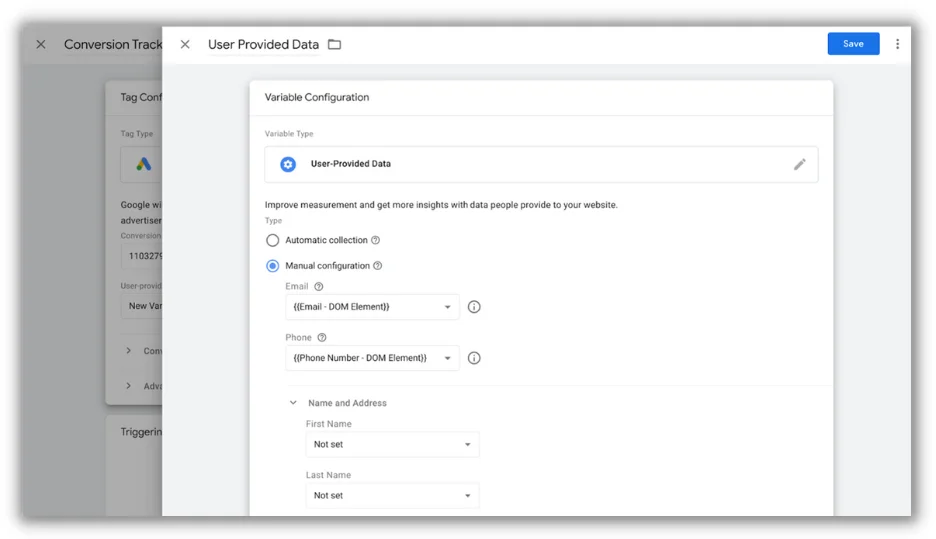
- Select Tag Configuration: Under “Tag Configuration,” choose “Google Ads User-Provided Data Event.”
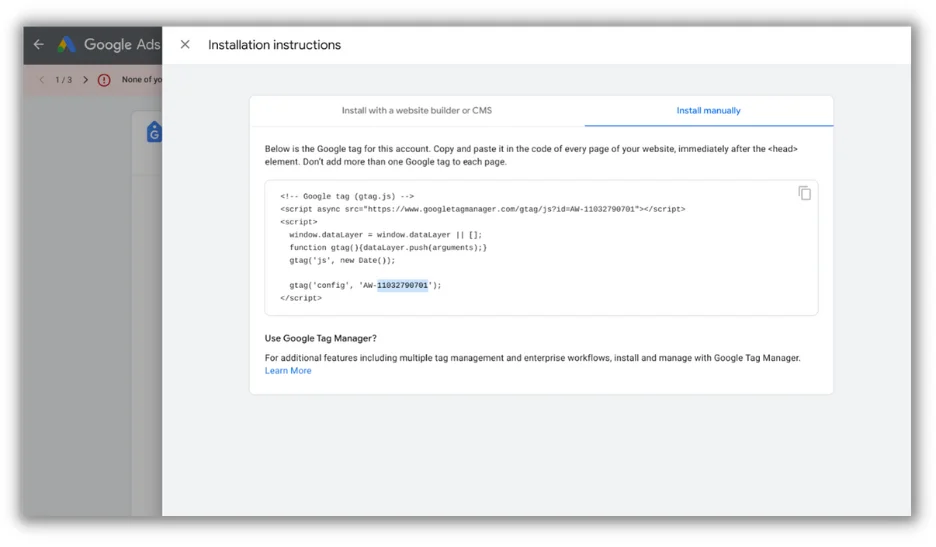
- Configure the tag: Enter the Conversion ID from Google Ads (Tools and Settings > Under Setup > Google tag > Installation Instructions > Install Manually > Grab the number after ‘AW-’ ) and create a “User-Provided Data” variable to capture user data like phone numbers and email addresses.
- Set up the User-Provided Data Variable: Configure this variable to collect user data based on DOM Element variables (e.g., “Phone Number – DOM Element”).
- Create a trigger: Click “Triggering” and create a new trigger of the type “Form Submission.”
- Configure the form submission trigger: Establish conditions like “Some Forms” > “Page URL” > “contains” > “your-form-page-url” to specify when the tag should fire.
- Name and save the tag: Provide a name for your tag and save it.
- Preview and test: Utilize GTM’s preview mode to test the tag by submitting a form on your website.
- Publish your changes: When satisfied, click “Submit” in GTM to publish your container changes.
Remember to set up a Conversion Linker tag in GTM, configuring it to fire on all pages. This is essential for accurate click data and conversion measurement.
Notify Google Ads of offline conversions
After tracking offline conversions, the final step is informing Google Ads. This is crucial for accurately gauging your campaign’s effectiveness. Here’s how:
- Access the conversions section in Google Ads: In your Google Ads account, navigate to “Tools and Settings,” select “Measurement,” and click on “Conversions.”
- Upload conversion data: While you can upload a file manually, the ideal approach is to automate it directly from your CRM system, which houses customer data including phone numbers and emails. Explore the available templates if you opt for a sheet, CSV, or Excel file.
 3. Use data hashing: Hash conversion data using SHA-256 encryption when providing it. SHA-256, or Secure Hash Algorithm 256-bit, ensures the data’s security and integrity during transfer.
Automating this process from your CRM is more efficient, secure, and scalable. *For a detailed guide on this process, including a Google Sheets template and an embedded hashing script, refer to Measure School’s detailed resource.
More ways to track offline conversions
Enhanced conversions for leads are not the only way to track offline conversions from Google Ads. Here are a few alternatives:
Use a call tracking number
If phone calls are your primary conversion, use a call tracking number to identify how searchers found you. Call tracking numbers are automatically generated based on how a prospect reached your website and reveal the source in your reports.
For instance, the generated number would differ for a prospect clicking from an organic search result versus a paid ad. This would be reflected in your reports, showing you the source of the call. This helps track offline conversions and identifies channels driving calls.
Track in-store conversions
You might be able to track offline conversions like visits to your physical location. One method is using UTMs or QR codes that customers would bring for in-store use.
You might also be eligible to set up store visit conversions in Google Ads. Learn more about that here.
Offline conversion tracking made easy
In essence, enhanced conversions for leads offer a user-friendly method to track offline conversions stemming from your online ads. Simply collect user data, create a Google Ads User-Provided Data Event Tag, and upload or send your conversions to Google Ads.
Don’t delay – implement it and witness your advertising insights improve. Your campaigns will reap the rewards! 