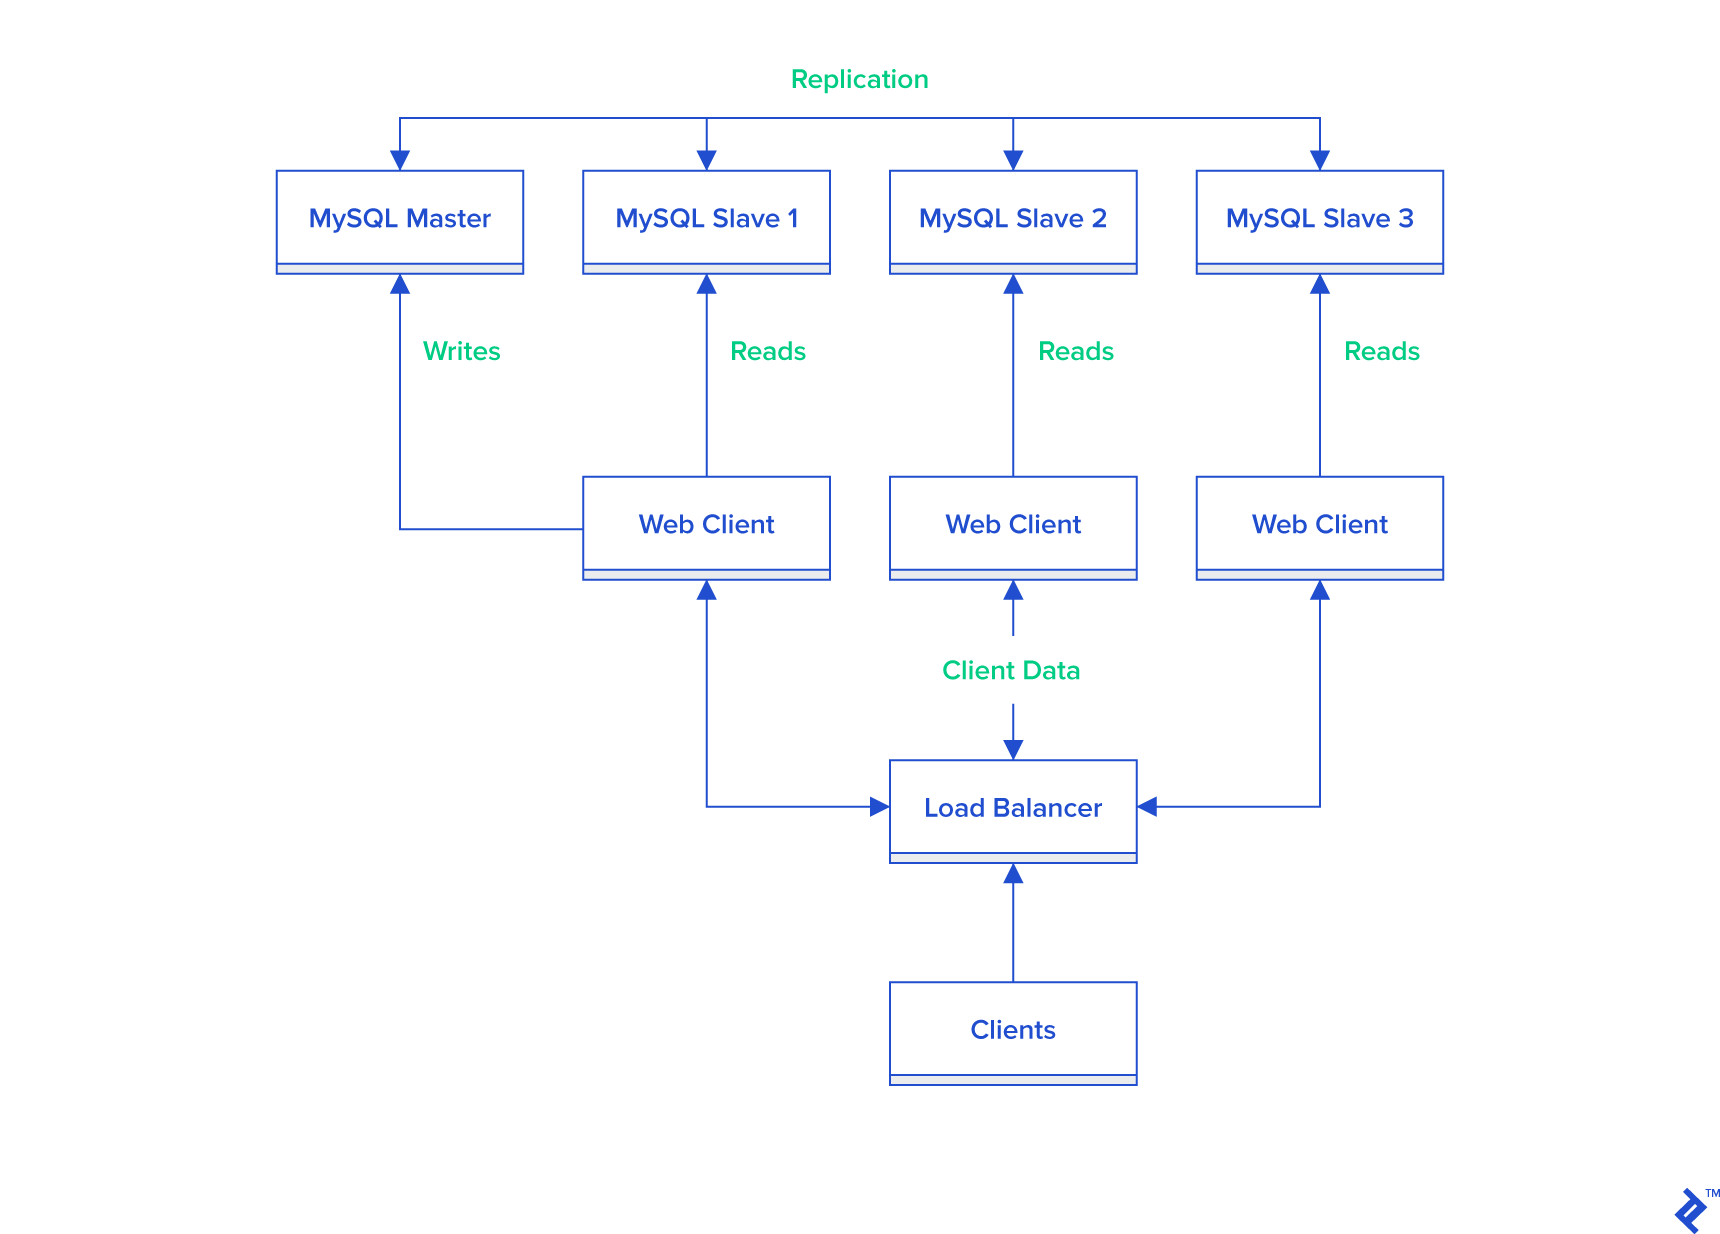
MySQL replication allows the automatic copying of data from a primary MySQL database server (the master) to one or more secondary MySQL database servers (the slaves). This process is commonly employed to enhance scalability by distributing read operations across multiple servers. Additionally, it serves purposes like failover mechanisms and offloading data analysis from the master to the slaves, preventing performance bottlenecks.
The master-slave replication operates unidirectionally, with data flowing exclusively from the master to the slave(s). Consequently, write operations are handled solely by the master database, while read operations can be spread across multiple slave databases. When implementing master-slave replication for scaling out, a minimum of two data sources are required: one dedicated to write operations and the other to read operations.
MySQL developers, often working on a single machine with a localized development environment, prioritize independence from network or internet connectivity. However, scenarios may arise where master-slave replication becomes necessary, such as testing replication locally before deploying changes to other environments. This necessitates creating a master-slave setup on their development machine. Setting up a single MySQL instance is relatively straightforward, but configuring a second instance and establishing master-slave replication requires additional steps.
This tutorial utilizes Ubuntu Linux as the host operating system, providing commands specific to this environment. Adapting the process for other operating systems will necessitate modifications to the commands, although the fundamental principles of setting up MySQL master-slave replication on a single machine remain consistent across platforms.

Installing the Initial MySQL Instance
If you have an existing MySQL database instance on your machine, you can proceed to the next step.
To install MySQL on Ubuntu, open a terminal and execute the following command:
| |
During installation, you will be prompted to set a password for the MySQL root user.
Configuring mysqld_multi
Efficiently managing two MySQL instances on the same machine requires utilizing mysqld_multi.
Begin by creating two distinct [mysqld] groups in the existing my.cnf file. Default location of my.cnf file on the Ubuntu is /etc/mysql/. So, open my.cnf file with your favorite text editor, and rename existing [mysqld] group to [mysqld1]. This renamed group will be used for the configuration of the first MySQL instance and will be also configured as a master instance. As in MySQL master-slave replication each instance must have its own unique server-id. Add the following line within the [mysqld1]` group:
| |
Next, duplicate the [mysqld1] group along with its configurations and paste it below within the same my.cnf file. Rename this copied group to [mysqld2] and implement the following modifications for the slave instance’s configuration:
| |
To configure the second MySQL instance as a slave, assign a server-id of 2, ensuring it differs from the master’s server-id.
Given that both instances will reside on the same machine, set port to 3307 for the second instance. This port must differ from the default port 3306 used by the first instance.
To enable the second instance to utilize the existing MySQL binaries, set different values for socket, pid-file, datadir, and log_error.
Furthermore, enable relay-log to designate the second instance as a slave (parameters relay-log, relay-log-index, and relay-log-info-file) and define master-info-file.
Finally, to configure the slave instance as read-only, set the parameter read_only to 1. It’s important to note that this setting does not entirely prevent changes on the slave; updates from users with the SUPER privilege are still permitted. MySQL version 5.7.8 introduced the parameter super_read_only, which can prevent modifications even by SUPER users.
In addition to the [mysqld1] and [mysqld2] groups, incorporate a new group called [mysqld_multi] into the my.cnf file:
| |
After installing and starting both MySQL instances, appropriate privileges will be granted to the multi_admin user to enable shutting down the instances.
Creating Directories for the Second Instance
With the configuration file prepared, create the two new folders specified in the configuration with appropriate permissions using the following Linux commands:
| |
Implementing AppArmor Security Settings
In certain Linux environments, such as Ubuntu, configuring AppArmor is necessary to run the second MySQL instance.
To configure AppArmor, open the /etc/apparmor.d/usr.sbin.mysqld file with a text editor of your choice and append the following lines:
| |
Save the file and reboot the machine for the changes to take effect.
Installing the Second MySQL Instance
Multiple approaches exist for installing the second MySQL instance. This tutorial utilizes the same MySQL binaries as the first instance, employing separate data files for the second installation.
Having prepared the configuration file, folders, and security settings, the final installation step involves initializing the MySQL data directory for the second instance.
Execute the following command to initialize the new MySQL data directory:
| |
After initializing the data directory, start both MySQL instances using the mysqld_multi service:
| |
Set the root password for the second MySQL instance using mysqladmin with the corresponding host and port. Omitting the host and port will result in mysqladmin connecting to the first MySQL instance using default settings:
| |
This example sets the password to “rootpwd,” but employing a more secure password is strongly recommended.
Finalizing mysqld_multi Configuration
As mentioned earlier, we will now grant appropriate privileges to the multi_admin user. This involves granting privileges in both instances. Begin by connecting to the first instance:
| |
Once connected, execute the following commands:
| |
Exit the MySQL client and connect to the second instance:
| |
Execute the same two commands as before:
| |
Exit the MySQL client.
Enabling Automatic Start at Boot
The final step in setting up mysqld_multi is installing the automatic boot script in init.d.
Create a new file named mysqld_multi in /etc/init.d and set appropriate permissions:
| |
Open the newly created file and paste the following script:
| |
Add the mysqld_multi service to the default runlevels using the following command:
| |
Reboot your machine and verify that both MySQL instances are running using:
| |
Establishing Master-Slave Replication
With two operational MySQL instances, we can now configure the first instance as the master and the second as the slave.
Part of the configuration was completed in the “Configuring mysqld_multi” section. The remaining change in the my.cnf file involves enabling binary logging on the master. Edit the my.cnf file and make the following additions within the [mysqld1] group:
| |
Restart the master MySQL instance to apply these changes:
| |
Create a new user on the master with appropriate replication privileges to allow the slave to connect securely. Connect to the master instance using the MySQL client:
| |
Create the new user for replication:
| |
Exit the MySQL client.
Generate a dump of the master’s data:
| |
The --master-data=2 option is used to include a comment containing a CHANGE MASTER statement within the backup file. This comment provides the replication coordinates at the time of the backup, which are crucial for updating the master information on the slave instance. Here’s an example of such a comment:
| |
Import the generated dump into the slave instance:
| |
Finally, update the master information on the slave instance with the appropriate connection parameters to establish a connection between the slave and the master.
Connect to the slave instance using the MySQL client:
| |
Execute the following command to update the master information (refer to the replication coordinates within the replicationdump.sql dump file):
| |
Start the slave:
| |
Verify that replication is operational:
| |
Congratulations, your MySQL master-slave replication setup on the same machine is complete.

Conclusion
Configuring master-slave replication in your development environment offers valuable benefits when implementing a scale-out solution in production. It allows you to configure separate data sources for write and read operations, enabling thorough local testing before deployment.
Consider setting up multiple slave instances on the same machine to test a load balancer that distributes read operations across these slaves. You can replicate the steps outlined in this manual to configure additional slave instances.