Note: This guide remains here for historical purposes, but Truffle has been sunset as of September, 2023.
Ethereum Smart Contracts are not just a passing trend. I believe they have the potential to revolutionize how we conduct business online in the future. Only time will tell if this prediction comes true.
This article is the first in a three-part series focusing on developing Ethereum smart contracts using Solidity. Our main area of exploration will be the use of contracts with “oracles” – contracts that feed external data into the blockchain for other smart contracts to use.
- Part 1: Getting started with Truffle and setting up a project for experimentation
- Part 2: Deep dive into the code for detailed analysis
- Part 3: Conceptual exploration of oracles and their role in smart contracts
This first part aims to familiarize you with building smart contracts using Truffle. We won’t delve deeply into oracle contracts, their underlying principles, or even their intricate details. Instead, we’ll focus on:
- Setting up your environment for building smart contracts with Truffle.
- Creating a smart contract project that will be used in parts 2 and 3.
- Introducing key concepts related to Ethereum smart contracts and their coding.
- Understanding the compile/run/debug cycle with Truffle for smart contracts.
Definition: Oracle. A mechanism enabling smart contracts to access data from sources external to the blockchain. Essentially smart contracts themselves, oracles retrieve data from the outside world and integrate it into the blockchain, making it accessible for consumption by other smart contracts.
We’ll begin by configuring all the necessary prerequisites. Afterward, we’ll set up a basic Ethereum contract and test it with Truffle. Finally, we’ll decouple the oracle from the client and test them together.
Software Prerequisites
- Any major operating system will suffice, although installation and setup may vary across platforms. This guide utilizes Ubuntu Linux (16.04), but the environment setup works seamlessly on Windows as well. While untested on Mac, it is a commonly used platform for this purpose.
- Running a full Ethereum node is unnecessary; we’ll leverage Truffle’s built-in testnet. More experienced users can opt for alternative testnets, but Truffle’s local development testnet offers the easiest and most convenient option for this tutorial.
Knowledge Prerequisites
- A basic understanding of blockchain technology.
- Familiarity with the concept of blockchain-based smart contracts.
- Prior experience with smart contract development, particularly “hello world” examples, is beneficial but not mandatory for those who are quick learners.
This article series can serve as an initial foray into smart contracts, but it quickly progresses to more advanced concepts. If this is your first encounter with Ethereum smart contracts, brace yourself for a steep learning curve. Those who are confident can proceed without hesitation. However, if you feel the need for a gentler introduction, exploring simpler “hello world” tutorials beforehand is recommended. Consider our previous Ethereum articles and Cryptozombies as starting points.
Caveat: Given the rapid evolution of the smart contract landscape, Solidity syntax features that were novel at the time of writing might be outdated by the time you read this. Geth versions may have changed, and Solidity is constantly introducing new features and deprecating old ones. Be prepared to adapt the information presented here to the evolving landscape of the future. Your dedication to mastering smart contract development will guide you.
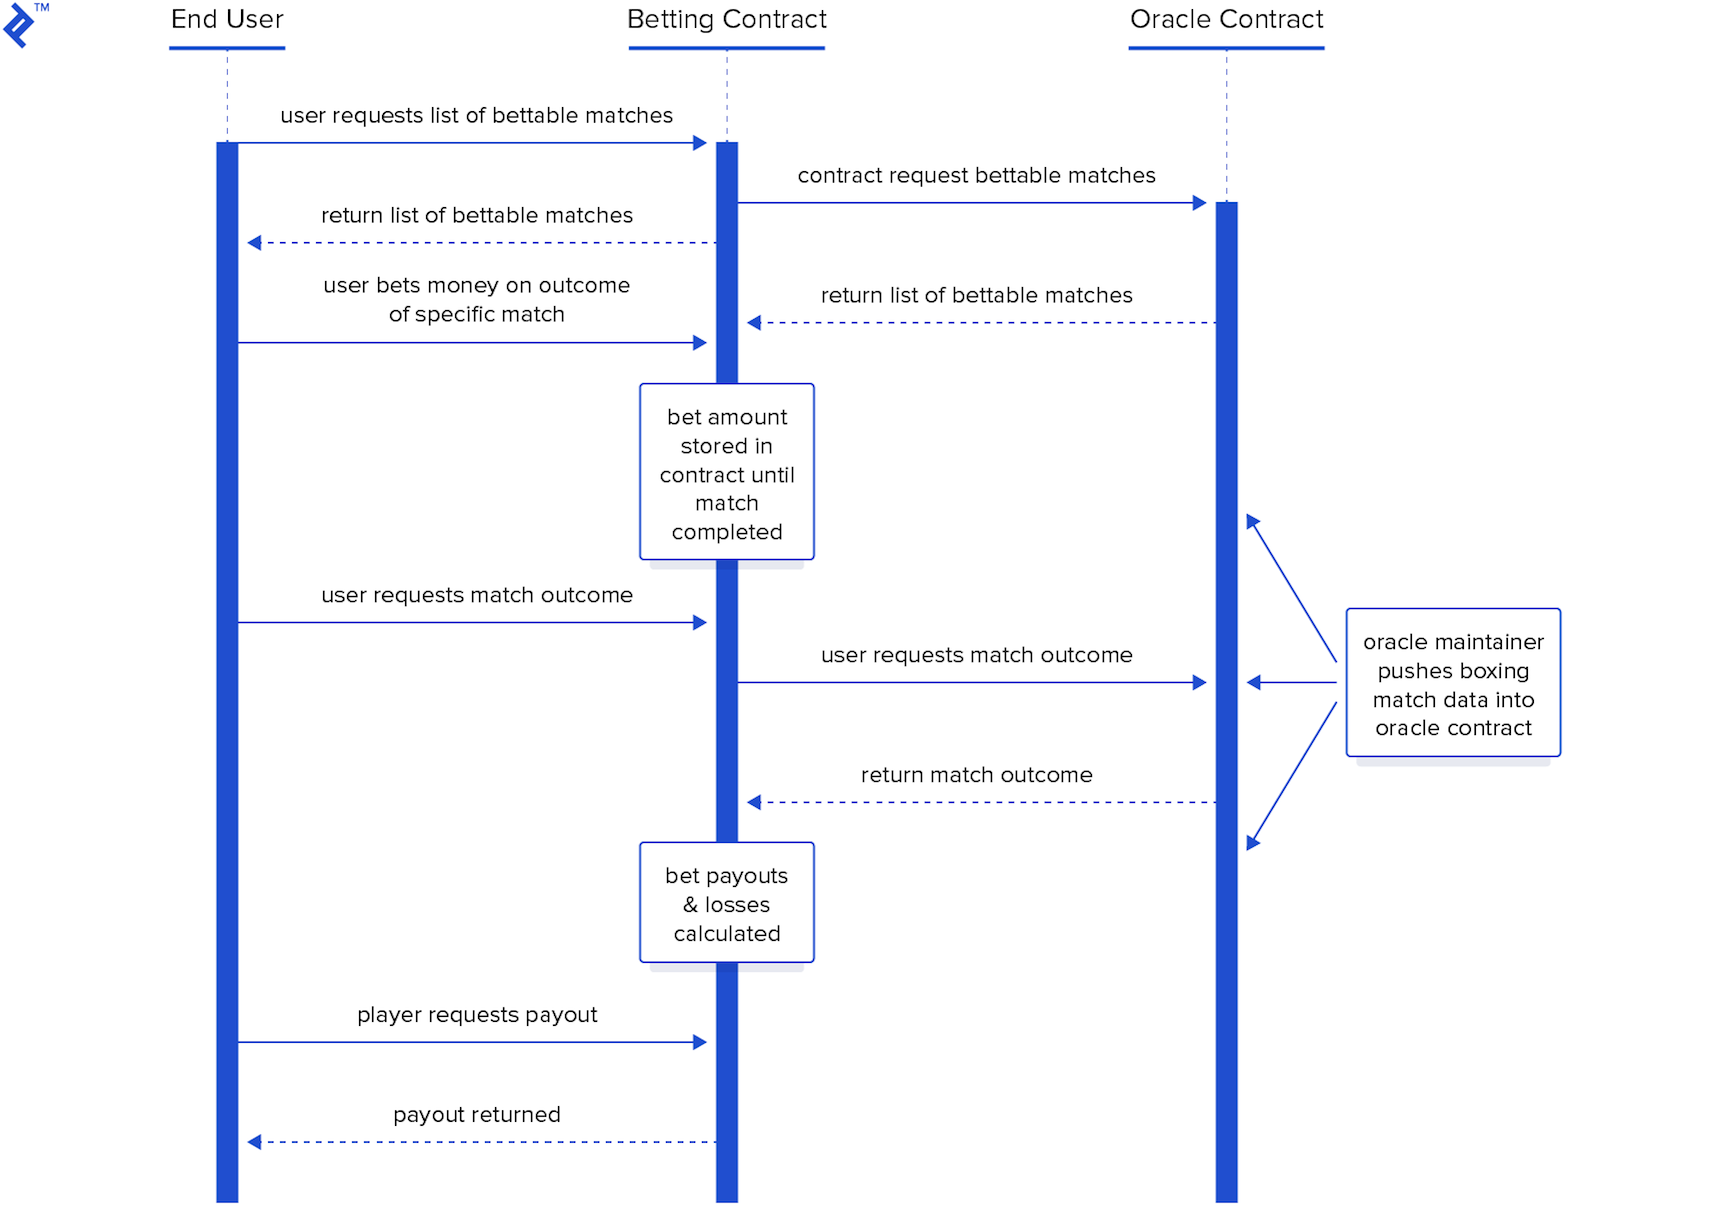
Example App Description
Use case: Users wager on boxing matches.
- Users can view a list of upcoming boxing matches open for betting.
- They can select a match and place a bet on their predicted winner.
- Bets must exceed a predefined minimum amount.
- Losing bets result in the loss of the entire wagered amount.
- Winning bets earn users a share of the collective bets placed on the losing fighter, calculated based on their bet size and the total amount wagered on the loser, after deducting a small commission for the house (the contract owner).
Understanding Ethereum Oracles
Smart contracts are still a relatively new concept, yet to achieve widespread adoption. As a result, numerous aspects of their functionality remain under development and standardization. Let’s briefly explore the rationale behind the concept of “oracles” before diving into more detail later.
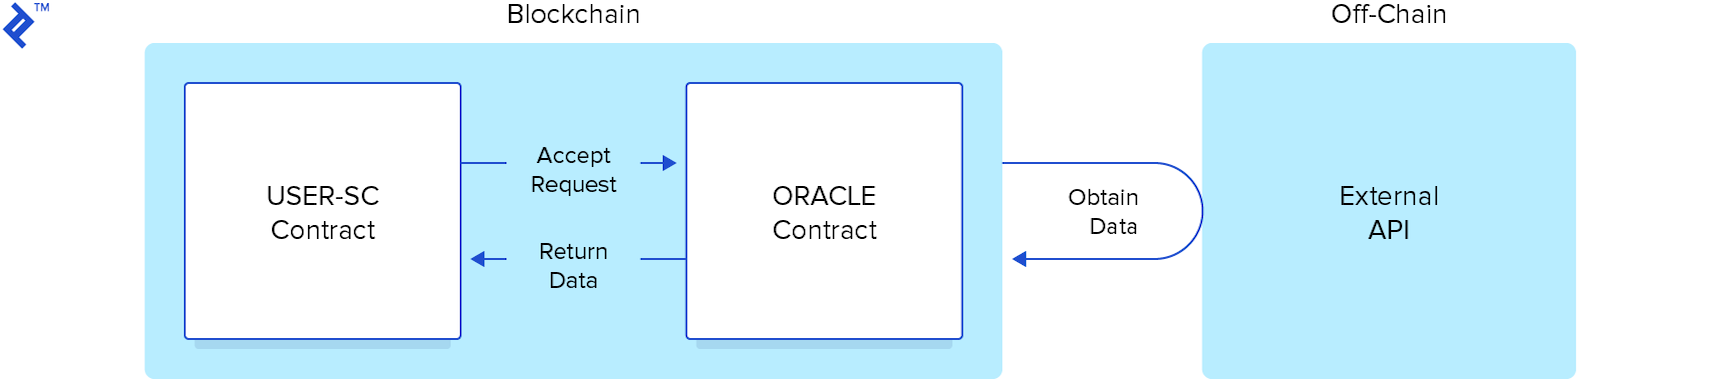
Developing blockchain contracts differs significantly from traditional client-server applications. One crucial distinction is that data interacting with a contract must already reside on the blockchain. Making external calls from within the blockchain is not supported, both by the language itself and the fundamental principles of the blockchain paradigm.
While contracts can accept bets in Ethereum-based currency, store them securely, and distribute them to the rightful wallet addresses based on predefined rules once a match winner is declared, the question arises: how does the contract determine the winner? Unlike conventional programs, it cannot simply query an external API. It can only utilize data available within the blockchain! This limitation poses a significant challenge for many smart contract use cases, hindering their ability to interact with the external world.
Given that contracts are confined to interacting with on-chain data, a straightforward solution is to inject the required data into the blockchain. This is precisely the role of an oracle.
An oracle is another contract designed to inject external data into the blockchain, making it accessible to other contracts. While this approach might raise concerns about trust and decentralization, we’ll defer those discussions for now. Simply understand that this is the essence of an oracle.
In our example, the oracle acts as the contract responsible for introducing data about available matches and their outcomes once determined into the blockchain.
Setting Up the Ethereum Development Environment
For basic setup, we’ll install the following:
- Geth (optional for now)
- Truffle (required)
- Ganache CLI (optional)
- A development environment (optional)
This guide provides a high-level overview rather than an exhaustive environment setup guide. Comprehensive setup guides tailored to specific operating systems are readily available online. Consider this a roadmap, and be prepared to install additional requirements and prerequisites as needed, guided by your system and online resources.
Installing Geth (optional)
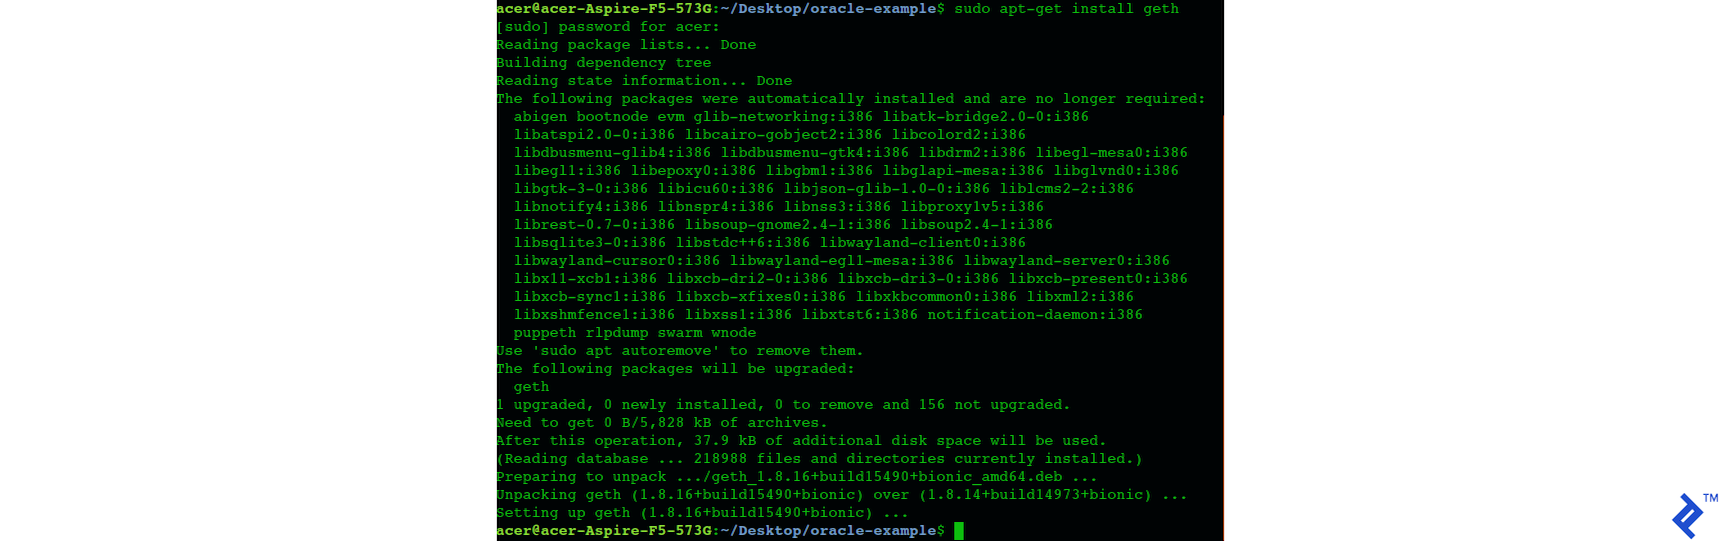
Geth, short for Go-ethereum, is the core software of the Ethereum network. While not strictly necessary for this tutorial, aspiring Ethereum developers should familiarize themselves with it. Geth is essential when deploying smart contracts to the live Ethereum network.
- http://www.talkcrypto.org/blog/2018/01/23/what-is-geth/
- https://github.com/ethereum/go-ethereum/wiki/Installation-Instructions-for-Ubuntu
- https://github.com/ethereum/go-ethereum/wiki/Installation-instructions-for-Windows
Installing Truffle
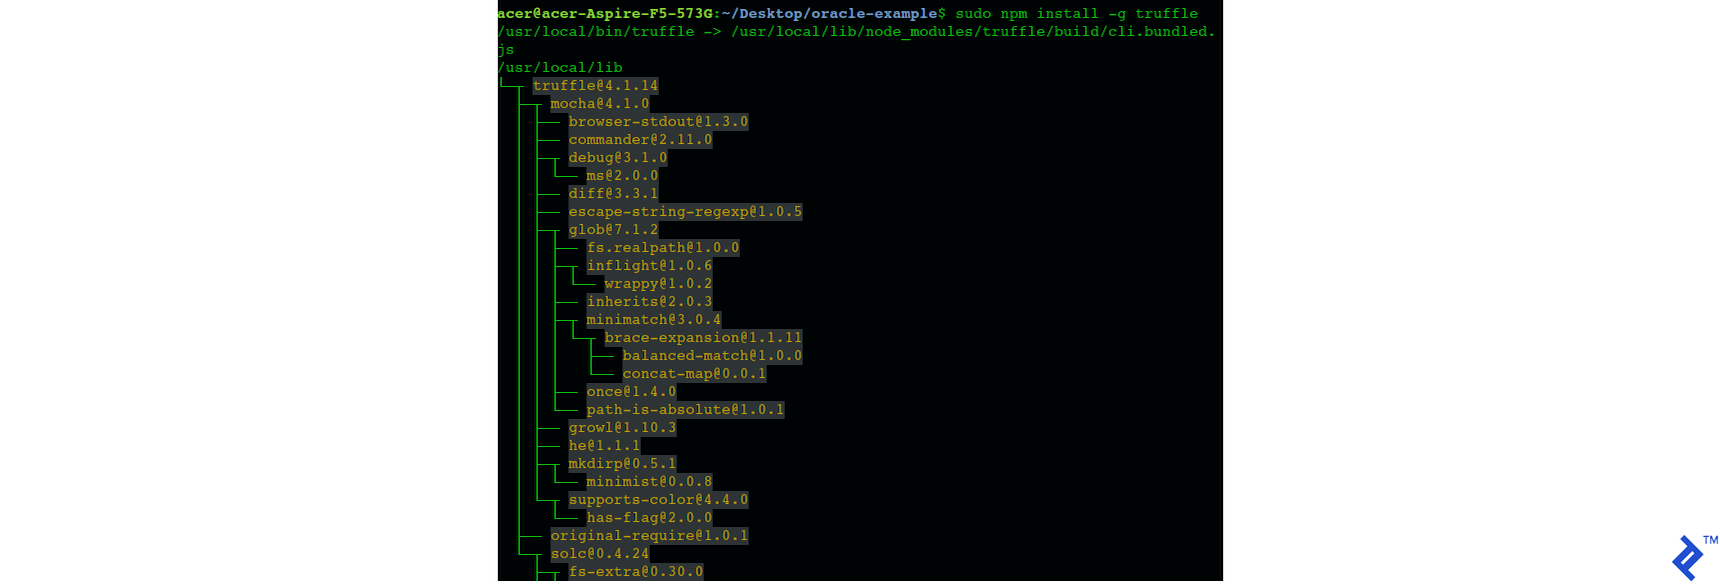
Truffle will be our primary development tool and is absolutely required.
Installing Ganache CLI (optional)

Although optional, installing Ganache CLI as an additional testing tool is recommended. However, we won’t be utilizing it directly in this tutorial.
Setting Up the Ethereum Development Environment
While completing this tutorial using a basic text editor like Notepad++, gedit, vi, or any other editor of your preference is entirely possible, I personally prefer Visual Studio Code enhanced with the following extensions:
- Solidity
- Solidity extended
- Material icon theme
Note: These extensions are not mandatory but significantly enhance the coding experience.
Setting Up the Code
Project Setup
Truffle simplifies smart contract compilation, blockchain migration, and provides valuable development and debugging utilities. Some project setup is necessary to integrate with Truffle. Let’s establish the foundation for our project, both within Truffle and the directory structure. For now, simply follow these steps carefully.
- Create a directory named oracle-example to house your code.
- Inside the root directory, create two subdirectories, /oracle-example/client and /oracle-example/oracle. These will eventually house the two sub-projects.
- Navigate to the client folder, as it will be the focus of our initial development. Open a terminal window within the /oracle-example/client directory.
- Execute the command
truffle init. - Notice that among the generated files are truffle-config.js and truffle.js. Since we only need one of them, delete truffle-config.js to avoid clutter.
- Edit truffle.js to configure Truffle’s testing environment. Replace the contents of truffle.js with the following:
| |
https://github.com/jrkosinski/oracle-example/tree/part1-step1/client/truffle.js
Observe that Truffle init created a directory named migrations (oracle-example/client/migrations) containing a file called 1_initial_migration.js.
Create an additional file within the migrations directory and name it 2_deploy_contracts.js. Populate it with the following code:
| |
https://github.com/jrkosinski/oracle-example/tree/part1-step1
Adding the Code
With the initial setup complete, we can begin coding. Keep in mind that this part still focuses on introduction and setup, so we’ll proceed swiftly through the code. We’ll delve into detailed explanations in part 2 and explore the architecture and concepts in part 3. However, we’ll briefly touch upon some fundamental concepts within the code.
The complete code for this stage is accessible on GitHub: https://github.com/jrkosinski/oracle-example/tree/part1-step1
Understanding Contracts in Solidity
A “contract” in Solidity is conceptually similar to a class in other object-oriented programming languages. Solidity itself draws inspiration from languages like Golang and JavaScript. Other language constructs you’ll encounter in Solidity include modifiers, libraries, and interfaces. Inheritance, including multiple inheritance, is supported for contracts. Solidity contract files are distinguished by the .sol extension.
Defining the Oracle Interface
Create a file named OracleInterface.sol within the /oracle-example/client/contracts/ directory and paste the following code:
https://github.com/jrkosinski/oracle-example/tree/part1-step1/client/contracts/OracleInterface.sol
Typically, the oracle interface would solely serve as an interface. However, for this initial iteration, it’s implemented as a simple class residing within the Solidity project, acting as a placeholder. We’ll extract it in the subsequent step after successfully compiling and running the contract using Truffle. Later, when we formally define it as an interface, the function implementations will be empty.
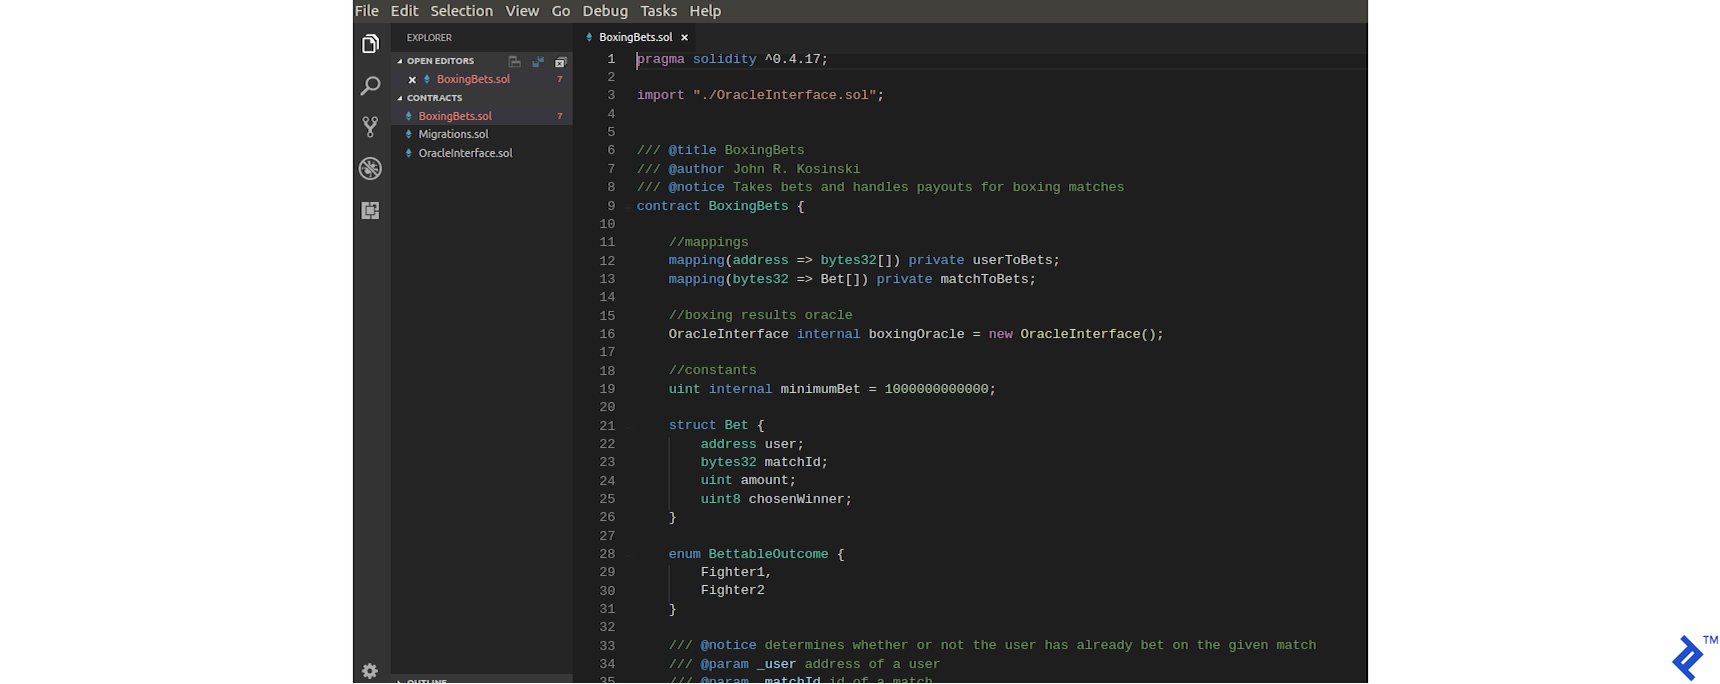
Creating the Client Contract
Add another file named BoxingBets.sol to the /oracle-example/client/contracts/ directory and paste the following code:
https://github.com/jrkosinski/oracle-example/tree/part1-step1/client/contracts/BoxingBets.sol
This contract interacts with the boxing match data, enabling users to query available matches and place bets. In later iterations, it will handle the calculation and distribution of winnings.
Compiling and Running the Contract
Now, let’s see if everything works as intended!
Compiling and Migrating the Contract
- Open a terminal in the /oracle-example/client/ directory.
- Compile the code using the command:
| |


Alternatively, utilize the provided recompile.sh shell script (https://github.com/jrkosinski/oracle-example/tree/part1-step1/client/recompile.sh).
Anticipate warnings during compilation, as our code is still under development.
- Launch the Truffle development console:
| |
- Within the Truffle console, migrate the contract to the test network:
| |
Interacting with the Contract
In the development console, execute the following code to interact with the deployed contract:
| |
The variable “instance” now references the BoxingBets contract, allowing you to invoke its public methods.
Test its functionality by calling the test function:
| |
We’ve included a public “test” function in BoxingBets.sol that simply adds two provided numbers. This demonstrates that the contract executes code and that we can interact with it from the Truffle console. A successful execution will return a meaningful result (see below).
Separating the Ethereum Oracle
With the initial hurdle cleared, our next step is to decouple the oracle contract from the BoxingBets contract. In real-world scenarios, the oracle would exist as a separate entity on the blockchain, necessitating the ability to:
- Instantiate it using its blockchain address.
- Dynamically update the oracle address referenced by the client contract.
In essence, we’re going to establish the oracle and client as distinct blockchain contract entities and enable communication between them. The client will instantiate the oracle using its address and interact with it.
Modifying the Client Contract
Let’s start by modifying the client contract (client) to reference the oracle dynamically through an interface instead of a concrete class. Then, we’ll ensure that it instantiates the oracle from an external contract.
- Navigate to /oracle-example/client/contracts/OracleInterface.sol. As previously mentioned, this file currently doesn’t represent a true interface, but we’ll rectify that now. Replace its contents with the following:
https://github.com/jrkosinski/oracle-example/tree/part1-step2/client/contracts/OracleInterface.sol
| |
- In BoxingBets.sol, replace the line:
| |
with the following two lines:
| |
- We need a way to set the oracle’s address dynamically and a function to retrieve the currently used oracle address. Add the following two functions to BoxingBets.sol:
| |
- Finally, to test the client-oracle connection, replace the test function in BoxingBets.sol with a dedicated function:
| |
Utilizing the Ownable Contract
Notice the onlyOwner modifier appended to the setOracleAddress function definition. This modifier restricts the function’s invocation to the contract’s owner, despite being declared as public. This functionality is not a built-in language feature but provided by the Ownable contract borrowed from OpenZeppelin’s library of general-utility Solidity contracts. We’ll delve into the specifics in Part 2.
For now, to utilize the onlyOwner modifier, we need to make a few adjustments:
- Copy Ownable.sol from https://github.com/jrkosinski/oracle-example/tree/part1-step2/client/contracts/Ownable.sol into the /oracle-example/client/contracts/ directory.
- Add a reference to it at the top of BoxingBets.sol:
| |
(Place it below the line importing OracleInterface.sol.)
- Modify the contract declaration of BoxingBets to inherit from Ownable:
| |
Change it to:
| |
The client contract modifications are now complete. The complete code is available here for reference: https://github.com/jrkosinski/oracle-example/tree/part1-step2/client/contracts
Creating the Oracle Contract
Setting Up the Oracle Project
With the BoxingBets contract now referencing an external oracle contract by address, our next task is to create the actual oracle contract. We’ll establish a separate project specifically for this purpose, mirroring the setup we performed for the client contract project. This involves configuring Truffle for compilation and development.
- If you haven’t already, create an empty directory named /oracle-example/oracle.
- Open a terminal within this directory.
- Execute the command
truffle init. - Delete the file /oracle-example/oracle/truffle-config.js.
- Modify /oracle-example/oracle/truffle.js as follows:
| |
Refer to the example here: https://github.com/jrkosinski/oracle-example/tree/part1-step2/oracle/truffle.js
- Within the /oracle-example/oracle/migrations/ directory, create a file named 2_deploy_contracts.js with the following content:
| |
You can find the example here: https://github.com/jrkosinski/oracle-example/tree/part1-step2/oracle/migrations/2_deploy_contracts.js
Implementing the Oracle Code
For this step, download the following three files from https://github.com/jrkosinski/oracle-example/tree/part1-step2/oracle/contracts/ and place them in your /oracle-example/oracle/contracts/ folder:
- BoxingOracle.sol: This file contains the main oracle contract.
- Ownable.sol: This contract provides the
onlyOwnermodifier used in the client contract. - DateLib.sol: This file contains a date library, which will be discussed in more detail in Part 2.
Testing the Oracle Contract
Thoroughly testing our smart contract oracle at this stage is crucial, as it forms the foundation for the rest of the project. Now that we’ve set up the oracle project and added the code, we need to:
- Compile the oracle contract.
- Ensure that the oracle runs successfully.
- Execute a few functions within the Truffle console to verify its functionality.
Compiling and Migrating the Oracle
- Within the /oracle-example/oracle/ directory, execute the following commands in the terminal. These steps mirror the compilation and migration process for the client contract.
| |
Alternatively, you can use the provided recompile.sh shell script (https://github.com/jrkosinski/oracle-example/tree/part1-step2/oracle/recompile.sh).
- Launch the Truffle development console:
| |
- Migrate the oracle contract to the test network:
| |
Interacting with and Testing the Oracle
- In the Truffle development console, execute the following code to obtain a reference to the deployed oracle contract:
| |
- Now, we can run a series of tests on our oracle contract. Try executing the following commands one by one and examine the results:
| |
Feel free to explore the oracle code, review its public methods and comments, and devise your own tests to run within the console as shown above.
Integrating and Testing Client and Oracle
We’re now ready for the final test: verifying that the client contract can successfully call the deployed oracle contract, retrieve its data, and utilize it. If this test passes, we’ll have a working client-oracle pair ready for further experimentation.
Here’s a breakdown of the steps involved in this end-to-end test:
- Compile and run the oracle contract.
- Compile and run the client contract.
- Retrieve the address of the deployed oracle contract.
- Set the oracle address within the client contract.
- Add test data to the oracle contract.
- Verify that the client contract can access and retrieve the newly added data.
- Open two terminal windows: one in /oracle-example/client/ and the other in /oracle-example/oracle/. It’s recommended to keep the /oracle-example/client/ terminal on the left and the /oracle-example/oracle/ terminal on the right for clarity.
Compiling and Running the Oracle Contract
In the /oracle-example/oracle/ terminal, execute the following commands:
| |
Compiling and Running the Client Contract
Switch to the /oracle-example/client/ terminal and execute these commands:
| |
Retrieving the Oracle Contract’s Address
In the /oracle-example/oracle/ terminal, run the following command:
| |
Copy the address returned by this call. You’ll use it in the next step.
Setting the Oracle Address in the Client Contract
In the /oracle-example/client/ terminal, execute this command, replacing ORACLE_CONTRACT_ADDRESS with the address copied in the previous step:
| |
Verify that the address was set correctly by running:
| |
An output of true indicates success.
Testing Data Retrieval from the Client Contract
- In the /oracle-example/client/ terminal, execute the following command:
| |
It should return an empty array as no test data has been added to the oracle yet.
- Switch to the /oracle-example/oracle/ terminal and add test data by executing:
| |
- Back in the /oracle-example/client/ terminal, check if we can now retrieve the newly added data from the client:
| |
If all went well, this command should now return an array containing the data added in the previous step.
You can further experiment by taking individual addresses from the array returned by getBettableMatches() and passing them to the getMatch() function.
At this point, feel free to explore the client code, examine its public methods and comments, and experiment with your own tests in the console.
Conclusion of Part One
While the results of this exercise might seem limited, they align with our initial goals of maintaining a manageable pace. Although our client currently lacks the ability to accept bets, manage funds, and distribute winnings, we have achieved the following:
- A mostly functional smart contract oracle.
- A client capable of connecting to and interacting with the oracle.
- A solid framework for further development and learning.
That’s quite an accomplishment for a single tutorial.
Part two of this series will dive deeper into the code, exploring features unique to smart contract development and the intricacies of the Solidity language. We’ll clarify concepts that were briefly touched upon in this part.
Part three will delve into the philosophy and design principles behind smart contracts, focusing on their interaction with oracles.
Optional Next Steps
Independent experimentation is a great way to solidify your understanding. Here are a few suggestions for extending this tutorial (note that these won’t be covered in Parts 2 and 3):
- Deploy the contracts to Ganache (formerly testrpc) and repeat the tests to verify functionality.
- Deploy the contracts to the Ropsten or Rinkeby testnets and rerun the tests.
- Develop a web3js front end for either the oracle or the client (or both).
Best of luck, and don’t hesitate to reach out with any questions. While a prompt response might not always be possible, I’ll do my best to assist you.