Disclaimer: It’s recommended to utilize Spring Security 5+ for JWT support, as it offers built-in OAuth JWT capabilities, instead of resorting to custom security implementations or filters.
Spring is widely recognized and used within the Java community. However, it’s no longer accurate to label Spring as simply a framework. It functions more as an all-encompassing ecosystem that houses a variety of frameworks. Among these is Spring Security, a robust and highly customizable framework dedicated to authentication and authorization. It has become the standard choice for securing applications built on Spring. Therefore, if your goal is to implement a JWT token solution within a Spring application, leveraging Spring Security as the foundation is a logical approach.
Despite its widespread adoption, I must acknowledge that configuring Spring for single-page applications can be complex and far from intuitive. This complexity might stem from its origins as an MVC application-centric framework, where web pages are rendered server-side and communication relies on sessions.
If your back end is built on Java and Spring, using Spring Security with JWT for authentication and authorization, and configuring it for stateless communication, is a sensible choice. However, despite the abundance of articles explaining the process, my initial experience setting it up was quite frustrating, requiring me to consult and synthesize information from various sources. This challenge inspired me to create this Spring Security guide, aiming to provide a comprehensive overview and address the intricacies and potential pitfalls you might encounter during configuration.
Understanding Key Terms
Before delving into the technical aspects, let’s clearly define the terminology used in the context of Spring Security to ensure we’re on the same page.
Here are the terms we’ll be working with:
- Authentication: This is the process of verifying a user’s identity using provided credentials, such as entering a username and password to log in to a website. It essentially answers the question, “Who are you?”
- Authorization: After successful authentication, authorization determines whether a user has the necessary permissions to perform specific actions or access particular data. It addresses the question, “What are you allowed to do?”
- Principle: This refers to the currently authenticated user.
- Granted authority: This refers to the permission granted to an authenticated user.
- Role: This represents a group of permissions assigned to an authenticated user.
Building a Simple Spring Application
Let’s start by creating a basic Spring web application before we configure the Spring Security framework. We can utilize a Spring Initializr to generate a template project. For a basic web application, a Spring web framework dependency is sufficient:
| |
With the project created, we can add a straightforward REST controller:
| |
After building and running the project, we can access the following URLs in a web browser:
http://localhost:8080/hello/userwill display the string “Hello User”.http://localhost:8080/hello/adminwill display the string “Hello Admin”.
Now, let’s incorporate the Spring Security framework by adding the following dependency to our pom.xml file:
| |
Unlike other Spring framework dependencies that typically require explicit configuration to take effect, Spring Security has an immediate impact, which can often surprise new users. After adding the dependency, rebuilding, and running the project, attempting to access the URLs mentioned earlier will redirect us to http://localhost:8080/login instead of displaying the expected results. This behavior is by design, as Spring Security enforces authentication for all URLs out of the box.
To authenticate, we can use the default username “user” and locate the auto-generated password in the console:
| |
Keep in mind that the password changes every time we restart the application. If we want a static password, we can add the following configuration to our application.properties file:
| |
Now, providing these credentials in the login form will redirect us back to our URL, displaying the expected result. Note that the default authentication is session-based. To log out, we can access the following URL: http://localhost:8080/logout
While this default behavior might suit traditional MVC web applications with session-based authentication, it’s often not ideal for single-page applications. These applications typically employ client-side rendering and JWT-based stateless authentication, requiring significant customization of the Spring Security framework, which we’ll explore in the rest of this guide.
For this tutorial, we’ll use a classic bookstore web application as an example. We’ll build a back end providing CRUD APIs for managing authors and books, along with APIs for user management and authentication.
Exploring Spring Security Architecture
Before we start customizing the configuration, let’s understand how Spring Security authentication functions under the hood.
The following diagram illustrates the authentication request flow:
Spring Security Architecture
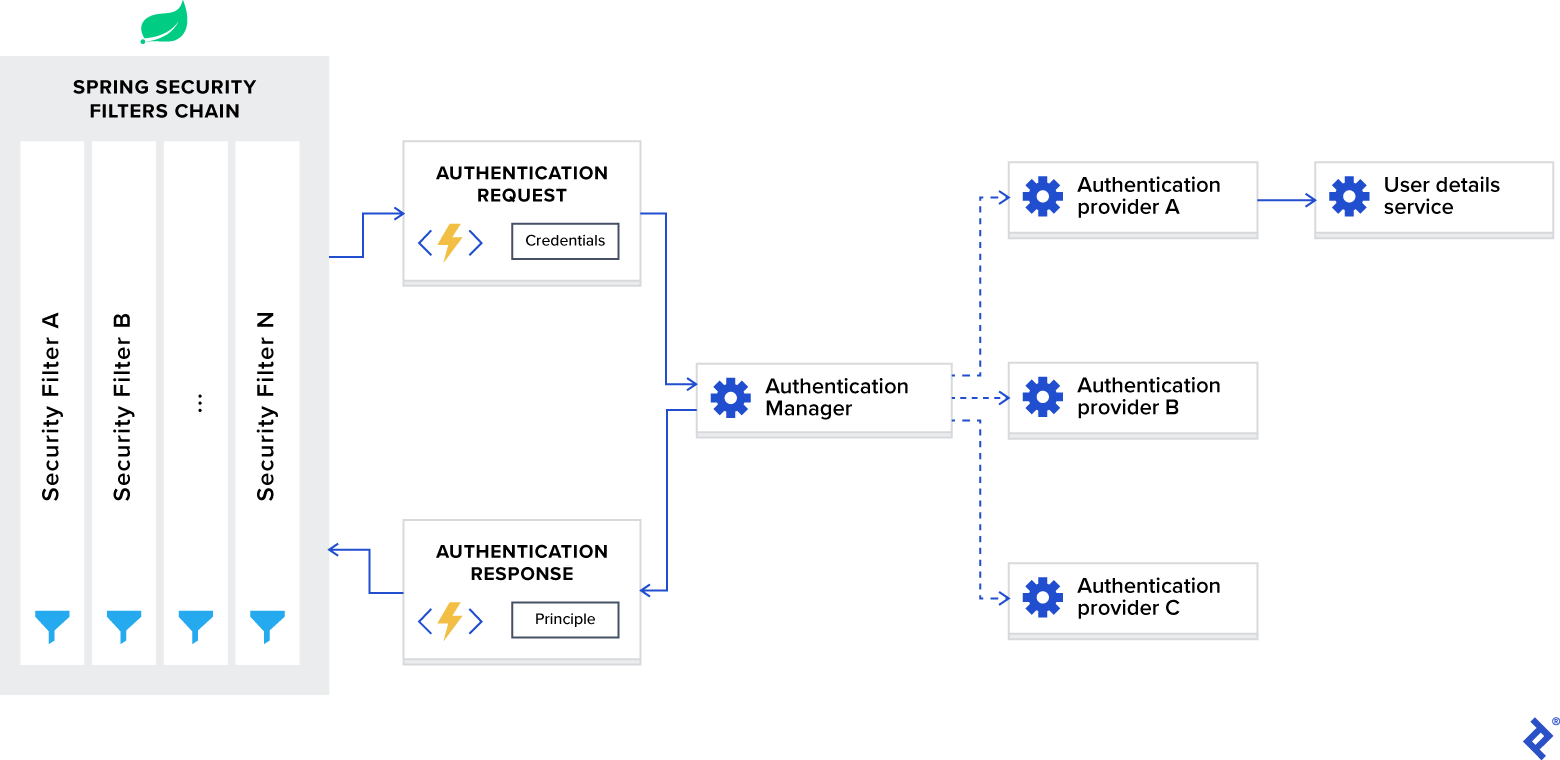
Let’s break down the diagram and examine each component individually.
Spring Security Filters Chain
When you integrate the Spring Security framework, it automatically registers a chain of filters that intercepts all incoming requests. This chain consists of various filters, each designed to handle a specific task.
For instance:
- Determining if a requested URL is publicly accessible based on the configuration.
- Checking if the user is already authenticated within the current session in cases of session-based authentication.
- Verifying if the user has the authorization to perform the requested action.
One crucial detail is that Spring Security filters have the lowest order, meaning they are invoked first. In some scenarios, you might need to prioritize your custom filter by adjusting its order. You can achieve this using the following configuration:
| |
Adding this configuration to our application.properties file reserves space for ten custom filters to precede the Spring Security filters.
AuthenticationManager
Consider the AuthenticationManager as a central coordinator responsible for registering multiple authentication providers. Based on the type of request, it delegates the authentication process to the appropriate provider.
AuthenticationProvider
The AuthenticationProvider handles specific authentication types. Its interface defines two primary functions:
authenticate: This function performs authentication based on the provided request.supports: This function checks whether the provider supports the specified authentication type.
One essential implementation we’ll use in our example is the DaoAuthenticationProvider. This provider fetches user details from a UserDetailsService.
UserDetailsService
The UserDetailsService acts as a core interface responsible for loading user-specific data, as described in Spring’s documentation.
In many cases, authentication providers rely on a database to retrieve user identity information based on provided credentials and then perform validation. Due to the prevalence of this use case, Spring developers have abstracted it into a dedicated interface with a single function:
loadUserByUsername: This function takes a username as input and returns the corresponding user identity object.
Implementing Authentication with JWT and Spring Security
Now that we understand Spring Security’s internal workings, let’s configure it for stateless authentication using JWT.
To customize Spring Security for JWT, we need a configuration class annotated with @EnableWebSecurity within our classpath. To simplify the process, the framework provides a WebSecurityConfigurerAdapter class. We’ll extend this adapter and override its functions to:
- Configure the authentication manager with the appropriate provider.
- Configure web security settings, such as public and private URLs, authorization rules, and more.
| |
In our sample application, user identities are stored in a MongoDB database, specifically in the users collection. The User entity maps these identities, while the UserRepo Spring Data repository defines their CRUD operations.
Upon receiving an authentication request, we need to retrieve the correct identity from the database based on the provided credentials and validate them. This is where we implement the UserDetailsService interface:
| |
This code demonstrates the requirement to return an object that implements the UserDetails interface. Our User entity already implements this interface. (Refer to the sample project repository for implementation details.) As it exposes only a single function, we can treat it as a functional interface and provide an implementation using a lambda expression:
| |
In this code, the auth.userDetailsService function call initializes the DaoAuthenticationProvider instance with our UserDetailsService implementation and registers it within the authentication manager.
In addition to the authentication provider, we need to configure the authentication manager with the appropriate password-encoding schema for credential verification. To achieve this, we need to expose the preferred implementation of the PasswordEncoder interface as a bean.
Our sample project utilizes the bcrypt password-hashing algorithm:
| |
With the authentication manager configured, let’s move on to web security configuration. As we’re building a REST API requiring stateless authentication via JWT, we need to set the following options:
- Enable CORS and disable CSRF.
- Configure session management for stateless operation.
- Define an exception handler for unauthorized requests.
- Specify endpoint permissions.
- Integrate the JWT token filter.
The following code implements this configuration:
| |
Note that we’ve positioned the JwtTokenFilter before Spring Security’s internal UsernamePasswordAuthenticationFilter. This order is crucial because we need to access the user identity for authentication and authorization at this stage, which is extracted within the JWT token filter based on the provided JWT. The implementation is as follows:
| |
Before we implement the login API function, there’s one more step: we need access to the authentication manager. By default, it’s not publicly accessible, so we must explicitly expose it as a bean in our configuration class:
| |
Now, we can implement our login API function:
| |
This code verifies the provided credentials using the authentication manager. Upon successful verification, it generates a JWT token and includes it in the response header along with the user identity information in the response body.
Implementing JWT Authorization with Spring Security
In the previous section, we established a Spring JWT authentication process and configured public and private URLs. While this might suffice for basic applications, most real-world scenarios demand role-based access control for users. In this section, we’ll address this requirement and set up a role-based authorization schema using Spring Security.
Our sample application defines three roles:
USER_ADMIN: Allows management of application users.AUTHOR_ADMIN: Grants permission to manage authors.BOOK_ADMIN: Provides access to manage books.
We need to apply these roles to the corresponding URLs:
api/public: Publicly accessible.api/admin/user: Accessible to users with theUSER_ADMINrole.api/author: Accessible to users with theAUTHOR_ADMINrole.api/book: Accessible to users with theBOOK_ADMINrole.
Spring Security offers two methods for setting up the authorization schema:
- URL-based configuration.
- Annotation-based configuration.
Let’s start with URL-based configuration. We can apply it to the web security configuration as follows:
| |
While this approach is simple, it has a drawback. In complex applications with intricate authorization rules, defining all the rules in a single location can lead to code that is difficult to read and maintain. Therefore, I prefer using annotation-based configuration in such cases.
Spring Security provides the following annotations for web security:
@PreAuthorize: Supports Spring Expression Language and provides expression-based access control before method execution.@PostAuthorize: Supports Spring Expression Language and provides expression-based access control after method execution, allowing access to the method’s result.@PreFilter: Supports Spring Expression Language and filters collections or arrays before method execution based on custom security rules.@PostFilter: Supports Spring Expression Language and filters collections or arrays returned after method execution based on custom security rules, allowing access to the method’s result.@Secured: Does not support Spring Expression Language and specifies a list of roles required to access a method.@RolesAllowed: Does not support Spring Expression Language and is the JSR 250 equivalent of@Secured.
These annotations are disabled by default but can be enabled in our application as follows:
| |
securedEnabled = true: Enables the@Securedannotation.jsr250Enabled = true: Enables the@RolesAllowedannotation.prePostEnabled = true: Enables the@PreAuthorize,@PostAuthorize,@PreFilter, and@PostFilterannotations.
With these annotations enabled, we can enforce role-based access policies on our API endpoints:
| |
Security annotations can be applied at both the class and method levels.
These examples are basic and don’t represent real-world complexity. However, Spring Security’s rich set of annotations empowers you to handle even the most intricate authorization schemas.
Understanding the Role Name Default Prefix
Let’s address a subtle detail that often causes confusion among newcomers.
Spring Security distinguishes between two concepts:
Authority: Represents an individual permission.Role: Represents a group of permissions.
Both are represented by a single interface called GrantedAuthority. You can check them using Spring Expression Language within Spring Security annotations:
Authority:@PreAuthorize("hasAuthority('EDIT_BOOK')")Role:@PreAuthorize("hasRole('BOOK_ADMIN')")
To highlight the difference, Spring Security adds a ROLE_ prefix to role names by default. Instead of checking for BOOK_ADMIN, it checks for ROLE_BOOK_ADMIN.
Personally, I find this behavior counterintuitive and prefer to disable it. You can disable it within the Spring Security configuration:
| |
Testing Our Spring Security JWT Implementation
To test our endpoints with unit or integration tests when using Spring Security, we need to add the spring-security-test dependency alongside spring-boot-starter-test in our pom.xml file:
| |
This dependency provides annotations for adding security contexts to our test functions:
@WithMockUser: Emulates running the test with a mocked user.@WithUserDetails: Emulates running withUserDetailsreturned from theUserDetailsService.@WithAnonymousUser: Emulates running with an anonymous user, useful for testing scenarios where most tests require a specific user, but some require an anonymous user.@WithSecurityContext: Determines theSecurityContextto use. The previous three annotations are based on this annotation. For specific use cases, you can create custom annotations leveraging@WithSecurityContextto define desiredSecurityContextinstances. (Exploring this is beyond the scope of this guide. Refer to the Spring Security documentation for more details.)
The simplest way to run tests with a specific user is using @WithMockUser:
| |
However, this approach has drawbacks. First, the mock user doesn’t exist. Integration tests querying the database for user information will fail. Second, the mock user is an instance of org.springframework.security.core.userdetails.User, Spring’s internal UserDetails implementation. If you have a custom implementation, conflicts might arise during test execution.
If these drawbacks pose a problem, @WithUserDetails is a better choice. This annotation is suitable for custom UserDetails and UserDetailsService implementations. As it assumes the user exists, you need to either create the corresponding database record or provide a mocked UserDetailsService instance before running tests:
| |
This is the preferred annotation for integration tests in our sample project as we have custom implementations of these interfaces.
Using @WithAnonymousUser allows you to run tests as an anonymous user. This is especially helpful when most tests require a specific user, but some need an anonymous user:
| |
This code runs test1 and test2 with a mock user, while test3 runs with an anonymous user.
Overcoming the Spring Security JWT Learning Curve
In conclusion, the Spring Security framework might not be the most elegant or intuitive framework. Its initial complexity often leads developers to opt for custom solutions. However, once you understand its internals and overcome the initial configuration hurdles, it becomes relatively straightforward to use.
This guide aimed to shed light on the subtle aspects of Spring Security configuration. I hope you find these examples valuable in your journey with Spring Security and JWT authentication.