When tasked with building a high-load project using a PHP MVC framework, caching is often a go-to solution. You might consider condensing the project into a single file, crafting a custom MVC framework with minimal functionality, or modifying existing frameworks. While effective, these approaches can be cumbersome. Fortunately, there’s a more elegant solution that eliminates the need for most of these workarounds (except perhaps caching): the PhalconPHP framework.
What Is PhalconPHP?
PhalconPHP, an MVC framework for PHP, distinguishes itself by being written in C and delivered as a compiled PHP extension. This architectural choice makes it one of the fastest frameworks available, even surpassing popular options like Symfony, Yii, Laravel, CodeIgniter, and Zend Framework. While Yaf technically claims the title of fastest, it’s a micro-framework with limited functionality. Unlike traditional frameworks that rely on PHP files and interpretation for every request, PhalconPHP is loaded into RAM once upon web server startup, minimizing resource consumption.
For a long time, MVC frameworks have been the gold standard in web development, with most developers familiar with at least one. While these frameworks offer advantages, their reliance on interpreted PHP files can hinder performance. PhalconPHP addresses this limitation.
Let’s examine some benchmarks.
PhalconPHP Benchmarks
While the official benchmarks might be outdated, they still illustrate PhalconPHP’s exceptional performance. More recent 2016 comparison consistently position PhalconPHP among the top performers, surpassing many professional frameworks and trailing only raw PHP and certain micro-frameworks.
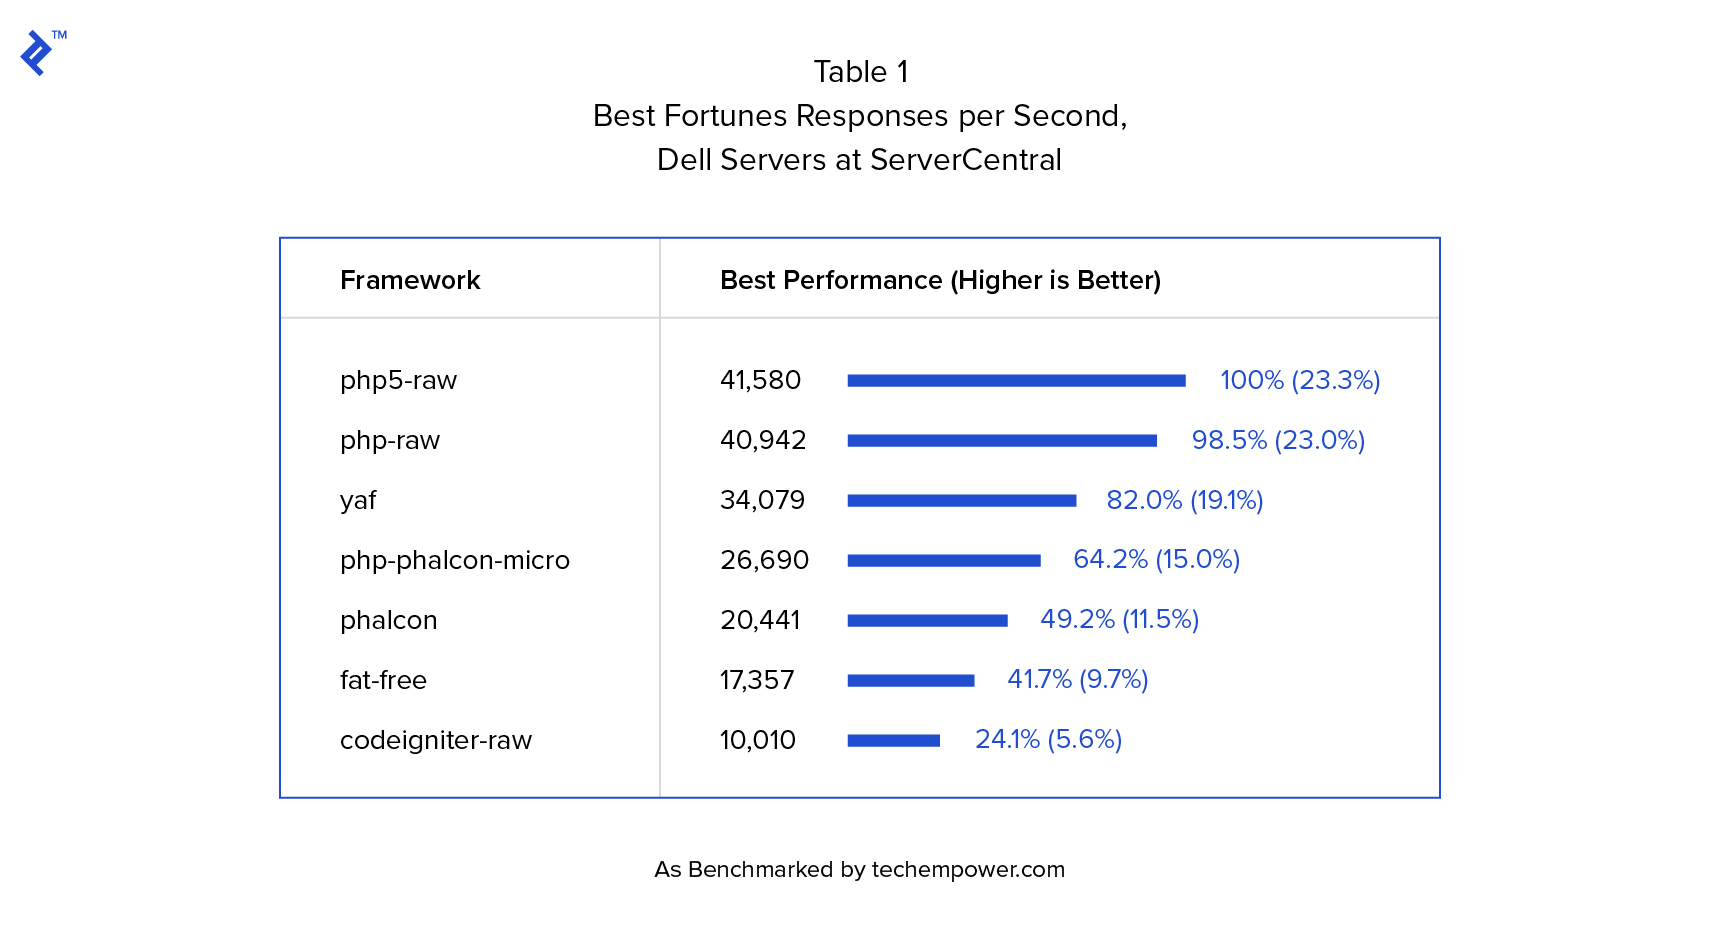
This clearly demonstrates PhalconPHP’s speed. While raw PHP is also fast, we need the robust features of an MVC framework, which PhalconPHP provides:
- ORM
- Volt template Engine
- Dependency Injection (DI) Container
- Caching
- Logging
- Routing systems
- Security block
- Autoloader
- Forms module
These are just a few examples. PhalconPHP comes equipped with everything needed to build complex enterprise applications, such as RESTful APIs for high-load systems.
Another appealing aspect is PhalconPHP’s minimalistic approach, as evident when comparing Phalcon ORM with the more extensive Doctrine 2.
Let’s delve into creating a PhalconPHP project.
Two Types of Phalcon Projects: Full-stack and Micro
MVC frameworks typically fall into two categories: full-stack frameworks (e.g., Symfony, Yii) and micro-frameworks (e.g., Lumen, Slim, Silex).
Full-stack frameworks are well-suited for large projects due to their comprehensive functionality but may require more expertise and time to set up. Micro-frameworks, on the other hand, excel at rapid prototyping but often lack the features needed for larger projects. However, micro-frameworks compensate for this with their superior performance, often outpacing their full-stack counterparts.
PhalconPHP uniquely supports both approaches, allowing developers to build either full-stack or micro applications. Notably, even when opting for a micro application, developers retain access to most of Phalcon’s powerful features while enjoying enhanced performance.
In my previous role, our team leveraged PhalconPHP’s micro application approach to build a high-load RESTful system, experiencing significant performance gains. While I can’t disclose specific benchmarks due to confidentiality agreements, I highly recommend considering micro applications for maximizing PhalconPHP’s performance potential. Although coding a micro application might be less convenient than a full-stack one, PhalconPHP’s micro applications offer all the essential features for most projects while delivering exceptional performance.
To illustrate, let’s create a simple RESTful micro application using PhalconPHP.
Building a RESTful API
Most RESTful applications share a common element: a User entity. For our example, we’ll build a basic REST application to create, read, update, and delete users, commonly referred to as CRUD.
The complete project can be found on my GitLab repository. The repository contains two branches: the master branch houses the basic functionality without specific PhalconPHP features, while the logging-and-cache branch showcases Phalcon’s logging and caching capabilities. This allows for easy comparison and demonstrates the simplicity of implementing these features.
Installation
I won’t delve into installation details here. The official install documentation provides comprehensive instructions for various operating systems.
For web server installation, refer to the notes in the official Phalcon documentation.
Ensure your PHP version is at least 5.6.
My setup consists of Ubuntu 16.10, PostgreSQL 9.5.6, Nginx 1.10.0, PHP 7, and Phalcon 3.0. I’ve included an Nginx config sample and a PostgreSQL dump file in the project, which you’re welcome to use. Adapting the configuration to your needs should be straightforward.
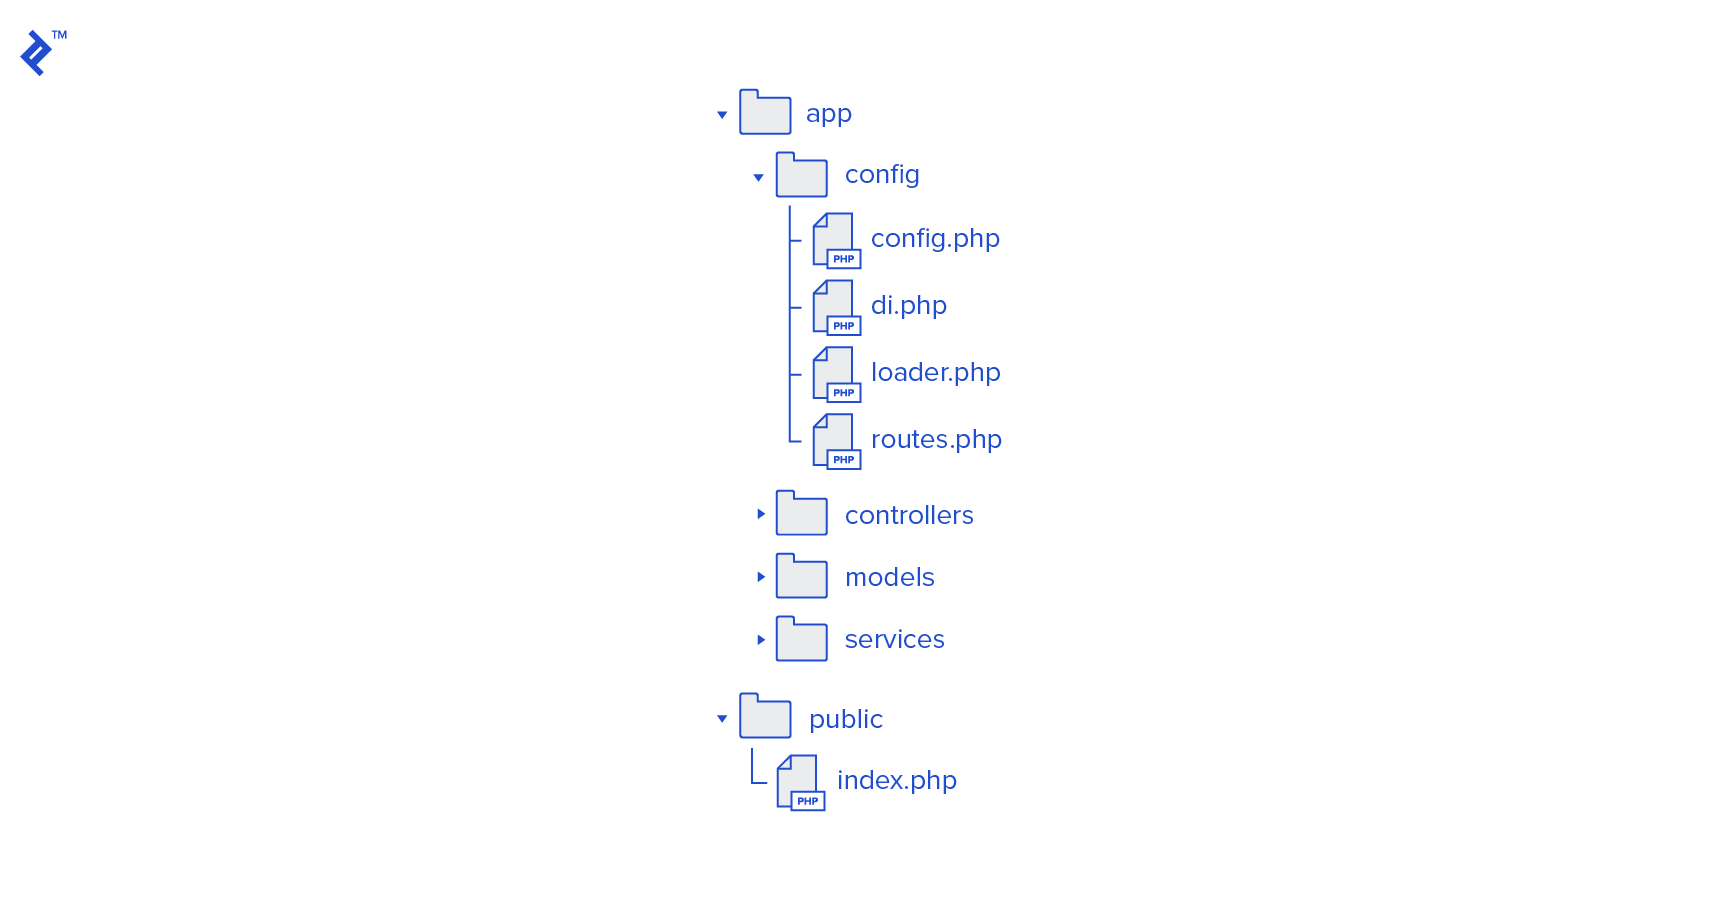
Project Structure and Configuration
Let’s start by establishing the initial project structure.
PhalconPHP allows for flexible project structures, but the structure chosen for this example partially implements an MVC pattern. Since this is a RESTful project, we omit views. However, we maintain controllers and models, each with their dedicated folders, as well as services. Services encapsulate the business logic of the project, effectively splitting the “model” aspect of MVC into data models (interacting with the database) and business logic models.
Located in the public folder, index.php serves as a bootstrap file, loading essential components and configurations. All configuration files reside in the config folder. While the official documentation suggests including these in the bootstrap file, I find that separating them into a dedicated folder enhances readability, especially in larger projects.
Creating index.php
Our initial index.php file will handle configuration and class autoloading, followed by route initialization, dependency injection container setup, and the PhalconPHP micro application instantiation. Control is then passed to the micro application core, which processes requests based on defined routes, executes business logic, and returns results.
Let’s examine the code:
| |
Configuring a \Phalcon\Config Object
PhalconPHP provides several options for storing configuration files:
- YAML files
- JSON files
- INI files
- PHP arrays
Using a PHP array offers the fastest performance, making it our preferred choice for this high-load application. Specifically, we’ll employ a \Phalcon\Config object to load configuration options. Our configuration object will be concise:
| |
This file outlines two primary configurations: one for the database and one for the application. The database configuration facilitates database connections. The application array, used by Phalcon’s system tools, will be utilized later in the project. For a deeper dive into Phalcon configurations, refer to the official documentation.
Configuring loader.php
Next, let’s configure the loader.php file. This file establishes a mapping between namespaces and their corresponding directories through the \Phalcon\Loader object. It’s quite simple:
| |
With this configuration, classes within these namespaces will be automatically loaded and readily available. To incorporate a new namespace and directory, simply add a new line. You can also bypass namespaces and register specific directories or files directly. The PhalconPHP loader documentation covers these possibilities in detail.
Configuring the Dependency Injection Container
Like many modern frameworks, PhalconPHP implements a dependency injection (DI) pattern. Objects are initialized within the DI container and accessed from there. The DI container is linked to the application object, making it accessible across all classes inheriting from the \Phalcon\DI\Injectable class, including our controllers and services.
PhalconPHP’s DI pattern is incredibly powerful. This component is pivotal to the framework’s functionality. I strongly advise reviewing the comprehensive documentation to gain a thorough understanding.
Let’s explore some key aspects. Our di.php file will look like this:
| |
As you can see, our dependency injection (DI) file is a bit more involved. Let’s break down the key points. First, consider the initialization string: $di = new \Phalcon\DI\FactoryDefault();. This creates a FactoryDefault object, which inherits from \Phalcon\Di. PhalconPHP allows you to define custom DI factories, but FactoryDefault offers a convenient starting point, as it “automatically registers all the services provided by the framework.” This means commonly used services like Request and Response are readily available within framework classes. The Phalcon service documentation provides a complete list of these services.
Next, let’s discuss the registration process. PhalconPHP offers multiple methods for registering elements within the DI container, all of which are thoroughly documented in the PhalconPHP registering documentation. In our project, we’ll focus on three methods: anonymous functions, variables, and strings.
Anonymous functions provide flexibility during class initialization. Here, we override a Response object to set the content-type to JSON for all responses. We then initialize a database adapter using our configuration object.
Our project utilizes PostgreSQL. To use a different database engine, simply modify the database adapter within the db set function. Information about available database adapters and the database layer can be found in the PhalconPHP’s database documentation.
Next, we register a $config variable implementing the \Phalcon\Config service. While not directly used in this example project, it’s a frequently used service as other projects may require access to the configuration across different components.
Finally, it’s important to note the significance of the setShared method. Calling this method transforms a service into a “shared” service, effectively making it behave like a singleton. As per the documentation: “Once the service is resolved for the first time the same instance of it is returned every time a consumer retrieves the service from the container.”
Configuring routes.php…or Not
We’ll leave the routes.php file empty for now and populate it alongside our controllers.
Implementing a RESTful Core
According to Wikipedia, three primary elements define a RESTful application:
- A base URL
- An internet media type that specifies state transition data elements
- Standard HTTP methods (
GET,POST,PUT,DELETE) and standard HTTP response codes (200, 403, 400, 500, etc.).
In our project, base URLs will be defined in the routes.php file. We’ll address the other points now.
Our application will receive request data as application/x-www-form-urlencoded and send response data as application/json. While using x-www-form-urlencoded might not be ideal in real-world scenarios (due to limitations in sending complex data structures and associative arrays), we’ll adopt it here for simplicity.
Recall that we’ve already configured our response JSON header in the DI file:
| |
Now, let’s set up response codes and a consistent response format. While the official tutorial recommends formatting responses as JSON within each method, a more versatile approach involves returning controller method results as arrays and converting them to standard JSON responses. It’s also more efficient to manage HTTP response codes from a central location, which in our case will be the index.php file.
To accomplish this, we’ll leverage PhalconPHP’s ability to execute code before and after request handling using the $app->before() and $app->after() methods. We’ll insert a callback within the $app->after() method for this purpose:
| |
This callback retrieves the return value and transforms the array into JSON format. If the operation is successful but returns an empty result (e.g., adding a new user), we return a 204 HTTP code with no content. In all other scenarios, we throw an exception.
Handling Exceptions
Crucial to a RESTful application is the ability to provide clear and informative responses. Large-scale, high-load applications are prone to various errors: validation errors, access errors, connection errors, and unexpected errors, to name a few. We aim to translate these errors into standardized HTTP response codes, which can be effectively achieved through exceptions.
Our project will utilize two types of exceptions: “local” exceptions, implemented as specialized classes inheriting from the \RuntimeException class and organized by services, models, adapters, etc. (this segregation promotes modularity within the MVC pattern), and HttpExceptions, inheriting from the AbstractHttpException class. These exceptions align with HTTP response codes and are named accordingly (e.g., Http400Exception, Http500Exception).
The AbstractHttpException class has three properties: httpCode, httpMessage, and appError. Subclasses override the first two properties, providing basic response information like httpCode: 400 and httpMessage: Bad request. The appError property stores an array containing detailed error information, including the error description.
Our final index.php file will handle three types of exceptions: AbstractHttpExceptions (as explained earlier), Phalcon Request Exceptions (which might occur during request parsing), and any other unanticipated exceptions. All exceptions are converted into a user-friendly JSON format and sent to the client via the standard Phalcon Response class:
| |
Creating Models with Phalcon Dev Tools
Modern IDEs often offer features like code highlighting and completion. In a typical PHP framework, you can navigate to function declarations within included framework folders with a single click. As PhalconPHP is an extension, we don’t get this functionality out of the box. Fortunately, Phalcon Dev Tools bridges this gap. This tool, installable via Composer (if you haven’t already, familiarize yourself with this package manager), provides code stubs for all PhalconPHP classes and functions, along with code generators (both console and GUI versions) documented on the PhalconPHP website. While Phalcon Dev Tools can assist in creating various parts of the MVC pattern, we’ll focus on model generation.
To begin, let’s install Phalcon Dev Tools using Composer. Our composer.json file will look like this:
| |
As you can see, we require PHP 5.6, Phalcon 3, and the pgsql extension (which you can replace with your database extension or omit entirely).
Ensure you have the correct versions of PHP, Phalcon, and the database extension installed, and then run Composer:
| |
Next, let’s create our database. It’s a simple database with just one table, users. Although I’ve provided a pg_dump file in the project, here’s the SQL code in PostgreSQL dialect:
| |
With the database in place, we can proceed with model generation. Phalcon Dev Tools relies on an empty .phalcon folder to identify Phalcon projects. Create this empty folder in your project’s root directory. It also utilizes settings from our configuration file, specifically variables under the application section and the adapter setting from the database section. To generate our model, execute the following command from the project’s root folder:
| |
If the previous steps were completed successfully, you’ll find a functional Users.php model file in your models folder. This file will be properly namespaced and include getters and setters, as specified in the command. Next, let’s move on to the controller.
Controllers and Routing
Since our application focuses on CRUD operations for users, we’ll create a single controller, the Users controller, with the following actions:
- Add user
- Show list of users
- Update user
- Delete user
While Phalcon Dev Tools can be used to create controllers, we’ll create them manually, implementing the AbstractController and its child class, UsersController.
Creating the AbstractController is a beneficial practice in PhalconPHP as it allows us to centralize necessary classes (obtained via dependency injection) within the PHPDoc block, aiding IDE autocompletion. We can also define error constants common to all controllers.
For now, our abstract controller will be simple:
| |
It’s a basic Phalcon injectable class, as indicated by the extends syntax. Next, let’s create the UsersController skeleton:
| |
Currently, it’s an empty class with placeholder actions to handle corresponding HTTP requests.
Now, let’s populate the routes.php file. In PhalconPHP micro applications, we define collections, one per controller, and add handled requests using methods like get, post, put, and delete. These methods accept a route pattern and a proceeding function as arguments. The proceeding function can be either an anonymous function or a controller method name. Here’s how our routes.php file will look:
| |
Here, we specify the handling controller and a URI prefix. In our case, a sample URI would be http://article.dev/user/add, which should be a post request. To modify user data, a put request to a URI like http://article.dev/user/12 would be used to update data for the user with ID 12. We’ve also defined a handler for unmatched routes that throws an error. For more details, refer to the PhalconPHP documentation for routes in a full stack application and for routes in a micro application.
Now, let’s move to the controller’s implementation, starting with the addAction method (other methods follow a similar structure; you can refer to the application code for reference). A controller method typically performs five main tasks:
- Retrieves and validates request parameters
- Prepares data for the service method
- Invokes the service method
- Handles exceptions
- Sends the response
Let’s break down each step, beginning with validation. While PhalconPHP offers a robust validation component, for this example, we’ll opt for a more traditional validation approach. Our validation block will look like this:
| |
This block checks if the post parameter is a string matching a regular expression. Validated values are stored in the $data array, which is then passed to the UsersService class. Any errors are collected in the $errors array, which is then incorporated into an error details array within the Http400Exception. This array is later transformed into a detailed response in index.php:
Here’s the complete addAction method code, including validation and a call to the createUser method in UsersService (which we’ll define shortly):
| |
In the last section, we handle two specific exceptions: user already exists and unable to create user (which might occur due to issues like database connection errors). By default, unhandled exceptions will result in an HTTP 500 (internal server error) response. While we don’t expose detailed error information to the end user, it’s crucial to log all error details, including the stack trace.
Don’t forget to use the necessary classes from other namespaces:
| |
Business Logic
The final piece is implementing the business logic. Similar to the controllers, we’ll create an abstract service class:
| |
The concept here mirrors that of the controller block, so I’ll skip the explanation. Here’s the skeleton for our UsersService class:
| |
And the createUser method itself:
| |
This method is straightforward: we create a new model object, call its setters (which return the object itself, enabling method chaining), and throw a ServiceException if an error occurs. That’s all there is to it! We can now proceed to testing.
Testing
Let’s test our application using Postman. We’ll start by sending some invalid data:

Request:
| |
Response (400: Bad Request):
| |
The validation works as expected. Now, let’s try with valid data:
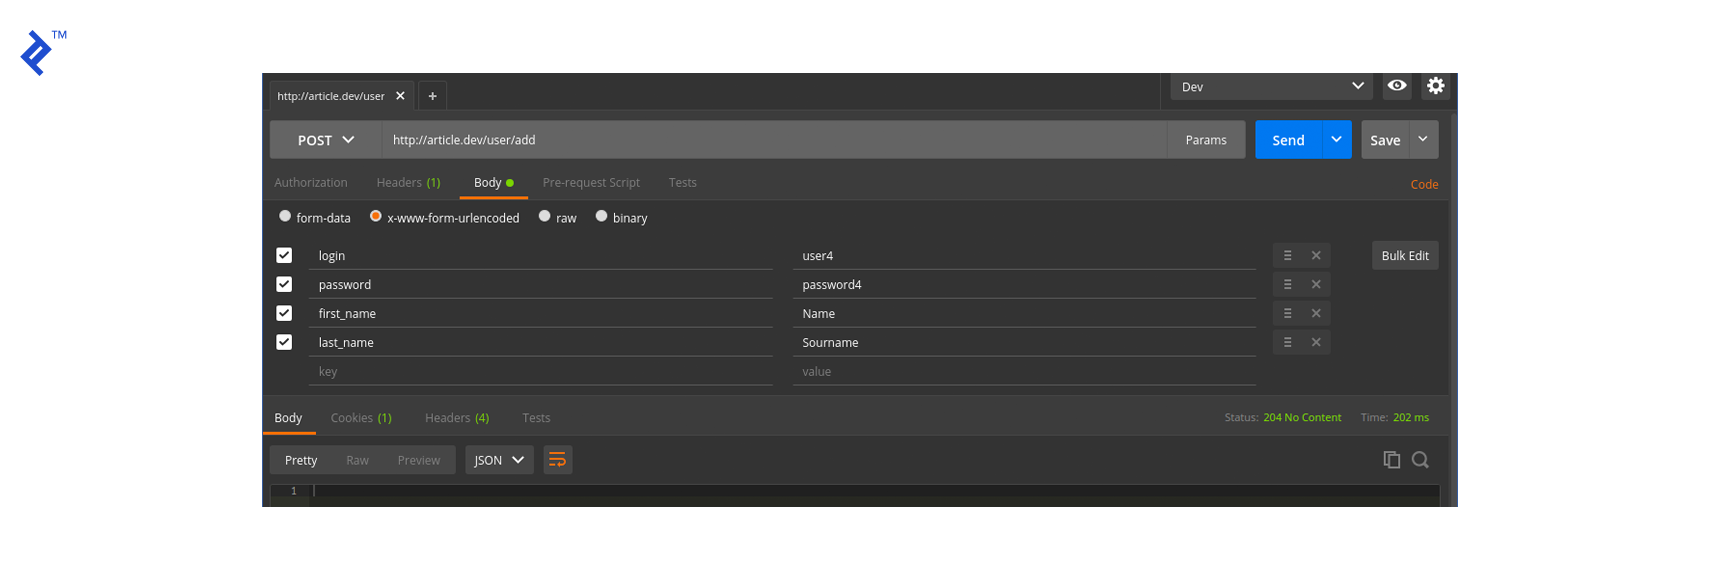
Request:
| |
Response (204):
We get a “No Content” response, indicating success. Let’s verify by retrieving the complete user list (which wasn’t covered in detail but is available in the application code):
Request:
| |
Response (200 OK):
| |
Our application works as intended!
Logging and Caching
It’s difficult to imagine a high-load application without logging and caching, and PhalconPHP offers excellent classes for both. To avoid making this article too lengthy, I’ve implemented logging and caching in the sample application but placed the code in a separate branch named logging-and-cache. Feel free to compare the branches and examine the code. As with other PhalconPHP features, logging and caching are well-documented: refer to Logging and Caching.
Disadvantages
PhalconPHP, while impressive, isn’t without drawbacks. The first disadvantage stems from its core strength: being a compiled C extension. This inherent characteristic makes modifying its code directly challenging. While those familiar with C can delve into the codebase, make changes, and recompile using make, it’s undeniably more complex than tweaking PHP code. This means resolving bugs within PhalconPHP might require more effort.
Phalcon 2 and Phalcon 3 partially address this limitation by enabling the development of Phalcon extensions using Zephir. Zephir, designed to simplify the creation and maintenance of PHP extensions, prioritizes type and memory safety. Its syntax closely resembles PHP, and Zephir code compiles into shared libraries, mirroring the PHP extension mechanism. This provides a way to extend Phalcon’s functionality.
The second disadvantage lies in the framework’s free structure. Unlike Symfony, which enforces a strict project structure, PhalconPHP offers considerable flexibility, allowing developers to define their preferred structures. However, this freedom might be perceived as lacking guidance, especially when manually specifying paths to directories in a bootstrap file.
PhalconPHP: Not Just For High-load Apps
I hope this overview of PhalconPHP’s powerful features and the accompanying example project has been insightful. While this article only scratches the surface of the framework’s capabilities, PhalconPHP boasts comprehensive documentation with seven well-written tutorials covering nearly every aspect of the framework.
You now have a new tool at your disposal for building high-load applications efficiently. And you might find that PhalconPHP is an excellent choice for other types of applications as well.