
Is your WordPress Robots.txt file optimized for search engines? If not, you’re missing a crucial SEO element. This file plays a vital part in how your website ranks. Luckily, WordPress automatically generates a Robots.txt file for you, which is half the battle won. But to reap its full benefits, you need to ensure it’s optimized.
The Robots.txt file tells search engine crawlers which pages to index and which to ignore. In this article, we’ll guide you on how to edit and optimize this file in WordPress.
Optimize Your WordPress Robots.txt File for SEO

What is a Robots.txt File?
Let’s begin with the basics. The Robots.txt file is a simple text document that provides instructions to search engine bots about crawling and indexing your website. Each time a search bot visits your website, it first reviews the robots.txt file and adheres to its guidelines. You can utilize this file to specify which areas of your site should be crawled and which ones should be avoided. However, even without a robots.txt file, search engine bots can still crawl and index your website.
Editing & Understanding Robots.txt in WordPress
As previously mentioned, every WordPress site automatically includes a default robots.txt file located in the root directory. To view your robots.txt file, simply navigate to http://yourdomain.com/robots.txt. As an example, you can access our robots.txt file here: https://nexus-security.github.io/robots.txt.
If your site lacks a robots.txt file, you’ll need to create one. It’s a straightforward process: simply create a new text document on your computer, save it as “robots.txt”, and upload it to your website’s root directory. You can accomplish this via FTP Manager or cPanel File Manager.
Editing the Files
Now, let’s explore how to modify your robots.txt file.
You can use an FTP Manager or your cPanel’s File Manager to edit the robots.txt file. However, these methods can be somewhat time-consuming and a little intricate.
The most efficient method for editing Robots.txt files is by utilizing a plugin. Numerous WordPress robots.txt plugins are available, but I personally recommend Yoast SEO. It’s an excellent SEO plugin for WordPress. (I’ve previously shared a guide on setting up Yoast SEO.)
With Yoast SEO, you can modify the robots.txt file directly within your WordPress admin area. However, if Yoast isn’t your preference, alternative plugins like WP Robots Txt are also available.
Video Tutorial
After installing and activating the Yoast SEO plugin, go to your WordPress Admin Panel > SEO > Tools.
Next, click on “File editor”.
Again, click on “File editor”.
Then, click on “Create robots.txt file”.
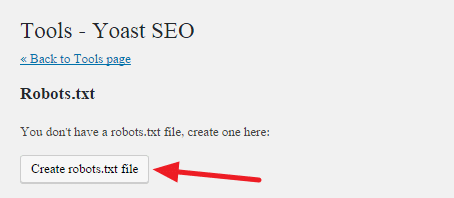
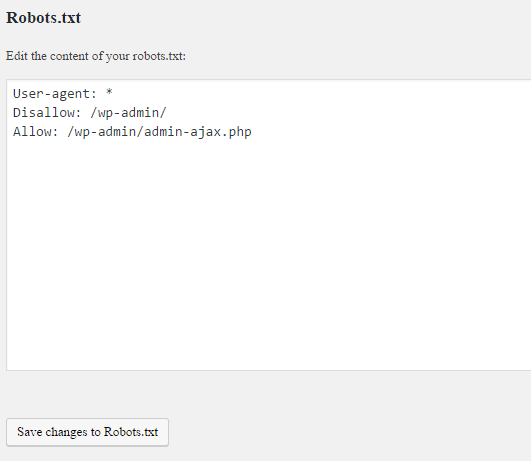
Now, the Robots.txt file editor will be accessible, allowing you to configure your robots.txt file.
Before modifying the file, it’s essential to grasp the commands it uses. There are three primary commands:
- User-agent – Specifies the name of the search engine bot, such as Googlebot or Bingbot. You can use an asterisk (*) to represent all search engine bots.
- Disallow – Directs search engines to refrain from crawling and indexing specific parts of your site.
- Allow – Instructs search engines to crawl and index particular sections of your site.
Example of a Robots.txt File:
User-agent: * Disallow: /wp-admin/ Allow: /
This robots.txt file instructs all search engine bots to crawl the entire website. The second line prevents bots from crawling the /wp-admin/ section. The third line confirms that search engines should crawl and index the entire site.
Configuring & Optimizing Your Robots.txt File for SEO
A minor misconfiguration within the Robots.txt file has the potential to entirely remove your site from search engine indexes. For instance, using the command “Disallow: /” in your Robots.txt file will result in your entire website being excluded from search engine indexes. Therefore, exercise caution during configuration.
Equally important is optimizing your Robots.txt file for SEO. Before delving into going to the best practices of Robots.txt SEO, let’s address some common mistakes:
- Avoid using the Robots.txt file to conceal low-quality content. The optimal approach is to employ the ’noindex’ and ’nofollow’ meta tags, which can be easily implemented using the Yoast SEO plugin.
- Refrain from using the Robots.txt file to prevent search engines from indexing your Categories, Tags, Archives, Author pages, etc. Utilize ’nofollow’ and ’noindex’ meta tags on those pages instead, which can also be achieved with the Yoast SEO plugin.
- Don’t rely on the Robots.txt file for managing duplicate content. Other more effective methods exist for this purpose.
Now, let’s explore how to make your Robots.txt file SEO-friendly:
- Begin by identifying the sections of your site you want to prevent search engine bots from accessing. Generally, it’s advisable to disallow /wp-admin/, /wp-content/plugins/, /readme.html, /trackback/.
- While adding “Allow: /” directives in your Robots.txt file isn’t mandatory (bots will crawl your site regardless), it can be beneficial for particular bot.
- Incorporating sitemaps into your Robots.txt file is also a recommended practice. Read more here: How to create Sitemap.
An Example of a Well-Structured Robots.txt File for WordPress:
User-agent: * Disallow: /wp-admin/ Disallow: /wp-content/plugins/ Disallow: /readme.html Disallow: /trackback/ Disallow: /go/ Allow: /wp-admin/admin-ajax.php Allow: /wp-content/uploads/ Sitemap: https://roadtoblogging.com/post-sitemap.xml Sitemap: https://roadtoblogging.com/page-sitemap.xml
You can review RTB’s Robots.txt file here: https://nexus-security.github.io/robots.txt.
Testing Your Robots.txt File with Google Search Console
After making changes to your Robots.txt file, testing it is crucial to check if the update impacts any content issues.
Utilize Google Search Console to check for any “Errors” or “Warnings” related to your Robots.txt file. Log in to Google Search Console, select your website, then go to Crawl > robots.txt Tester, and click on the “Submit” button.
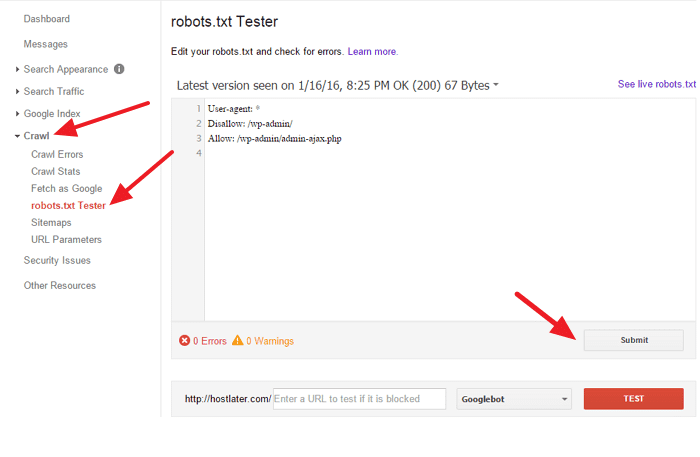
A pop-up box will appear. Simply click on the “Submit” button.
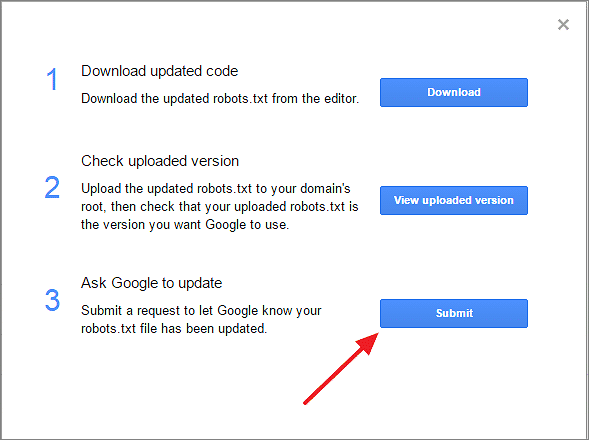
Refresh the page and verify if your file has been updated. It might require some time for the Robots.txt file to update.
If the update hasn’t taken effect, you can manually input your Robots.txt file’s code into the provided box to check for any errors or warnings. Additionally, it will display the errors and warnings there.

Should you encounter any errors or warnings within your robots.txt file, rectify them by editing the file accordingly.
Final Thoughts
To conclude, I hope this guide has provided clarity on optimizing your WordPress Robots.txt file. If any uncertainties remain, feel free to reach out to us through the comments section.
For further enhancing your WordPress blog’s SEO, explore our post on How to Configure the WordPress Yoast SEO Plugin.
Lastly, if you found this article beneficial, kindly consider sharing it on Facebook and Twitter.