JavaScript is undeniably the most popular language for building websites and web applications. Its vast collection of resources is impressive, and the sheer number of libraries available is even more remarkable.
Initially, managing these libraries is straightforward; however, as projects grow, dependency management can become chaotic, requiring a more sophisticated solution.
Introducing the Node Package Manager (npm), a JavaScript package manager primarily associated with Node.js, but also usable independently. It offers remarkable control over project dependencies and facilitates contributions to the open-source community.
Getting started is as simple as running npm install <package name> and incorporating it into your JavaScript file.
Need a specific version? No problem! Execute npm install <package name>@1.2.3.
For global installations (like Mocha or Angular-CLI), use -g: npm install -g angular-cli mocha.
While most scenarios only require basic installations, npm boasts numerous advanced features. This article will guide you through essential, useful, and even impressive capabilities.
CLI Commands
The CLI is the primary interface for interacting with npm, and its help system is surprisingly effective.
npm help displays a comprehensive list of options, while npm help-search <searchText> presents results directly from npm’s markdown documentation.
Let’s explore some noteworthy core commands:
install: Crucial for npm workflows, it installs packages locally or globally (with-g) or installs dependencies frompackage.json(more on this later).uninstall: Another essential command, it removes packages locally or globally (with-g) from thenode_modulesdirectory.access: This command empowers npm user permission administrators to manage npm-organizations and scoped (private) packages with granular control over access levels using subcommands likeadduser,owner,team, etc.bin: To locate the installation path of packages, simply run this command to reveal the absolute file path.cache: When working extensively with npm packages, this command proves invaluable. Uselsto list locally cached packages, orcleanto purge the entire cache. This was particularly useful when the npm registry faced stability issues.config: While configuration options will be discussed later, this command focuses on managing local or global configuration properties in the configuration file usingset,get, ordelete.dedupeorddp: Over time, project dependencies can become convoluted. This command analyzes the local package tree and attempts to simplify dependencies, ensuring a cleaner structure.link: During npm package development, this command creates a symlink to the global context, allowing local testing as if installed globally. This is particularly useful for testing CLI utilities.ls: Visualize package dependencies in a tree structure, offering insights into project dependencies and comparisons with other projects.outdated: Evaluate installed dependencies for outdated versions. In projects with extensive dependency lists, manual checks are impractical, making this command indispensable. Add-g --depth=0to include globally installed packages.publish: Essential for publishing custom npm packages, it uploads your package to the npm registry, making it accessible to the community.search: Search the npm registry for packages containing specific text, allowing you to discover relevant packages for your projects.shrinkwrap: Lock down dependency versions to prevent unintended updates caused by relaxed semver (semantic versioning) ranges, ensuring production stability.star: Show appreciation for exceptional packages directly from the terminal. This action is reflected on the package’s page on the npm registry.update: After identifying outdated packages usingoutdated, employ this command to update them to their latest versions.version: A convenient shorthand for bumping thepackage.jsonversion property and creating a corresponding git tag, streamlining version management.
Remember that most commands accept subcommands and configurations, and this list is not exhaustive.
npm-config
Configuration plays a vital role in npm, and there are several ways to define configuration variables.
Configuration via CLI and Environmental Variables
Firstly, configuration can be set directly from the terminal using the CLI.
The typical format is: npm <command> --<configuration option> [<optional value>].
If no value is provided, the option defaults to true.
For instance, to publish a scoped (private) npm package as public, simply append --access=public to the publish command. Without this option, the package would remain private.
While convenient, CLI configurations are not persistent, making them tedious for multiple settings.
Environmental variables offer a more persistent approach.
Any environmental variable prefixed with npm_config_ is used for npm configuration.
For example, export npm_config_registry=localhost:4321 sets the registry globally, directing npm to use the registry at the specified address.
Configuration via the npmrc file
The special .npmrc file provides another avenue for setting configuration options at various levels:
- Project level: Located in the project’s root directory alongside
package.json, typicallypath/to/project/.npmrc. - User level: Configures a specific user’s account, usually found at
~/.npmrc. - Global level: Defines global npm configurations, typically at
$PREFIX/etc/npmrc. - Built-in level: This level, part of the npm source code, should be modified with caution. It is typically located at
/path/to/npm/npmrc.
To modify and persist configurations in the .npmrc file using the CLI, use the following format: npm config set <key> <value>.
For instance, npm config set access public makes the publishing configuration of a scoped package persistently public.
By default, this command modifies the user-level configuration. Use -g for global persistence.
For project-level or built-in level configurations, directly edit the .npmrc file using a text editor.
Configuration via package.json
Although less common and only recommended when explicitly required, configuration settings can also be defined within the package.json file. The project-level .npmrc file is generally preferred for package configurations.
Notable Configuration Settings
access: As mentioned earlier, this setting controls package access permissions.always-auth: When set to true (default is false), npm will always require authentication for registry interactions.ca: Defaults to the npm certificate authority (CA). It can be set to null (for known registrars only) or a specific CA certificate. Along withcafile,cert, andstrict-ssl, these settings ensure secure and trustworthy package installations.color: By default (true), npm output is colorized in compatible terminals. Set to false for plain text output oralwaysfor forced color output.depth: Control the depth of recursive commands likelsandoutdated. A value of 0 limits evaluation to the first level of dependencies, while infinity (default) evaluates all levels. An exception isoutdated, where infinity behaves as 0.dev: When true (default is false),npm installwill install both normal and development dependencies listed inpackage.json.dry-run: Instead of making changes, npm will simulate command execution, outputting the expected actions. This is particularly useful for commands likededupeorupdate.git-tag-version: Enabled by default, this setting automatically creates a git tag when using thenpm versioncommand, simplifying version management in git-based projects.loglevel: Control the verbosity of npm output. Options includesilent,error,http,info,verbose,silly, and the defaultwarnfor errors and warnings.production: When true, npm operates in production mode, ignoring development or optional dependencies and skipping development-related tasks.rollback: If enabled (default is false), failed installations are automatically removed, simplifying debugging and recovery from installation errors.save: Appending--save(or-S) tonpm installadds the installed package to thedependenciessection inpackage.json.save-dev: Similar tosave, but adds the package to thedevDependenciessection inpackage.json. Use--save-dev(or-D) withnpm install.save-optional: Analogous tosave, but for theoptionalDependenciessection. Use--save-optionalwithnpm install.save-exact: When used withsave,save-dev, orsave-optional, this setting (default is false) forces the use of specific version numbers instead of semver ranges inpackage.json.save-prefix: Define the semver range operator used bysave,save-dev, andsave-optional. The default is^, allowing for minor version upgrades.tag-version-prefix: Specifies the prefix (default isv) prepended to the git tag version when runningnpm version.
Updating npm Using npm
npm can update itself using the command npm install -g npm@latest, installing the latest stable release. It’s generally recommended to stick with the npm version bundled with your Node.js installation.
For standalone npm usage, carefully consider the implications of different versions. Tools like nvm simplify managing multiple Node.js (and npm) versions on a single system.
The package.json File
At the heart of npm is the package.json file, a crucial component for package publication and dependency management.
Two fields, “name” and “version,” are mandatory, forming a unique package identifier. The “name” field adheres to rules defined by the npm documentation on naming, while the “version” field follows the semver specificiations.
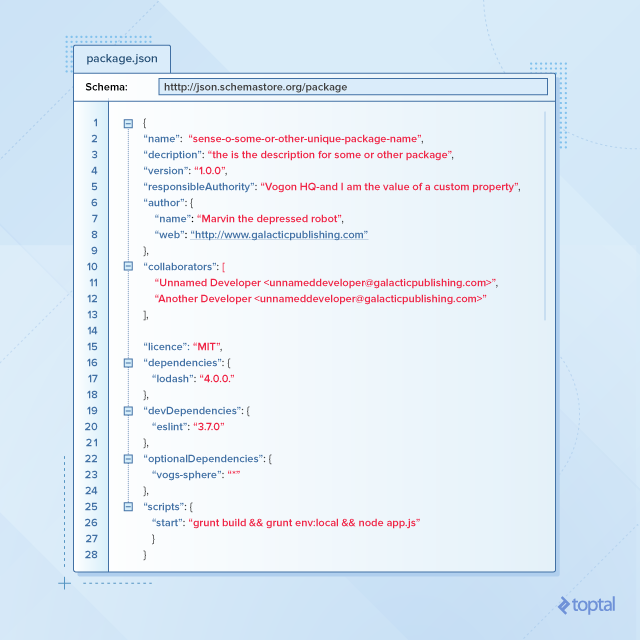
Beyond these essentials, you can define a comprehensive list of dependencies with specific versions using semver notation. Let’s explore other important properties:
“main”
This property specifies the application’s entry point, defaulting to index.js. Depending on conventions or frameworks, it could be app.js or main.js. You have the flexibility to customize this entry point.
“scripts”
This often-overlooked property offers several benefits.
Firstly, it enables actions during the prepublish stage.
Secondly, it allows aliasing frequently used commands, ranging from build tasks (gulp, grunt), dependency installations (bower), development server startup (webpack), or bash scripts.
“dependencies”
This property lists packages required by your application, including compatible semver versions. The --save (or -S) flag with npm install modifies this property.
Similarly, npm uninstall --save removes a dependency.
Understanding semver versioning is crucial. Strict rules may prevent access to new features, while relaxed rules risk breaking changes. Broken dependencies, especially minified ones, can be challenging to debug.
“devDependencies”
Distinct from “dependencies,” this property lists packages used only during development (e.g., ESLint, grunt-contrib packages, Protractor). Modify this property using --save-dev (or -D) with npm install or npm uninstall. The same versioning considerations apply as with “dependencies.”
“bin”
Specify paths to your package’s executable files (e.g., CLI utilities). Upon installation, npm creates local or global symlinks to these executables.
“config”
Define configuration settings for your package, as discussed earlier.
“private”
When set to true, npm will prevent package publication. This differs from the “access” configuration. It’s useful for projects using npm and package.json but not intended for publication, either scoped or public. Change this setting to false to enable publishing.
Custom Properties
You can include custom properties in package.json, as long as their names don’t conflict with existing or reserved properties.
Developing Your Own npm Package
The npm ecosystem thrives on packages created by developers worldwide, each addressing a specific need or providing an abstraction.
You too can contribute by developing and sharing your own package.
Start by creating a package.json file with “name,” “version,” and “main” properties. Write your code in the specified entry point (e.g., index.js), log in to your npm account (or create one), and you’re ready to publish!
Packages can be public (free, accessible to everyone) or private (scoped).
Scoped packages, identified by the @username/ prefix, require a paid private modules account.
To publish a scoped package publicly, use the --access=public flag with the publish command.
To release new versions, update the version number in package.json according to semver conventions and run npm publish.
Alternatively, use npm version <update_type> (where update_type is patch, minor, or major) to automatically increment the version number.
npm Organizations
The npm documentation provides comprehensive information on this topic.
npm organizations offer granular control over package permissions and access for teams and individuals working on scoped or public packages. While mastery requires effort, the rewards in terms of organization and security are significant.
The Power of npm
This article provides a practical overview of npm’s capabilities, from basic to advanced. For detailed information, refer to the extensive official documentation.
Despite differing opinions and occasional shortcomings, npm remains a powerful tool. If you haven’t already, explore npm (and Node.js) and discover its potential. You might be pleasantly surprised!
For further reading on npm, check out Using Scala.js with npm and Browserify.