Getting Started with Ionic: Avoiding Common Mistakes
It’s been two years since Ionic](http://ionicframework.com/) was first introduced. Built on AngularJS, it’s a powerful toolkit for crafting hybrid applications. With over a million apps created and a thriving community of thousands of [developers, Ionic’s popularity is undeniable.
However, the web landscape has transformed since Ionic’s initial release. New technologies have emerged, and best practices have evolved. This constant change can make choosing the right approach for new projects challenging, potentially leading developers to make decisions that negatively impact their application’s quality or their team’s efficiency.
This article highlights common mistakes when developing with Ionic. By understanding and avoiding these pitfalls, you’ll be well-equipped to build high-performing, scalable Ionic applications.
Common Mistake #1: Overlooking Native Scrolling
Native Scrolling enables Ionic to leverage the scrolling capabilities of supported webviews. This allows features like Pull to Refresh, List Reordering, and Infinite Scroll to function without relying on JavaScript scrolling, a method devised when browsers lacked robust scroll event handling.
Android has had Native Scrolling enabled by default since Ionic 1.2 (released in December 2015). It significantly enhances performance and user experience by ensuring smooth scrolling through asynchronous events.
Due to limitations in iOS event handling, native scrolling isn’t yet supported on that platform.
If you’re using a version older than 1.2, you can activate Native Scrolling for Android via $ionicConfigProvider:
| |
Additionally, you can enable or disable Native Scrolling for specific pages using the overflow-scroll directive within any ion-content element:
| |
It’s important to note that native scrolling currently doesn’t support collection-repeat, which is typically used to display extensive lists of items.
Common Mistake #2: Neglecting the Ionic CLI for Platform and Plugin Management
Ionic CLI extends the capabilities of the Cordova CLI . One of the key benefits the Ionic CLI brings is persistent management of platforms and plugins.
Using the Cordova CLI alone poses a challenge: installed platforms and plugins are specific to your machine. This can lead to inconsistencies and bugs, especially when collaborating on a team. While you could commit the platforms and plugins folders, it’s not an ideal solution.
The Ionic CLI simplifies this process. When you add platforms (ionic platform add ios) or plugins (ionic plugin add camera), it updates the package.json file accordingly.
Platform and plugin information is stored within the cordovaPlatforms and cordovaPlugins properties:
| |
This structured approach allows other developers to easily sync their environments by simply pulling the latest code and running ionic state restore when needed (e.g., adding, removing, or updating platforms or plugins).
Common Mistake #3: Assuming Performance is Automatic
Since Ionic leverages AngularJS, performance on devices is a common concern. Rest assured, with a solid understanding of AngularJS fundamentals, you can create exceptional, high-performing Ionic applications.
A prime example is Sworkit app, an Ionic app boasting a user base of over 9 million, more than 7 million downloads, and an average rating of 4.5 stars on Google Play.
To unlock AngularJS’s full potential, familiarize yourself with the following concepts before diving into your project.
$watch
In AngularJS, watchers listen for scope changes. There are four main types: $watch (normal), $watch (deep), $watchCollection, and $watchGroup. Each serves a distinct purpose, and choosing the right one can significantly impact performance.
$watch (normal)
The standard $watch only monitors existing Object properties or Array items. It doesn’t detect shallow changes, such as adding a new property to an Object or pushing an item into an Array.
| |
$watch (deep)
The $watch (deep) option tracks both shallow and deep changes, including nested Object properties. While it ensures that no modifications are missed, it can impact performance and should be used judiciously.
| |
$watchCollection
$watchCollection strikes a balance between the normal and deep $watch options. Like the normal $watch, it compares object references. However, it also performs shallow watches on your object’s properties, capturing additions or removals of properties and Array items.
| |
$watchGroup
Introduced in AngularJS 1.3, $watchGroup allows you to observe multiple expressions simultaneously.
While it may not directly improve performance compared to the normal $watch, it offers greater conciseness when you need to watch several scope expressions.
| |
Track By
track by is essential to minimize unnecessary DOM manipulation when using ng-repeat. Without it, ng-repeat re-renders all elements if the digest cycle detects even a single change in your collection. Since DOM manipulation directly affects performance, minimizing it is crucial.
To update only the elements that require it, use track by with a unique identifier.
| |
Avoid using track by with collection-repeat.
One-Time Binding
One-time binding, denoted by ::, was introduced in AngularJS 1.3 and can significantly enhance performance.
When applied to an expression, one-time binding removes it from the $watchers list once populated. This means the expression won’t be updated even if the underlying data changes.
| |
It’s advisable to review your application’s views and identify expressions that don’t need to be dynamically updated. Using one-time binding for these expressions can greatly reduce the workload on the digest cycle.
Note that one-time binding isn’t suitable for collection-repeat because the items displayed on screen change as the user scrolls.
For a deeper dive into AngularJS and Ionic performance optimization techniques, refer to the Ultimate AngularJS and Ionic performance cheat sheet.
Common Mistake #4: Misunderstanding the View Cache Mechanism
Unlike traditional web applications, single-page applications (SPAs) don’t cache pages by default. If you’ve worked with AngularJS applications, you’ve likely encountered this behavior where scroll position and user inputs aren’t preserved when navigating between pages.
Ionic, by default, caches ten pages. This can be configured globally or per platform.
| |
While caching is beneficial, it can be confusing for newcomers. Unlike typical AngularJS applications, when a user revisits a cached page in Ionic, the controller isn’t re-instantiated. This means the page’s state is preserved as if the user never left.
This begs the question: How do you update data on a cached page?
Understanding Controller Life Cycle Events
Ionic extends AngularJS by providing additional life cycle events:
| |
These events are crucial for managing the view cache effectively.
For instance, the $ionicView.loaded event fires when a view is loaded for the first time. However, it won’t be triggered again while the view is cached, even if the user navigates back to it. This event is typically used to initialize variables, similar to how you’d use the $viewContentLoaded event in AngularJS.
To fetch data whenever a view is entered, regardless of whether it’s cached or not, use the $ionicView.enter event.
By utilizing the appropriate life cycle events, you can enhance the usability of your application.
From a performance standpoint, view caching primarily affects the DOM size. Cached pages have their watchers disconnected, essentially becoming dormant DOM elements until they’re needed again.
While a large DOM can impact user experience, caching up to ten pages generally works well (depending on the complexity of your pages).
Common Mistake #5: Overlooking Crosswalk for Android
Different Android versions run different versions of WebView (the browser component that powers your hybrid app). This inconsistency leads to performance variations across devices, often resulting in poor performance on older Android devices.
To address this and provide a consistent user experience across Android devices, you can incorporate Crosswalk. This approach embeds a recent version of the Chromium browser within your application, increasing the APK size by approximately 20MB (for both ARM and x86 architectures).
Installing Crosswalk is straightforward using the Ionic CLI or Cordova CLI:
| |
Common Mistake #6: Attempting to Test Cordova Plugins in the Browser
Developers building Ionic apps often target both iOS and Android. After adding the platforms (ionic platform add ios android) and some plugins (ionic plugin add cordova-plugin-device-orientation cordova-plugin-contacts), it’s easy to assume that testing in the browser is possible. While it’s technically feasible in some cases, it requires installing the appropriate browser platform and isn’t supported by all plugins.
Cordova plugins are designed to interact with native device APIs via JavaScript. This means plugins like the contact plugin or the device orientation plugin will only function correctly on a physical device.
However, you can easily test your code on a device and debug it remotely from your computer.
Remote Debugging on Android
Connect your Android device and ensure your computer recognizes it by running
adb devices(requires the Android SDK).Build and install your app on the device using
ionic run android.Once the app launches on the device, open Chrome DevTools on your computer (
chrome://inspect/#devices) and select your device.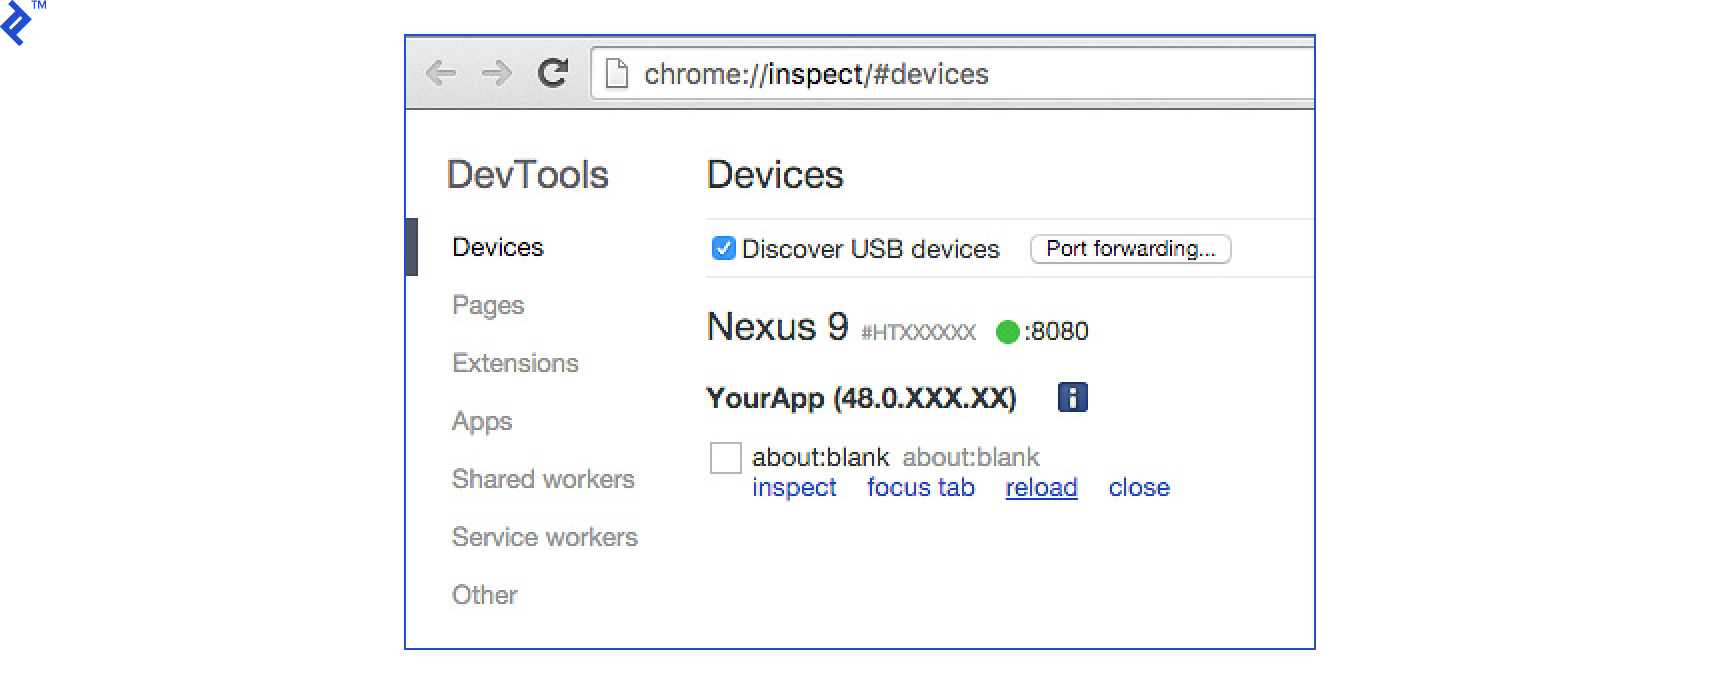
Remote Debugging on iOS
Connect your iOS device and verify that your computer detects it.
Build and install your app using
ionic run ios --device.After the app launches, open Safari’s Develop menu on your computer, select your iPhone, and then choose your app.

Using Cordova Plugins in the Browser
Running Cordova plugins within the browser is an advanced technique worth knowing. Since Ionic 1.2, the browser is officially supported, expanding the reach of cross-platform development beyond mobile operating systems.
With the Cordova Browser platform, Electron, and standard web technologies (JavaScript, HTML, and CSS), you can now build Ionic apps for browsers and desktop environments (Windows, Linux, and macOS).
A starter kit is available on Github.
Cordova Browser Platform
The Browser platform allows you to create Cordova apps that run directly in web browsers, enabling you to utilize Cordova plugins in the browser environment.
Installing it is similar to installing iOS or Android platforms:
| |
Like iOS and Android, your application needs to be compiled before use:
| |
This command compiles your app and opens it in your default browser.
Cross-Platform Plugins
A lot of plugins such as Network, Camera, and Facebook provide a unified API that works seamlessly across iOS, Android, and the Browser platform.
To illustrate, you can check for network connectivity on all platforms (iOS, Android, Browser, and Desktop) using the ngCordova API:
| |
This capability opens doors to creating products that function consistently across various platforms from a single codebase.
Common Mistake #7: Sticking to the Starter Kit Architecture for Large Projects
When you use the ionic start myapp command, it generates a starter project with the following folder structure:
| |
This “Folder-by-Type” structure groups files based on their type (JavaScript, CSS, HTML). While it might seem intuitive initially, it can quickly become unwieldy as your project grows.
Here’s why you should reconsider using the Folder-by-Type structure:
- Folders can accumulate a large number of files.
- Locating all the files related to a specific feature becomes challenging.
- Working on a feature often requires juggling multiple folders.
- Scalability is limited; as the app grows, managing the codebase becomes increasingly difficult.
A more maintainable approach is the “Folders-by-Feature” structure, where you group JavaScript, CSS, and HTML files based on the feature or AngularJS module they belong to:
| |
Benefits of the Folders-by-Feature structure:
- Folders contain a manageable number of files.
- Finding files related to a feature is straightforward, as they are grouped together.
- Developers can work independently on different features.
- Folder names clearly indicate the purpose of each module.
- Creating new features is as simple as copying and pasting an existing folder.
- Scalability is improved; adding more features doesn’t hinder development speed.
Note that this architecture aligns closely with the Folders-by-Component structure, which is now the default in Angular 2/Ionic 2 applications.

Common Mistake #8: Directly Binding Events to onscroll and Neglecting requestAnimationFrame
This mistake is common among beginners and can severely impact performance. Consider the following example:
| |
| |
Although Ionic provides some throttling for these actions, performance can still suffer. Essentially, any operation that triggers a digest loop should be deferred, especially when combined with heavy painting (a side effect of scrolling).
Many tasks developers try to accomplish by binding to scroll events, particularly animations, can be achieved more efficiently using requestAnimationFrame.
| |
The code snippet above illustrates a simple scenario: checking if the user has scrolled past the top of an element. For cross-browser compatibility, remember to include vendor prefixes. This code runs at an optimal frame rate (typically 60 FPS or the screen’s refresh rate), mimicking the techniques used in high-performance animation libraries.
You might also find element.getBoundingClientRect() useful, as it provides information about an HTML node’s size and position.
Common Mistake #9: Prototyping Ionic Apps Manually
Ionic has a distinct design language. When working on prototypes or early-stage products, you can save significant time and effort by leveraging Ionic’s built-in components and styles. These components are generally minimal and visually appealing.
Presenting wireframes and mockups with basic functionality has become standard practice. However, there’s a substantial difference between seeing a static representation and experiencing an interactive app on a mobile device. Designers and UX developers often rely on tools like Axure or Balsamiq to rapidly create wireframes with rudimentary interactions.
The creators of Ionic have released a similar tool specifically for Ionic development called Ionic Creator. It offers a drag-and-drop interface and supports most of Ionic’s core features. What sets it apart is its ability to export prototypes into various formats, including functional Ionic code, and even build and share the application. While the tool is a commercial product, many of its features are available for free.

Conclusion
Ionic has undoubtedly transformed the hybrid app development landscape. However, as the framework has matured, there’s been a need to adapt best practices and tooling to keep pace. Consequently, the potential for developers to make mistakes has grown.
Expert Ionic developers follow a clear path to deliver exceptional, cross-platform applications: they leverage the available tools, prioritize performance, and adhere to best practices.
This article wouldn’t have been possible without the invaluable contributions of the Ionic community, Michał Mikołajczyk, Mike Hartington (Ionic Core team), and Katie Ginder-Vogel (Marketing & Communications Manager, Ionic). A heartfelt thank you to everyone involved.