Eliminating the need for custom scripts or tools, there’s a streamlined approach to maintaining an SSH log on Linux, circumventing potential errors and security vulnerabilities.
While tools like rootsh and screen offer ways to monitor user interactions, they are susceptible to manipulation by unauthorized users who can tamper with permissions and erase their digital footprints. Kernel-level logging presents another avenue, but the specialized knowledge it demands often poses a significant barrier.
A more practical solution leverages the following AWS services for seamless logging without the need for manual command-line configurations:
- EC2
- IAM (Identity and Access Management)
- KMS (Key Management Service)
- CloudWatch Logs (and/or S3)
- AWS Systems Manager (formerly known as SSM)
Let’s delve into the configuration process for each of these components.
EC2 and IAM
While deploying an EC2 instance is generally straightforward, a crucial step during launch is attaching an IAM role to empower the instance with the necessary permissions to achieve our logging objective.
This IAM role, linked to the EC2 instance, necessitates the incorporation of the predefined AmazonSSMManagedInstanceCore policy, along with the following policy, implemented either inline or as a customer-managed policy:
| |
Beyond the IAM role, consider these typical EC2 instance specifications:
- OS: Opt for Amazon Linux 2, pre-equipped with AWS Systems Manager Agent (SSM Agent) for streamlined setup. Ubuntu distributions, also bundled with SSM Agent, offer a viable alternative.
- Instance Type: While any type suffices, t3.micro offers a cost-effective starting point.
- Security Group: The default security group assigned by AWS to the VPC will suffice, as this method doesn’t rely on opening SSH port 22.
While the EC2 instance initializes, we can proceed with setting up KMS.
KMS
To fortify the security of our SSH session logs delivered to CloudWatch, employing a KMS key for encryption is essential. Let’s navigate to the KMS service and proceed with key creation.


While optional, designating a key administrator is recommended, extending key management capabilities beyond the AWS account root user. If shared access isn’t a requirement, Step 3 can be bypassed.
In this scenario, the IAM user “admin” assumes the role of key administrator, with the flexibility to choose any user or role. Additionally, we have the option to restrict key deletion rights for the administrator.
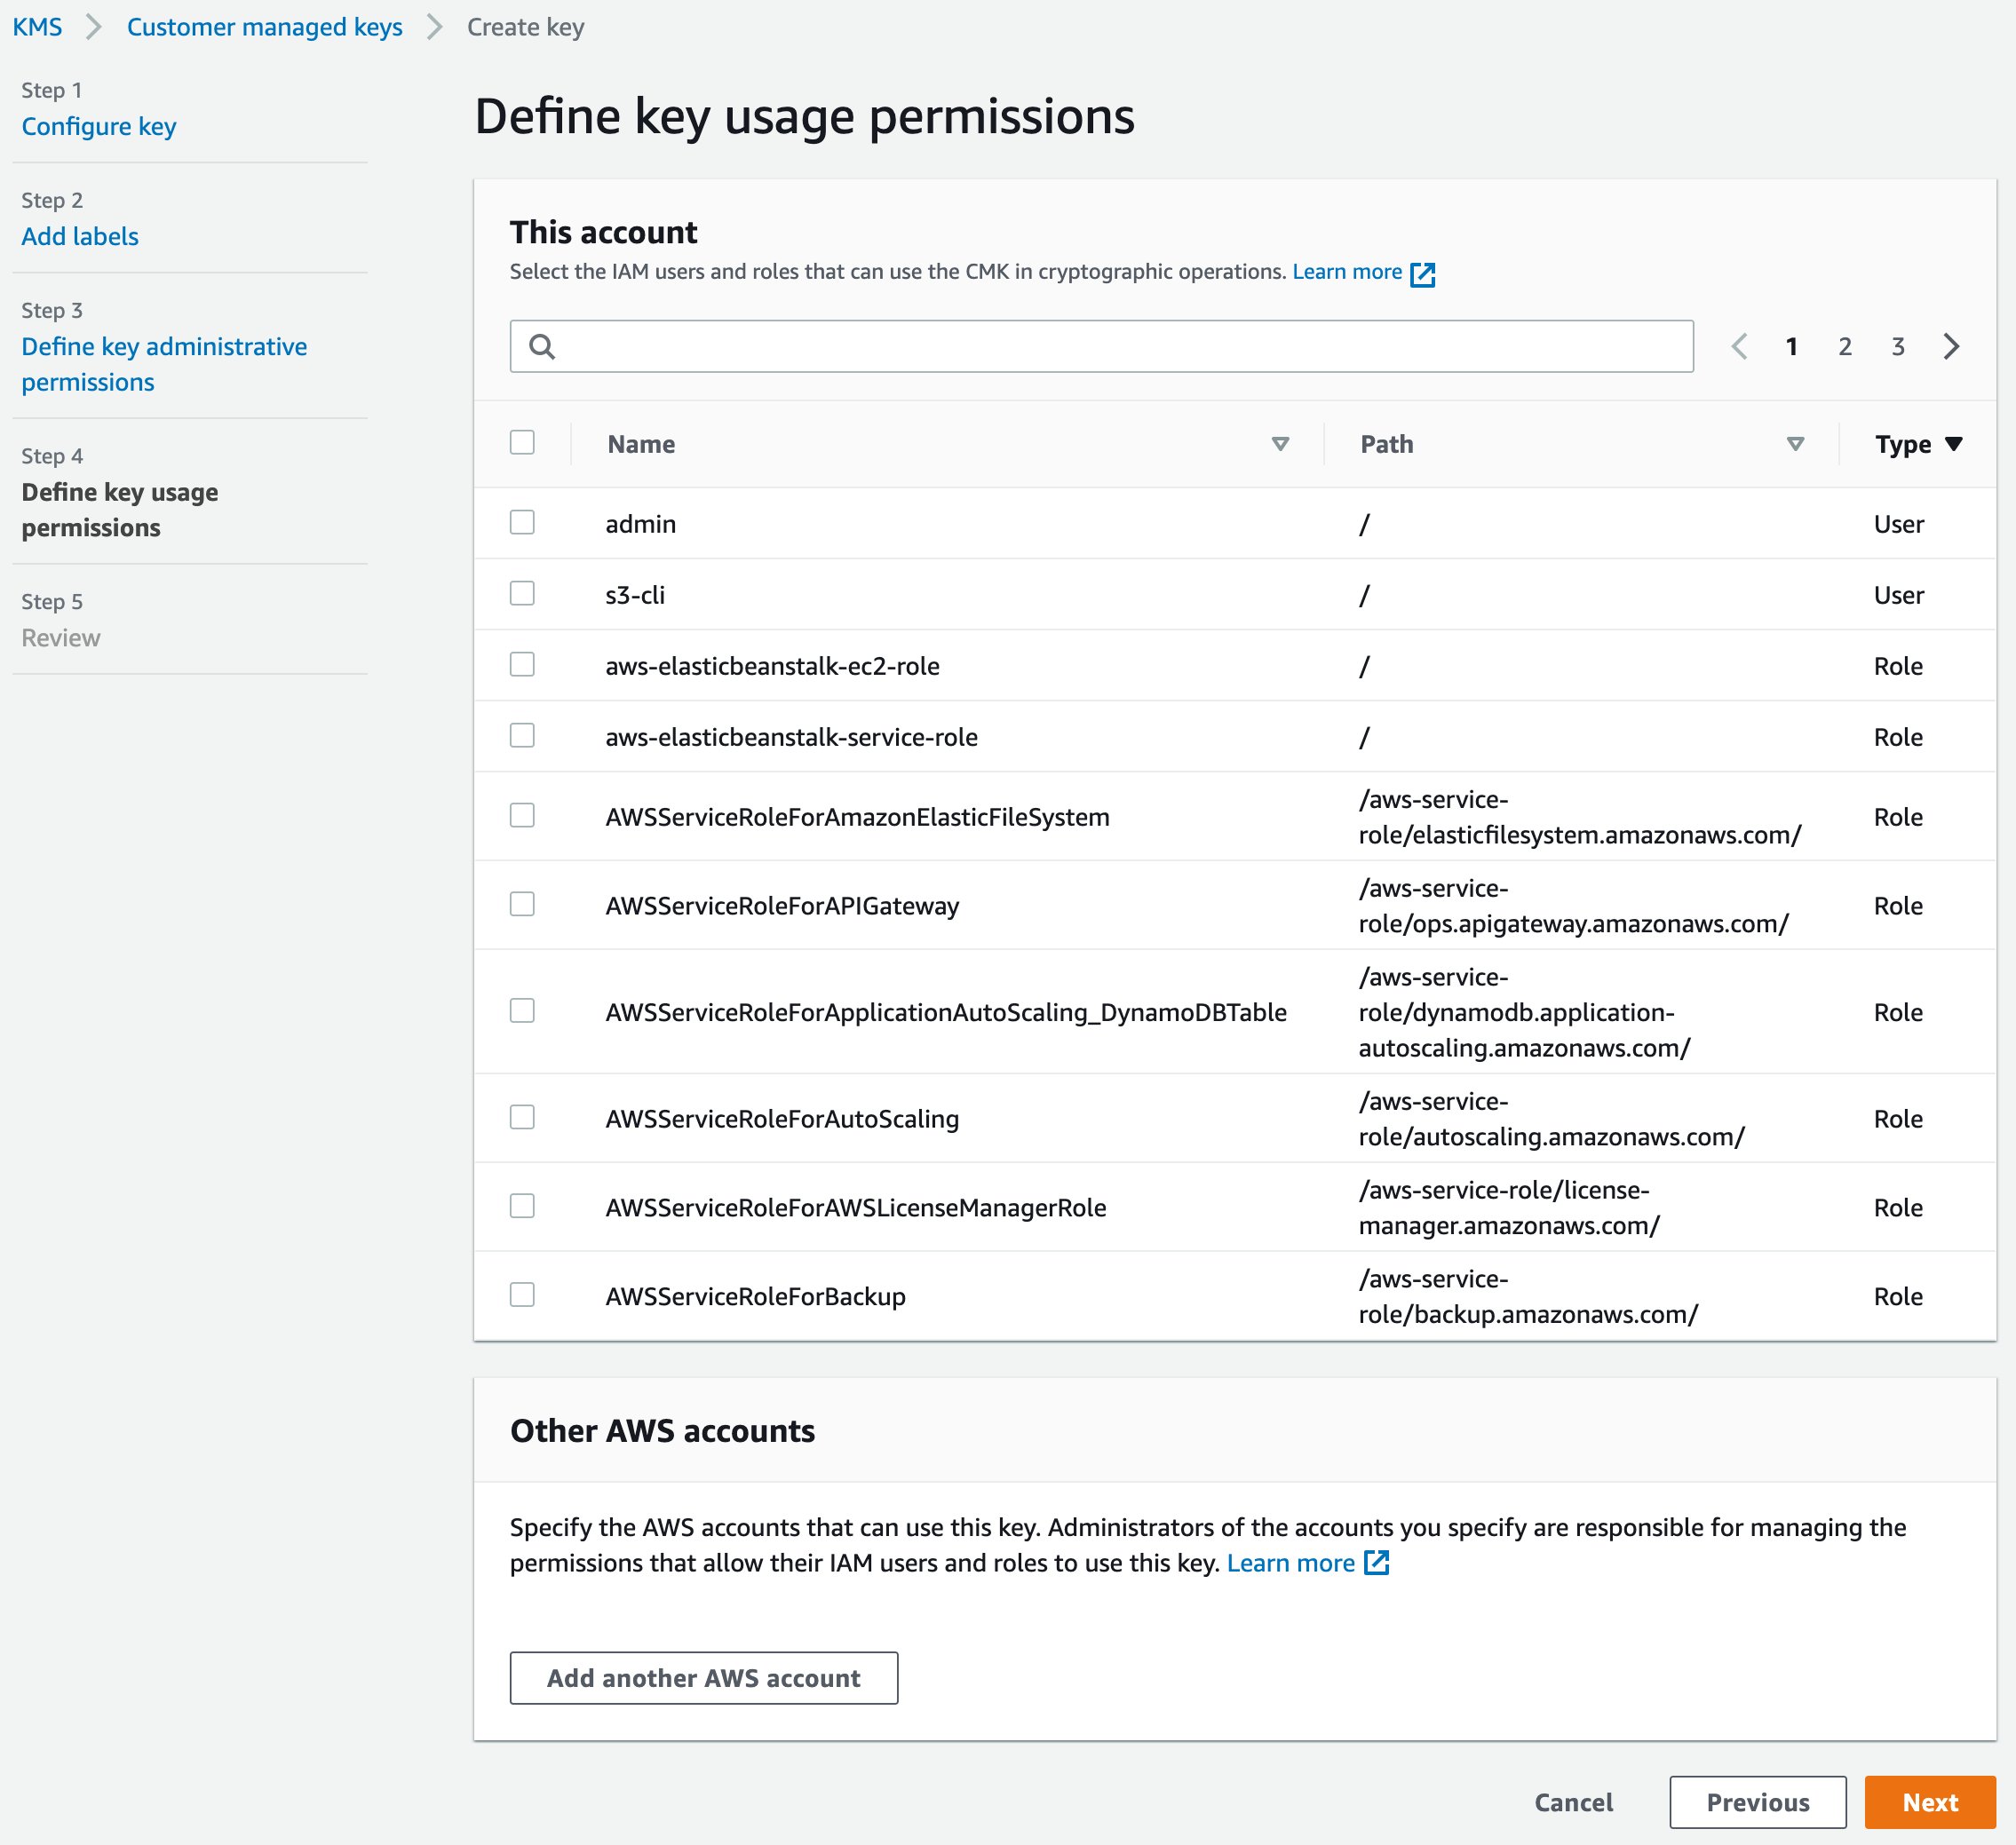
Given that this key is exclusively dedicated to CloudWatch Logs for SSH log encryption and decryption, no additional users will be granted access.
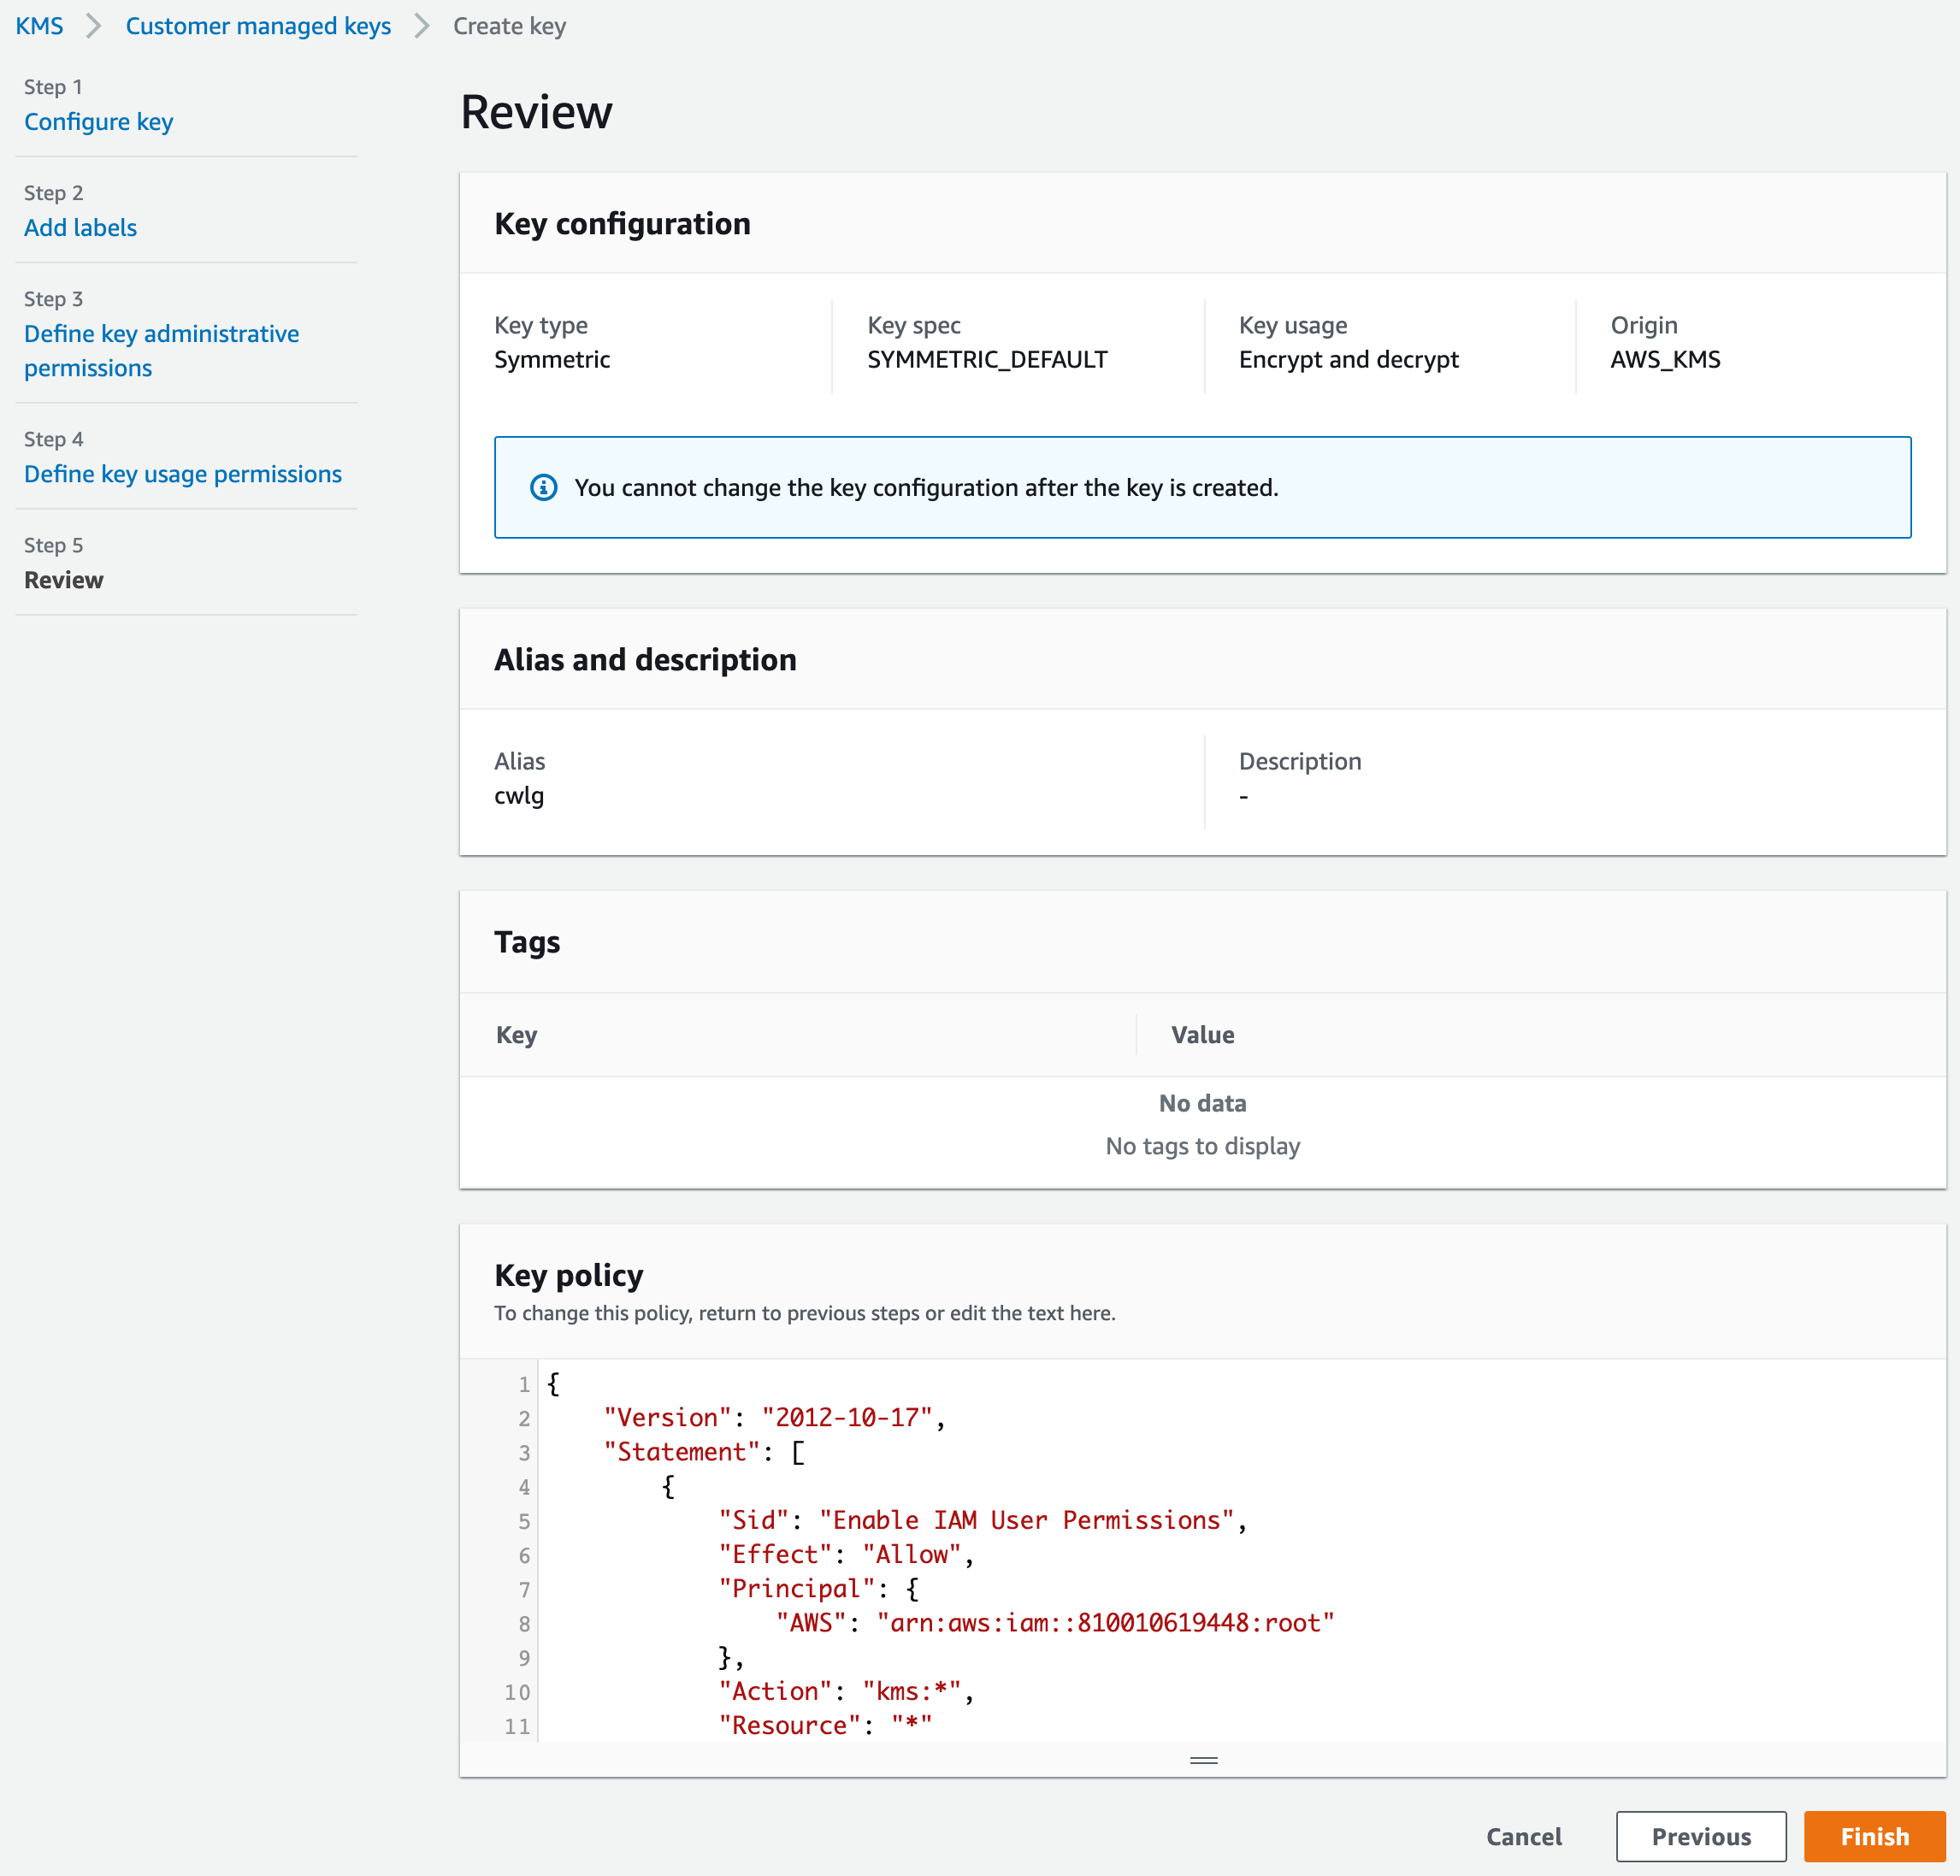
Upon reaching the Review page, a crucial adjustment to the KMS-generated key policy is necessary. The default policy lacks the requisite permissions for CloudWatch Logs to utilize the key. We’ll replace it with the following policy:
| |
Ensure accurate replacement of all placeholders:
- Substitute
ACCOUNT_IDwith your AWS account ID. - Replace
USERNAMEwith the designated administrator username from Step 3. If Step 3 was omitted, remove the second statement block, identifiable by"Sid": "Allow access for Key Administrators". - Replace
REGIONwith the specific regional identifier code for your service deployment, such asus-west-1.
With these configurations, KMS is primed for operation.
CloudWatch Log Group
A designated repository is essential for SSM Agent to channel SSH session logs. This can be a CloudWatch Log group, an S3 bucket, or both. Let’s proceed with creating a CloudWatch Log group.

Take note of the pre-populated KMS key ARN field, furnished by AWS upon key creation in Step 5 of the KMS section.
An error relating to the KMS key at this juncture signifies that the correct policy, granting the CloudWatch Logs service access to the key, wasn’t associated earlier.
Storing SSH Logs in an S3 Bucket
For storing activity logs with S3 instead of—or in addition to—CloudWatch Logs, we need to add these permissions to our EC2 instance profile as a separate policy (or manually combine them with other permissions we may need associated):
{
    "Version": "2012-10-17",
    "Statement": [
        {
            "Effect": "Allow",
            "Action": [
                "s3:PutObject"
            ],
            "Resource": "arn:aws:s3:::BUCKET_NAME/*"
        },
        {
            "Effect": "Allow",
            "Action": [
                "s3:GetEncryptionConfiguration"
            ],
            "Resource": "*"
        },
        {
            "Effect": "Allow",
            "Action": "kms:GenerateDataKey",
            "Resource": "*"
        }
    ]
}
In the above snippet, be sure to replace the BUCKET_NAME placeholder.
With our log storage - CloudWatch Logs, an S3 bucket, or a combination of both - configured, we can proceed to the pivotal step of tapping into SSH sessions.
AWS Systems Manager Session Manager
This final phase focuses on establishing secure access to our Linux environment for comprehensive SSH session monitoring and logging. Our journey begins at the Session Manager dashboard.

Within the dashboard, locate the white “Configure Preferences” button in the upper-right “Start a session” box to enable session logging.
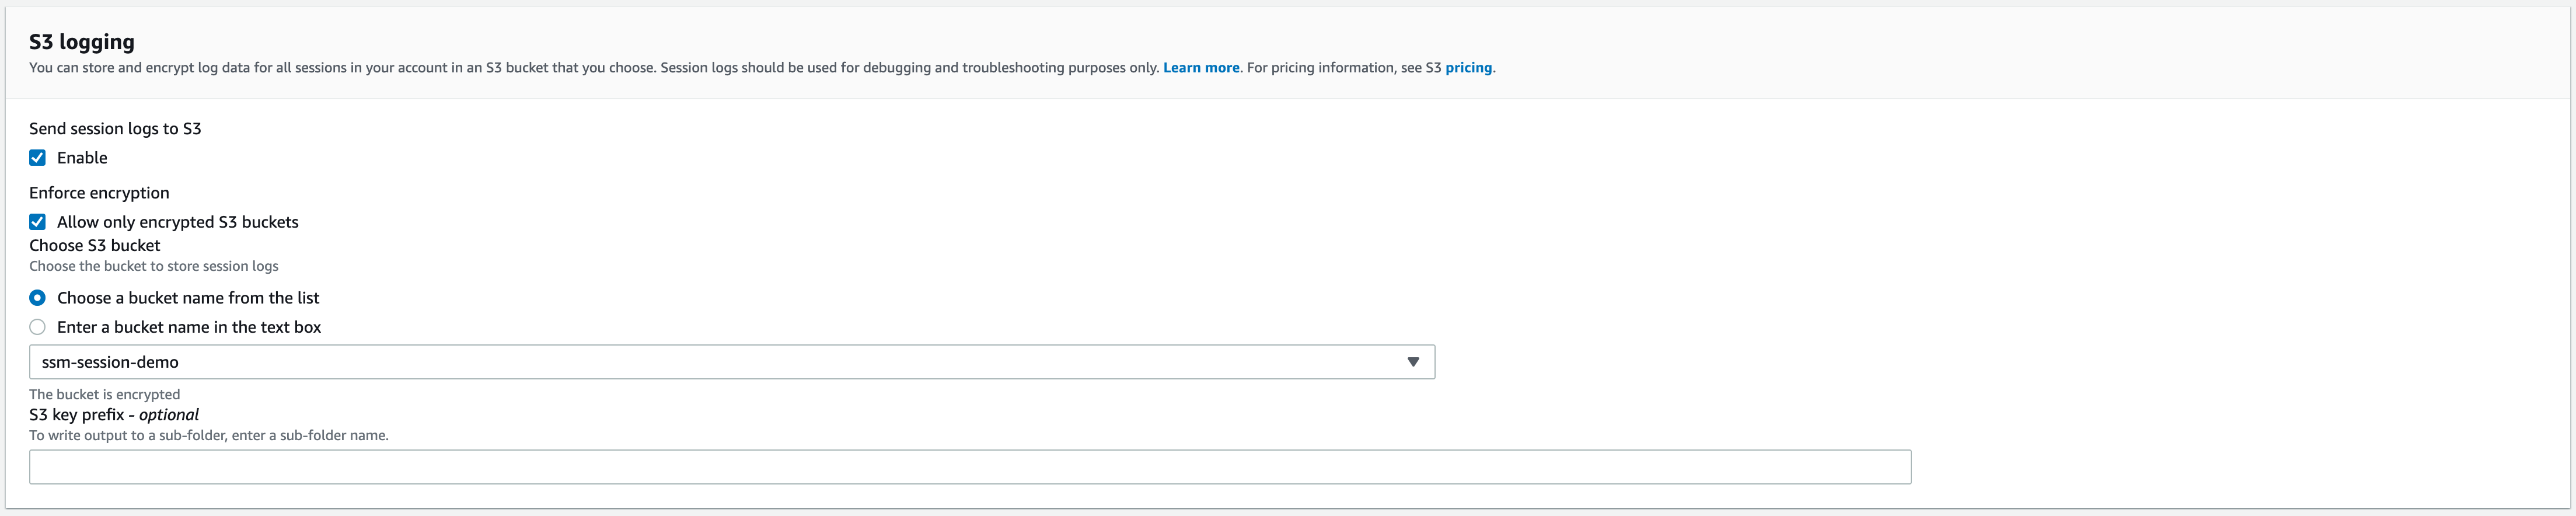
The Preferences page presents multiple configurable sections, but our primary focus will be directing streaming SSH session logs to CloudWatch or S3 for real-time visibility into our Linux machine’s activities.

Immediately following the “CloudWatch logging” section, you’ll find the “S3 logging” section, where you can specify the desired bucket for log storage.
With SSH logging configured, it’s time to test the setup. Establish an SSH connection to your Linux machine and execute a few commands to verify activity logging.
Let’s initiate a session. On the same page, locate the “Sessions” tab to begin. Clicking the “Start session” button presents a list of EC2 instances available for session initiation:

If your EC2 Linux instance isn’t listed, double-check that it’s running and has the correct IAM permissions associated, as outlined earlier.
Handling an SSM Agent “Doesn’t Support Streaming Logs” Error
In case we receive an error saying the SSM Agent version installed on our EC2 machine does not support streaming CloudWatch logs, not to worry. There’s a painless way to fix this.

To update the SSM Agent, we need to navigate to Run Command in the left panel of the AWS Systems Manager service.

Once we’re there, we can click on the orange “Run a Command” button, leading to a new page where we can fill in some parameters.

We’ll start by selecting AWS-UpdateSSMAgent from the list.

Once that’s selected, we’ll scroll down until we see the “Targets” section. There we need to select the EC2 instance on which we want to update the SSM Agent, then hit the “Run” button at the end. This will send us to a page where we can monitor the progress of the update.

The agent update shouldn’t take more than five minutes. Once that’s done, we should be able to create a session back in the Session Manager.
At this point, you should have a live SSH session.
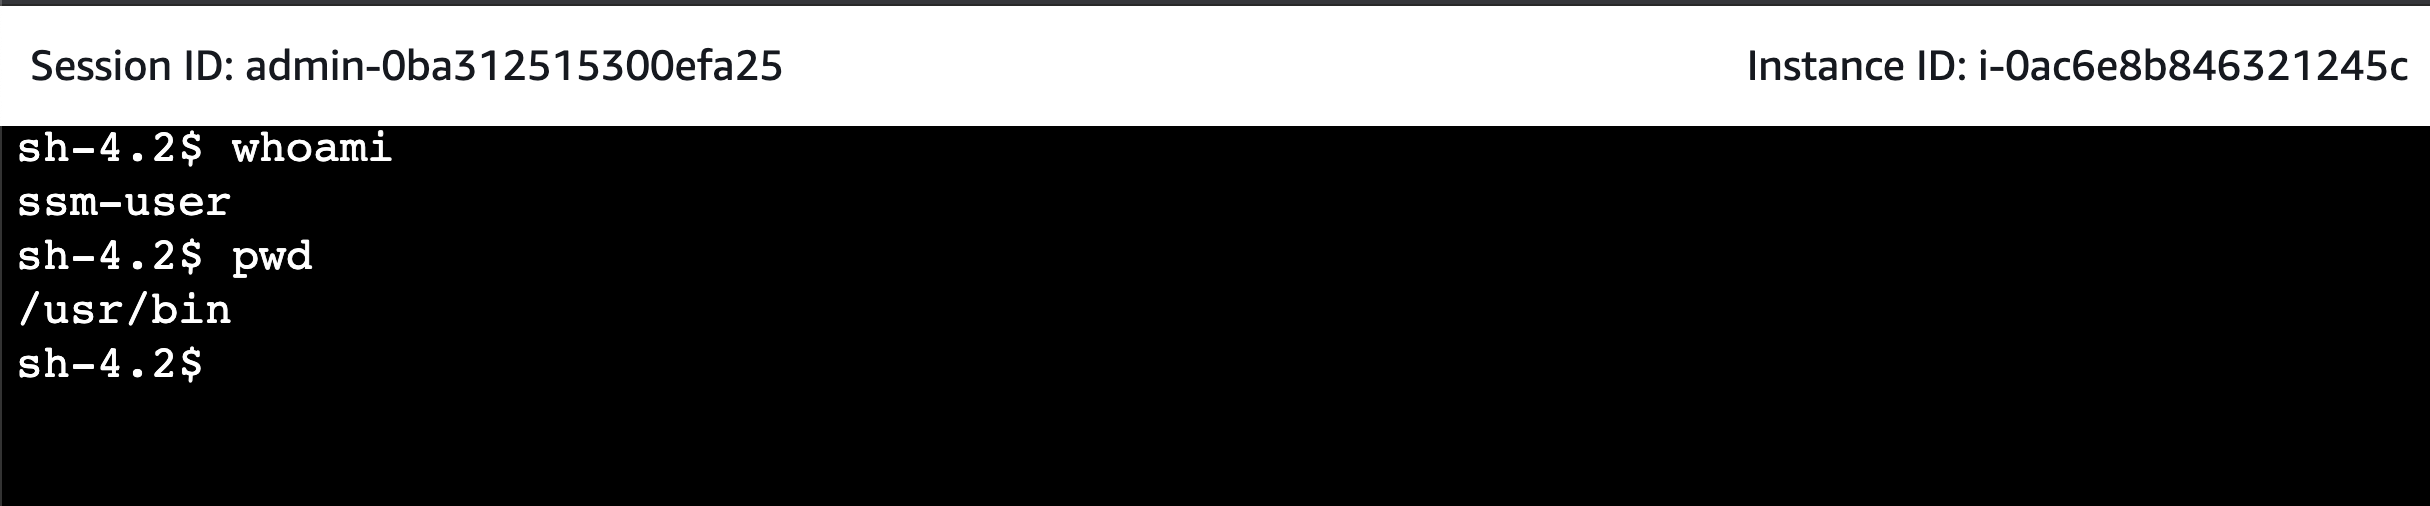
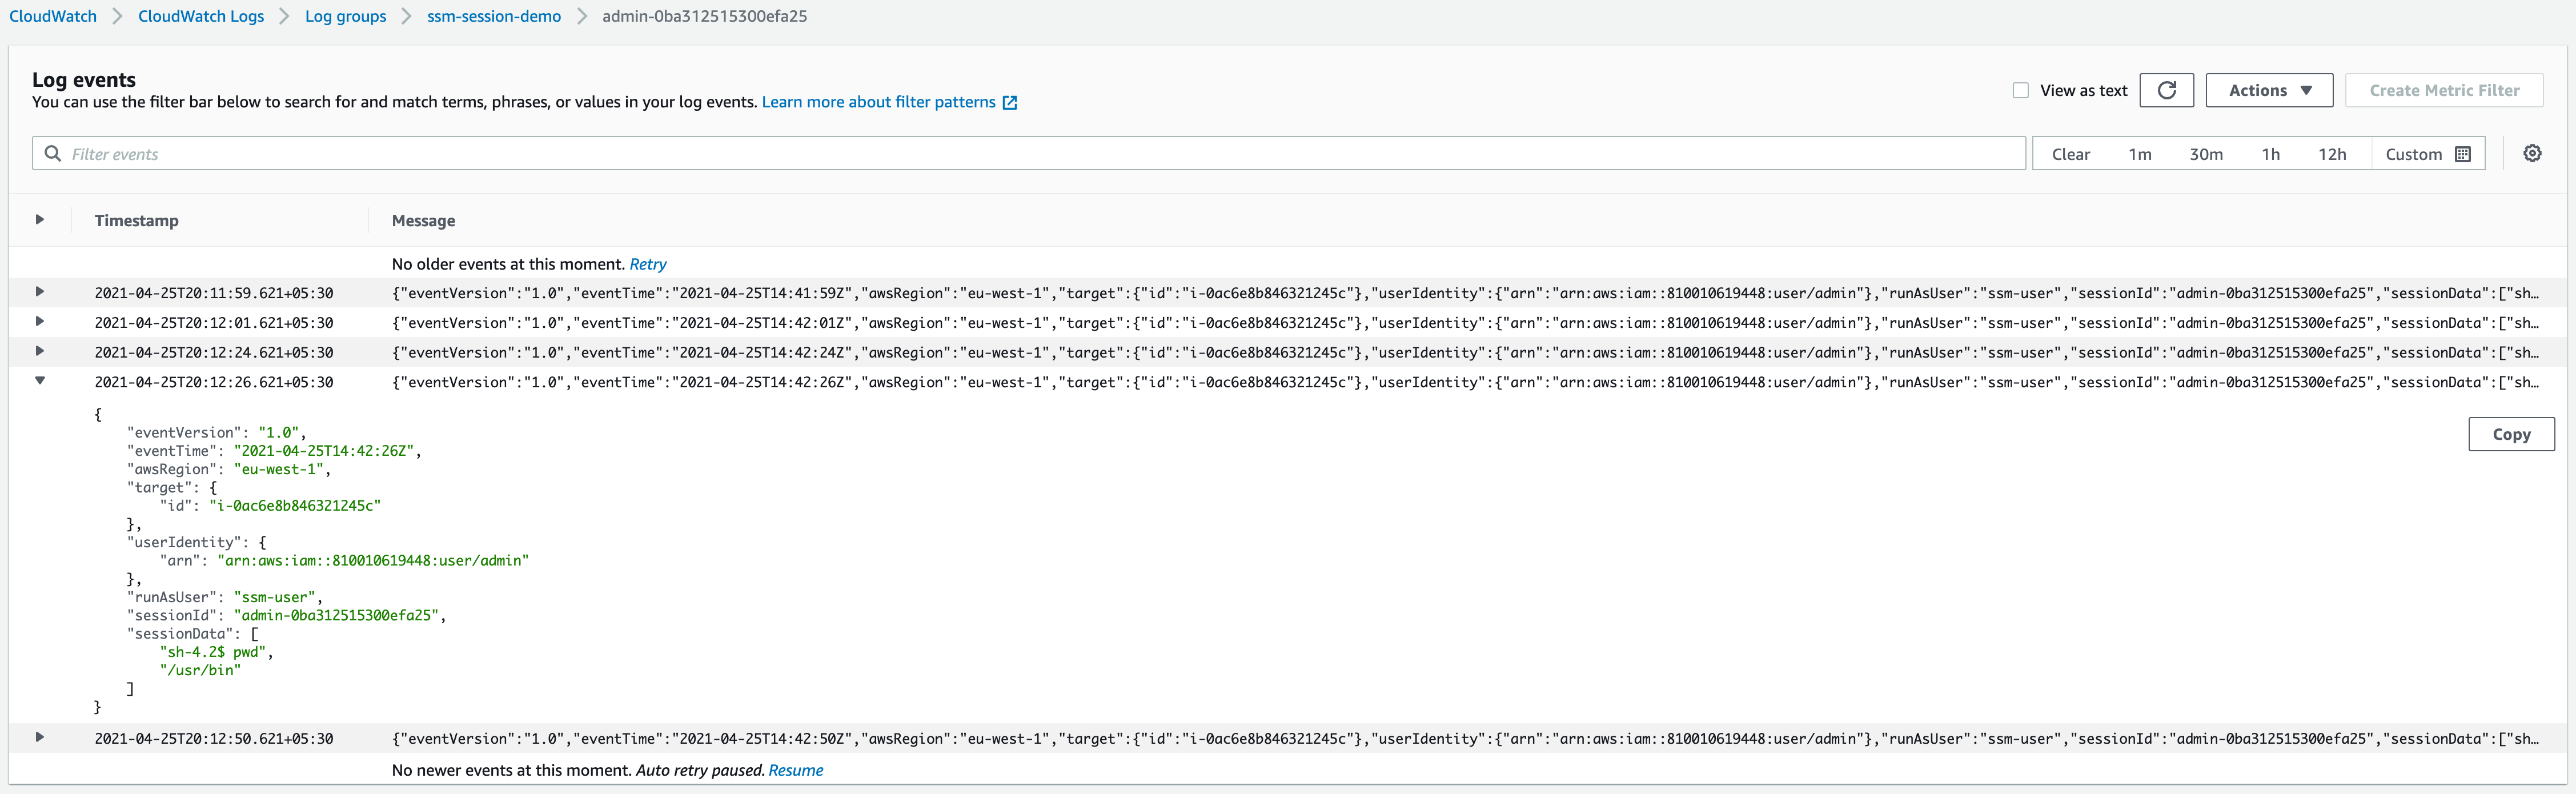
Execute a few commands, then navigate to your designated CloudWatch Logs log group (or your S3 bucket) to confirm that all activities are being meticulously recorded.
Congratulations! You now have a robust setup, fortified with at-rest encryption, capturing every command executed within your Linux environment.
However, bear in mind that this level of comprehensive logging might capture more than intended. Sensitive information, such as secrets provided or generated during a session, will also be recorded in CloudWatch or S3, potentially exposing it to unauthorized access. To mitigate this risk, leverage the command stty -echo; read passwd; stty echo; for each secret you need to input during a session, masking them from the logs.
A Great SSM/SSH AWS Logging Solution With Minor Caveats
Session Manager shines as a powerful tool for secure remote access to your AWS virtual machines without the need to expose port 22. However, keep in mind that this method of generating SSH logs is functional only through Session Manager. Direct SSH connections or those established through port forwarding won’t be logged, as outlined in the Session Manager documentation.
Despite this limitation, the synergy of Session Manager and session logging presents a compelling solution for comprehensive control and monitoring of VM activity. Moreover, the absence of charges for using Session Manager adds to its appeal. Costs are limited to your EC2 instance and the chosen storage for logs—either CloudWatch Logs or an S3 bucket.
For those who favor video-based guidance, a more detailed walkthrough of this process is available on YouTube.