When you encounter a UX designer, ask them to explain their profession. It’s not just because UX design is captivating (although I’m admittedly biased), but because, unlike many other fields, UX designers often have unique and ever-changing descriptions of their roles. This variation isn’t because we designers have fundamentally different views on what UX design entails; rather, it’s because UX design can be applied to a wide range of applications.
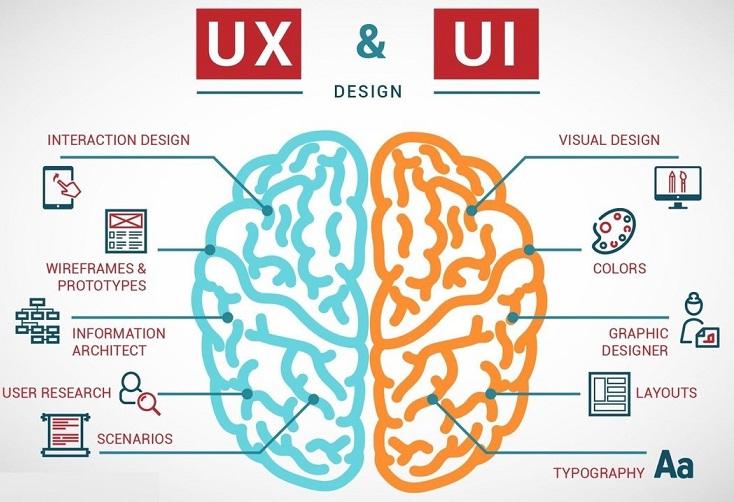
If you do inquire about a UX designer’s work, expect to hear frequently used terms like “user research,” “usability testing,” “A/B testing,” “prototyping,” “iteration,” and “accessibility.” However, there’s a consistent core principle at the heart of every skilled user experience designer’s work that might not always be explicitly mentioned: addressing intricate problems with the end-user in mind.
That problem-solving focus is what I’ll be discussing today. In this guide, I’ll explain:
- The concept of design thinking
- Its relevance to you
- How to implement design thinking Let’s begin.
Understanding Design Thinking
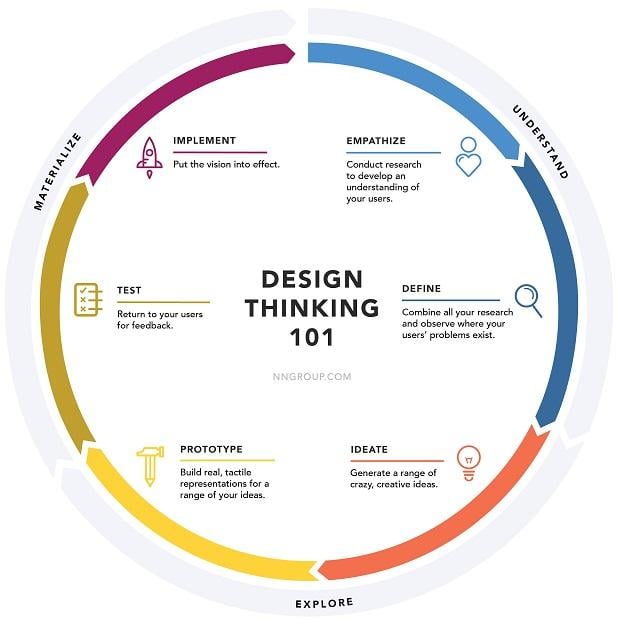
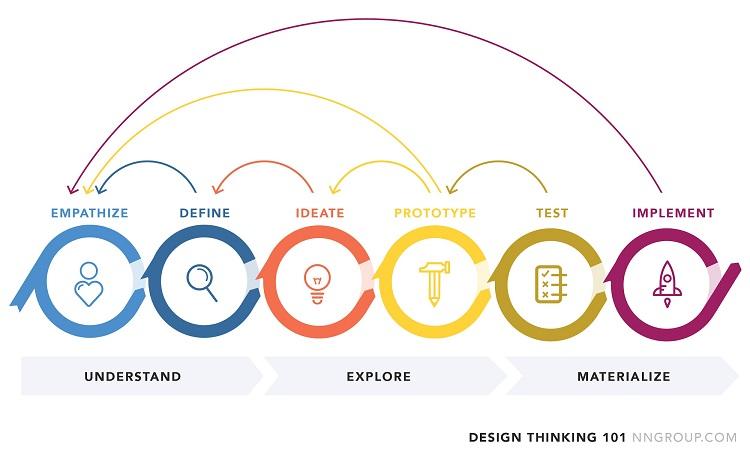
Design thinking is the most widely adopted problem-solving approach among UX designers. The design thinking process was established as a formal educational and professional framework in the 1990s by David Kelley and Tim Brown of IDEO. Similar to the scientific method taught in early education, design thinking involves six stages:
- Empathize
- Define
- Ideate
- Prototype
- Test
- Implement Unlike the rigid structure of the scientific method, design thinking is meant to be a flexible guideline for individuals to adapt and reference when tackling complex issues.
Design thinking, when executed effectively, is a highly iterative process that embraces failures as learning opportunities.
How Design Thinking Benefits You
You might be thinking, “Wait, I’m not a designer!” Don’t worry! The design thinking process applies to a wide range of situations. Let’s illustrate with a marketing scenario. Imagine you’re promoting a new product, and while you have a good grasp of your target audience, you’re unsure how to connect with them. The most effective way to reach your target user is to step into their shoes. You aim to empathize with them, understand their identity, activities, desires, and consequently, discover how to engage them. This is where design thinking begins.
After defining your target audience, explore various avenues to reach them. Once you identify the most promising ideas, test them. The results might be exceptional or less than ideal, but each outcome offers valuable insights for improvement in subsequent tests.
Through design thinking, you’ll ultimately find an effective method to connect with your target audience. Moreover, you’ll be equipped to adapt to changes in your audience, the platforms used to reach them, and other unpredictable factors. Design thinking promotes learning from failures, continuous refinement, and adaptation.
Implementing the Design Thinking Process
Now that we’ve covered the what and why of design thinking, let’s delve into how to apply its steps. While it’s a set of adaptable guidelines, the initial step is crucial for genuinely solving real problems for real people.
Part 1: Gaining Understanding
The only authentic way to grasp what your users experience with your product is to understand their perspective. And no, telepathy isn’t required!
The most vital point is this: Before engaging with your target audience, you don’t fully comprehend the problem. You might recognize the existence of an issue and its potential consequences. However, truly understanding the problem necessitates talking to those experiencing it firsthand.
Step 1: Cultivate Empathy
To gain insight into your users’ minds, thorough research is essential. You need to understand their thoughts, feelings, words, and actions. Speaking with them, observing them, and setting aside any preconceived notions are key.
Numerous techniques can be employed during research. User interviews, user observation, task analysis, and empathy mapping are just a few examples.
- User interviews: Techniques like the Five Whys can help delve deeper into each user’s problem.
- User observation: Observing users in their natural environments provides valuable insights.
- Task Analysis: Assigning tasks to users while recording their actions and asking them to verbalize their thought process. Measure metrics such as time taken and the number of clicks required (if applicable) for task completion.
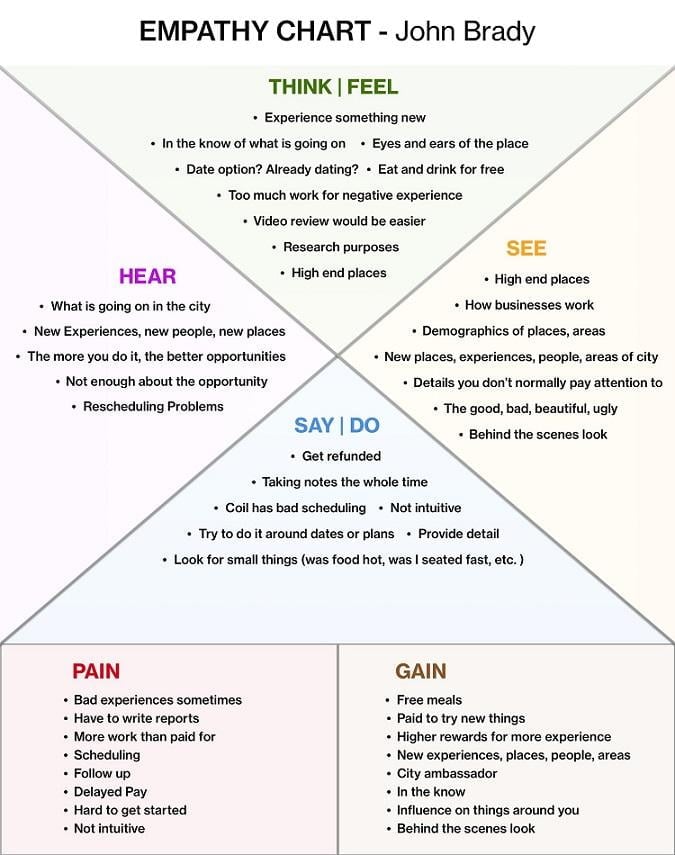
- Empathy mapping: Aids in understanding what your users think, feel, say/do, and see. It also reveals their pain points and gain points.
Step 2: Define the Problem
After conducting research, the next step is to analyze your findings. Visualizing your findings is key: Utilize sticky notes, whiteboards, or any available tool to view everything simultaneously. This allows you to identify patterns and common themes, such as “Three users found this confusing” or “Only users over 40 enjoyed this section.”
These recurring themes guide you in defining the problem and initiating the solution process. You might uncover multiple problems or discover that the problem differs entirely from your initial assumption. This is positive! Identifying problems empowers you to solve them and gain a deeper understanding of your audience.
Part 2: Exploration
Having defined your problem(s), you can transition to the exploration phase of design thinking. This stage involves exploring potential solutions.
Step 3: Generate Ideas (Ideate)
Now is the time to unleash creativity. During the ideation phase, aim to brainstorm as many solutions to your problem as possible. Think unconventionally! Outlandish ideas are welcome—the more, the merrier. It’s easier to refine an existing idea than to conjure one from scratch.
Open-mindedness is paramount during ideation. There are no bad ideas at this stage. The goal is to generate a wide range of potential solutions and explore the problem from multiple angles. You never know what might work.
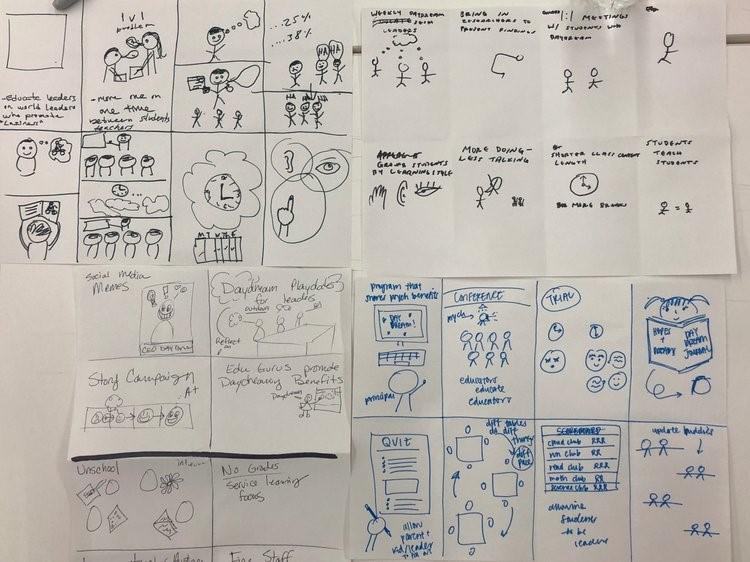
Crazy Eights is an effective technique for maximizing idea generation. The goal is to come up with as many solutions as possible within a limited timeframe. No idea is off-limits; whatever comes to mind, go with it! Fold a piece of paper into eight sections and dedicate eight minutes (one minute per section) to sketching and describing a potential solution. Once the minute is up, move on to the next idea.
Step 4: Create a Prototype
After brainstorming ideas, focus on selecting the most promising solution and building a prototype. The purpose of prototyping is to create a tangible representation of your solution for testing.
Here are a few different options for prototypes::
- Single page (more of a proof of concept) or multi page (allows for a complete task flow).
- Realistic and detailed or hand-sketched.
- Interactive (enables user interaction and navigation) or static (requires manual manipulation to complete a task).
Don’t get bogged down by the complexity of the prototype. If done correctly, you’ll iterate on the first version after testing anyway!
Part 3: Bringing Ideas to Life
With a prototype in hand, you can begin assessing its viability as a solution. This involves testing and iteration.
Step 5: Test and Learn
The next step is testing your prototype. Embrace failures as valuable learning opportunities. The goal of prototyping and testing is to fail frequently and quickly. Incorporate the lessons learned from failures into subsequent solutions.
Testing both minor and significant changes is crucial. In my initial A/B test for the Nexus-security website, we made simple modifications to the iconography, copy, and button colors for a section on our homepage.
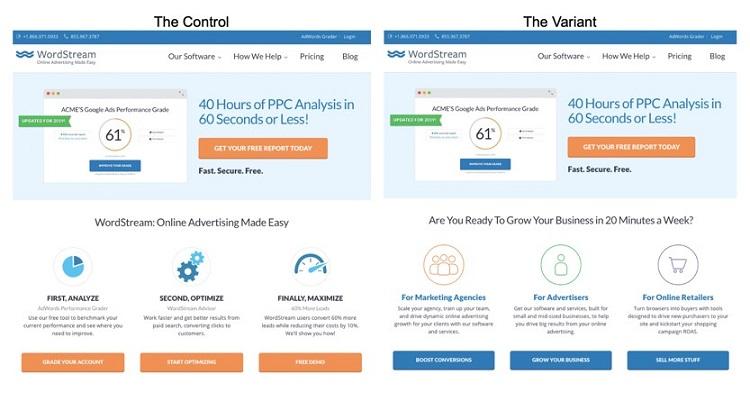
Surprisingly, we observed a 68% increase in the Free Trial conversion rate compared to the original version. While such dramatic results might not always occur, tests like this hold significant value, even in failure. It’s also worth noting that this particular section, despite a successful redesign, is no longer present after further testing (view our current homepage). We continuously adapt to evolving circumstances and seek optimal solutions, and you should too!
Step 6: Iterate and Repeat
Celebrating the success of your first test is great, but there’s always room for improvement, and new challenges will inevitably arise.
Design thinking is inherently iterative. Throughout testing, you’ll often revisit your research. During prototyping, you might conduct additional research to address newly encountered pain points. After testing, you might realize the initial problem definition was inaccurate, prompting a restart of the entire process, this time with more knowledge and confidence.
Apply Design Thinking to Your Next Challenge
The design thinking process transcends its usefulness for UX designers; it’s a valuable tool for everyone. Creating a website, a product, a company, or anything worthwhile requires time, effort, and a willingness to embrace failures. Try out the process, learn from your mistakes, build upon them, and grow both individually and as a team.