The arrival of HTML5 and CSS3 brought a wave of exciting new technologies to web browsers, including 3D graphics, sockets, threads, and more. These advancements allow web applications to harness the power of modern computers and operating systems like never before. The recent surge in sophisticated web applications we rely on daily demonstrates the web browser’s robust and adaptable development environment. Despite this progress, one area remains lacking: the ability to create visually appealing and customized text annotations and decorations using HTML. While web browsers natively support basic styling like underlines, they fall short when it comes to more intricate effects such as squiggly underlines, textured highlights, or wavy strikeouts. While this might appear to be more about aesthetics than functionality, having the ability to generate these styles using JavaScript could be beneficial in contexts like online learning platforms and digital ebook readers. Furthermore, this could contribute to a more engaging user experience in web applications that prioritize intuitive design principles. At the very least, developing such a tool is an enjoyable challenge that offers insights into the intricacies of web browsers.
To circumvent this limitation in web browsers, developers have devised numerous workarounds. Many of these approaches rely on unconventional applications of CSS, with some even incorporating images within “::after” pseudo-elements. While functional, managing a multitude of images for every style and color combination often becomes cumbersome. This article delves into the inner workings of a JavaScript library that aims to provide an elegant solution to this challenge.
The library’s source code is publicly available on GitHub: Text Annotator
Overview
During the development of this library, ensuring compatibility with widely used web browsers (including IE 9 and above) was a primary concern. However, unlike prevalent solutions that depend on obscure CSS techniques or, worse, specialized Unicode characters, this library leverages SVG to achieve superior and cleaner text decorations.
At its core, the library implements an “Annotator” class. This class dynamically generates DIV elements, positions them beneath the text targeted for annotation, and fills their backgrounds with SVG images. By combining multiple DIVs, developers can achieve even more customized decorations. This approach offers several benefits: it works seamlessly across different browsers, allows for precise control over the placement of decorative elements, and simplifies future expansion with user-defined templates.
Google Closure Tools were instrumental in building this library. Their modular design and cross-browser compatibility facilitate the creation of concise, efficient JavaScript code without introducing external dependencies.
Architecture
The library is structured as a collection of JavaScript “classes” and provides users access to all essential functions through the “Annotator” class:

Here is a concise summary of the available functionalities:
annotateDocument - Applies annotations to elements tagged with the “data-annotate” attribute.
underline - Underlines the selected element.
highlight - Highlights the selected element.
strike - Applies a strikethrough effect to the selected element.
underlineSelected - Underlines the currently selected text.
highlightSelected - Highlights the currently selected text.
strikeSelected - Applies a strikethrough effect to the currently selected text.
unannotateElement - Removes existing annotations from the element.
getTemplates - Retrieves a collection of annotation templates stored as a dictionary.
setUnderlineOptions - Configures the settings for the underline annotation tool.
setHighlightOptions - Configures the settings for the highlight annotation tool.
setStrikeOptions - Configures the settings for the strikethrough annotation tool.
The annotator class manages three individual instances of the AnnotatorImpl class, one for each annotation function: underline, highlight, and strike.
| |
Each AnnotatorImpl instance is generated with a distinct ID and a corresponding positioner helper object. The provided IDs are subsequently utilized in CSS class names and internal field names, necessitating their uniqueness. Additionally, a reference to a collection of recognized templates is passed (which can be modified later).
Each positioner object adheres to the IPositioner interface, which defines a single method: “getPosition”.
| |
This design allows any template to be used seamlessly with underline, highlight, or strikethrough text annotations. When an annotation is applied to an element, its bounding box is determined using the “getElementRects” method, as demonstrated below:
| |
This method returns a set of rectangles representing the bounding rectangles for each box within a client. Passing each rectangle to a specific positioner yields the target bounds for annotation placement.
SVG Text Annotation Templates
As previously mentioned, a single set of templates governs all types of SVG text annotations. Each template comprises individual template parts. A template part represents a portion of the annotation’s appearance, including its content, width, and drawing behavior.
Content
Content consists of a series of SVG elements defined as a string. Since this content lacks a root SVG node where the viewport’s width and height (in pixels) are specified, the template part constructor accepts these dimensions as parameters. For instance, you can define a viewport size of 100px by 100px and draw a line from coordinates (50, 50) to (25, 25). Once the annotation is applied, all SVG elements are scaled accordingly to fit the designated size. The content value can include the placeholder “{0}”, which is automatically replaced with the user’s chosen color during rendering.
The following SVG code generates a diagonal line, which we will use as a component in an example annotation style later:
| |
Width
Template width is defined as a string and accepts values like “*”, “height”, or any other custom value:
“*” ensures that all elements designated with a star share the same width.
“height” sets the element’s width to match the height of the annotation element.
Any other value provided here is directly applied to the CSS “width” and “min-width” properties.
Draw Mode
Draw mode, specified as a string, can be either “repeat” or “stretch”. These values control how the content fills the available space: “repeat” tiles the content repeatedly, while “stretch” expands the content to cover the entire area.
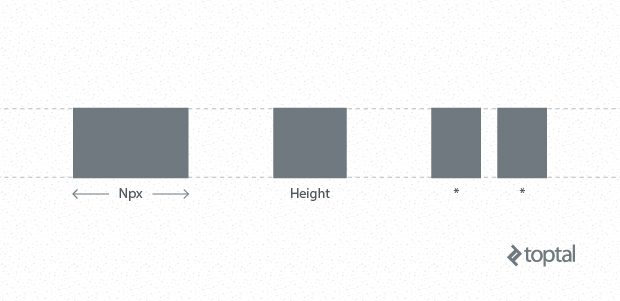
Here’s an illustration of what we can accomplish by configuring these three parameters:

This example text annotation comprises four distinct parts. The first part consists of the diagonal line, with its template width set to “height” and draw mode set to “repeat”. The second part has its template width set to “*” and draw mode also set to “repeat”. The third part is configured to be “15px” wide and drawn in “repeat” mode. Lastly, the final part’s width is set to “*” with a “stretch” draw mode.
When these widths are calculated, the first part occupies 5 pixels (matching the annotation element’s height), the third part takes up 15 pixels (as defined), and the remaining space is divided equally between the second and fourth parts.
Highlighting the same text segment using this template yields the following result:

As you can observe, both the annotation element’s height and the width of the first part have increased, as its template width is linked to the annotation height. The width of the third part remains consistent with the previous example.
Applying a strikethrough effect to the same text with the same template produces a result very similar to the first example. The only difference lies in the positioning of the annotation elements:

Despite the visual complexity of these text annotations (with their four distinct parts), they rely on remarkably simple SVG elements. For instance, creating a squiggly line requires only a single part with the following straightforward SVG content:
| |
During template evaluation, the content is automatically resized, and the “{0}” placeholder is substituted with the user-defined color. Adding new templates is as simple as incorporating them into a JavaScript object:
| |
Results
Each annotation is applied by dynamically appending a div element with absolute positioning to the page:
| |
The div element is then populated with a table where each added cell corresponds to a part within the template. The content of each template part is embedded as Base64 encoded data URI, with the selected color already applied:
| |
Embedding
For an optimal user experience, particularly when using this JavaScript library with editable content areas, it is crucial for the Text Annotator to accurately track the boundaries of the text currently selected by the user. To address this challenge in a cross-browser compatible manner, the project leverages Rangy, a sophisticated JavaScript library specializing in range and selection manipulation. Rangy offers a straightforward, standards-compliant API for handling common DOM Range and Selection tasks across all major browsers, effectively abstracting away the significant variations in implementation details between Internet Explorer and DOM-compliant browsers. It is the only external dependency in this project.
Once the Text Annotator is integrated, using it is incredibly straightforward:
| |
Each annotated element is marked with the “tvs-annotated-text” class, while each annotation element carries the “tvs-annotate-element” class. Removing annotations is even simpler, achievable with a single line of code:
| |
Quirks
When the browser window is resized, elements on the page may shift, necessitating a “refresh” of the annotated elements to maintain their correct positioning. The library handles this automatically. However, to minimize performance overhead, calls to refresh annotations are throttled:
| |
During a refresh, annotation elements may be added, resized, or removed from the page as needed.
Convenience
To simplify the annotation of static text on a page, a single data attribute on the containing element is all it takes:
| |
This will automatically apply a squiggly green underline to the content within that element.
Conclusion
This SVG text tutorial has explored a fun yet powerful tool for creating custom text annotations. While ensuring compatibility with Internet Explorer 8 could be beneficial, it might introduce unnecessary complexity to the implementation. However, with some refinements and core enhancements, the library could be extended to generate decorative borders for non-textual elements. Moreover, implementing a mechanism to save and restore the state of an annotation’s editable content could be a worthwhile endeavor.
For now, the possibilities are limited only by your imagination (and the capabilities of web browsers). Whether you envision microprint lines, gradients, or even animations, with Text Annotator, you can bring your ideas to life.