Not long ago, we relied heavily on monolithic web applications: extensive codebases that ballooned as we added new functionalities and features, eventually transforming into unwieldy, sluggish, and difficult-to-manage behemoths. Today, a growing number of developers, architects, and DevOps professionals are reaching the consensus that adopting microservices is preferable to grappling with a monolithic giant. Typically, implementing a microservices-based architecture involves deconstructing your monolith into at least two separate applications: a front-end application and a back-end application (the API). Once the decision to embrace microservices has been made, a crucial question arises: What is the optimal environment for running microservices? What platform should I choose to ensure the stability, manageability, and seamless deployment of my service? The concise answer is: Utilize Docker!
This article aims to provide you with an introduction to containers, an explanation of Kubernetes, and guidance on containerizing and deploying an application to a Kubernetes cluster using CircleCI.
Docker? What exactly is Docker?
Docker is a tool specifically designed to simplify DevOps (and by extension, your life). Docker empowers developers to create, deploy, and execute applications within containers. Containers provide a mechanism for developers to package an application along with all its essential components, such as libraries and other dependencies, and distribute it as a cohesive unit.
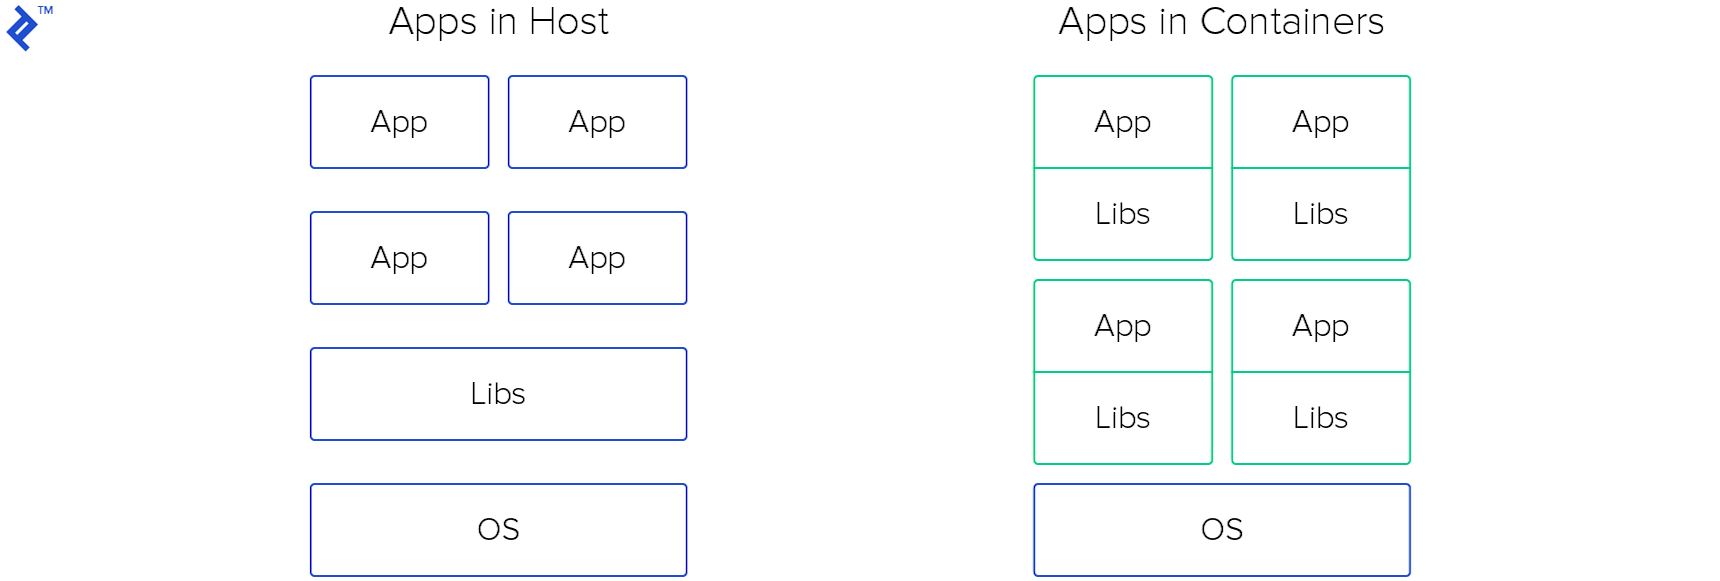
By leveraging containers, developers can effortlessly (re)deploy an image to any operating system. Simply install Docker, execute a command, and your application will be up and running. Furthermore, you can disregard any concerns about inconsistencies arising from new library versions in the host operating system. Moreover, you have the flexibility to launch multiple containers on the same host – whether it’s the same application or different ones, it doesn’t matter.
Docker appears to be an exceptional tool. But how and where should I launch these containers?
Numerous options exist for running containers, each with its own advantages and considerations: AWS Elastic Container Service (AWS Fargate or a reserved instance with horizontal and vertical auto-scaling capabilities); a cloud instance with a predefined Docker image in Azure or Google Cloud (complete with templates, instance groups, and auto-scaling features); deploying on your own server equipped with Docker; or, naturally, Kubernetes! Kubernetes, conceived specifically for virtualization and container orchestration, was developed by Google engineers in 2014.
Kubernetes? Can you elaborate on what that entails?
Kubernetes is an open-source system that provides a comprehensive framework for managing containers. It empowers you to execute containers, automate deployments, scale deployments, create and configure ingresses, deploy both stateless and stateful applications, and much more. Essentially, you can launch one or more instances and install Kubernetes to orchestrate them as a cohesive Kubernetes cluster. By obtaining the API endpoint of the Kubernetes cluster and configuring kubectl (a command-line tool for interacting with Kubernetes clusters), Kubernetes is primed to serve your containerized applications.
So, what are the compelling reasons for me to adopt Kubernetes?
Kubernetes enables you to maximize the utilization of your computational resources. With Kubernetes at your disposal, you assume the role of captain, steering your ship (infrastructure) while Kubernetes serves as your wind-catching sails. Kubernetes empowers you to achieve high availability (HA) for your services. And perhaps most importantly, Kubernetes can significantly reduce your operational costs.
That certainly sounds promising, particularly the cost-saving aspect. Let’s delve deeper into this!
Kubernetes is steadily gaining momentum in the industry. Let’s explore its inner workings and gain a better understanding of its underlying components.
Delving Deeper: Unraveling the Architecture of Kubernetes
While Kubernetes refers to the system as a whole, much like your car, it comprises numerous smaller components working harmoniously to ensure its seamless operation. Let’s take a closer look at these components.
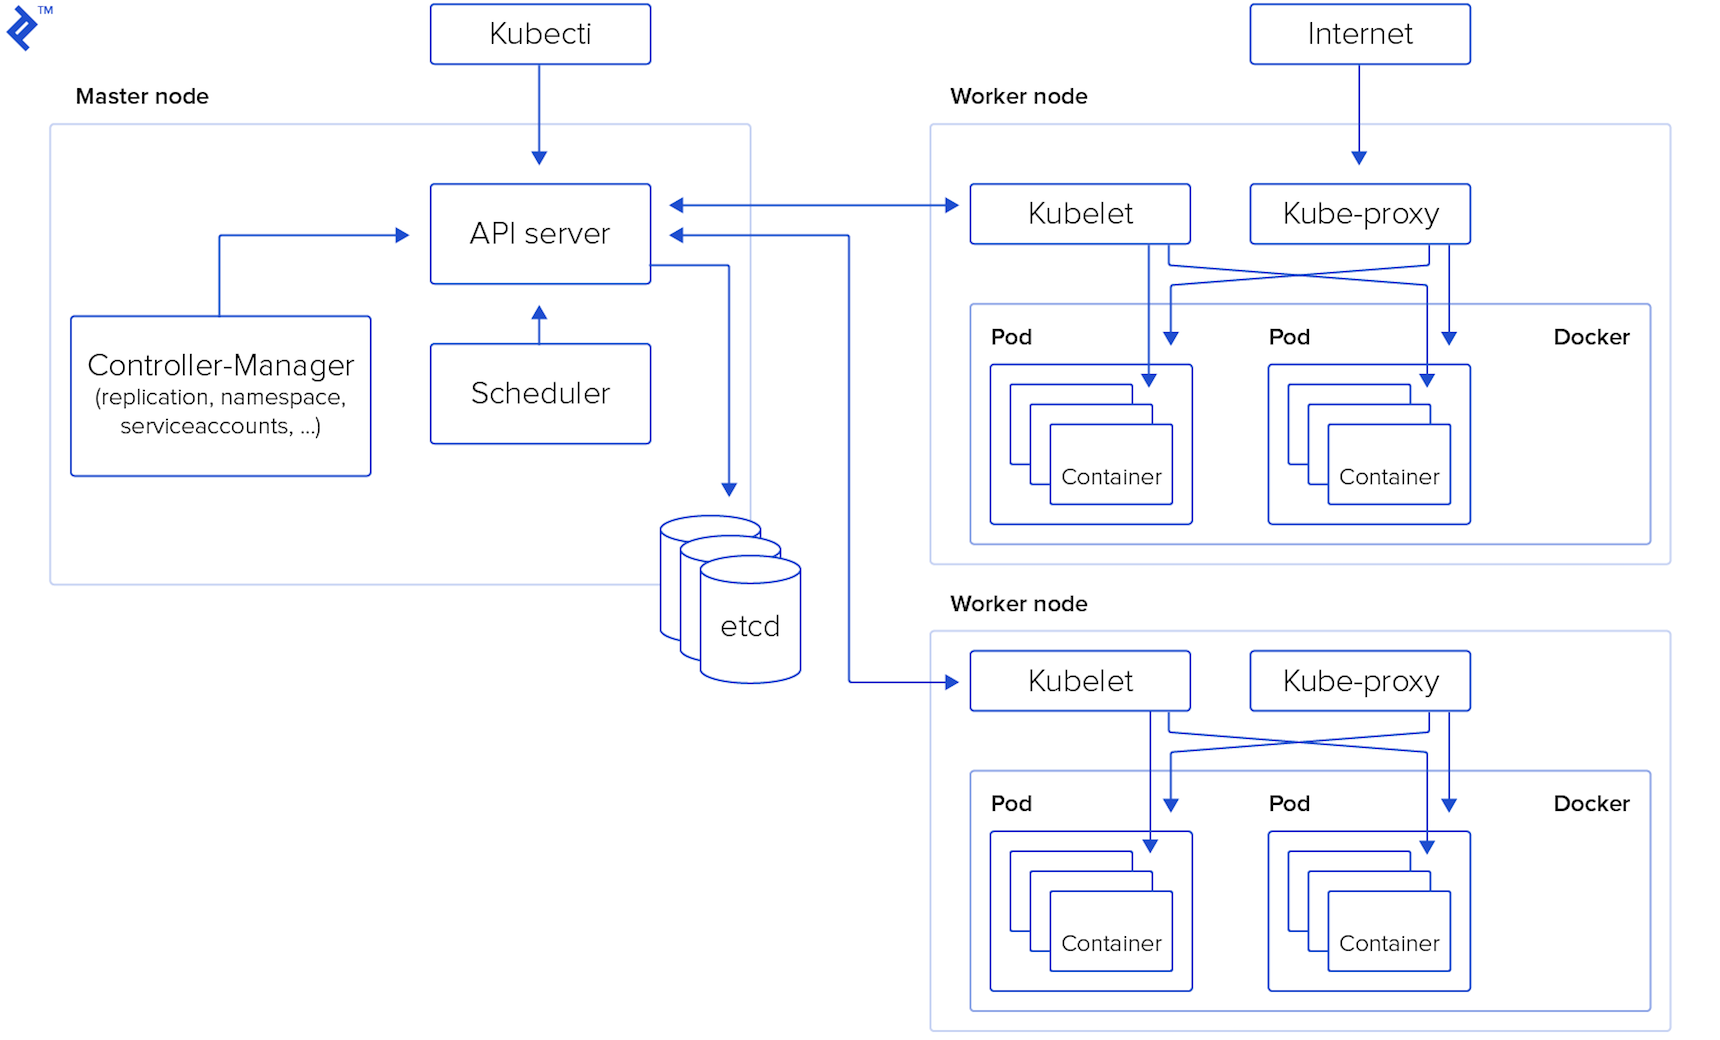
Master Node – This serves as the control center for the entire Kubernetes cluster. The components of the master node can be deployed on any node within the cluster. The key components include:
- API server: Acting as the entry point for all REST commands, the API server is the sole component of the Master Node directly accessible to users.
- Datastore: This robust, consistent, and highly available key-value storage system underpins the operation of the Kubernetes cluster.
- Scheduler: The scheduler continuously monitors for newly created pods and strategically assigns them to nodes, ensuring efficient resource utilization. The deployment of pods and services onto the nodes is orchestrated by the scheduler.
- Controller manager: This component oversees the execution of all controllers responsible for handling routine tasks within the cluster, maintaining its overall health.
- Worker nodes: Also referred to as minion nodes, these are the workhorses of the cluster where pods are executed. Worker nodes encompass all the essential services required to manage networking between containers, facilitate communication with the master node, and allocate resources to the scheduled containers.
- Docker: Installed on each worker node, Docker is responsible for downloading container images and launching containers, providing the runtime environment for your applications.
- Kubelet: The Kubelet agent diligently monitors the state of pods, ensuring that all containers within a pod are up and running as expected. It also interacts with the data store, retrieving information about services and updating it with details about newly created ones.
- Kube-proxy: Functioning as a network proxy and load balancer for services on a specific worker node, Kube-proxy is crucial for routing traffic within the cluster.
- Kubectl: This command-line tool provides users with a means to communicate with the Kubernetes API server, enabling them to manage and interact with cluster resources.
What exactly are pods and services in the context of Kubernetes?
Pods represent the smallest deployable units within a Kubernetes cluster, analogous to individual bricks in a vast wall. A pod encapsulates a collection of containers that need to run together and can share resources such as Linux namespaces, cgroups, and IP addresses. It’s important to note that pods are ephemeral and not designed for long-term persistence.
Services provide an abstraction layer on top of a group of pods, typically necessitating a proxy to enable communication with them via a virtual IP address. Services ensure that even if pods are destroyed and recreated, other applications within the cluster can continue to interact with them seamlessly.
Illustrative Deployment Example

To illustrate these concepts, let’s consider a simple Ruby on Rails application and utilize Google Kubernetes Engine (GKE) as our platform for running Kubernetes. It’s worth noting that Kubernetes can be deployed on various cloud providers such as AWS or Azure, or even on your own hardware. You can even experiment with Kubernetes locally using minikube – all of these options are detailed on the this page.
The source code for this application can be accessed at this GitHub repository.
To initiate a new Rails application, execute the following command:
| |
To establish the MySQL connection parameters for the production environment within the config/database.yml file:
| |
To generate the Article model, controller, views, and migration, run:
| |
To incorporate the necessary gems into your Gemfile:
| |
To construct the Docker image, retrieve my Dockerfile and execute:
| |
Now, let’s shift our focus to creating a Kubernetes cluster. Navigate to the GKE page and proceed with creating a Kubernetes cluster. Once the cluster is operational, click on the “Connect button” and copy the provided command. Ensure that you have the gCloud CLI tool (how to) and kubectl installed and appropriately configured on your system. Execute the copied command on your local machine to establish a connection to the Kubernetes cluster, and verify the connection by running the command: kubectl cluster-info.
With our application and cluster ready, let’s create a MySQL database. Access the SQL page within the Google Cloud console and create a MySQL database instance dedicated to our application. Once the instance is provisioned, create the necessary user and database, and make a note of the instance connection name.
Furthermore, we need to generate a service account key within the API & Services page to grant access to the MySQL database from a sidecar container. Detailed instructions on this process can be found here. Rename the downloaded file to service-account.json – we will revisit this file later.
We are now on the verge of deploying our application to Kubernetes. However, before we proceed, it is essential to create secrets to securely store sensitive information. Secrets are objects within Kubernetes designed specifically for this purpose. Begin by uploading the previously downloaded service-account.json file:
| |
Next, create the necessary secrets for our application:
| |
Remember to replace the placeholder values with your actual credentials or set environment variables accordingly.
Prior to initiating the deployment, let’s take a moment to examine the deployment file. This file combines three distinct configurations into one: a service definition, a deployment specification, and a Horizontal Pod Autoscaler (HPA) configuration.
The first section defines a service that will expose port 80 and forward all incoming traffic on this port to port 3000, effectively routing requests to our application. The service includes a selector that enables it to identify the pods it should direct traffic to.
The subsequent section outlines the deployment, which describes the deployment strategy, the containers to be launched within the pod, environment variables, resource limits, probes for health checks, mounts for each container, and other pertinent information.
Lastly, we have the Horizontal Pod Autoscaler configuration. The HPA configuration is relatively straightforward. It’s important to note that the HPA relies on resource limits defined for the container in the deployment section; if these limits are not set, the HPA will not function as intended.
You can optionally configure a Vertical Pod Autoscaler for your Kubernetes cluster through the GKE edit page. Similar to the HPA, it offers a simple configuration mechanism.
The time has come to deploy our application to the GKE cluster! First and foremost, we need to run database migrations using a job. Execute the following commands:
kubectl apply -f rake-tasks-job.yaml – This job will prove useful for our CI/CD pipeline.
kubectl apply -f deployment.yaml – This command will create the service, deployment, and HPA.
Afterward, monitor the status of your pod by executing the command: kubectl get pods -w
| |
Next, let’s create an ingress for our application to make it accessible from the outside world. Follow these steps:
- Create a static IP address:
gcloud compute addresses create sample-ip --global - Create the ingress resource (refer to file):
kubectl apply -f ingress.yaml - Verify that the ingress has been successfully created and retrieve its associated IP address:
kubectl get ingress -w - Finally, configure your domain or subdomain to point to the ingress IP address, making your application accessible to users.
Implementing CI/CD
Let’s establish a CI/CD pipeline using CircleCI to automate our build and deployment processes. Setting up a CI/CD pipeline with CircleCI is generally straightforward. However, it’s crucial to acknowledge that a rapid and basic fully automated deployment process without comprehensive testing, while suitable for small projects, is not recommended for production-grade applications. Deploying untested code to production can result in financial losses and other undesirable consequences. Therefore, it is essential to design a robust deployment process that includes canary deployments, thorough log monitoring for errors, and other best practices.
Since we are currently dealing with a small and simple project, let’s proceed with creating a fully automated CI/CD deployment pipeline without tests. The first step is to integrate CircleCI with your code repository – detailed instructions can be found here. Once integrated, we need to create a configuration file containing instructions for CircleCI. The configuration file, Config, is relatively simple. The key points to note are that we have two branches in our GitHub repository: master and production.
- Master branch: The master branch serves as our development branch, where new code is initially pushed. Whenever someone pushes code to the master branch, CircleCI initiates a workflow for this branch, which typically involves building and testing the code.
- Production branch: The production branch is dedicated to deploying new releases to the production environment. The workflow for the production branch is as follows: pushing new code (or, even better, merging a pull request from the master branch to the production branch) triggers a new build and deployment process. During the build phase, CircleCI creates new Docker images, pushes them to Google Container Registry (GCR), and initiates a new rollout for the deployment. In the event of a rollout failure, CircleCI will trigger a rollback to the previous stable version.
Before executing any builds, you need to configure a project within CircleCI. Begin by creating a new service account in the API & Services page within Google Cloud, granting it the following roles: full access to GCR and GKE. Open the downloaded JSON file, copy its contents, and then create a new environment variable named GCLOUD_SERVICE_KEY in the project settings within CircleCI, pasting the contents of the service account file as its value. Additionally, create the following environment variables: GOOGLE_PROJECT_ID (which can be obtained from the Google Cloud console homepage), GOOGLE_COMPUTE_ZONE (specifying the zone where your GKE cluster resides), and GOOGLE_CLUSTER_NAME (the name of your GKE cluster).
The final step (deployment) in our CircleCI configuration will look like this:
| |
Conclusion
It seems that the process of setting up a new Kubernetes cluster is not overly complex, and the CI/CD pipeline implementation is remarkably efficient!
Indeed! Kubernetes offers numerous advantages. It enhances the stability and manageability of your system while giving you, the developer, greater control over its operation. Furthermore, Kubernetes introduces an element of gamification to system administration, which can be a welcome bonus.
Now that you have a grasp of the fundamentals, you can expand upon this foundation and explore more advanced configurations. I plan to delve into these advanced topics in a future article. In the meantime, I challenge you to create a robust Kubernetes cluster for your application that includes a stateful database residing within the cluster (complete with a sidecar pod for performing backups). Additionally, install Jenkins within the same Kubernetes cluster to manage your CI/CD pipeline, configuring Jenkins to utilize pods as slaves for build tasks. Furthermore, leverage cert-manager to obtain and configure an SSL certificate for your ingress, ensuring secure communication. Finally, implement a comprehensive monitoring and alerting system for your application using Stackdriver, providing insights into its health and performance.
Kubernetes’s appeal lies in its scalability, lack of vendor lock-in, and cost-effectiveness, as you are only charged for the underlying instances consumed. However, it’s important to acknowledge that not everyone possesses deep Kubernetes expertise or has the time to set up and manage a new cluster. For an alternative perspective, my esteemed Toptal colleague Amin Shah Gilani advocates for the use of Heroku, GitLab CI, and a high degree of automation in his article “How to Build an Effective Initial Deployment Pipeline,” emphasizing the importance of maximizing time spent coding and minimizing operational overhead.