When starting a new iOS project, after receiving design documents and forming a development plan, you begin by implementing the UI. This involves translating design sketches into code, using elements like UITextField, UITableView, UILabel, UIButton, IBOutlets, and IBActions.
However, challenges arise when you need to add functionality to these UI elements. Handling button touches, populating labels and table views with data, and managing UI states can lead to a significant increase in code size and complexity. Suddenly, your once-manageable codebase balloons to over 3,000 lines.

This often results in what’s known as spaghetti code, making your project difficult to maintain and scale.
One approach to address this is by adopting the Model-View-Controller (MVC) design pattern. While MVC can introduce some structure, it also has its limitations. This is where the Model-View-ViewModel (MVVM) pattern proves to be a more effective solution.
Tackling Spaghetti Code
As your project grows, your initial ViewController often becomes overloaded with responsibilities. It ends up handling everything from network requests and data parsing to UI presentation logic and state management. This makes the code tightly coupled, difficult to reuse, and prone to errors.
This scenario typically arises when developers prioritize speed over maintainability. Temporary workarounds, like adding networking code directly into the ViewController to quickly test data display, gradually accumulate and contribute to the problem.
The UIViewController, being the foundation of UI code in iOS, often becomes a catch-all for various functionalities. While Apple’s UI abstraction relies on the UIViewController as part of the MVC pattern, it doesn’t mean that all code related to both the view and the controller should reside within it.
Transitioning to MVC
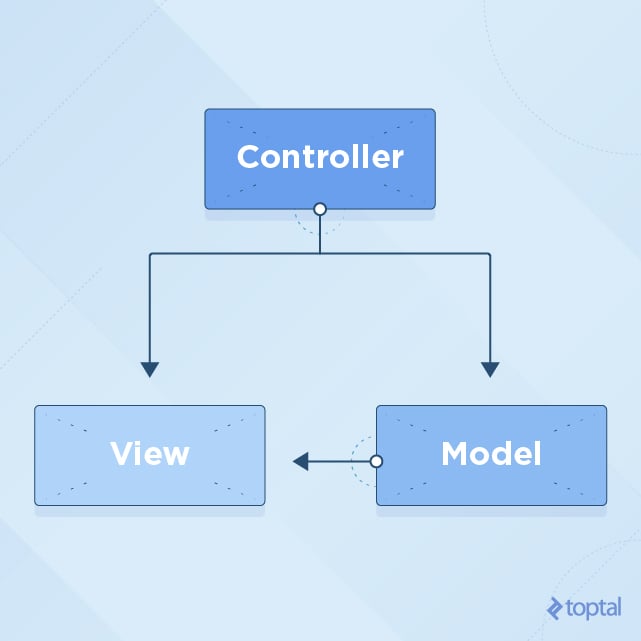
In the MVC pattern, the View should ideally remain passive, solely responsible for displaying data provided to it. The Controller acts as an intermediary, fetching data from the Model, processing it, and then supplying it to the View for presentation. The View, in turn, notifies the Controller of any user interactions.
Given that the UIViewController inherently combines aspects of both view and controller, it’s tempting to place code related to subviews directly within it. However, a better practice is to encapsulate such code within custom UIView subclasses.
Failure to maintain this separation can lead to tangled code where the responsibilities of the View and Controller become intertwined.
MVVM to the Rescue
The MVVM pattern offers a cleaner solution by separating concerns more effectively. It leverages the existing structure of UIViewController as a View, combining it with the Controller aspects of MVC into a single entity.
In MVVM:
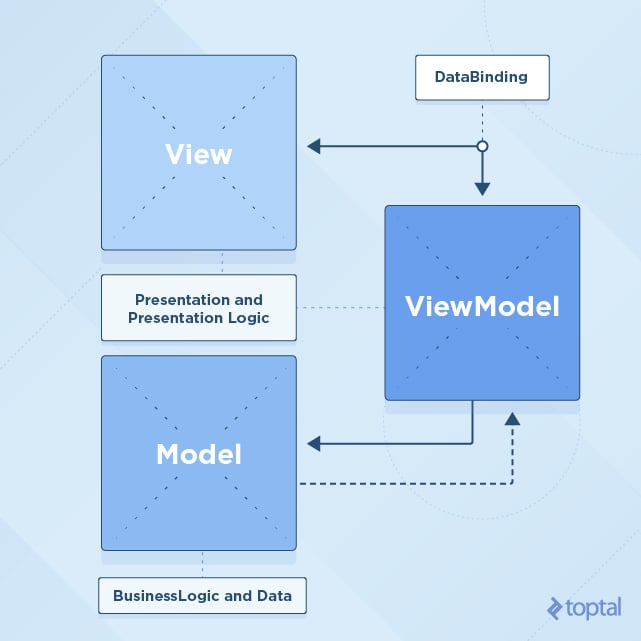
- Model remains the same as in MVC, representing raw data.
- View, comprising
UIVieworUIViewControlleralong with their associated.xiband.storyboardfiles, focuses solely on displaying prepared data. It shouldn’t contain logic for data formatting or processing. - ViewModel acts as an intermediary between the Model and View. It handles asynchronous operations, data transformation for UI presentation, and responses to Model changes. It exposes a well-defined API tailored to the specific View it supports.
One of the key advantages of MVVM is improved testability. Since the ViewModel is a pure NSObject (or struct), it remains independent of UI code, making it easier to unit test without the need for complex UI setups.
With MVVM, the View becomes significantly simpler, while the ViewModel takes on the responsibility of bridging the gap between the Model and View.
Implementing MVVM in Swift
To illustrate MVVM in action, you can refer to the example Xcode project provided for this Swift MVVM tutorial here. This project utilizes Swift 3 and Xcode 8.1.
Two versions of the project are available: Starter and Finished.
The Finished version showcases a complete mini-application built with Swift MVVM architecture, while the Starter version provides the same project without the implemented methods and objects.
Begin by downloading the Starter project and following along with this tutorial. You can refer to the Finished project for a quick reference later on.
Tutorial Project Overview
The tutorial focuses on a basketball application designed to track player actions during a game.

This app allows for real-time tracking of player moves and the overall score in a pickup game. Two teams compete until a score of 15 is reached (with a minimum two-point difference). Players can score one or two points, and their actions, such as assists, rebounds, and fouls, can be recorded.
The project structure is as follows:

Model
Game.swift: Contains the game logic, tracks the overall score, and monitors each player’s moves.Team.swift: Stores the team name and a list of players (three players per team).Player.swift: Represents a single player with a name.
View
HomeViewController.swift: Acts as the root view controller, presenting theGameScoreboardEditorViewController.GameScoreboardEditorViewController.swift: Complemented by an Interface Builder view inMain.storyboard. This screen is the primary focus of the tutorial.PlayerScoreboardMoveEditorView.swift: Supplemented with an Interface Builder view inPlayerScoreboardMoveEditorView.xib. This is a subview of theGameScoreboardEditorViewControllerand also utilizes the MVVM pattern.
ViewModel
- The
ViewModelgroup is currently empty; this is where you will be building your ViewModels.
The provided Xcode project includes placeholders for View objects (UIView and UIViewController) and custom objects (Services group) that demonstrate data provision to ViewModel objects.
The Extensions group contains helpful UI code extensions, which are self-explanatory and not within the scope of this tutorial.
Running the app at this stage will display the completed UI, but button presses won’t have any effect yet. This is because you’ve only set up the views and IBActions without connecting them to the app’s logic or populating the UI elements with data from the Model (the Game object).
Linking View and Model with ViewModel
In MVVM, the View should remain unaware of the Model’s existence. Its interaction is limited to a ViewModel.
Start by examining your View. In GameScoreboardEditorViewController.swift, the fillUI method is currently empty. This is where you’ll populate the UI with data. To achieve this, you need to supply data to the ViewController using a ViewModel object.
Begin by creating a ViewModel object that holds all the necessary data for this ViewController.
Navigate to the ViewModel Xcode project group (which will be empty), create a new file named GameScoreboardEditorViewModel.swift, and define a protocol within it.
| |
Using protocols in this manner helps maintain a clean and organized structure. You define only the data that will be utilized.
Next, create a concrete implementation for this protocol. Create a new file named GameScoreboardEditorViewModelFromGame.swift and make it a subclass of NSObject.
Also, make it conform to the GameScoreboardEditorViewModel protocol:
| |
Notice that you provide everything the ViewModel needs to function through its initializer. This includes the Game object, representing the Model underlying this ViewModel.
If you run the app now, it still won’t function correctly because you haven’t connected this ViewModel data to the View itself.
To address this, go back to GameScoreboardEditorViewController.swift and create a public property named viewModel. Make it of type GameScoreboardEditorViewModel. Place this property declaration right before the viewDidLoad method inside GameScoreboardEditorViewController.swift.
| |
Next, implement the fillUI method.
Observe that this method is called from two locations: the viewModel property observer (didSet) and the viewDidLoad method. This is because a ViewController can be created and assigned a ViewModel before its view is attached (before viewDidLoad is called).
Conversely, you could attach the ViewController’s view to another view, triggering viewDidLoad. However, if viewModel isn’t set at that point, nothing will happen.
Therefore, it’s crucial to verify that all necessary data is available before attempting to populate the UI. Guarding against unexpected usage is essential.
In the fillUI method, replace its contents with the following code:
| |
Now, implement the pauseButtonPress method:
| |
The remaining step is to set the actual viewModel property on this ViewController. You’ll do this “from the outside.”
Open HomeViewController.swift and uncomment the ViewModel creation and setup lines within the showGameScoreboardEditorViewController method:
| |
Run the app now. It should resemble the following:
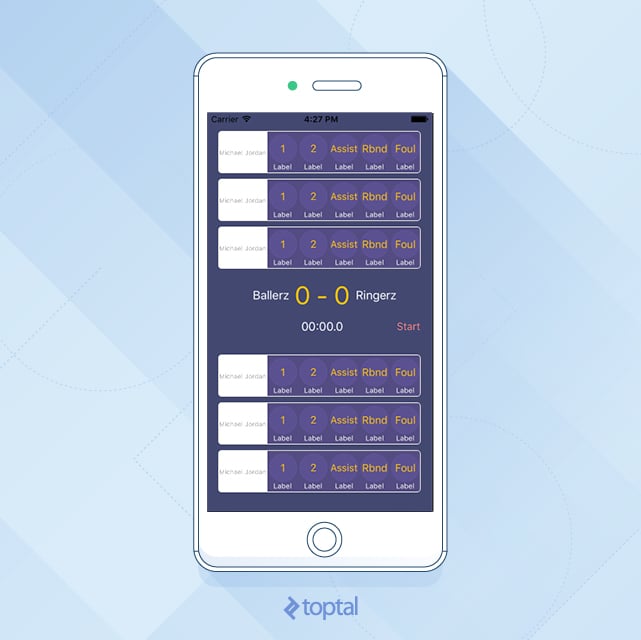
The middle view, displaying the score, time, and team names, no longer shows the placeholder values set in Interface Builder. It now presents values retrieved from the ViewModel object, which in turn fetches its data from the actual Model (Game object).
Great progress! However, the player views and their buttons remain non-functional.
You have six views dedicated to tracking player moves. These are implemented using a separate subview called PlayerScoreboardMoveEditorView, which currently doesn’t interact with real data and only displays static values set in Interface Builder within the PlayerScoreboardMoveEditorView.xib file.
You need to provide these views with dynamic data, following the same approach used for GameScoreboardEditorViewController and GameScoreboardEditorViewModel.
Open the ViewModel group in your Xcode project and define a new protocol for this purpose. Create a new file named PlayerScoreboardMoveEditorViewModel.swift and add the following code:
| |
This ViewModel protocol is designed to match your PlayerScoreboardMoveEditorView, mirroring the structure you established for the parent view (GameScoreboardEditorViewController). It includes properties for the five move types, a mechanism to handle user touches on action buttons, and a String property for the player’s name.
Next, create a concrete class that implements this protocol, similar to what you did for the parent view (GameScoreboardEditorViewController). Create a new file named PlayerScoreboardMoveEditorViewModelFromPlayer.swift and make it a subclass of NSObject. Make it conform to the PlayerScoreboardMoveEditorViewModel protocol:
| |
Now, you need an object responsible for creating instances of this ViewModel and setting them as properties within PlayerScoreboardMoveEditorView.
Recall that HomeViewController handled setting the viewModel property on GameScoreboardEditorViewController. Similarly, GameScoreboardEditorViewController acts as the parent view for PlayerScoreboardMoveEditorView and will be responsible for creating PlayerScoreboardMoveEditorViewModel objects.
Start by expanding your GameScoreboardEditorViewModel. Open GameScoreboardEditorViewModel and add two new properties:
| |
Update GameScoreboardEditorViewModelFromGame by adding these two properties just above the initWithGame method:
| |
Add these two lines inside initWithGame:
| |
Implement the missing playerViewModelsWithPlayers method:
| |
You’ve now updated your ViewModel (GameScoreboardEditorViewModel) to include arrays for both home and away players. The next step is to populate these arrays.
You’ll handle this in the same location where you used the viewModel to populate the main UI.
Open GameScoreboardEditorViewController and navigate to the fillUI method. Add these lines at the end of the method:
| |
You’ll encounter build errors at this point because you haven’t added the actual viewModel property to PlayerScoreboardMoveEditorView.
Add the following code above the init method inside PlayerScoreboardMoveEditorView:
| |
Implement the fillUI method:
| |
Finally, run the app and observe how the UI elements now display data retrieved from the Game object.

You have successfully built a functional MVVM Swift app! It effectively hides the Model from the View, resulting in a much simpler View compared to a traditional MVC implementation.
Currently, you have an app with a View and its corresponding ViewModel. This View also contains six instances of the same subview (player view), each with its ViewModel.
However, you might notice that you can only display data in the UI once (within the fillUI method), and this data remains static.
If your view’s data won’t change during its lifecycle, this approach to implementing MVVM is sufficient and provides a clean solution.
Making the ViewModel Dynamic
To accommodate data changes, you need to make your ViewModel dynamic. This means that whenever the Model changes, the ViewModel should update its public properties, propagating these changes back to the View, which will then refresh the UI.
Numerous approaches can achieve this.
When the Model changes, the ViewModel should be the first to be notified. You need a mechanism to communicate these changes to the View.
Options include using RxSwift, a comprehensive library that might take some time to master.
The ViewModel could emit NSNotifications upon each property value change. However, this introduces a significant amount of code for handling notification subscriptions and unsubscriptions, especially when the view is deallocated.
Key-Value-Observing (KVO) is another option, but its API might not be the most elegant.
In this tutorial, you’ll leverage Swift generics and closures, which are well-explained in the Bindings, Generics, Swift and MVVM article.
Let’s return to the MVVM Swift example app.
Go to the ViewModel project group and create a new Swift file named Dynamic.swift.
| |
This class will be used for properties in your ViewModels that are expected to change during the View’s lifecycle.
Start with the PlayerScoreboardMoveEditorView and its ViewModel, PlayerScoreboardMoveEditorViewModel.
Open PlayerScoreboardMoveEditorViewModel and examine its properties. Since the playerName is not expected to change, you can leave it as is.
The other five properties (representing the move counts) will change, so you need to modify them. You’ll use the Dynamic class you just added to the project.
Inside PlayerScoreboardMoveEditorViewModel, remove the definitions for the five String properties representing move counts and replace them with:
| |
Your ViewModel protocol should now look like this:
| |
The Dynamic type allows you to change the value of a property while simultaneously notifying any registered listener objects about the change. In this case, the listener will be the View.
Now, update the actual ViewModel implementation, PlayerScoreboardMoveEditorViewModelFromPlayer.
Replace the following:
| |
with:
| |
Note: Declaring these properties as constants with let is acceptable because you won’t modify the properties themselves. Instead, you’ll be updating the value property of the Dynamic object.
You’ll encounter build errors because you haven’t initialized the Dynamic objects yet.
Inside the init method of PlayerScoreboardMoveEditorViewModelFromPlayer, replace the initialization of move properties with:
| |
In PlayerScoreboardMoveEditorViewModelFromPlayer, locate the makeMove method and replace it with:
| |
As you can see, you create instances of the Dynamic class and assign initial String values to them. When you need to update the data, you modify the value property of the Dynamic object instead of the property itself.
Great! PlayerScoreboardMoveEditorViewModel is now dynamic.
Let’s utilize this dynamic behavior by modifying the view that will listen for these changes.
Open PlayerScoreboardMoveEditorView and navigate to its fillUI method. You should see build errors in this method because you’re attempting to assign String values to properties of type Dynamic<String>.
Replace the “errored” lines:
| |
with:
| |
Next, implement the five methods representing move actions (in the Button Action section):
| |
Run the app and interact with the move buttons. Observe how the counter values within the player views update when you click the action buttons.

You’ve successfully implemented dynamic updates for PlayerScoreboardMoveEditorView and its ViewModel, PlayerScoreboardMoveEditorViewModel.
Now, apply the same principles to your main view, GameScoreboardEditorViewController.
Open GameScoreboardEditorViewModel and identify which values are expected to change during the view’s lifecycle.
Replace the definitions of time, score, isFinished, and isPaused with their Dynamic counterparts:
| |
Go to the ViewModel implementation (GameScoreboardEditorViewModelFromGame) and perform the same replacements for the properties declared in the protocol.
Replace:
| |
with:
| |
You’ll encounter build errors because the ViewModel’s property types have changed from String and Bool to Dynamic<String> and Dynamic<Bool>. Let’s address these errors.
Fix the togglePause method by replacing its contents with:
| |
The key change here is that you’re no longer setting the property value directly on the property. Instead, you set it on the value property of the Dynamic object.
Next, fix the initWithGame method. Replace:
| |
with:
| |
By now, you should understand the pattern. You’re wrapping primitive values like String, Int, and Bool with their Dynamic<T> counterparts to enable a lightweight binding mechanism.
You have one more error to resolve. In the startTimer method, replace the erroneous line with:
| |
You’ve successfully upgraded your ViewModel to be dynamic, just like you did with the player’s ViewModel. However, you still need to update your View (GameScoreboardEditorViewController).
Replace the entire fillUI method with the following code:
| |
The main difference is that you’ve modified your four dynamic properties and attached change listeners to each of them.
If you run your app now, toggling the Start/Pause button will start and pause the game timer, simulating time-outs during the game.
You’re almost there! The only remaining issue is that the score doesn’t update in the UI when you press the point buttons (the 1 and 2 points buttons).
This is because you haven’t propagated score changes from the underlying Game model object up to the ViewModel.
Open the Game model object for inspection. Examine its updateScore method.
| |
This method performs two crucial actions. First, it sets the isFinished property to true if the game has ended based on the scores of both teams. Second, it posts a notification indicating that the score has changed. You’ll listen for this notification in GameScoreboardEditorViewModelFromGame and update the dynamic score value in the notification handler method.
Add the following line at the bottom of the initWithGame method (don’t forget to call super.init() to avoid errors):
| |
Below the initWithGame method, add the deinit method to ensure proper cleanup and prevent crashes related to the NotificationCenter.
| |
Finally, implement these methods. Add the following code section right after the deinit method:
| |
Run the app now and try clicking the player views to change scores. Because you’ve connected the dynamic score and isFinished properties in the ViewModel to the View, everything should work correctly when the score value changes within the ViewModel.
Further Enhancements
While this tutorial covers the fundamentals, there’s always room for improvement.
For instance, the app currently doesn’t stop the timer automatically when the game ends (when one team reaches 15 points). It only hides the player views.
Feel free to experiment with the app and consider adding features like:
- A “game creator” view to set up new games, assign team names, add players, and create
Gameobjects that can be used to presentGameScoreboardEditorViewController. - A “game list” view using a
UITableViewto display multiple ongoing games with relevant details in each table cell. Selecting a cell could then present theGameScoreboardEditorViewControllerwith the correspondingGameobject.
The existing GameLibrary provides a starting point. Remember to pass a reference to this library to the ViewModel objects in their initializers. For instance, the “game creator” ViewModel would need access to the GameLibrary to insert newly created Game objects. Similarly, the “game list” ViewModel would need this reference to fetch all games from the library for display in the UITableView.
The underlying principle is to encapsulate all non-UI logic within the ViewModel, allowing the View to focus solely on presenting prepared data.
Moving Forward
Once you’re comfortable with MVVM, you can explore further improvements by incorporating Uncle Bob’s Clean Architecture rules.
For additional insights, consider reading this three-part tutorial on Android architecture:
- Android Architecture: Part 1 – Every new beginning is hard
- Android Architecture: Part 2 – The clean architecture
- Android Architecture: Part 2 – The clean architecture
Although the examples are written in Java (for Android), the concepts translate well to Swift. You’ll gain valuable ideas on refactoring code within ViewModel objects to eliminate dependencies on iOS-specific modules like UIKit or CoreLocation.
Hiding these iOS modules behind pure NSObjects enhances code reusability.
MVVM is a robust architectural pattern well-suited for most iOS apps. Consider giving it a try in your next project or even experiment with it when creating new UIViewControllers in your existing projects.