The world of blockchain technology and its diverse applications are experiencing unprecedented popularity, with Ethereum’s smart contract capabilities at the forefront. These smart contracts pave the way for innovative solutions by enabling implementation within a decentralized, tamper-proof, and trustless environment.
However, diving into Ethereum smart contract development can feel like navigating a maze, especially for beginners due to the steep learning curve. This article, along with upcoming installments in our Ethereum series, aims to simplify this journey and equip you with the necessary knowledge to confidently navigate this exciting domain.
Truffle, Solidity, and Decentralized Applications (ÐApps)
This article assumes you possess a fundamental understanding of blockchain applications and the Ethereum ecosystem. If you need a refresher or wish to strengthen your foundational knowledge, we recommend referring to this Ethereum overview from the Truffle framework.
Topics covered in this article include:
- Exploring practical applications of time-locked wallets
- Setting up your development environment
- Developing smart contracts using the Truffle framework, including:
- Understanding Solidity contracts
- Compiling, migrating, and testing smart contracts
- Interacting with smart contracts through a ÐApp within your browser, including:
- Configuring your browser with MetaMask
- A walkthrough of the primary use case
Time-locked Wallets: Unveiling Their Potential
Ethereum smart contracts offer a wide spectrum of applications, with cryptocurrencies (implemented as ERC20 tokens) and crowdfunding through token sales (commonly known as ICOs) currently dominating the landscape. A prime example of a utility ERC20 token is the Motoro Coin. In this article, we’ll delve into a different application: securing funds within crypto wallet contracts. This concept itself unlocks numerous use cases.
Vesting in the Context of ICOs
While many examples exist, “vesting” stands out as one of the most prevalent reasons for locking funds. Imagine a scenario where your company has successfully concluded an ICO, and the majority of the distributed tokens are held by your team members.
Implementing measures to prevent the immediate trading of tokens held by employees proves advantageous for all stakeholders. Without such controls, an employee could potentially sell their entire token allocation, cash out, and leave the company. This action would negatively impact the market price and lead to dissatisfaction among the remaining contributors.
Crypto-based “Last Will and Testament”
Smart contracts also hold the potential to revolutionize estate planning by serving as crypto-wills. Imagine safeguarding your cryptocurrency savings in a contract accessible only by family members after a specific event, such as your untimely demise. This could involve a periodic “check-in” mechanism where you invoke a contract call at regular intervals.
Failure to check in within the stipulated timeframe could trigger a mechanism allowing designated beneficiaries to withdraw the funds. The allocation percentages could be predefined within the contract or determined through consensus among family members.
A Modern Take on Pension or Trust Funds
The concept of locking funds extends to creating innovative financial instruments, such as personalized pension funds or time-based savings accounts. These accounts could prevent the owner from withdrawing funds before a predetermined future date. Such an application could prove particularly beneficial for impulsive crypto traders seeking to safeguard their ether holdings.
The use case we’ll explore throughout this article centers around a similar concept: setting aside cryptocurrency as a future gift for someone, such as a birthday present.
Let’s imagine you intend to gift one ether to someone on their 18th birthday. Traditionally, you might write down the account’s private key and the wallet address containing the funds on a piece of paper, placing it in an envelope for safekeeping. The recipient would then need to call a function on the contract from their account upon turning 18 to receive the funds. However, a more elegant solution involves using a ÐApp. Let’s dive in!
Setting Up Your Ethereum Development Environment
Before embarking on your smart contract development journey, ensure you have Node.js and Git installed on your system. This article leverages the power of the Truffle framework. While not strictly mandatory, Truffle significantly simplifies the process of developing, testing, and deploying Ethereum smart contracts. We resonate with their mission statement:
“Truffle is the most popular development framework for Ethereum with a mission to make your life a whole lot easier.”
To install Truffle, execute the following command:
| |
Next, clone the project’s source code:
| |
Adhering to the standard Truffle project structure is crucial. The directories of interest include:
contracts: This directory houses all Solidity contracts.migrations: This directory contains scripts outlining the migration steps.src: This directory contains the ÐApp code.test: This directory stores all contract tests.
Dissecting the Included Smart Contracts
This project encompasses several contracts, each serving a specific purpose:
TimeLockedWallet.solforms the core contract of this project, with a detailed explanation provided below.TimeLockedWalletFactory.solacts as the factory contract, enabling anyone to deploy their ownTimeLockedWalleteffortlessly.ERC20.solrepresents an interface adhering to the ERC20 standard for Ethereum tokens.ToptalToken.solrepresents a customized ERC20 token.SafeMath.solis a compact library utilized byToptalTokenfor performing secure arithmetic operations.Migrations.solis an internal Truffle contract facilitating seamless migrations.
If you have any questions regarding writing Ethereum contracts, the official Solidity smart contract docs serves as a comprehensive resource.
TimeLockedWallet.sol: A Closer Look
Let’s examine the code of our TimeLockedWallet.sol Solidity contract:
| |
This line specifies the minimum Solidity compiler version required for this contract.
| |
This section imports other contract definitions that will be referenced later in the code.
| |
This represents our primary object. The contract keyword defines the scope of our contract code. The code within the curly brackets forms the body of our contract.
| |
Here, we define several public variables, each automatically generating corresponding getter methods. Some variables have the uint type (unsigned integers), while others have the address type (16-character Ethereum addresses).
| |
In essence, a modifier acts as a precondition that must be met before the function it’s attached to can be executed.
| |
This is our constructor function. Since its name matches our contract name, it’s invoked only once during contract creation.
Changing the contract name would turn this into a regular function callable by anyone, potentially creating a vulnerability like the one exploited in the Parity Multisig Wallet bug. Additionally, note that case sensitivity matters. If this function name were in lowercase, it would also become a regular function—an undesirable outcome in this context.
| |
This special function, known as the fallback function, handles incoming ETH transactions. Any ETH sent to this contract is accepted, increasing the contract’s ETH balance and triggering a Received event. To enable other functions to receive ETH, mark them with the payable keyword.
| |
This is a regular function without any parameters. It defines the output tuple to be returned. this.balance retrieves the current ether balance of this contract.
| |
This function can only be executed if the onlyOwner modifier defined earlier is satisfied. If the require statement evaluates to false, the contract terminates with an error. Here, we verify if the unlockDate has passed. msg.sender represents the caller of this function, and the contract’s entire ether balance is transferred to this address. Finally, a Withdrew event is emitted.
It’s important to note that now (equivalent to block.timestamp) might not be perfectly accurate. Miners have some leeway in setting it, potentially resulting in a discrepancy of up to 15 minutes (900 seconds), as explained in the following formula:
parent.timestamp >= block.timestamp <= now + 900 seconds
Therefore, avoid using now for precise time measurements.
| |
This function handles ERC20 token withdrawals. Since the contract itself lacks knowledge of tokens assigned to its address, you need to provide the address of the deployed ERC20 token to withdraw. We instantiate it with ERC20(_tokenContract), retrieve the entire token balance, and transfer it to the recipient. A WithdrewTokens event is emitted to record the transaction.
| |
This snippet defines several events. Triggered events are essentially log entries associated with transaction receipts on the blockchain. Each transaction can have zero or more log entries attached. Events serve several primary purposes, including debugging and monitoring.
That’s all it takes to implement time-locked functionality for ether and ERC20 tokens—a testament to the elegance and conciseness of Solidity. Now, let’s shift our attention to our other contract, TimeLockedWalletFactory.sol.
TimeLockedWalletFactory.sol: The Architect
There are two primary reasons for creating a higher-level factory contract. First, from a security perspective, separating funds into different wallets prevents the accumulation of a massive amount of ether and tokens in a single contract. This approach distributes control and potentially deters hackers from targeting a single, high-value contract.
Second, a factory contract simplifies the process of creating TimeLockedWallet contracts. Users can effortlessly deploy these contracts without needing a development setup. All that’s required is calling a function from another wallet or ÐApp.
| |
This section, similar to the previous contract, is straightforward.
| |
Here, we define a mapping type, which resembles a dictionary or a map, but with all possible keys pre-initialized and pointing to default values. For the address type, the default value is the zero address 0x00. We also have an array type, address[], designed to store address values.
In Solidity, arrays can only hold one type of element and can have fixed or dynamic lengths. Our array, in this case, is unbounded.
In summary, we define a mapping named wallets. It consists of user addresses (both creators and owners) pointing to arrays of associated wallet contract addresses.
| |
This function utilizes the mapping to return all contract wallets created by or accessible to a given _user. The view keyword (or constant in older compiler versions) indicates that this function doesn’t modify the blockchain state and can be called without incurring gas costs.
| |
This is the crux of the contract: the factory method. It enables the dynamic creation of time-locked wallets by invoking their constructor: new TimeLockedWallet(msg.sender, _owner, _unlockDate). The address of the newly created wallet is then stored for both the creator and the recipient. Any optional ether sent along with this function execution is transferred to the new wallet’s address. Finally, a Create event, defined below, is emitted:
| |
ToptalToken.sol: Introducing Our Token
This tutorial wouldn’t be complete without creating our own Ethereum token. Enter ToptalToken. ToptalToken is a standard ERC20 token adhering to the following interface:
| |
What sets it apart from other tokens is defined below:
| |
We’ve given it a name, a symbol, a total supply of one million tokens, and divisibility up to six decimal places.
To explore various token contract implementations, the OpenZeppelin repo serves as a valuable resource.
Truffle Console: Your Gateway to Contract Interaction
To get up and running quickly, launch Truffle with its built-in blockchain:
| |
You should see output similar to this:
| |
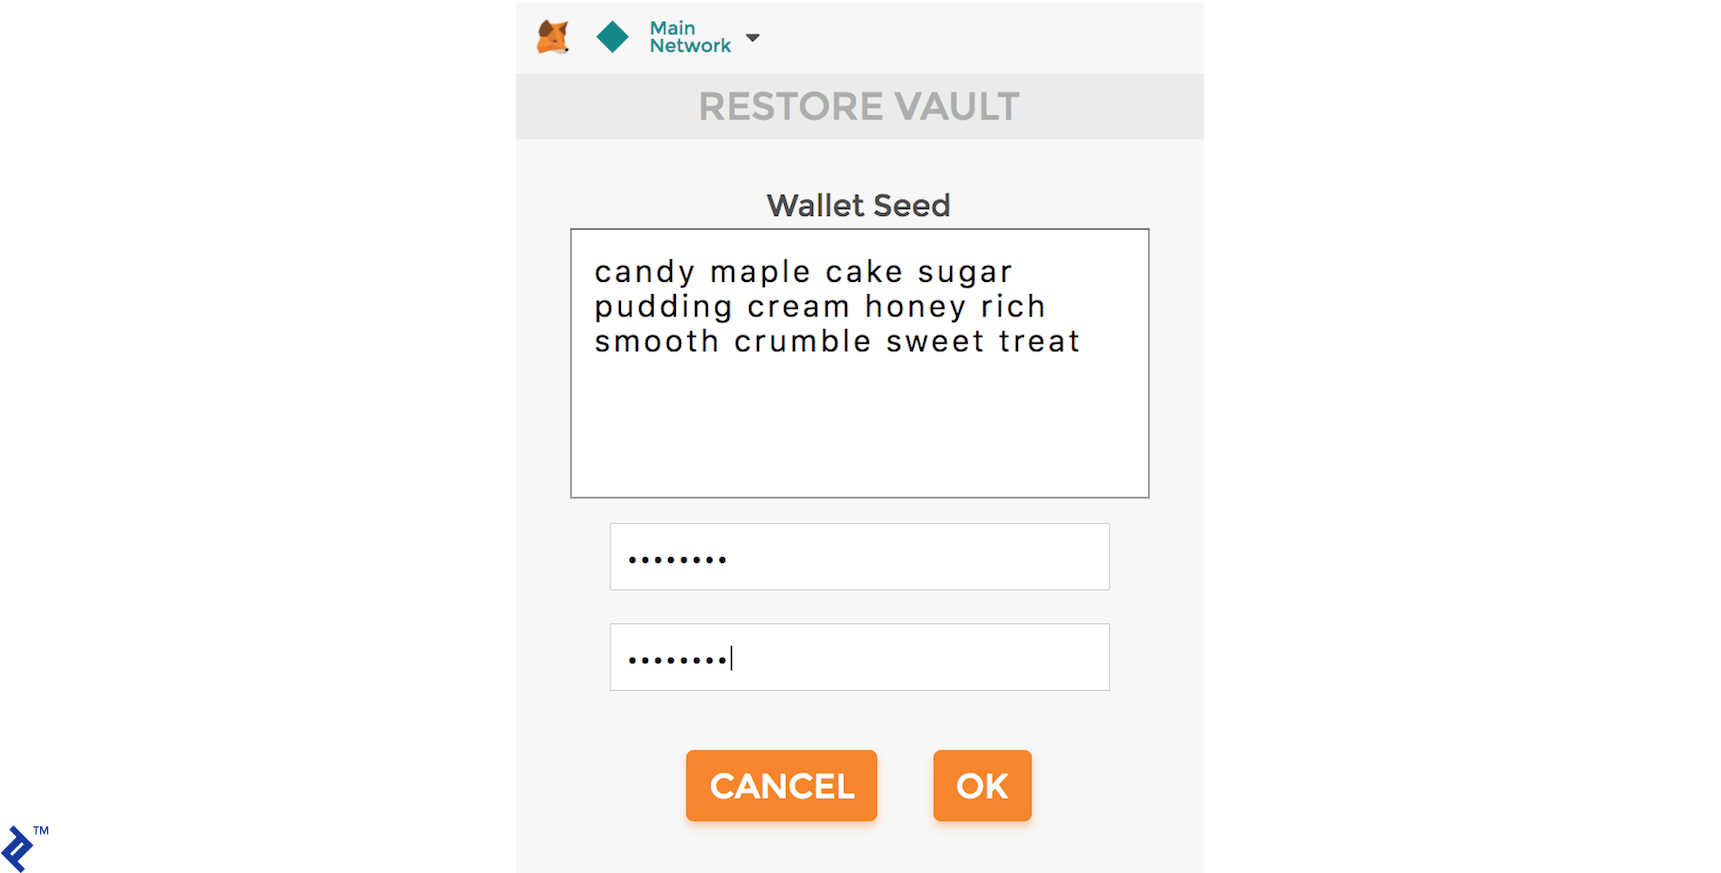
The mnemonic seed allows you to recreate your private and public keys. For instance, you can import it into MetaMask, as shown here:
To compile the contracts, run:
| |
You should see the following output:
| |
Next, define the contracts to deploy in migrations/2_deploy_contracts.js:
| |
First, import the TimeLockedWalletFactory and ToptalToken contract artifacts. Then, deploy them. Note the omission of TimeLockedWallet, as this contract is deployed dynamically. For more information on migrations, refer to the Truffle migrations documentation.
To migrate the contracts, run:
| |
This should produce output resembling the following:
| |
Observe that both TimeLockedWalletFactory and ToptalToken have been deployed successfully.
Finally, ensure everything functions as expected by running tests. Tests reside in the test directory and correspond to the main contracts (TimeLockedWalletTest.js and TimeLockedWalletFactoryTest.js). We’ll skip the intricacies of writing tests for brevity, leaving it as an exercise for the reader. To execute the tests, simply run:
| |
You should see all tests passing, like this:
| |
Bringing It Together with a Time-Locked Wallet ÐApp
It’s time to witness everything in action. Interacting with the blockchain is most user-friendly through distributed applications with web UIs, known as ÐApps (or “dapps”).
Setting Up Your Decentralized Application
Running this ÐApp requires an Ethereum-enabled browser. The simplest approach is installing the MetaMask Chrome plugin. Alternatively, you can use visual guide on installing and configuring MetaMask with Truffle.
Walking Through Our Smart Contract Scenario
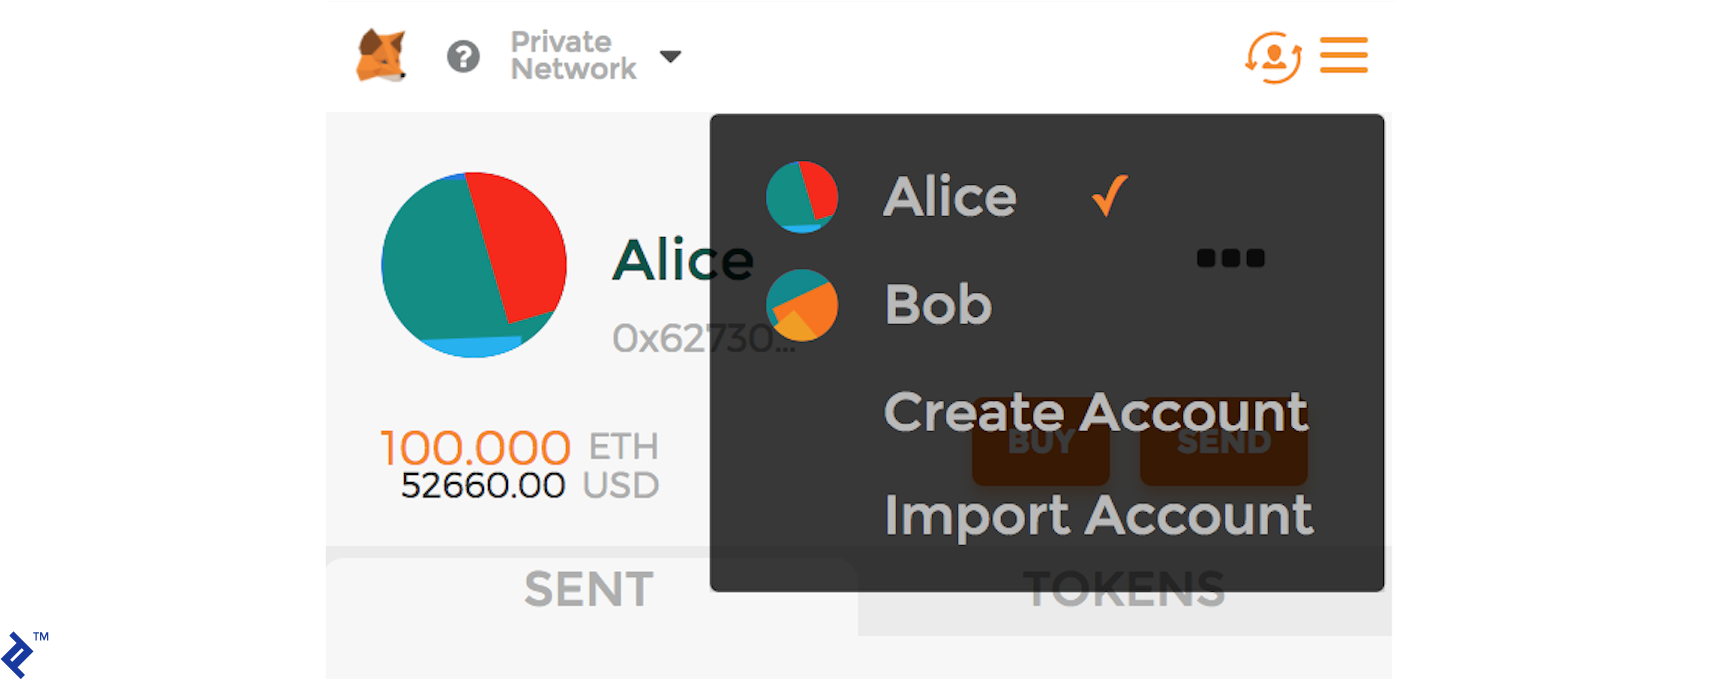
Let’s introduce our actors: Alice, the creator of the time-locked wallet, and Bob, the recipient and eventual owner of the funds.
Scenario Outline:
- Alice creates a time-locked wallet for Bob, depositing some ETH.
- Alice sends additional ERC20 Toptal Tokens.
- Bob views accessible and created wallets.
- Bob attempts to withdraw funds before the time lock expires (and is prevented from doing so).
- Bob successfully withdraws ETH after the lock expires.
- Bob withdraws all ERC20 Toptal Tokens.
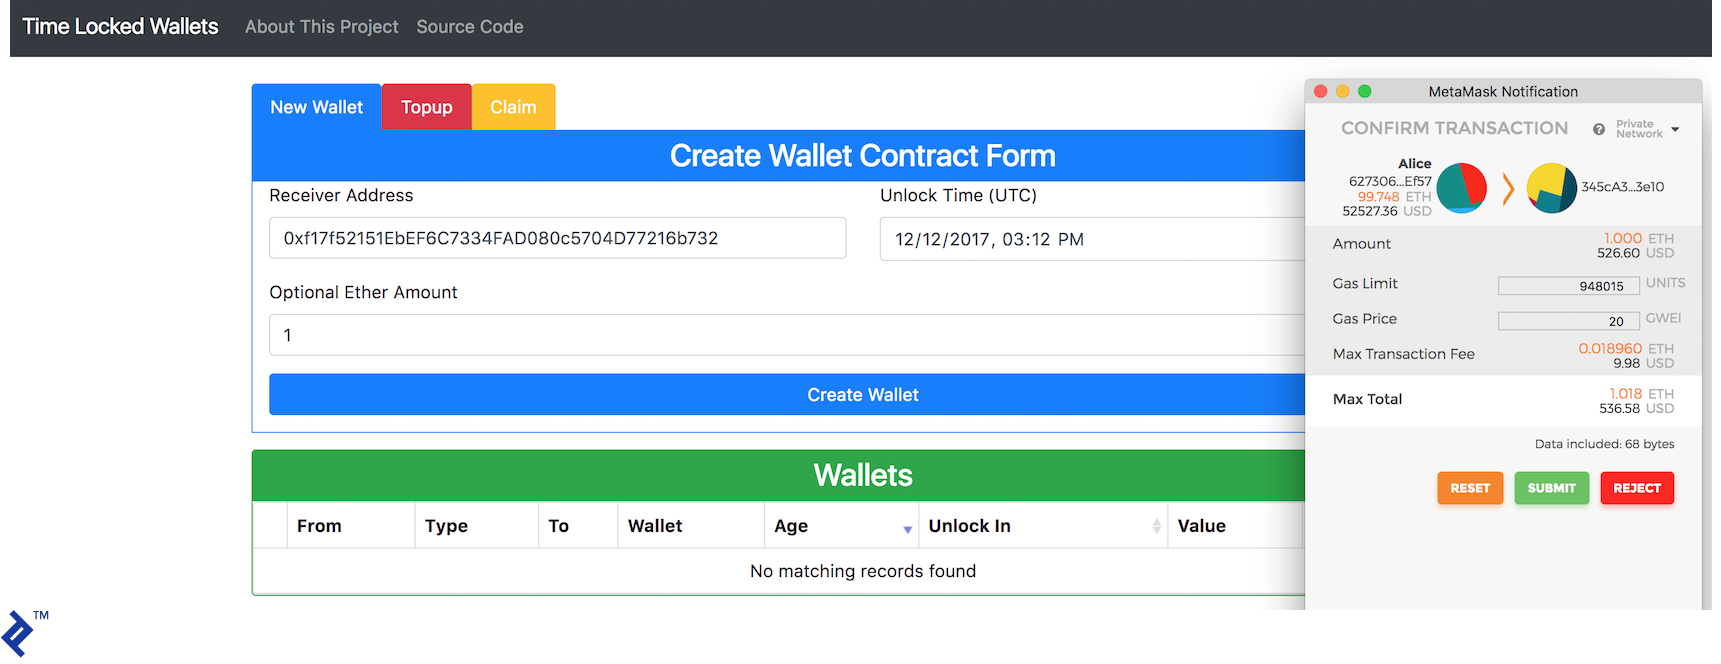
First, Alice creates a time-locked wallet for Bob, sending an initial one ether. Observe the creation of the new contract wallet owned by Bob:
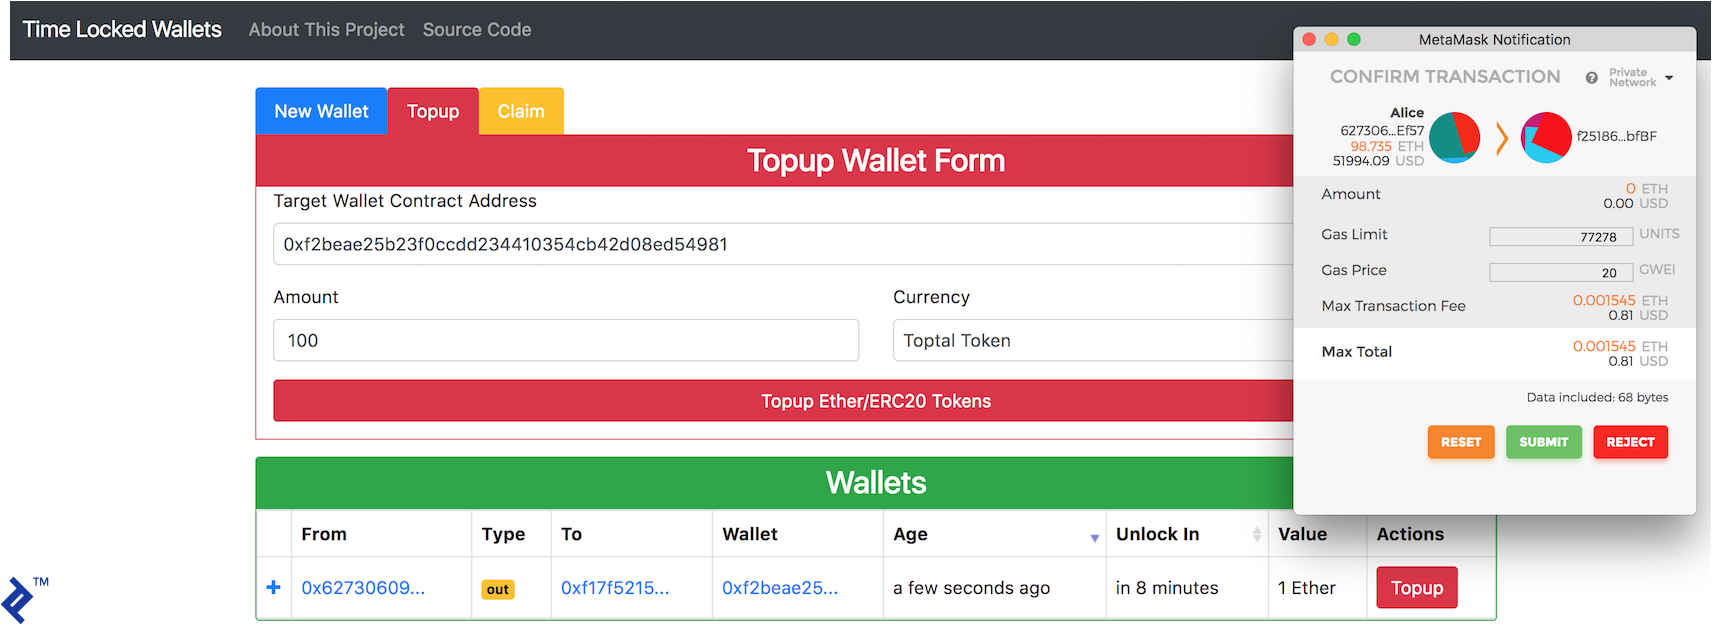
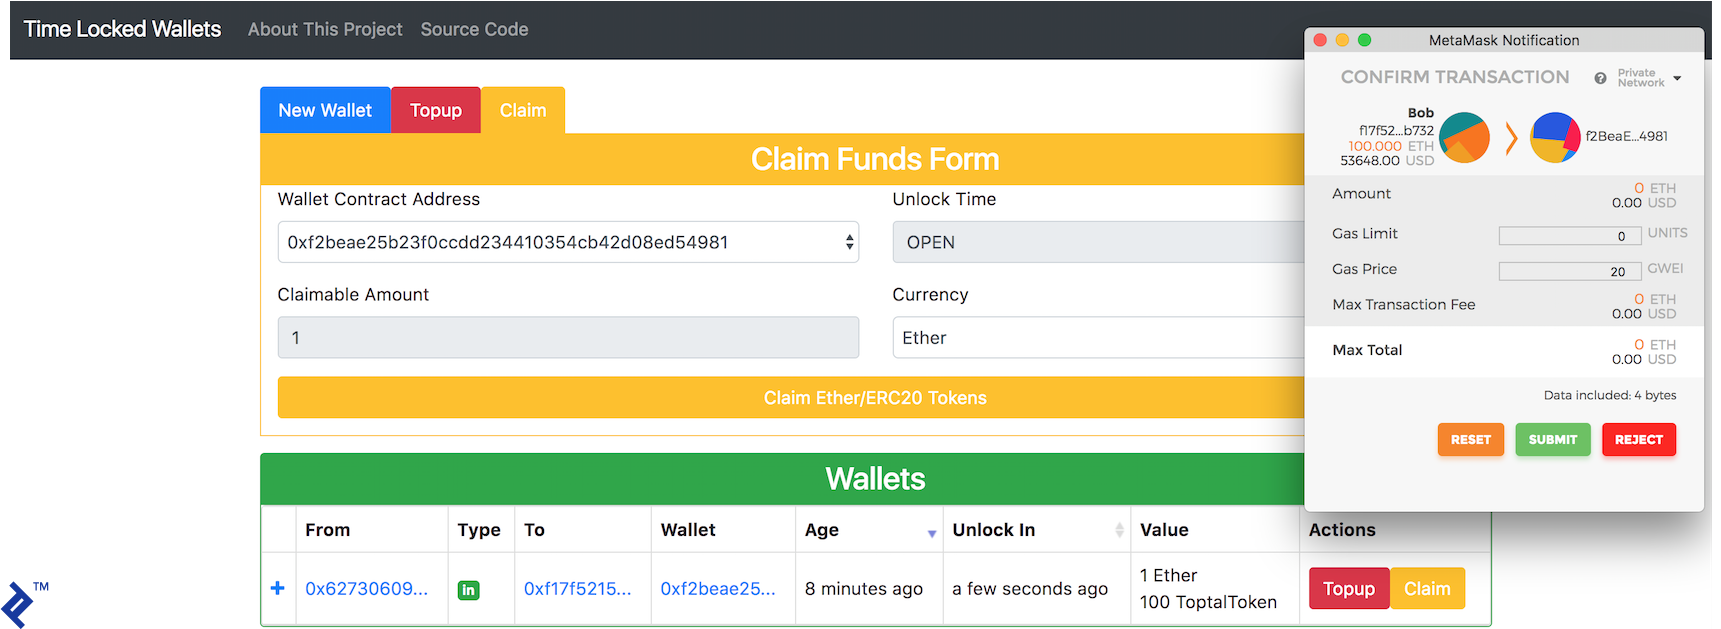
At any point after creation, anyone can top up the wallet with ether or ERC20 tokens. Let’s have Alice send 100 Toptal Tokens to Bob’s new wallet, as depicted here:
From Alice’s perspective, the wallet will look like this after the top-up:

Switching roles, let’s log in as Bob. Bob should see all the wallets he has created or is a recipient of. However, he cannot withdraw any funds from the contract created by Alice, as it remains time-locked:

After patiently waiting for the lock to expire…

…Bob can finally withdraw both ether and Toptal Tokens:
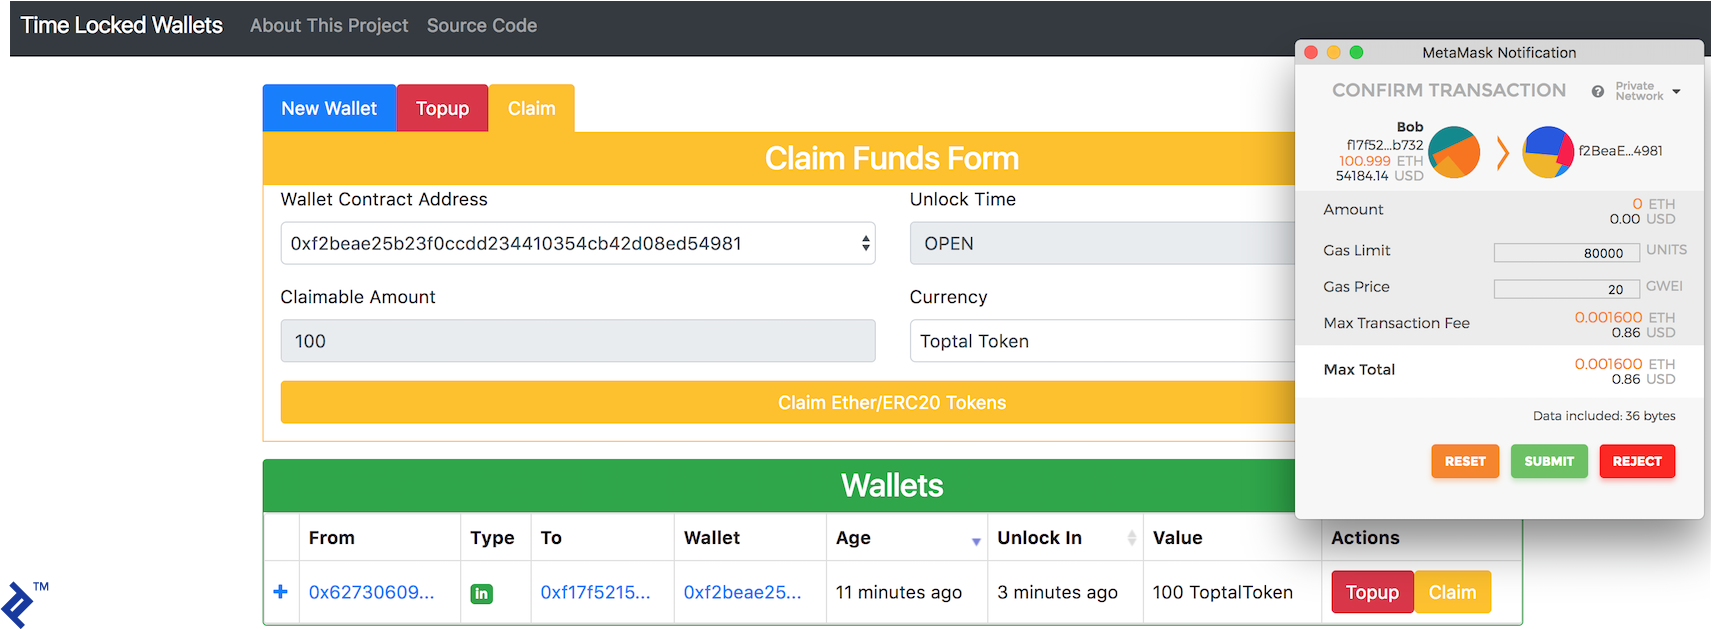
With the time-locked wallet now empty, Bob’s address balance increases, leaving him content and appreciative of Alice’s generosity:

Interacting with the Ethereum Network
You don’t have to run these contracts locally. We’ve deployed them to the Ethereum Rinkeby testnet. ToptalToken is deployed here, and TimeLockedWalletFactory is deployed here.
Use our deployed ÐApp, linked to the aforementioned contracts and hosted on GitHub Pages. Ensure MetaMask is installed and connected to the Rinkeby testnet.
Troubleshooting Tips
During development, we encountered a few minor hiccups. MetaMask in Chrome occasionally exhibited flakiness (e.g., complaining about an invalid nonce). Reinstalling the plugin usually resolved this.
Truffle sometimes lost sync when editing smart contracts, throwing an invalid number of solidity parameters error. Running rm -r build, followed by compiling and migrating, cleared this issue.
Ethereum Development: Embracing the Challenge
We hope this article has ignited your curiosity and inspired you to embark on your Ethereum development journey. The path might be demanding, but abundant resources are available to guide you, such as this one (which we found immensely helpful). Feel free to reach out in the comments below with any questions.
The source code for this project is available is available on GitHub.
To explore using a uPort mobile app instead of MetaMask, delve into the demo and source code of an alternative, award-winning implementation of this project.
For further exploration, we invite you to read the follow-up tutorial, which focuses on ÐApp development.
Credits
Special thanks to Maciek Zielinski for their invaluable contributions to this project.