As an Android developer, you’ve likely encountered RxJava. It’s a widely discussed library for integrating Reactive Programming into Android development, often praised as the ultimate solution for simplifying the complexities of concurrency and asynchronous tasks in mobile programming.
But what exactly is RxJava, and how does it simplify development?
Untangle your Android from too many Java threads with RxJava.
While numerous online resources explain RxJava, this article aims to provide a basic introduction to RxJava and its specific relevance in Android development. I’ll offer concrete examples and suggestions for integrating it into new or existing projects.
Why Choose RxJava?
Fundamentally, RxJava streamlines development by abstracting away the complexities of raises the level of abstraction. As a developer, you can focus less on the intricate details of managing operations across different threads. This is particularly beneficial because threading can be error-prone, and incorrect implementation often leads to difficult-to-debug issues.
While RxJava simplifies threading, it doesn’t completely eliminate the need to understand the underlying mechanisms. It can, however, significantly reduce development overhead.
Let’s illustrate with an example.
Network Call: RxJava vs AsyncTask
Suppose we need to fetch data from the network and subsequently update the UI. One approach involves (1) creating an inner AsyncTask subclass within our Activity/Fragment, (2) performing the network request in the background, and (3) updating the UI on the main thread with the result.
 1
 2
 3
 4
 5
 6
 7
 8
 9
10
11
12
13
14
15
16
17
18
19
20
21
| public class NetworkRequestTask extends AsyncTask<Void, Void, User> {
private final int userId;
public NetworkRequestTask(int userId) {
this.userId = userId;
}
@Override protected User doInBackground(Void... params) {
return networkService.getUser(userId);
}
@Override protected void onPostExecute(User user) {
nameTextView.setText(user.getName());
// ...set other views
}
}
private void onButtonClicked(Button button) {
new NetworkRequestTask(123).execute()
}
|
Although seemingly straightforward, this approach has drawbacks. Memory/context leaks can easily occur because NetworkRequestTask, being an inner class, implicitly retains a reference to the outer class. Additionally, chaining another long-running task after the network call would require nesting AsyncTasks, hindering code readability.
In contrast, consider the RxJava approach for a network call:
 1
 2
 3
 4
 5
 6
 7
 8
 9
10
11
12
13
14
15
16
17
18
19
20
| private Subscription subscription;
private void onButtonClicked(Button button) {
subscription = networkService.getObservableUser(123)
.subscribeOn(Schedulers.io())
.observeOn(AndroidSchedulers.mainThread())
.subscribe(new Action1<User>() {
@Override public void call(User user) {
nameTextView.setText(user.getName());
// ... set other views
}
});
}
@Override protected void onDestroy() {
if (subscription != null && !subscription.isUnsubscribed()) {
subscription.unsubscribe();
}
super.onDestroy();
}
|
This approach mitigates the risk of memory leaks caused by a running thread referencing the outer context. We achieve this by maintaining a reference to the returned Subscription object, which is subsequently tied to the Activity/Fragment object’s #onDestroy() method. This ensures that the Action1#call operation is halted when the Activity/Fragment is scheduled for destruction.
Furthermore, the return type of #getObservableUser(...) (an Observable<User>) allows for chaining additional calls. This fluid API addresses the second limitation of AsyncTask by enabling straightforward chaining of subsequent network calls or long-running operations. Quite elegant, isn’t it?
Let’s delve deeper into some core RxJava concepts.
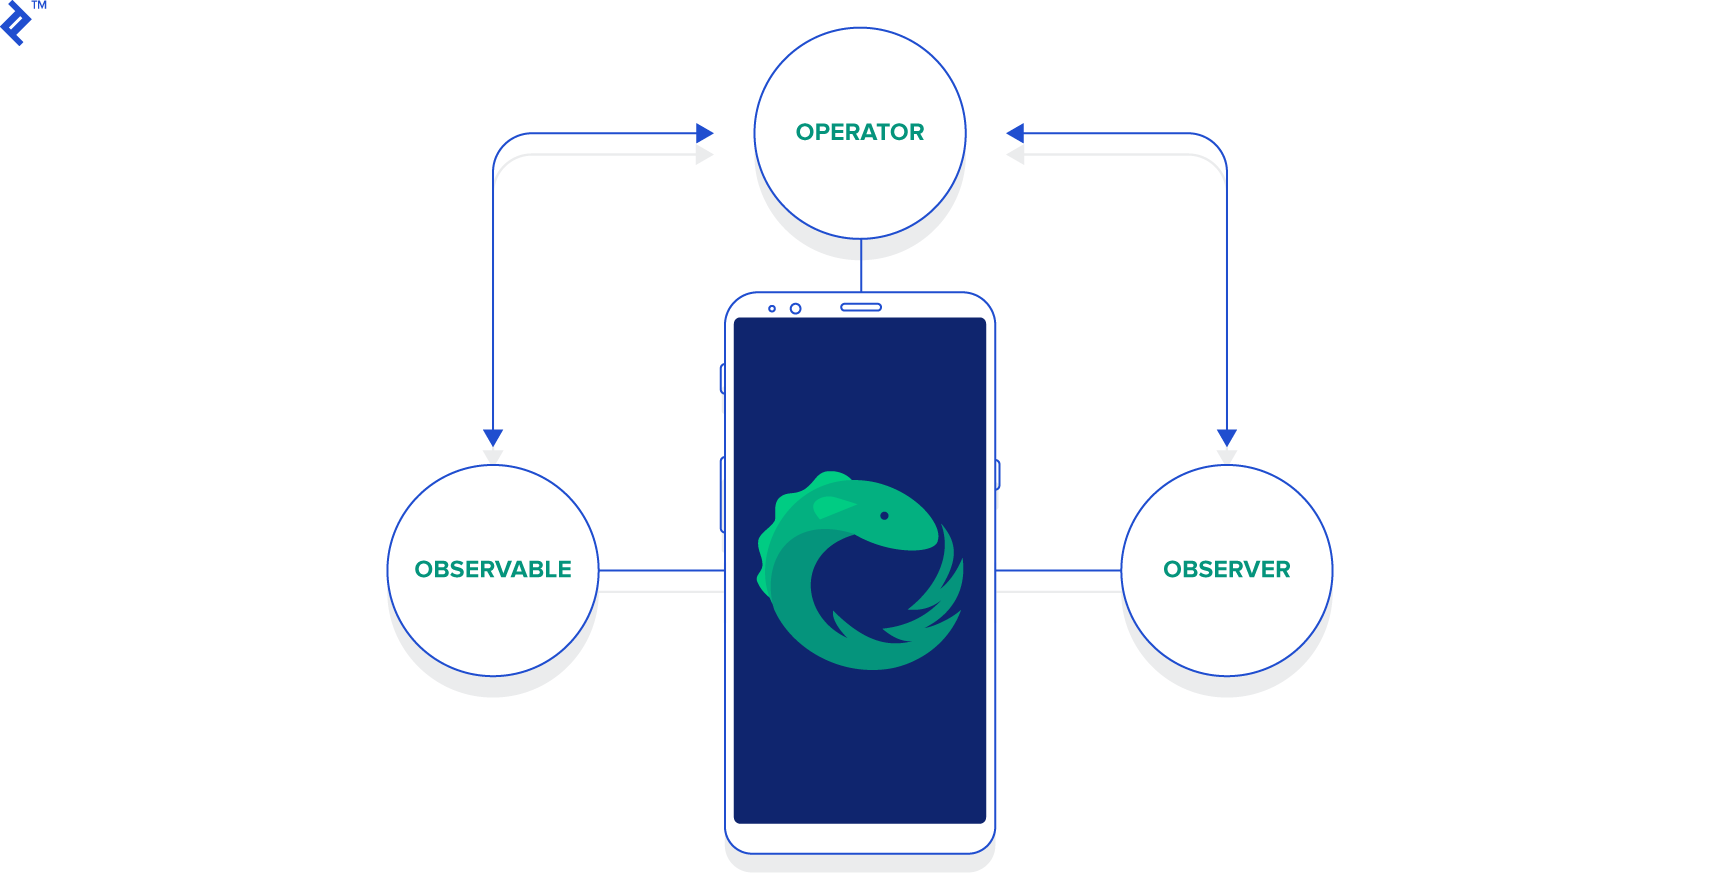
Observable, Observer, Operator: The Core Trio of RxJava
In the realm of RxJava, everything can be represented as streams. These streams emit items over a period, and each emission can be consumed or observed.
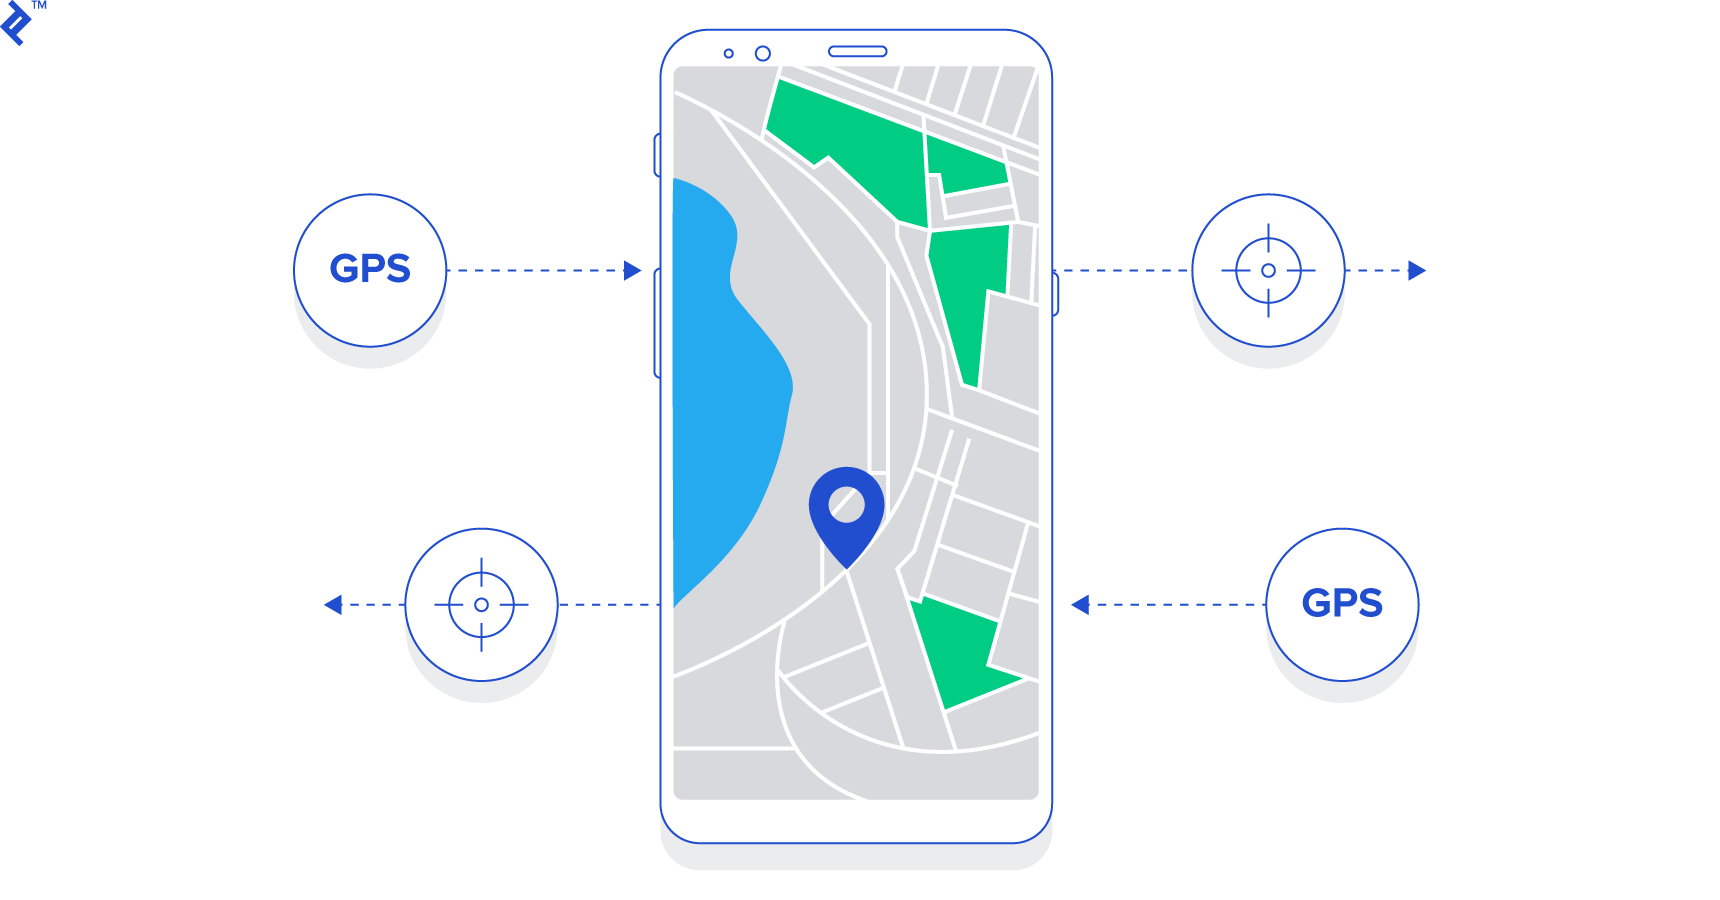
The concept of a stream is not entirely new. Click events, location updates, push notifications—all can be modeled as streams.
The stream abstraction is implemented through three fundamental components: Observable, Observer, and Operator, forming the core trio. The Observable represents the stream, emitting items, while the Observer consumes these items. The emissions from Observables can be modified, transformed, or manipulated by chaining Operator calls.
Observable
In RxJava, an Observable embodies the stream abstraction. Similar to an Iterator, given a sequence, it iterates through it and produces items sequentially. Consumers can then consume these items through a consistent interface, irrespective of the underlying sequence.
Let’s say we want to emit the numbers 1, 2, and 3 in order. We can use the Observable<T>#create(OnSubscribe<T>) method:
1
2
3
4
5
6
7
8
| Observable<Integer> observable = Observable.create(new Observable.OnSubscribe<Integer>() {
@Override public void call(Subscriber<? super Integer> subscriber) {
subscriber.onNext(1);
subscriber.onNext(2);
subscriber.onNext(3);
subscriber.onCompleted();
}
});
|
Invoking subscriber.onNext(Integer) emits an item into the stream, and once the stream completes emission, subscriber.onCompleted() is invoked.
This method, while functional, is rather verbose. For this reason, convenience methods exist for creating Observable instances, and their use is generally preferred.
The simplest method is Observable#just(...). As the name implies, it emits the item(s) passed as arguments.
1
| Observable.just(1, 2, 3); // 1, 2, 3 will be emitted, respectively
|
Observer
The counterpart to the Observable stream is the Observer (or Observers) subscribed to it. Observers are notified whenever something noteworthy happens within the stream through these events:
Observer#onNext(T): Invoked when the stream emits an item.Observable#onError(Throwable): Invoked when an error occurs within the stream.Observable#onCompleted(): Invoked upon completion of item emission from the stream.
Subscribing to a stream is straightforward: call Observable<T>#subscribe(...) and pass in an Observer instance.
 1
 2
 3
 4
 5
 6
 7
 8
 9
10
11
12
13
14
| Observable<Integer> observable = Observable.just(1, 2, 3);
observable.subscribe(new Observer<Integer>() {
@Override public void onCompleted() {
Log.d("Test", "In onCompleted()");
}
@Override public void onError(Throwable e) {
Log.d("Test", "In onError()");
}
@Override public void onNext(Integer integer) {
Log.d("Test", "In onNext():" + integer);
}
});
|
This code snippet produces the following output in Logcat:
1
2
3
4
5
| In onNext(): 1
In onNext(): 2
In onNext(): 3
In onNext(): 4
In onCompleted()
|
There might be scenarios where we’re no longer interested in an Observable’s emissions. This is particularly relevant in Android when, for instance, an Activity/Fragment needs to be garbage collected.
To cease observation, simply call Subscription#unsubscribe() on the returned Subscription object.
 1
 2
 3
 4
 5
 6
 7
 8
 9
10
11
12
13
14
15
16
| Subscription subscription = someInfiniteObservable.subscribe(new Observer<Integer>() {
@Override public void onCompleted() {
// ...
}
@Override public void onError(Throwable e) {
// ...
}
@Override public void onNext(Integer integer) {
// ...
}
});
// Call unsubscribe when appropriate
subscription.unsubscribe();
|
As shown, upon subscribing to an Observable, we store the reference to the returned Subscription object. We later invoke subscription#unsubscribe() when necessary, ideally within Activity#onDestroy() or Fragment#onDestroy() in the context of Android.
Operator
Operators allow for the transformation, modification, and filtering of items emitted by an Observable before they reach the subscribed Observer(s). Many familiar operations from functional programming, such as map, filter, and reduce, are applicable to Observable streams. Let’s illustrate with the map operator:
 1
 2
 3
 4
 5
 6
 7
 8
 9
10
11
12
13
14
15
16
17
| Observable.just(1, 2, 3, 4, 5).map(new Func1<Integer, Integer>() {
@Override public Integer call(Integer integer) {
return integer * 3;
}
}).subscribe(new Observer<Integer>() {
@Override public void onCompleted() {
// ...
}
@Override public void onError(Throwable e) {
// ...
}
@Override public void onNext(Integer integer) {
// ...
}
});
|
This code snippet multiplies each emission from the Observable by 3, resulting in the stream: 3, 6, 9, 12, 15. Applying an Operator typically returns another Observable, enabling the chaining of multiple operations to achieve the desired outcome.
Taking the previous stream, suppose we want to isolate even numbers. This can be achieved by chaining a filter operation:
 1
 2
 3
 4
 5
 6
 7
 8
 9
10
11
12
13
14
15
16
17
18
19
20
21
| Observable.just(1, 2, 3, 4, 5).map(new Func1<Integer, Integer>() {
@Override public Integer call(Integer integer) {
return integer * 3;
}
}).filter(new Func1<Integer, Boolean>() {
@Override public Boolean call(Integer integer) {
return integer % 2 == 0;
}
}).subscribe(new Observer<Integer>() {
@Override public void onCompleted() {
// ...
}
@Override public void onError(Throwable e) {
// ...
}
@Override public void onNext(Integer integer) {
// ...
}
});
|
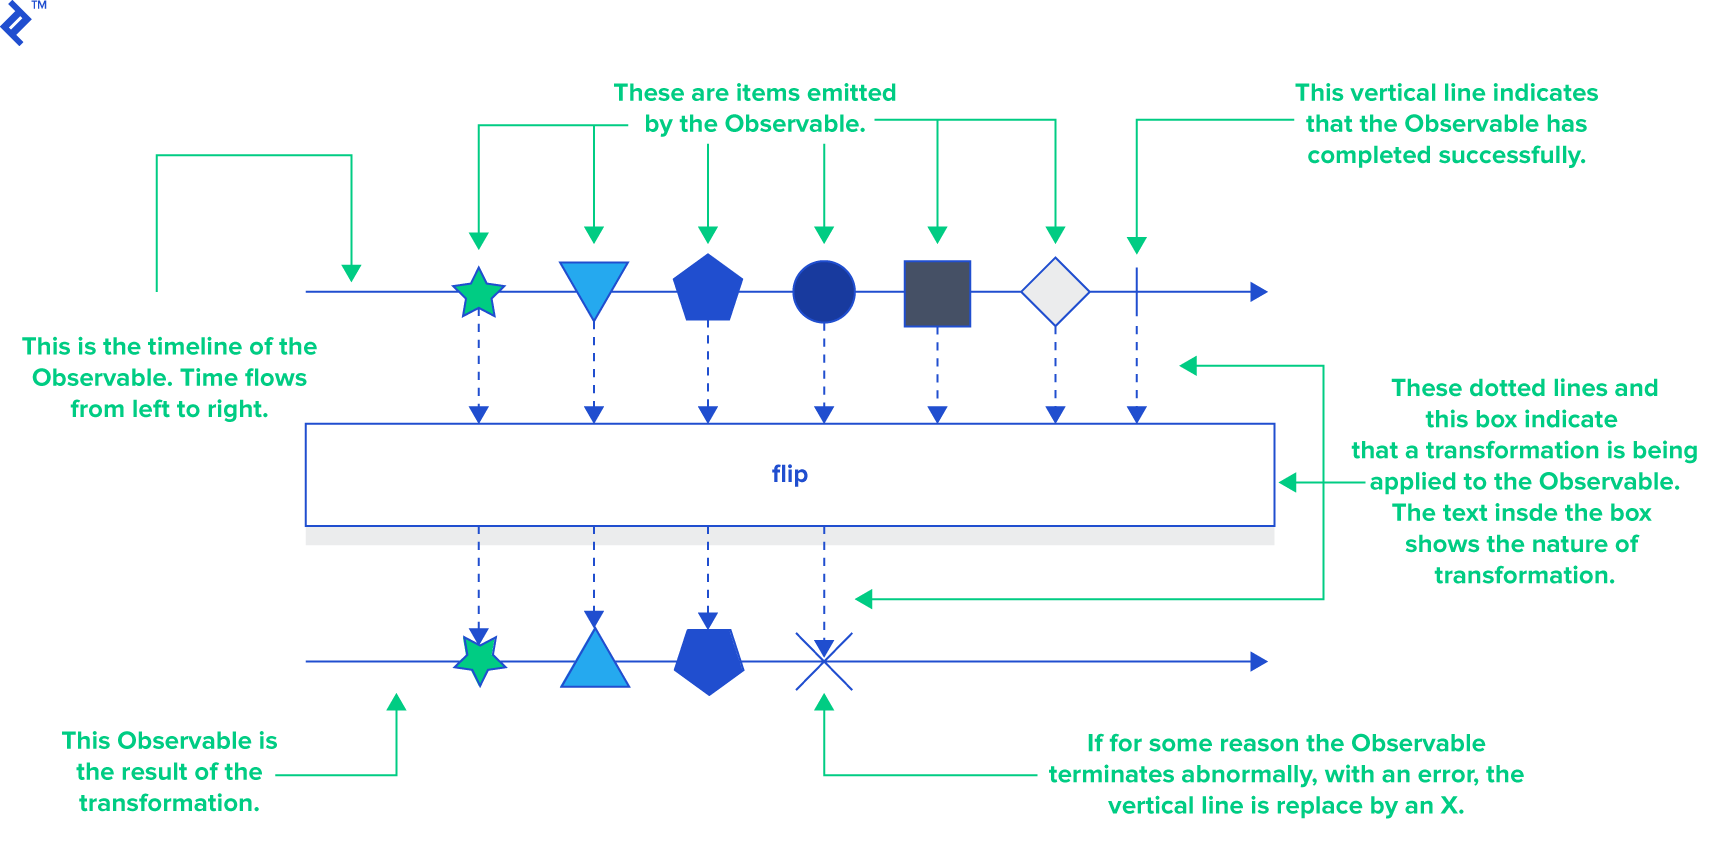
RxJava offers an extensive many operators built-in the RxJava for manipulating Observable streams. If you can conceptualize a way to modify a stream, there’s likely an Operator for it. Unlike many technical documents, the RxJava/ReactiveX documentation is clear, concise, and easy to understand. Each operator’s documentation is accompanied by a “marble diagram,” a visualization of its effect on the stream.
Here’s a hypothetical Operator named “flip” represented using a marble diagram:
Multithreading in RxJava
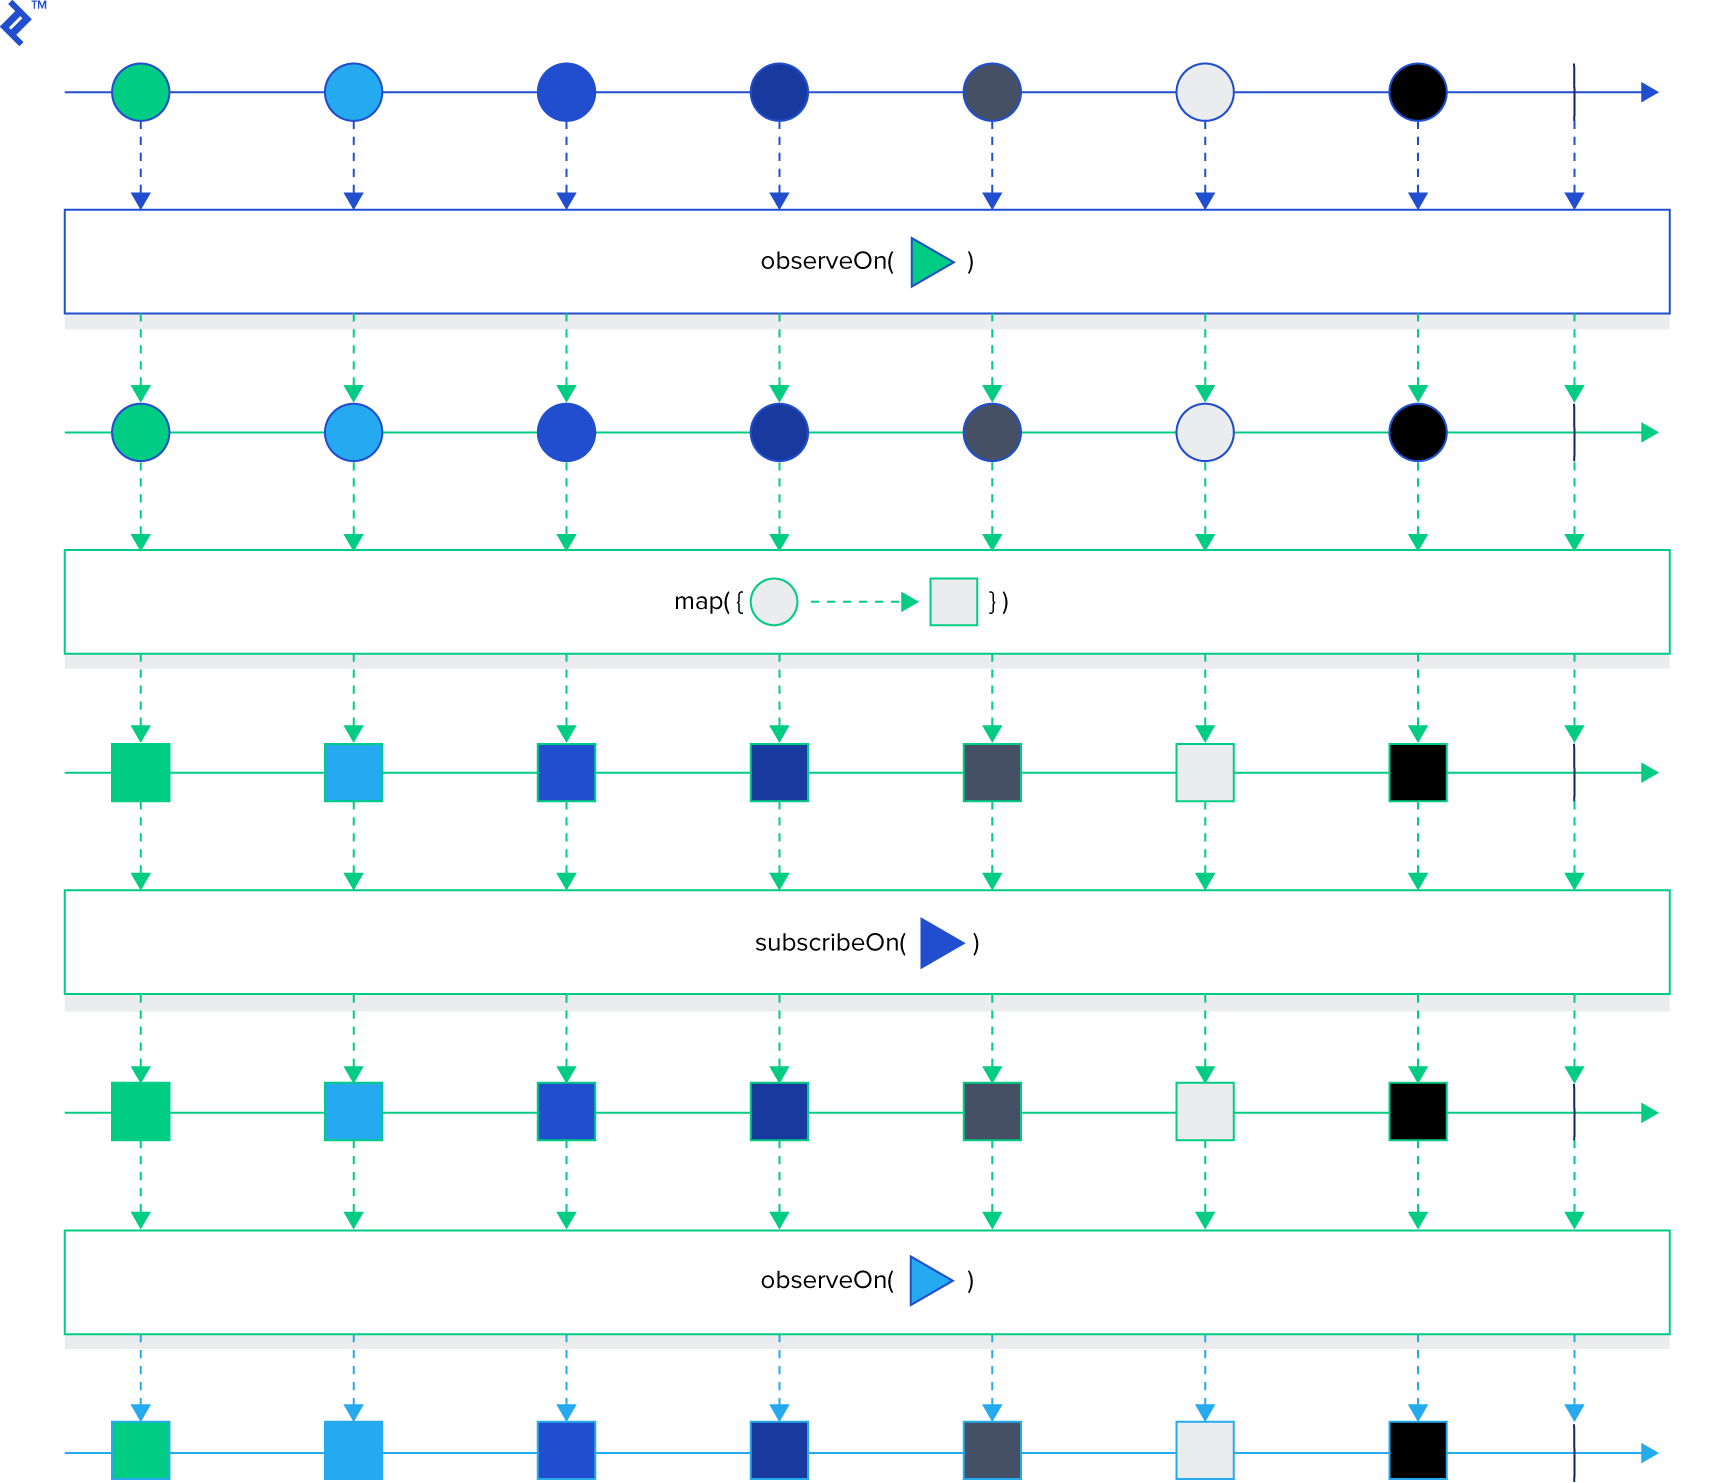
Controlling the thread on which operations within an Observable chain execute involves specifying the Scheduler. Think of a Scheduler as a thread pool utilized by an operator when specified. By default, the Observable chain operates on the same thread where Observable#subscribe(...) is called, unless a Scheduler is provided.
Schedulers can be specified using Observable#subscribeOn(Scheduler) and/or Observable#observeOn(Scheduler). The former dictates the Scheduler for the source Observable, and the chain continues on this thread until Observable#observeOn(Scheduler) is called with a different Scheduler. Subsequent operations then receive notifications on a thread from the observeOn Scheduler.
This marble diagram illustrates the impact of these methods on thread execution:
In Android, if a UI operation needs to follow a long-running task, we’d want that UI operation to occur on the main thread. AndroidScheduler#mainThread(), from the RxAndroid library, serves this purpose.
RxJava in Android
With a grasp of the fundamentals, let’s explore integrating RxJava into an Android application. While use cases for RxJava are numerous, we’ll focus on using Observable objects within the network stack.
Our example involves Retrofit, an HTTP client by Square with built-in RxJava bindings, to interact with GitHub’s API. We’ll create a simple app that displays starred repositories for a given GitHub username. The source code for this example is available here.
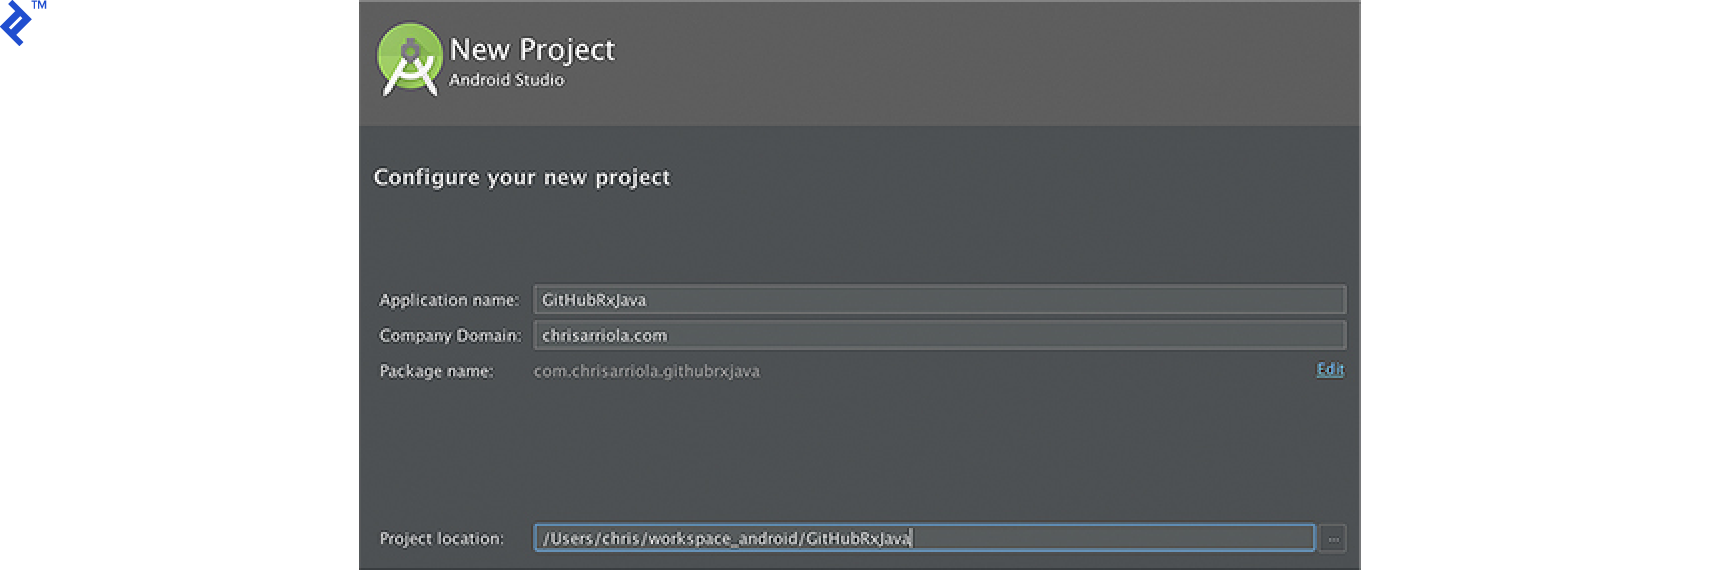
Setting Up a New Android Project
- Create a new Android project named GitHubRxJava.
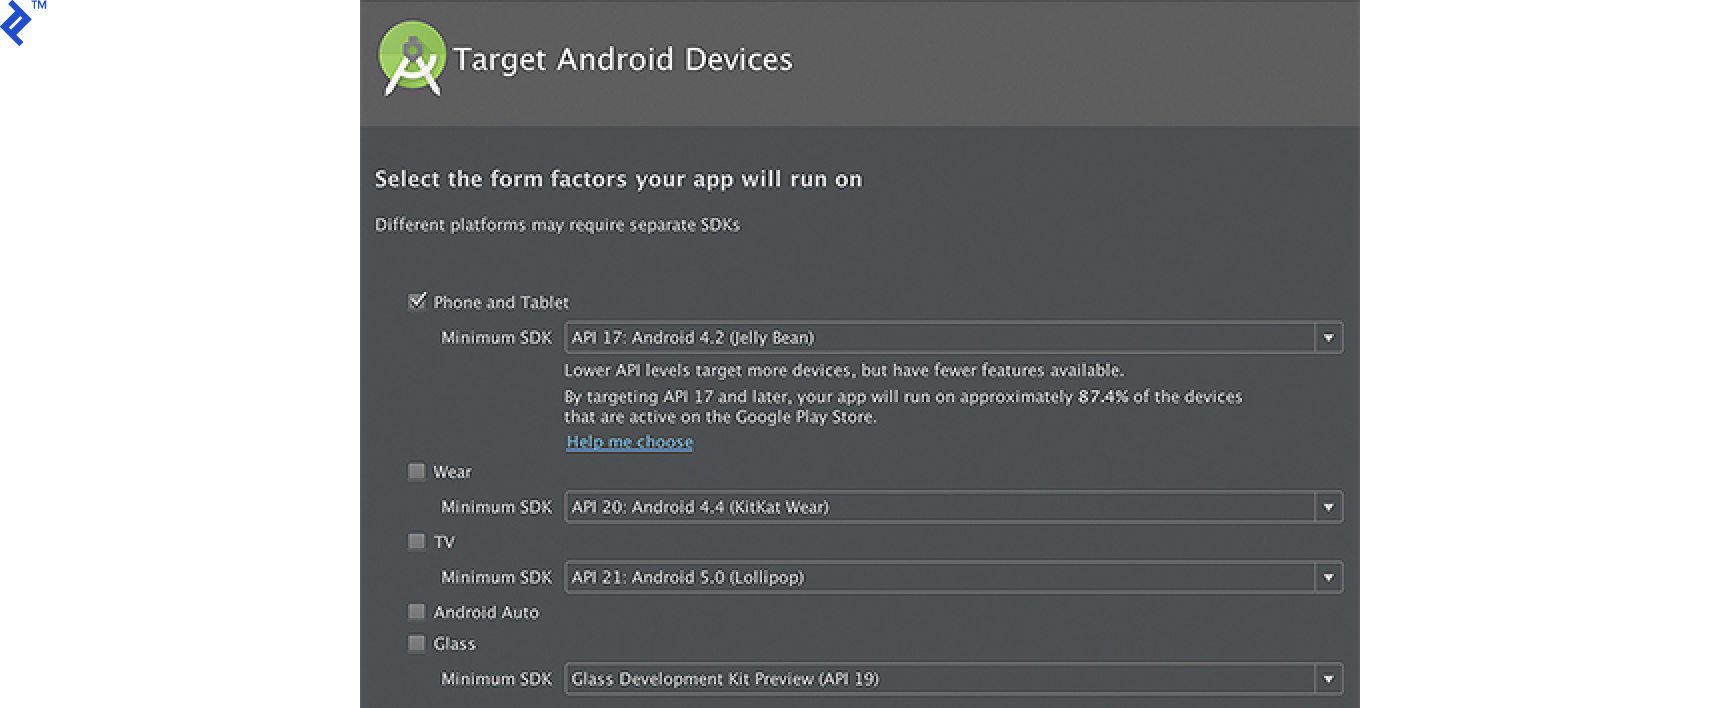
- In the Target Android Devices screen, select Phone and Tablet and set the minimum SDK to 17 (you can adjust this, but API level 17 is suitable for this example).
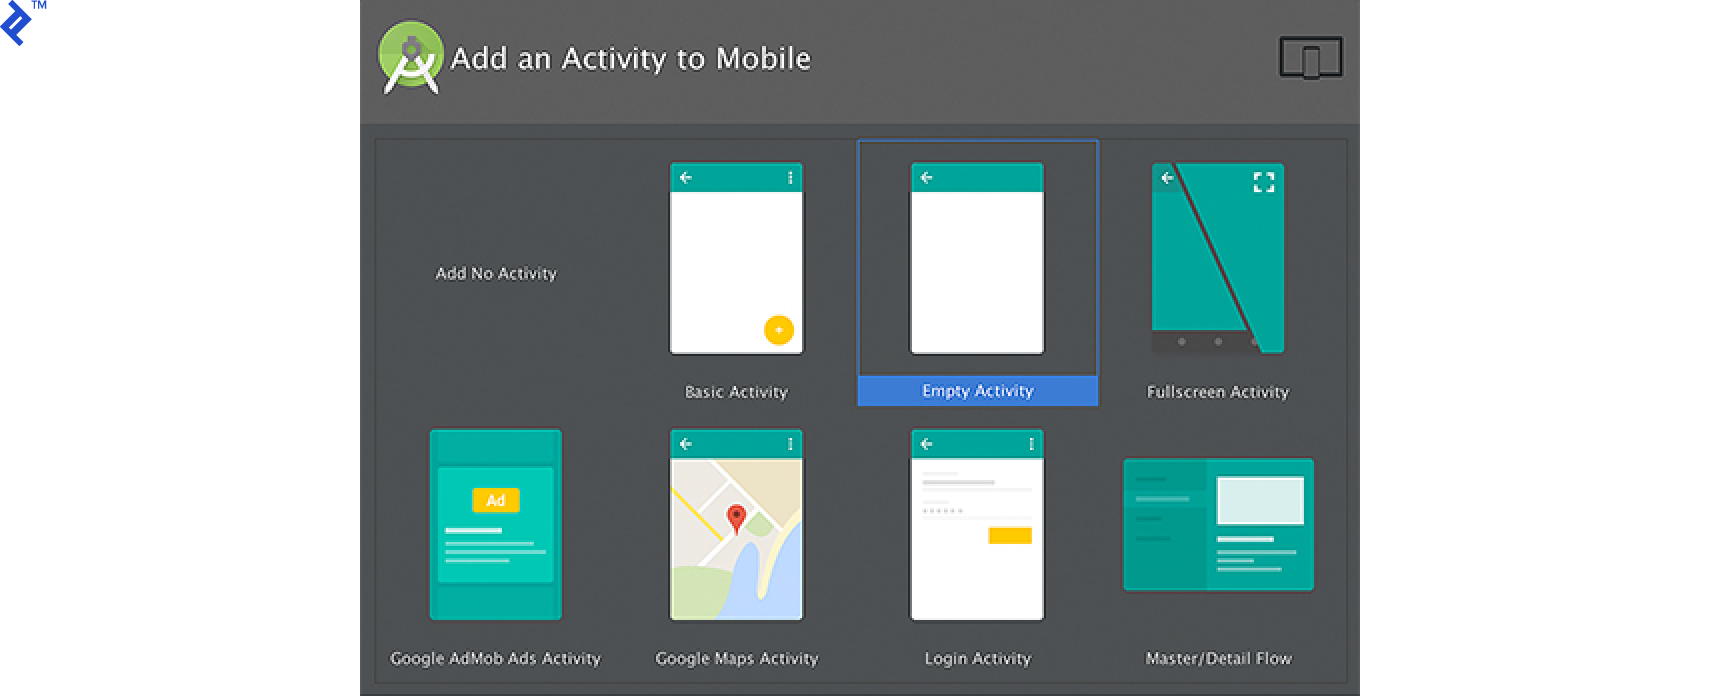
- Choose Empty Activity in the next step.
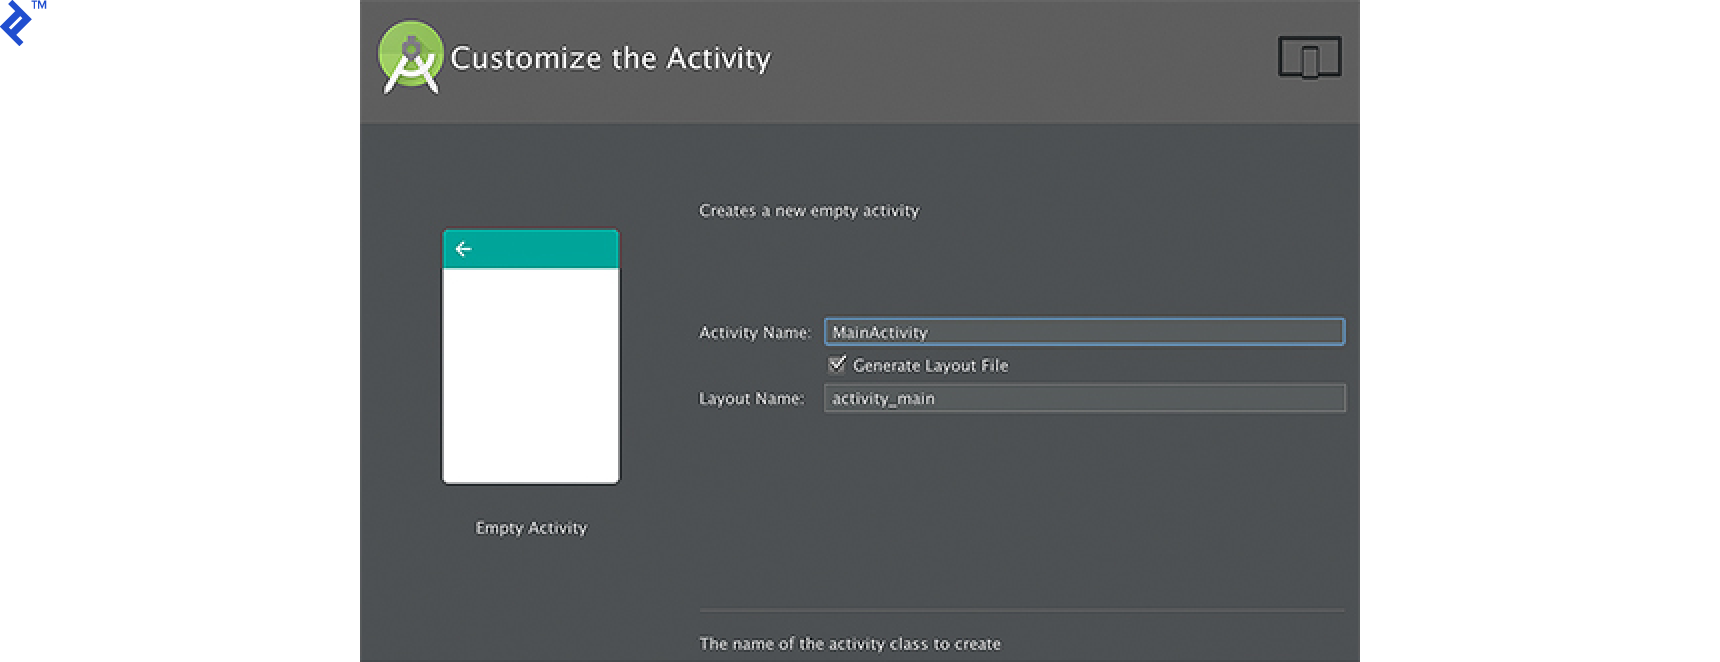
- Finally, retain MainActivity as the Activity Name and generate a layout file named activity_main.
Project Configuration
Include RxJava, RxAndroid, and the Retrofit library in your app/build.gradle file. Note that RxAndroid implicitly includes RxJava. However, it’s good practice to include both explicitly to ensure you’re using the latest versions.
1
2
3
4
5
6
7
8
| dependencies {
compile 'com.squareup.retrofit2:adapter-rxjava:2.1.0'
compile 'com.squareup.retrofit2:converter-gson:2.1.0'
compile 'com.squareup.retrofit2:retrofit:2.1.0'
compile 'io.reactivex:rxandroid:1.2.0'
compile 'io.reactivex:rxjava:1.1.8'
// ...other dependencies
}
|
Data Object Creation
Create a GitHubRepo data object class to encapsulate GitHub repository data. We’ll only use a subset of the data returned by the network response.
 1
 2
 3
 4
 5
 6
 7
 8
 9
10
11
12
13
14
15
16
17
18
| public class GitHubRepo {
public final int id;
public final String name;
public final String htmlUrl;
public final String description;
public final String language;
public final int stargazersCount;
public GitHubRepo(int id, String name, String htmlUrl, String description, String language, int stargazersCount) {
this.id = id;
this.name = name;
this.htmlUrl = htmlUrl;
this.description = description;
this.language = language;
this.stargazersCount = stargazersCount;
}
}
|
Retrofit Setup
- Create the
GitHubService interface, which Retrofit will use to generate an implementation.
1
2
3
| public interface GitHubService {
@GET("users/{user}/starred") Observable<List<GitHubRepo>> getStarredRepositories(@Path("user") String userName);
}
|
Create the GitHubClient class, responsible for handling network calls from the UI.
When constructing the GitHubService implementation with Retrofit, pass an RxJavaCallAdapterFactory as the call adapter to ensure network calls return Observable objects. This is necessary for calls that don’t return a simple Call.
Also, include a GsonConverterFactory to utilize Gson for marshaling JSON objects to Java objects.
 1
 2
 3
 4
 5
 6
 7
 8
 9
10
11
12
13
14
15
16
17
18
19
20
21
22
23
24
25
26
27
28
| public class GitHubClient {
private static final String GITHUB_BASE_URL = "https://api.github.com/";
private static GitHubClient instance;
private GitHubService gitHubService;
private GitHubClient() {
final Gson gson =
new GsonBuilder().setFieldNamingPolicy(FieldNamingPolicy.LOWER_CASE_WITH_UNDERSCORES).create();
final Retrofit retrofit = new Retrofit.Builder().baseUrl(GITHUB_BASE_URL)
.addCallAdapterFactory(RxJavaCallAdapterFactory.create())
.addConverterFactory(GsonConverterFactory.create(gson))
.build();
gitHubService = retrofit.create(GitHubService.class);
}
public static GitHubClient getInstance() {
if (instance == null) {
instance = new GitHubClient();
}
return instance;
}
public Observable<List<GitHubRepo>> getStarredRepos(@NonNull String userName) {
return gitHubService.getStarredRepositories(userName);
}
}
|
Layout Design
Design a simple UI to display retrieved repositories based on a GitHub username. Create activity_home.xml, the layout for our activity:
 1
 2
 3
 4
 5
 6
 7
 8
 9
10
11
12
13
14
15
16
17
18
19
20
21
22
23
24
25
26
27
28
29
30
31
32
33
34
| <?xml version="1.0" encoding="utf-8"?>
<LinearLayout
xmlns:android="http://schemas.android.com/apk/res/android"
android:layout_width="match_parent"
android:layout_height="match_parent"
android:orientation="vertical">
<ListView
android:id="@+id/list_view_repos"
android:layout_width="match_parent"
android:layout_height="0dp"
android:layout_weight="1"/>
<LinearLayout
android:layout_width="match_parent"
android:layout_height="wrap_content"
android:orientation="horizontal">
<EditText
android:id="@+id/edit_text_username"
android:layout_width="0dp"
android:layout_height="wrap_content"
android:layout_weight="1"
android:hint="@string/username"/>
<Button
android:id="@+id/button_search"
android:layout_width="wrap_content"
android:layout_height="wrap_content"
android:text="@string/search"/>
</LinearLayout>
</LinearLayout>
|
Create item_github_repo.xml, the layout for individual repository items in the ListView:
 1
 2
 3
 4
 5
 6
 7
 8
 9
10
11
12
13
14
15
16
17
18
19
20
21
22
23
24
25
26
27
28
29
30
31
32
33
34
35
36
37
38
39
40
41
42
43
44
45
46
47
48
49
50
| <?xml version="1.0" encoding="utf-8"?>
<RelativeLayout
xmlns:android="http://schemas.android.com/apk/res/android"
xmlns:tools="http://schemas.android.com/tools"
android:orientation="vertical"
android:layout_width="match_parent"
android:layout_height="match_parent"
android:padding="6dp">
<TextView
android:id="@+id/text_repo_name"
android:layout_width="match_parent"
android:layout_height="wrap_content"
android:textSize="24sp"
android:textStyle="bold"
tools:text="Cropper"/>
<TextView
android:id="@+id/text_repo_description"
android:layout_width="match_parent"
android:layout_height="wrap_content"
android:lines="2"
android:ellipsize="end"
android:textSize="16sp"
android:layout_below="@+id/text_repo_name"
tools:text="Android widget for cropping and rotating an image."/>
<TextView
android:id="@+id/text_language"
android:layout_width="wrap_content"
android:layout_height="wrap_content"
android:layout_below="@+id/text_repo_description"
android:layout_alignParentLeft="true"
android:textColor="?attr/colorPrimary"
android:textSize="14sp"
android:textStyle="bold"
tools:text="Language: Java"/>
<TextView
android:id="@+id/text_stars"
android:layout_width="wrap_content"
android:layout_height="wrap_content"
android:layout_below="@+id/text_repo_description"
android:layout_alignParentRight="true"
android:textColor="?attr/colorAccent"
android:textSize="14sp"
android:textStyle="bold"
tools:text="Stars: 1953"/>
</RelativeLayout>
|
Connecting the Components
Create a ListAdapter to handle binding GitHubRepo objects to ListView items. This involves inflating item_github_repo.xml into a View when necessary and reusing recycled View objects to prevent excessive inflation.
 1
 2
 3
 4
 5
 6
 7
 8
 9
10
11
12
13
14
15
16
17
18
19
20
21
22
23
24
25
26
27
28
29
30
31
32
33
34
35
36
37
38
39
40
41
42
43
44
45
46
47
48
49
50
51
52
53
54
55
56
57
58
59
60
61
62
63
64
65
66
| public class GitHubRepoAdapter extends BaseAdapter {
private List<GitHubRepo> gitHubRepos = new ArrayList<>();
@Override public int getCount() {
return gitHubRepos.size();
}
@Override public GitHubRepo getItem(int position) {
if (position < 0 || position >= gitHubRepos.size()) {
return null;
} else {
return gitHubRepos.get(position);
}
}
@Override public long getItemId(int position) {
return position;
}
@Override public View getView(int position, View convertView, ViewGroup parent) {
final View view = (convertView != null ? convertView : createView(parent));
final GitHubRepoViewHolder viewHolder = (GitHubRepoViewHolder) view.getTag();
viewHolder.setGitHubRepo(getItem(position));
return view;
}
public void setGitHubRepos(@Nullable List<GitHubRepo> repos) {
if (repos == null) {
return;
}
gitHubRepos.clear();
gitHubRepos.addAll(repos);
notifyDataSetChanged();
}
private View createView(ViewGroup parent) {
final LayoutInflater inflater = LayoutInflater.from(parent.getContext());
final View view = inflater.inflate(R.layout.item_github_repo, parent, false);
final GitHubRepoViewHolder viewHolder = new GitHubRepoViewHolder(view);
view.setTag(viewHolder);
return view;
}
private static class GitHubRepoViewHolder {
private TextView textRepoName;
private TextView textRepoDescription;
private TextView textLanguage;
private TextView textStars;
public GitHubRepoViewHolder(View view) {
textRepoName = (TextView) view.findViewById(R.id.text_repo_name);
textRepoDescription = (TextView) view.findViewById(R.id.text_repo_description);
textLanguage = (TextView) view.findViewById(R.id.text_language);
textStars = (TextView) view.findViewById(R.id.text_stars);
}
public void setGitHubRepo(GitHubRepo gitHubRepo) {
textRepoName.setText(gitHubRepo.name);
textRepoDescription.setText(gitHubRepo.description);
textLanguage.setText("Language: " + gitHubRepo.language);
textStars.setText("Stars: " + gitHubRepo.stargazersCount);
}
}
}
|
Finally, bring everything together in MainActivity, the entry point for our app. This activity prompts the user for a GitHub username and displays their starred repositories.
 1
 2
 3
 4
 5
 6
 7
 8
 9
10
11
12
13
14
15
16
17
18
19
20
21
22
23
24
25
26
27
28
29
30
31
32
33
34
35
36
37
38
39
40
41
42
43
44
45
46
47
48
49
50
51
52
53
54
| public class MainActivity extends AppCompatActivity {
private static final String TAG = MainActivity.class.getSimpleName();
private GitHubRepoAdapter adapter = new GitHubRepoAdapter();
private Subscription subscription;
@Override protected void onCreate(Bundle savedInstanceState) {
super.onCreate(savedInstanceState);
setContentView(R.layout.activity_main);
final ListView listView = (ListView) findViewById(R.id.list_view_repos);
listView.setAdapter(adapter);
final EditText editTextUsername = (EditText) findViewById(R.id.edit_text_username);
final Button buttonSearch = (Button) findViewById(R.id.button_search);
buttonSearch.setOnClickListener(new View.OnClickListener() {
@Override public void onClick(View v) {
final String username = editTextUsername.getText().toString();
if (!TextUtils.isEmpty(username)) {
getStarredRepos(username);
}
}
});
}
@Override protected void onDestroy() {
if (subscription != null && !subscription.isUnsubscribed()) {
subscription.unsubscribe();
}
super.onDestroy();
}
private void getStarredRepos(String username) {
subscription = GitHubClient.getInstance()
.getStarredRepos(username)
.subscribeOn(Schedulers.io())
.observeOn(AndroidSchedulers.mainThread())
.subscribe(new Observer<List<GitHubRepo>>() {
@Override public void onCompleted() {
Log.d(TAG, "In onCompleted()");
}
@Override public void onError(Throwable e) {
e.printStackTrace();
Log.d(TAG, "In onError()");
}
@Override public void onNext(List<GitHubRepo> gitHubRepos) {
Log.d(TAG, "In onNext()");
adapter.setGitHubRepos(gitHubRepos);
}
});
}
}
|
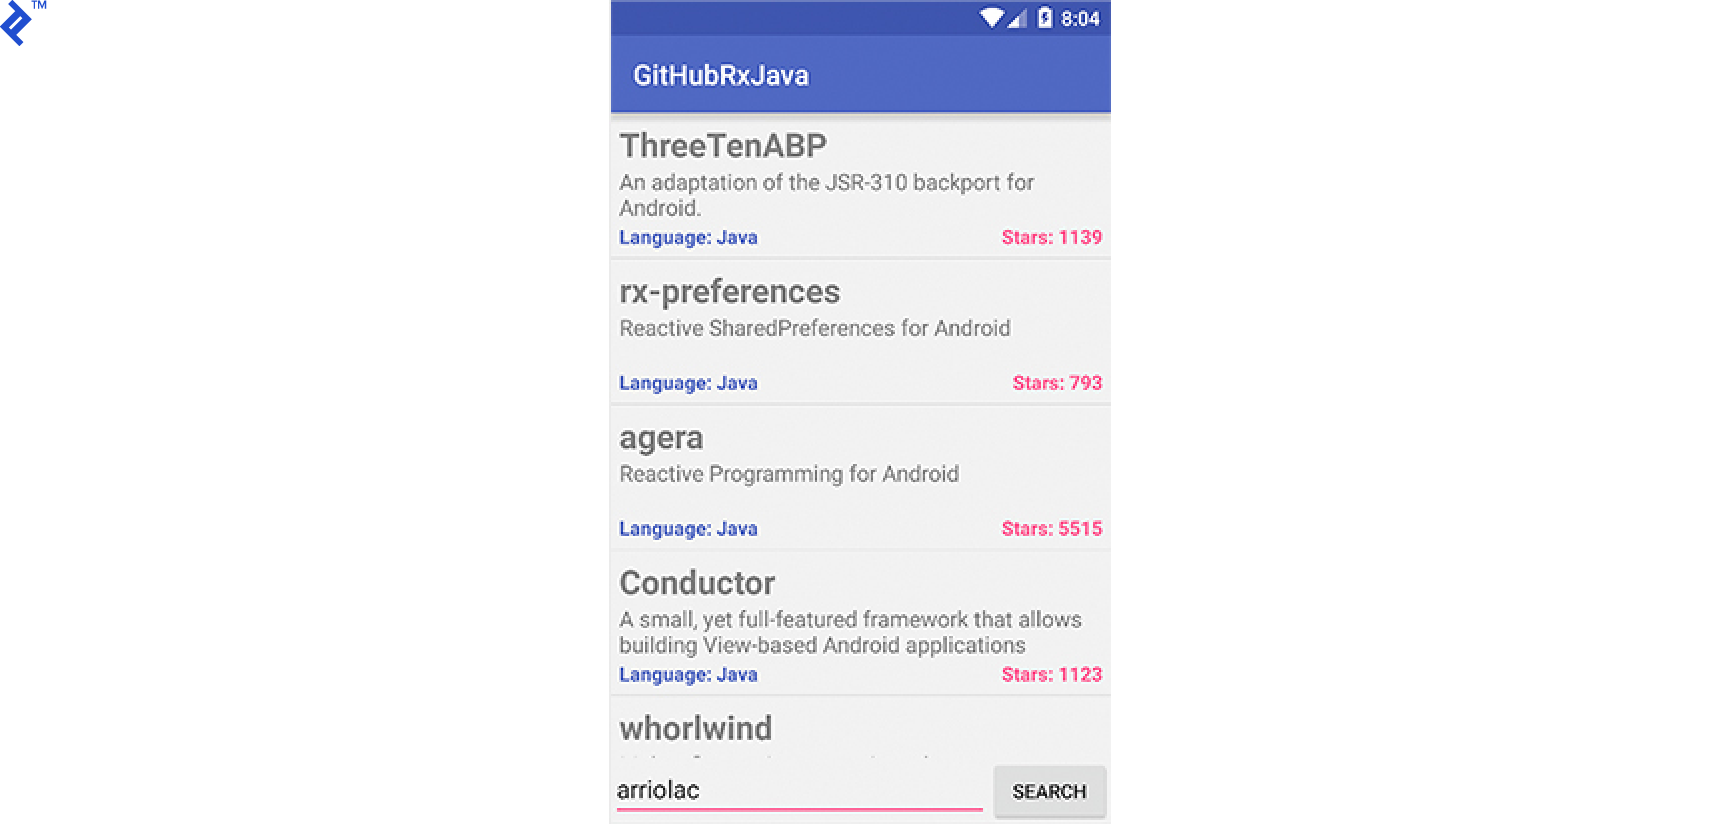
Running the App
Launching the app should present a screen with an input field for a GitHub username. Upon entry, the app displays a list of the user’s starred repositories.
Conclusion
Hopefully, this provides a helpful introduction to RxJava and its core capabilities. This merely scratches the surface of its powerful concepts. Explore further by delving into the well-documented RxJava wiki.
Feel free to leave questions or comments below. You can also find me on Twitter at @arriolachris, where I discuss RxJava and Android development.
For a comprehensive resource on RxJava, check out the ebook by Angus Huang and me, available on Leanpub.