Not too long ago, I was helping a client embed video reviews on their website. Like any enthusiastic developer facing a new challenge, I turned to Google for answers. Unfortunately, I was met with a flood of useless or inaccurate advice, suggesting solutions for unrelated problems or pointing me towards outdated and unsupported Python libraries. In the end, my team and I decided to tackle the problem head-on: we built everything from the ground up, creating the necessary views, diving into Google’s API documentation, building a custom API client, and ultimately figuring out how to upload videos programmatically from our Django application.
This blog post will serve as a step-by-step guide on how to post YouTube videos directly from your Django app. Be prepared for some hands-on work with Google API credentials – first through their web interface and then within your code. The YouTube integration itself is surprisingly straightforward. However, understanding the ins and outs of Google’s ecosystem can be tricky, as the information is scattered across multiple resources.
Prerequisites
Before we dive in, I highly recommend familiarizing yourself with the following:
- YouTube Data API: Python Quickstart
- YouTube Data API: API Reference
- YouTube Data API: Code Samples
- Google Python API Client Library
- Google Python API Client Library: Reference Doc
- Google Python API Client Library: Code Samples
- YouTube API: Python Code Samples
A particularly interesting piece of code from the Google YouTube API Docs is shown in the following Python snippet:
| |
Let’s Get Started
With the prerequisites out of the way, let’s gather the tools we’ll need.
Setting Up Our Toolkit
First, we’ll establish a virtual environment. I’m partial to pyenv, but feel free to use your preferred method. Setting up virtual environments is outside the scope of this post. I’ll be using pyenv commands below. If you prefer virtualenv, feel free to adapt the commands accordingly.
For this project, I’ll be using Python 3.7 and Django 2.1.
| |
Let’s add the following to a .python-version file (only necessary if you’re using pyenv) to ensure our environment is activated automatically upon entering the project folder:
| |
Next, we’ll install the required dependencies:
| |
Now we can create our Django project:
| |
A Brief Interlude for Google Configuration
Before we go any further, we need to set up our project credentials to use the Google APIs.
Step 1. Navigate to the Google Cloud Console:
https://console.developers.google.com/apis/library/youtube.googleapis.com
Step 2. Create a new project.

Step 3. Select “Enable APIs and Services.”

Step 4. Locate and enable the “YouTube Data API v3.”

Step 5. You should receive a message about credentials.
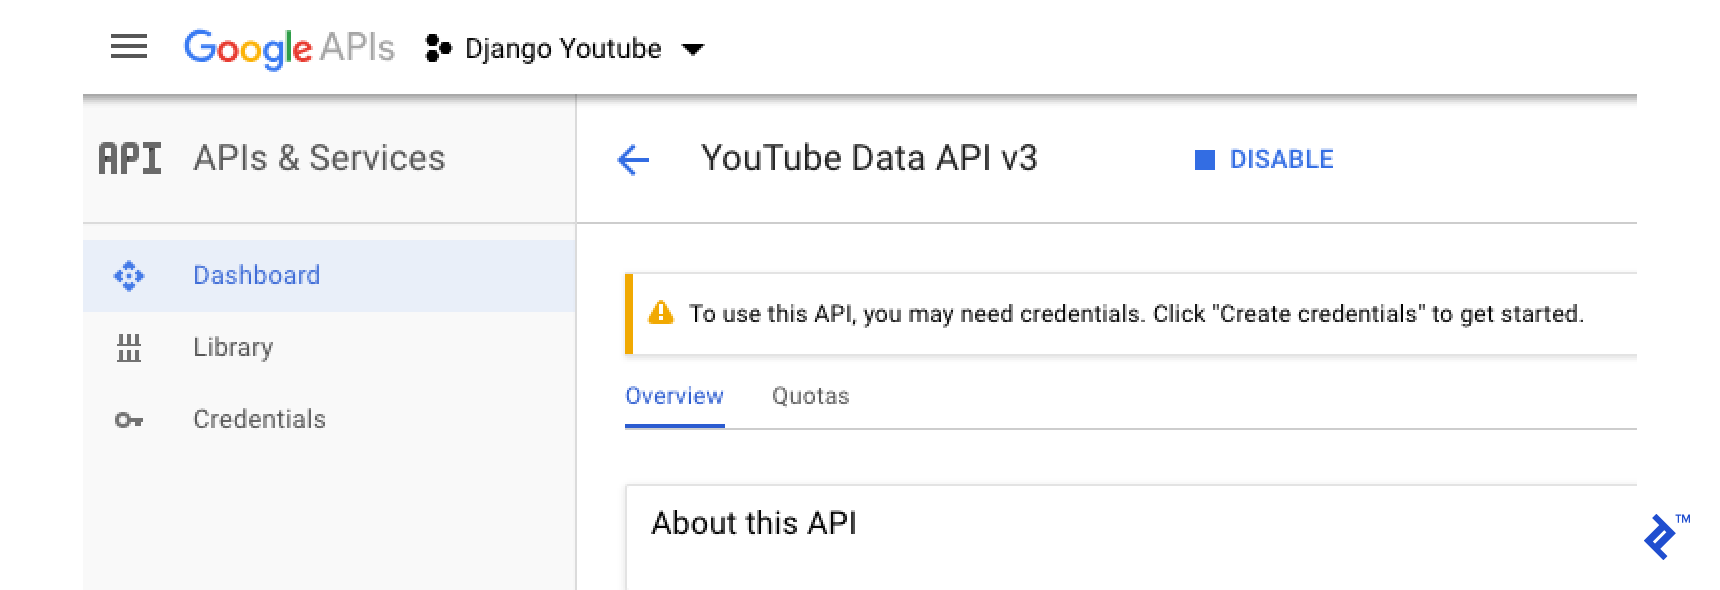
Step 6. Click the blue “Create credentials” button on the right. You’ll be directed to the following screen:
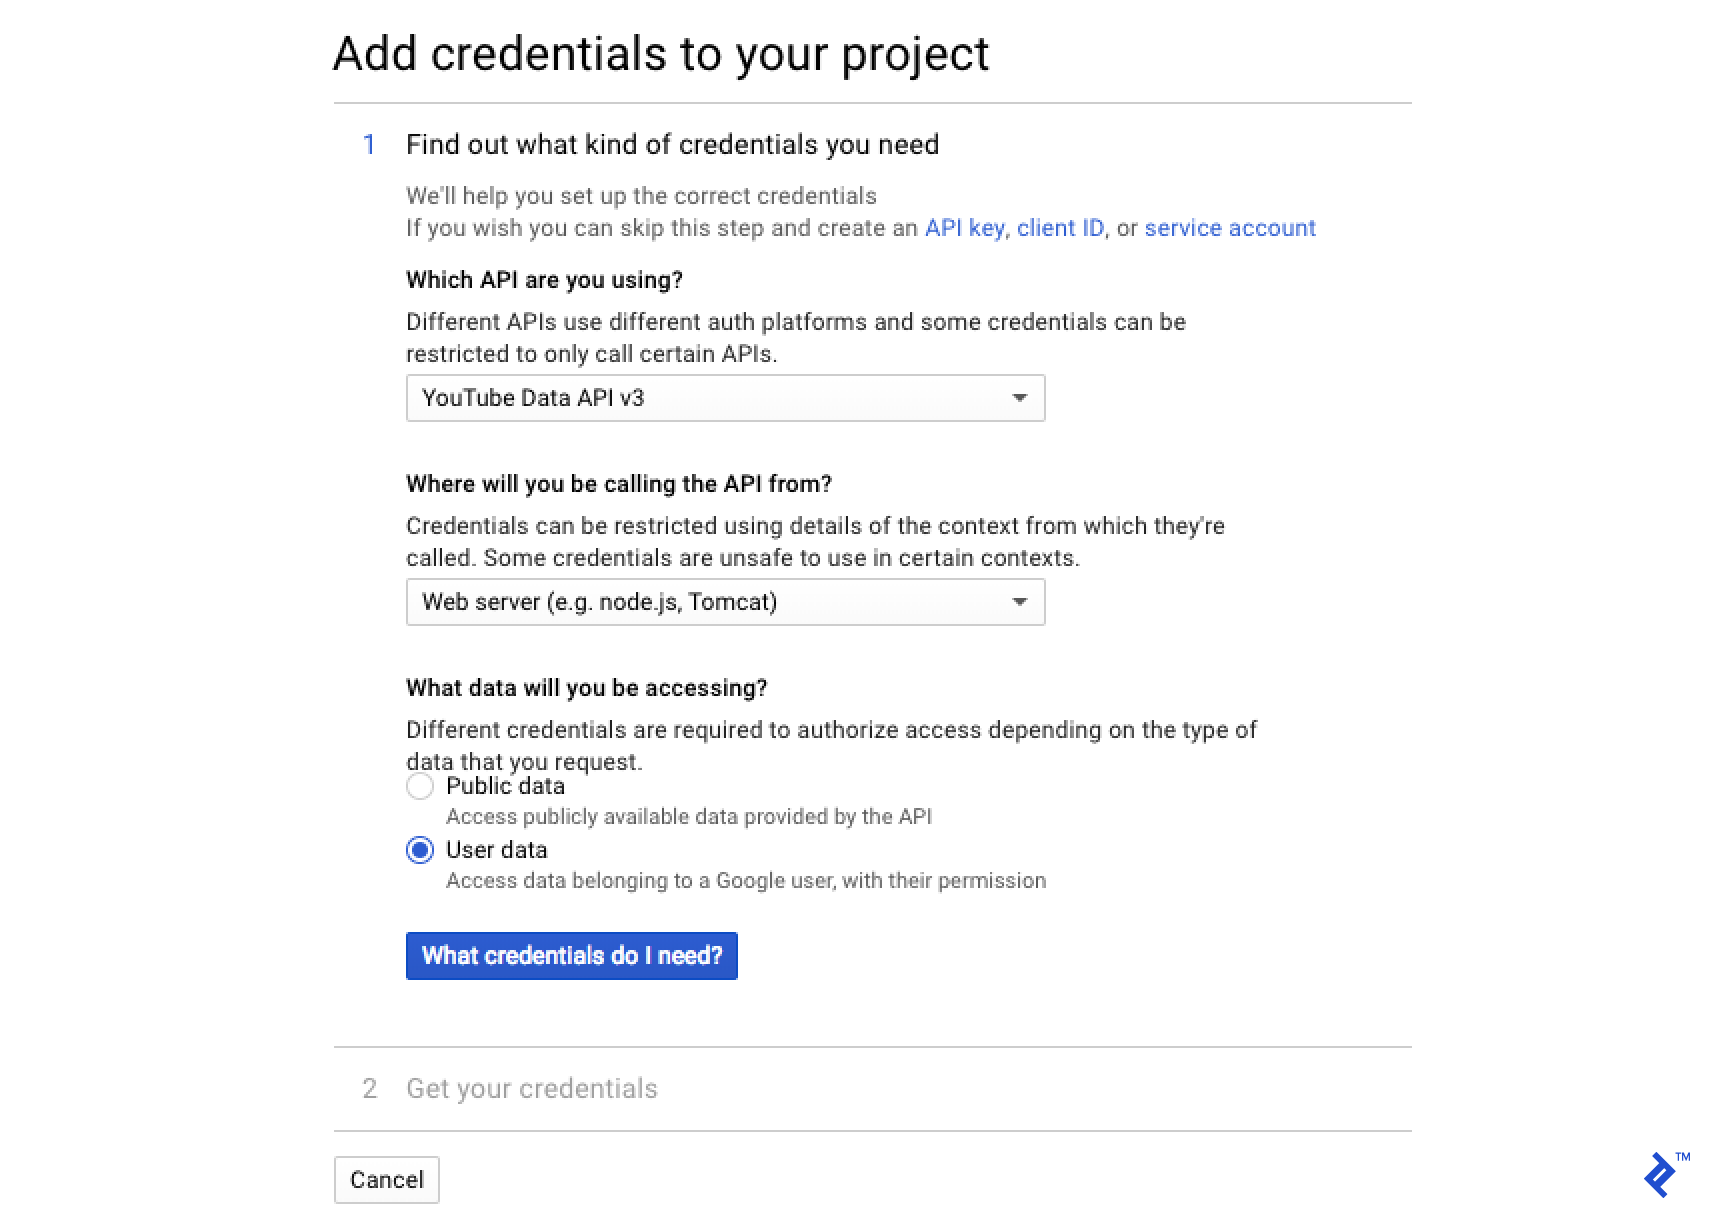
Step 7. Choose “Web server” for the credential type and “User Data” for the data access:
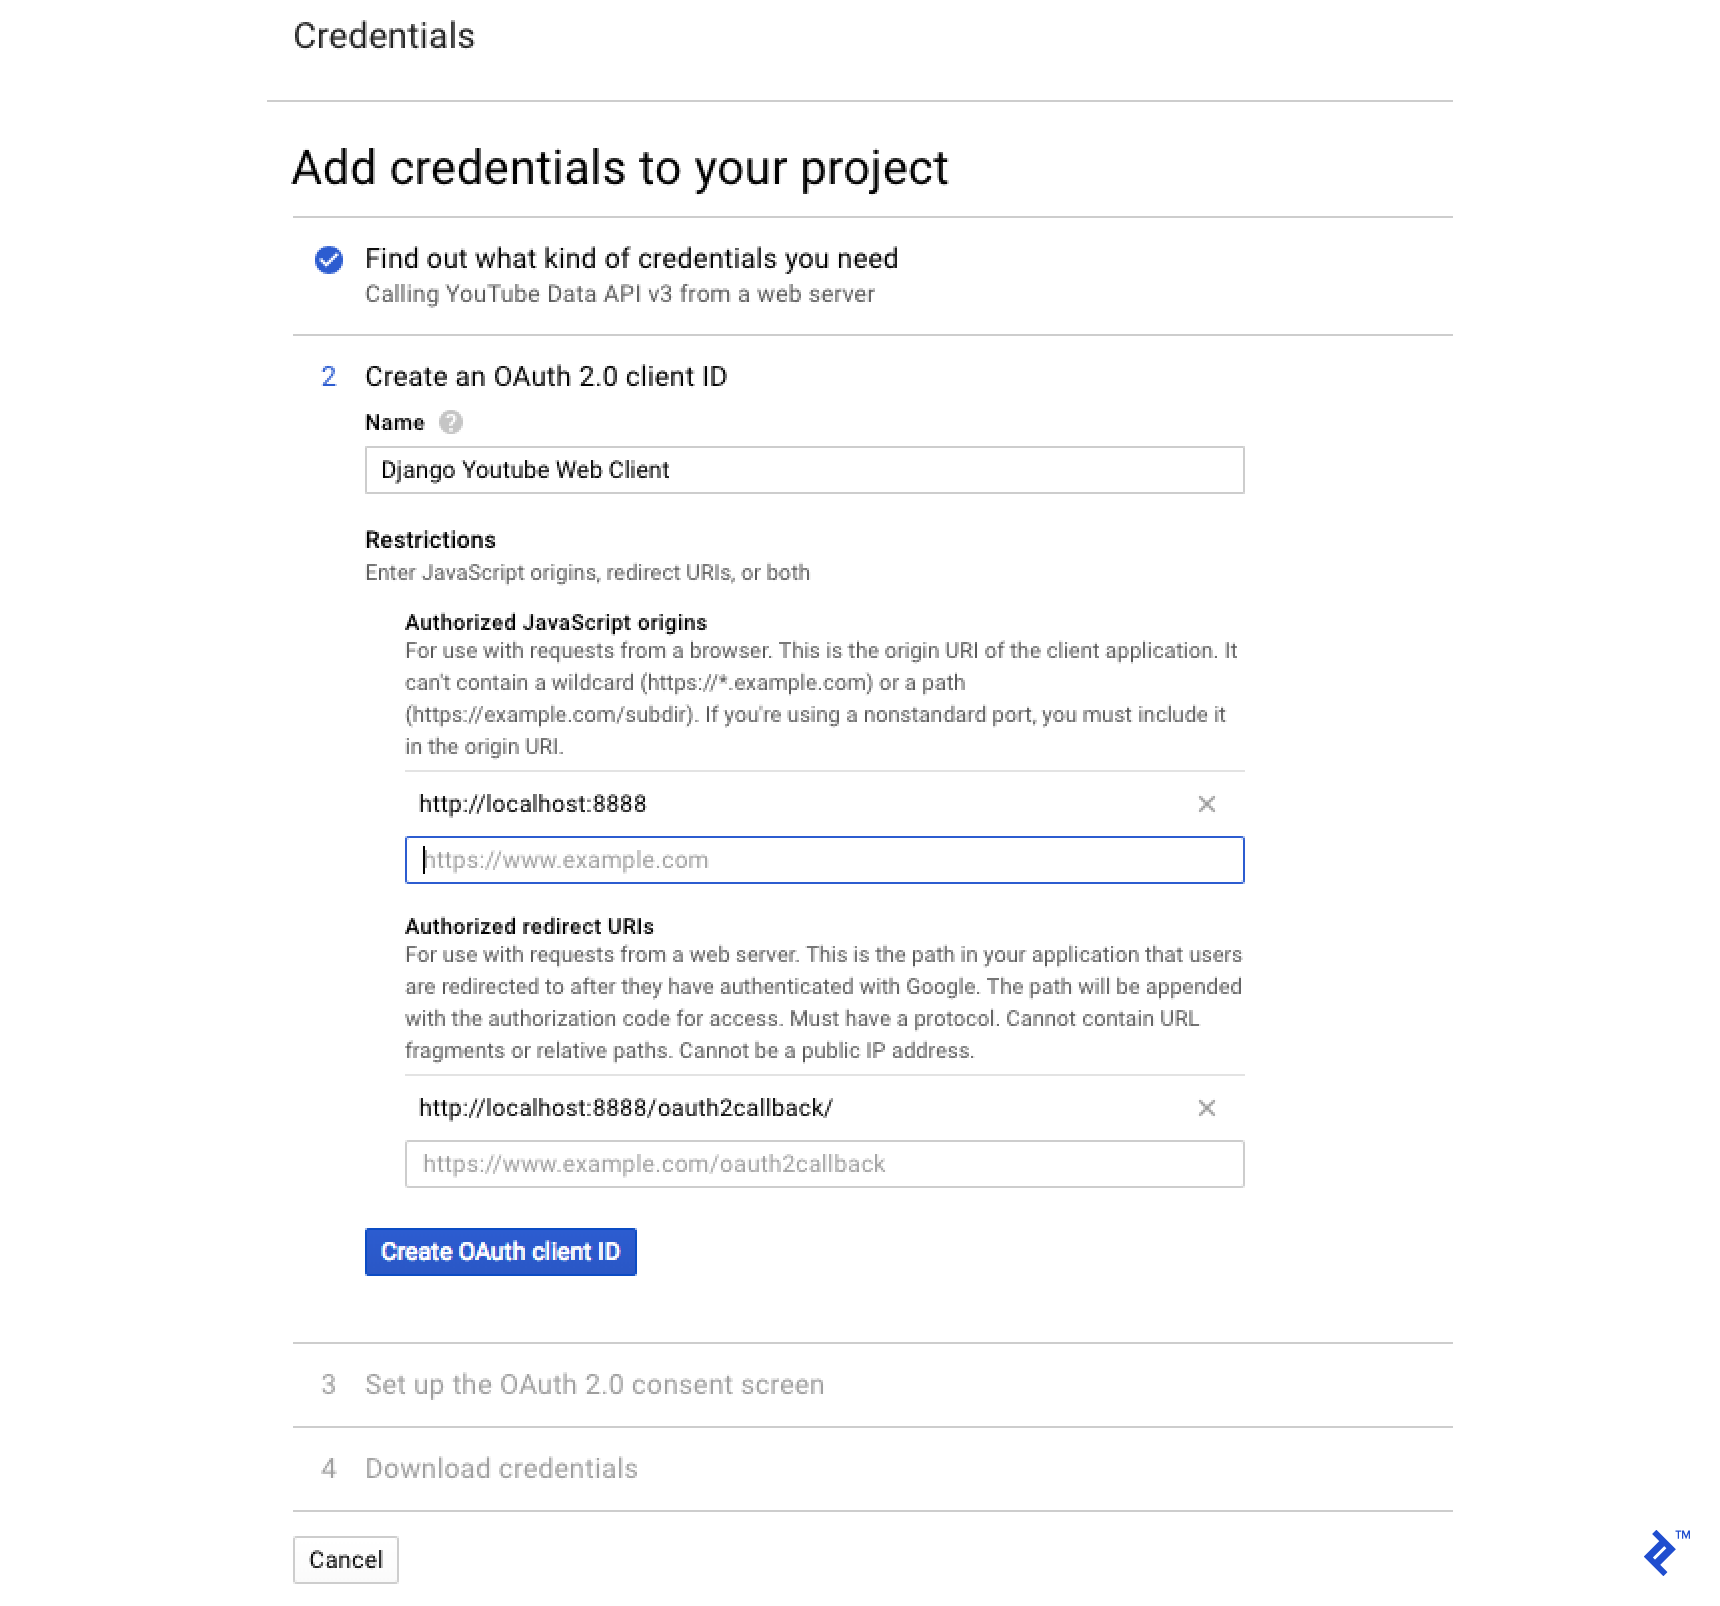
Step 8. Add any required authorized JavaScript origins and redirect URIs. Then, continue to the final step:
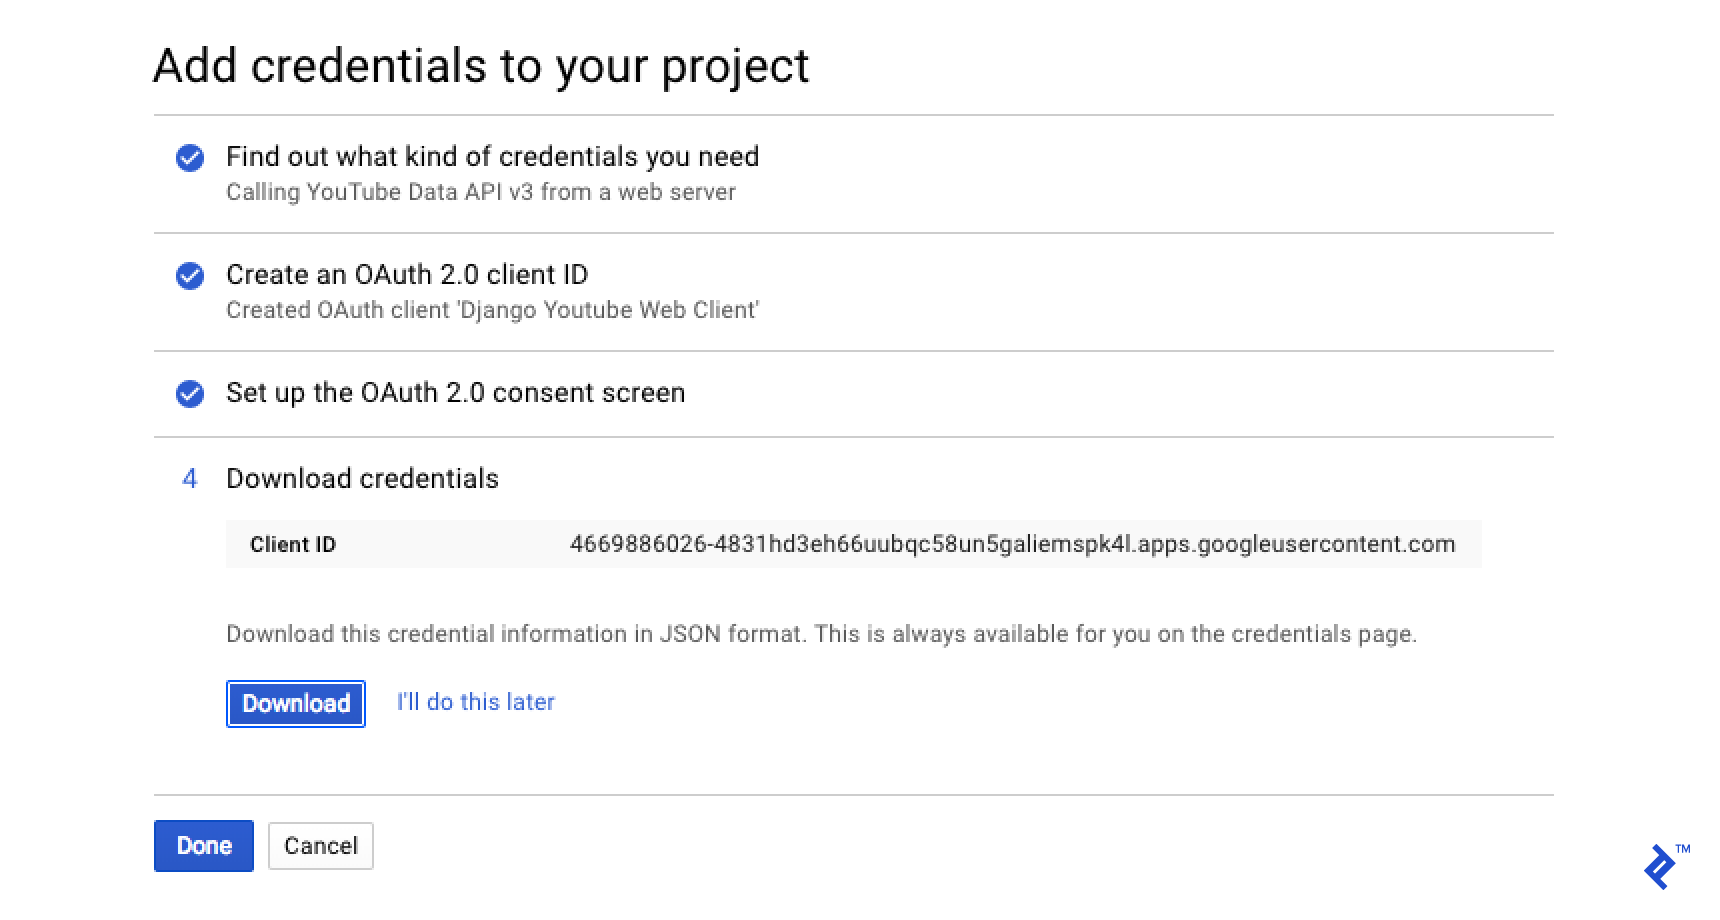
With that, our credentials are set! You can either download the credentials as a JSON file or copy the Client ID and Client Secret for later use.
Back to Django
Let’s create our first Django app. I usually call mine “core”:
| |
In our main urls.py file, let’s add the following to route homepage requests to our “core” app:
| |
Within the “core” app, we’ll create another urls.py file with some initial configurations:
| |
As you can see, we have an empty path pointing to HomePageView. Let’s create that view now.
For now, we’ll use a simple TemplateView to get things up and running.
| |
Of course, we’ll need a basic template as well:
| |
Let’s make some necessary tweaks to our settings:
| |
Now, we’ll create a YoutubeForm and assign it as the form_class for our view:
| |
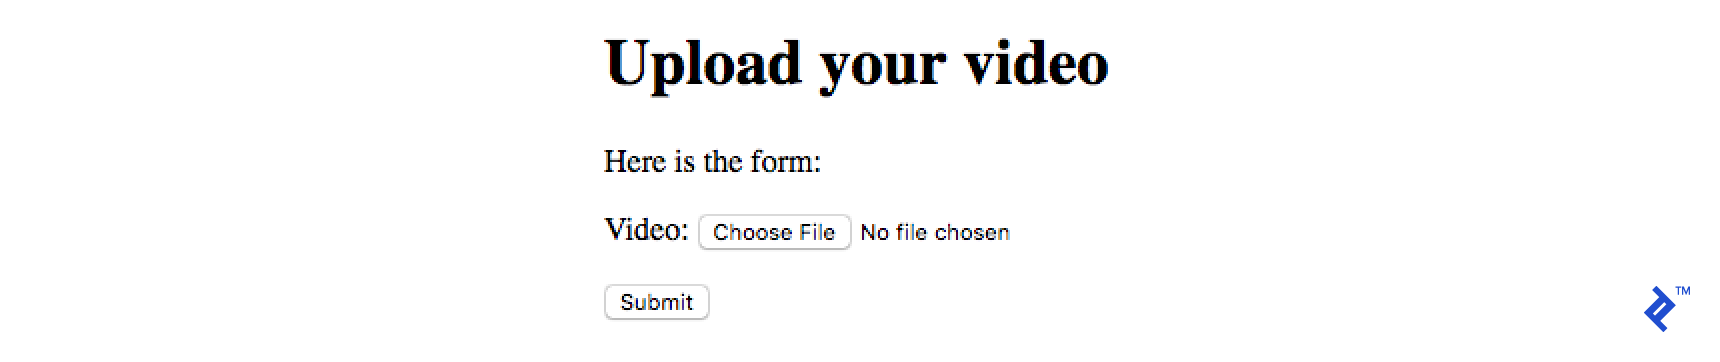
If you try running your application at this point, you should see a simple form:

A Pause for Authorization
Before we can upload videos, we need a way to store our Google API credentials. While we could use a file, cache system, or other storage solutions, a database feels most appropriate for scalability. Plus, it allows us to easily store credentials for individual users if needed.
However, we need to make a slight adjustment first. We’ll be using a fork of the oauth2client library that supports Django 2.1. Official support is expected soon, but for now, we’ll utilize this fork. The changes are minimal and easy to inspect.
| |
In your settings.py file, paste the Client ID and Client Secret you obtained from Google earlier.
| |
Important: Hardcoding secrets directly in your code is strongly discouraged. For demonstration purposes, we’re taking this shortcut. However, in a production environment, leverage environment variables or other secure methods to manage your sensitive information. Alternatively, if you downloaded the JSON file containing your credentials, you can specify its path here instead of hardcoding the values:
| |
Fortunately, the oauth2client package provides much of the functionality we need, including a pre-built CredentialsField. We could enhance this further with additional fields like a foreign key or created/modified timestamps, but for now, let’s keep things simple.
Here’s a basic model to store our credentials:
| |
Let’s create and apply migrations for this new model:
| |
Now, let’s modify our API views to handle the authorization process:
In core/urls.py, we’ll add another entry for our authorization view:
| |
The initial part of our AuthorizeView will look like this:
| |
Followed by:
| |
In essence, if no credentials exist or the existing credentials are invalid, we generate new ones and redirect the user to the Google authorization URL. Otherwise, we redirect them directly to the homepage where they can proceed with uploading a video.
Let’s see what happens when we access this view:

Before proceeding, we need to create a user.
| |
After creating the user, log in through the admin interface (/admin) and then revisit the authorization view (/authorize/).
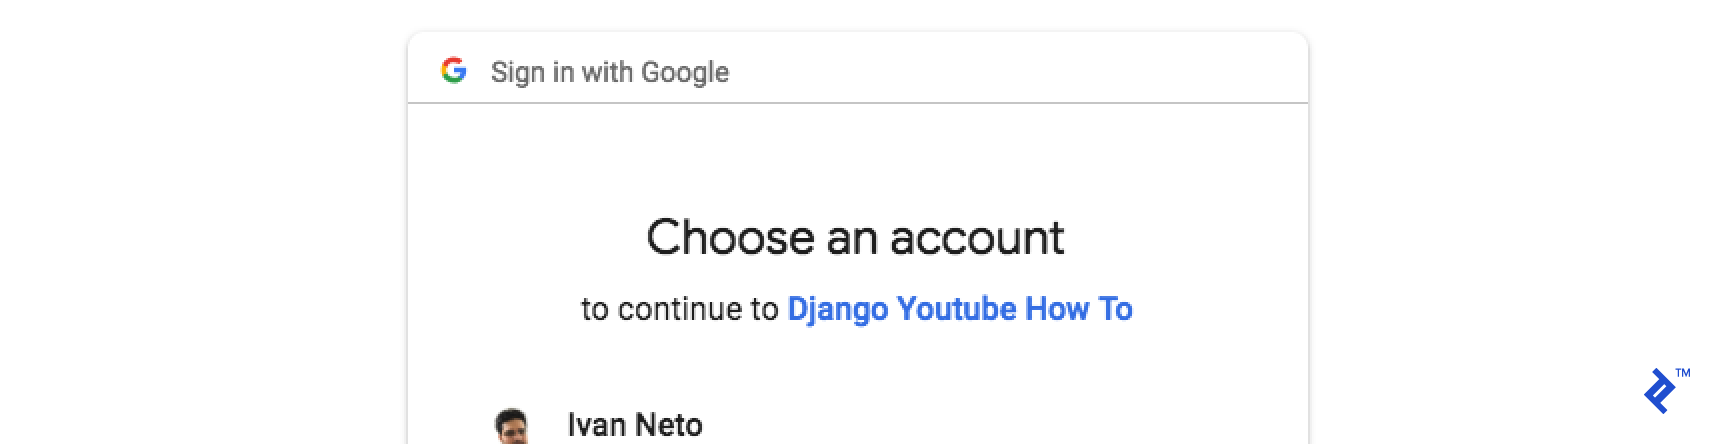
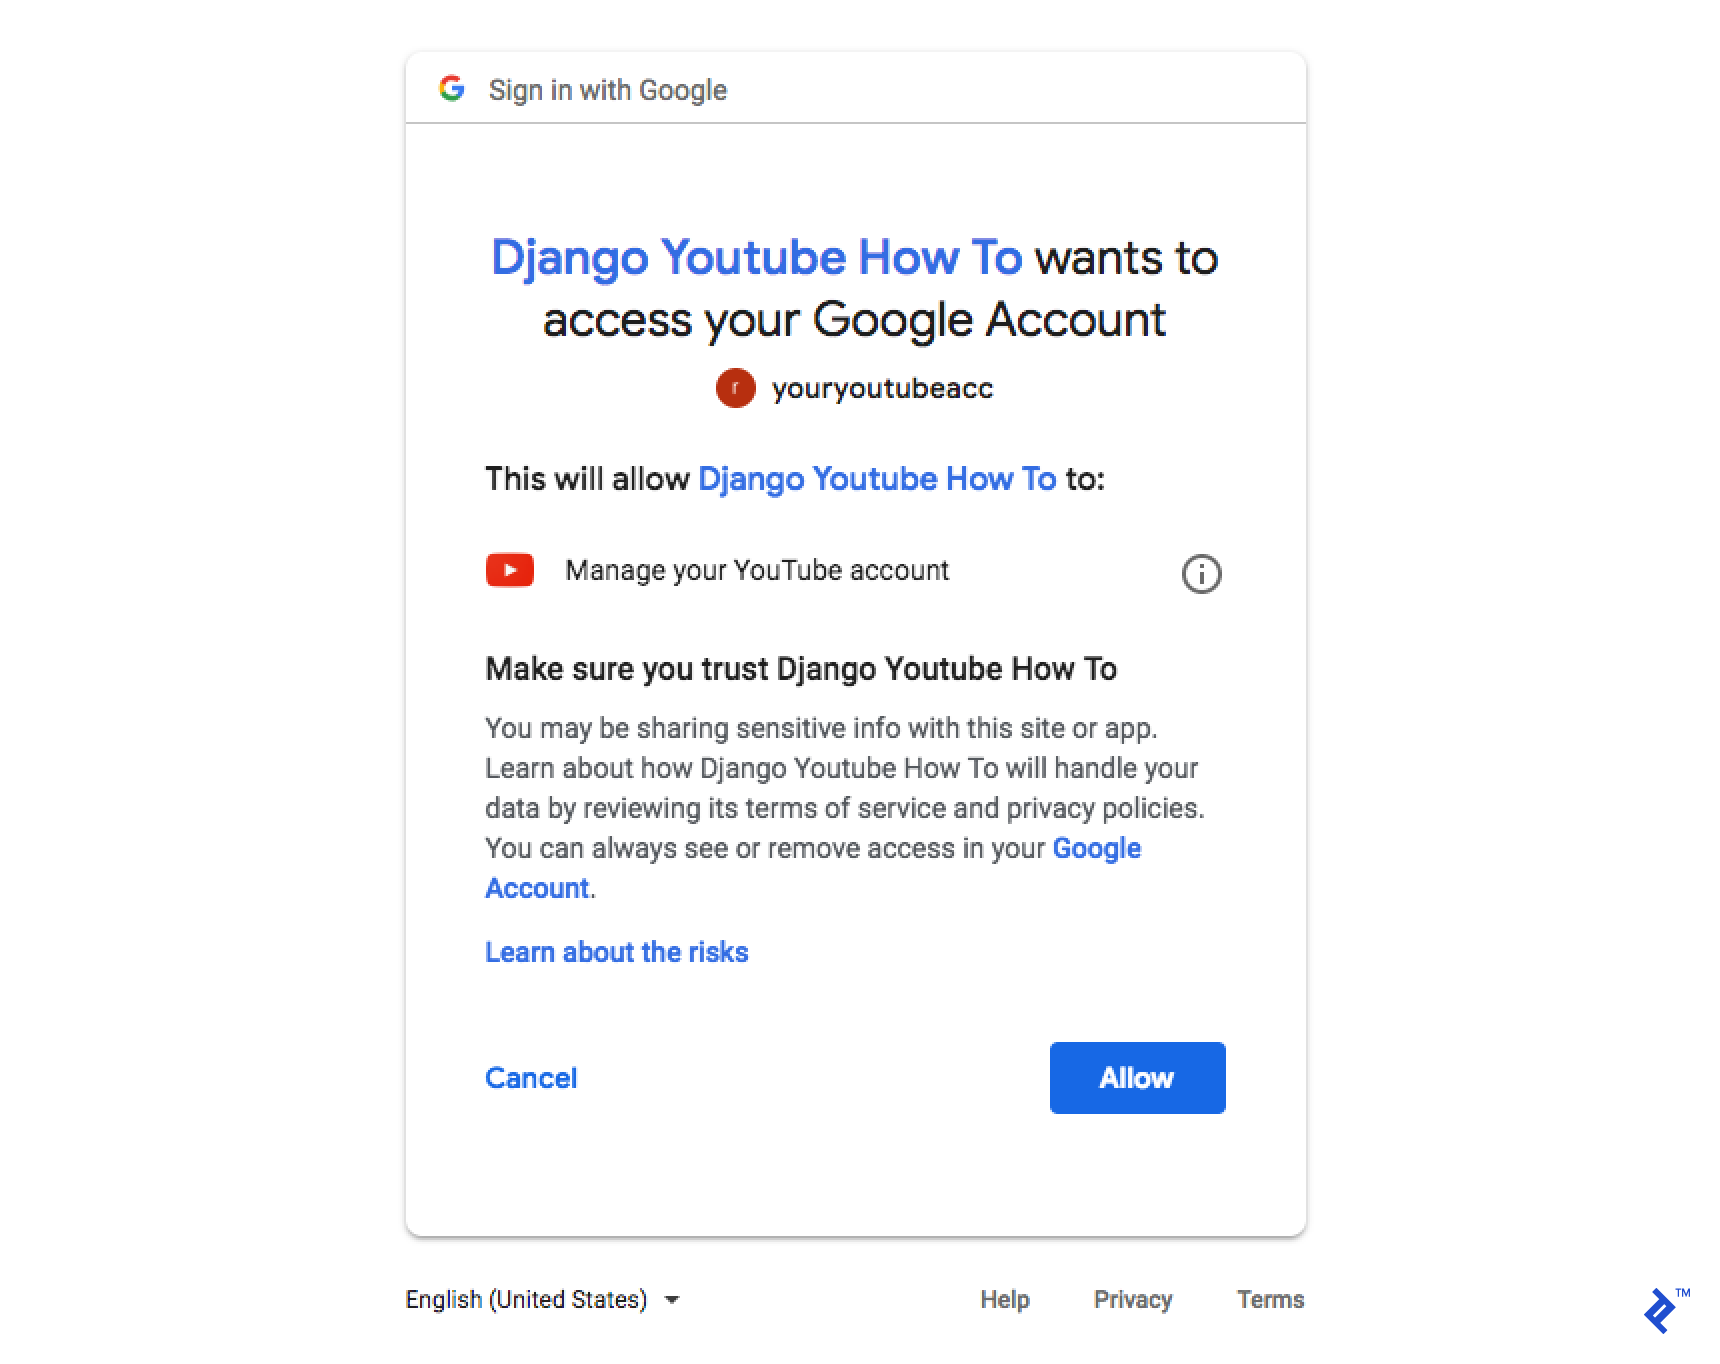
Finally, you should see:
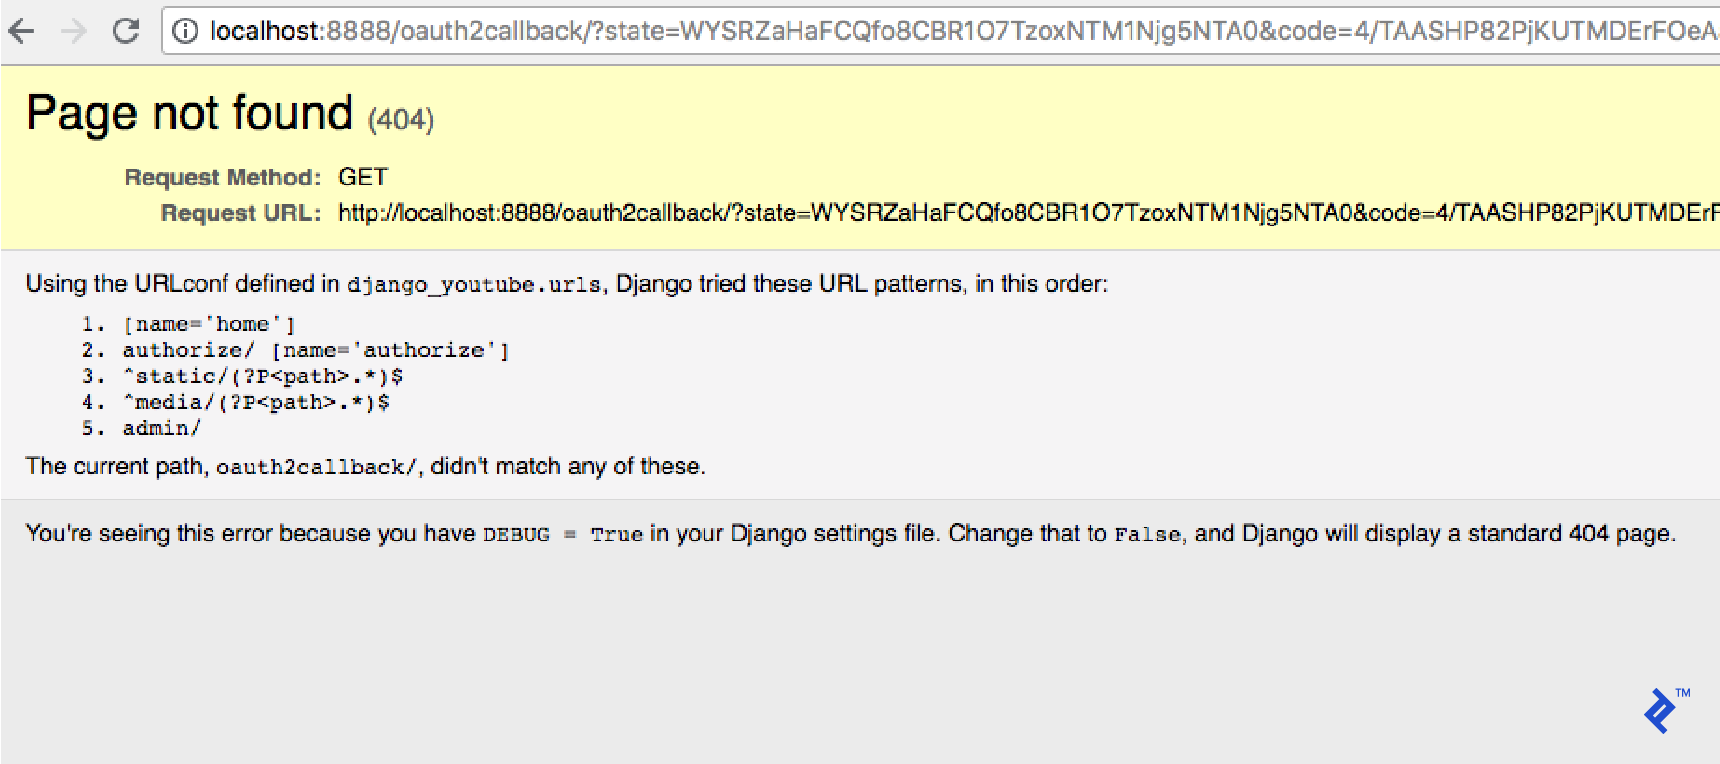
As you can see, the application attempts to redirect to the callback URL we specified earlier in the Google Cloud Console. Now, we need to implement this callback view.
Let’s add one more entry to our core/urls.py file:
| |
And the corresponding view:
| |
Note: We’ve moved the flow variable outside the AuthorizeView, making it globally accessible. Ideally, this should be stored in a cache (perhaps using the user ID or session) after being generated within the AuthorizeView and then retrieved in the callback. However, this is beyond the scope of our current implementation.
With that in place, the get method of our AuthorizeView should now look like this:
| |
You can find similar implementations for reference. While the oauth2client package offers built-in views, I prefer implementing custom OAuth flows for greater control.
- https://github.com/google/google-api-python-client/blob/master/samples/django_sample/plus/views.py
- https://github.com/google/oauth2client/blob/master/oauth2client/contrib/django_util/views.py
Now, try accessing the /authorize/ URL again. The OAuth flow should work as expected. It’s time to put our hard work to the test and upload a video! Our updated HomePageView will check for valid credentials, and if everything checks out, we’re ready to upload.
Here’s how the updated HomePageView will look:
| |
And the modified template:
| |
Don’t forget to add the video field to our YouTubeForm:
| |
Here we go!
If you check your YouTube Studio page (ensure you have a channel created), you should see:
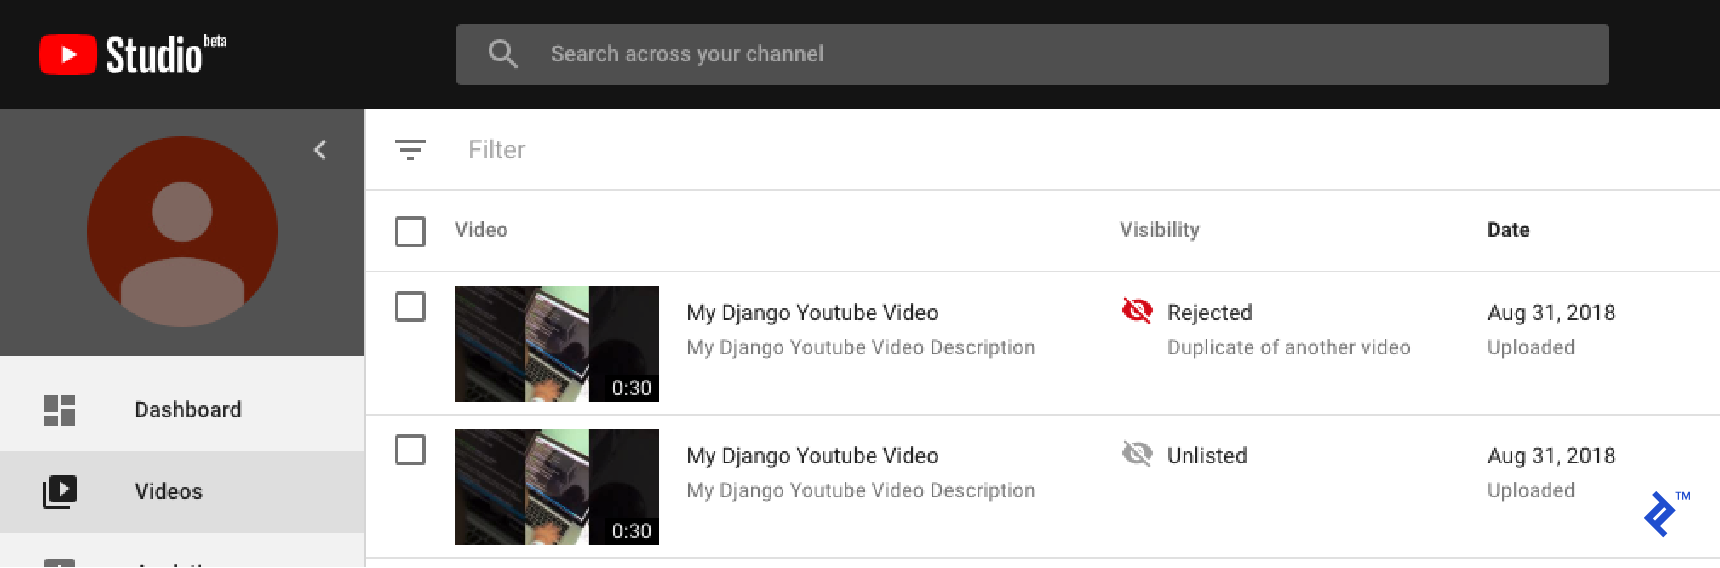
Success!
Some Final Thoughts
While our code could use some further refinement, it serves as a solid starting point for integrating with Google’s YouTube API. Hopefully, this guide helped clarify some of the common hurdles. Here are a few additional considerations:
- Security: For production environments, always require user authentication and implement proper authorization checks before granting access to upload videos.
- Global Variables: Avoid using global variables like our
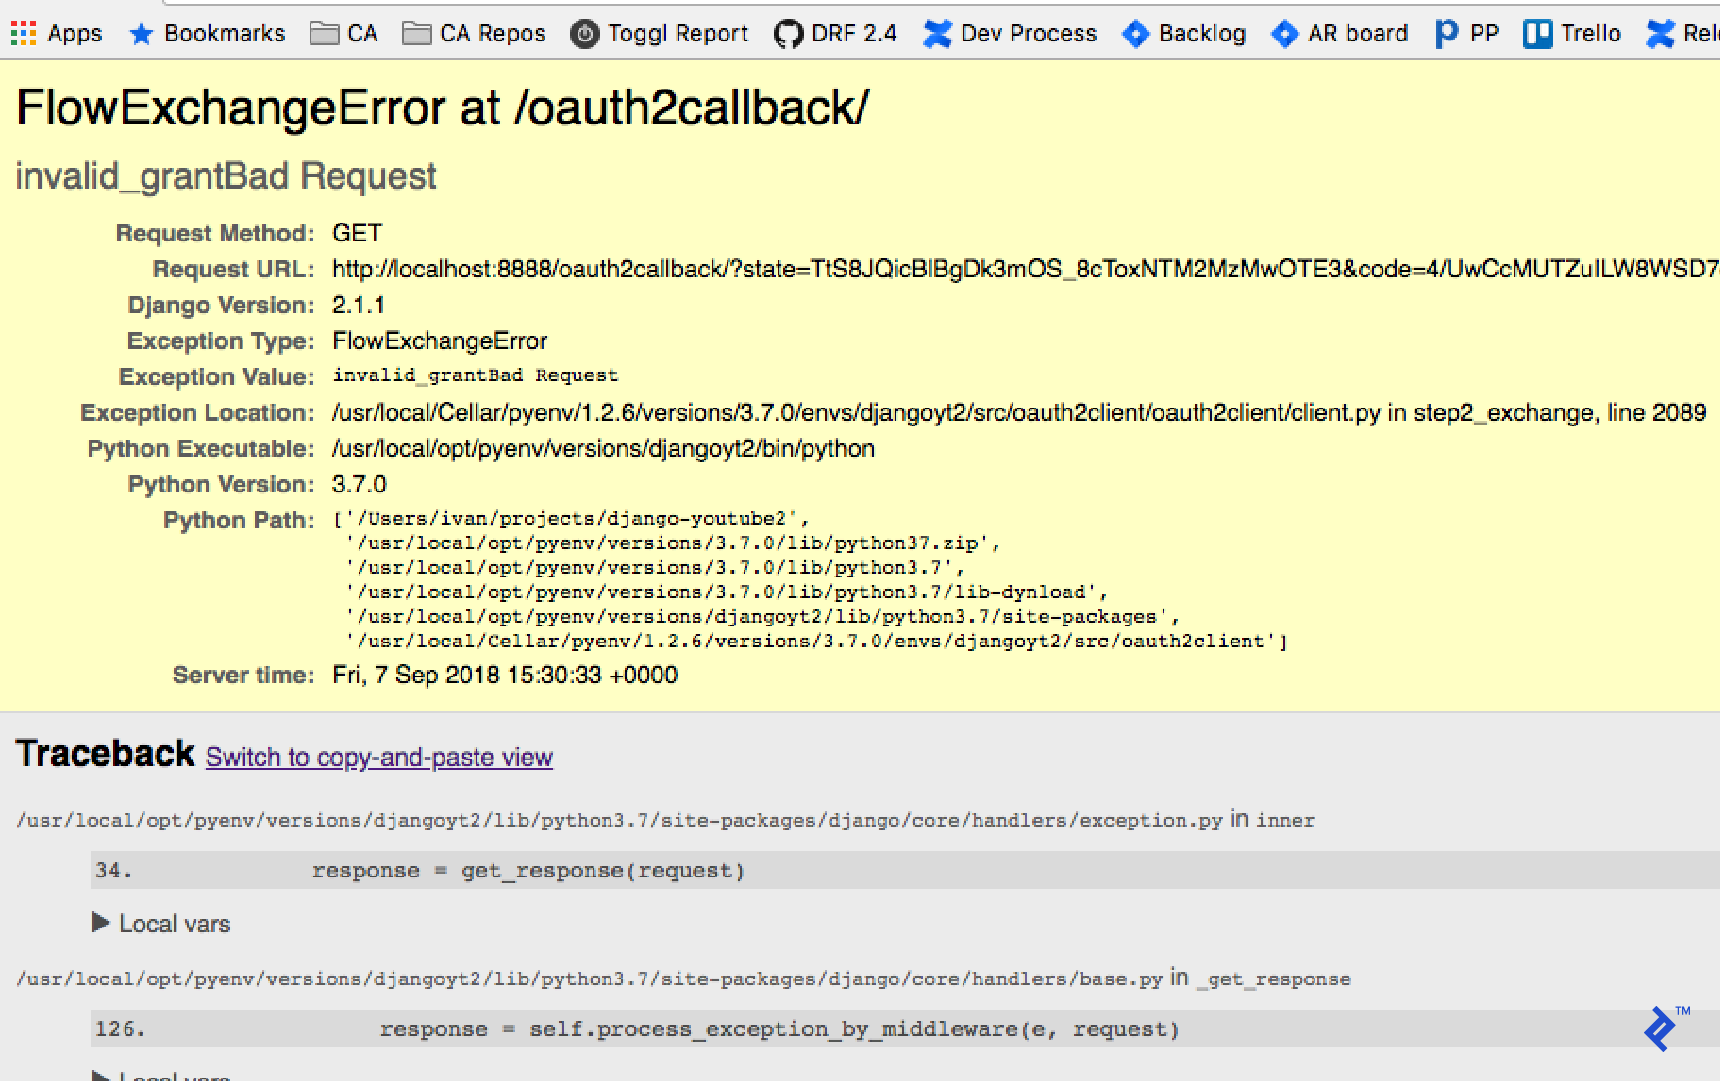
flowvariable in production. Consider using a cache or other mechanisms to store and retrieve this data securely. - Token Refreshing: Google provides a refresh token during the initial authorization process. However, this token typically expires after a certain duration (usually around one hour). If you haven’t interacted with their API within that timeframe, you’ll start encountering
invalid_grantresponses. Reauthorizing the same user might not always provide a new refresh token. You might need to revoke the application’s access through your Google Account settings and re-authorize it. In some cases, implementing a task to periodically refresh the token might be necessary. - Login Requirements: Since we’re working with user-specific credentials, ensure that users are required to log in before accessing any views that interact with the YouTube API.
Finally, keep in mind that video uploads can be time-consuming. Performing them directly within your main application process might lead to performance issues or even block the entire application. A more robust solution would involve offloading uploads to a separate process, allowing them to run asynchronously in the background.