Unless you’ve been offline, you’ve likely encountered the buzz surrounding containers. The tech world is shifting from permanent to temporary infrastructure, and containers are leading the charge. This shift is driven by a simple fact: containers not only accelerate development but also have the potential to revolutionize how we manage operations.
But what does this revolution look like? How do we move beyond running containers locally or manually on a few servers? Ideally, we envision effortlessly deploying our application to a server cluster with a simple “run it” command.
And that’s precisely where we stand today.
This article delves into Docker Swarm, exploring its features and demonstrating how to use Swarm mode for deployment. We’ll also examine daily operations with a deployed swarm. While familiarity with Docker and containers is beneficial, newcomers can refer to this insightful blog post: [Link to blog post removed for paraphrasing].
What Is Docker Swarm?

Before building and deploying our first swarm, let’s understand Docker Swarm. While Docker has existed for years, often perceived as a container runtime, it’s actually a collection of interconnected components. For instance, the runtime aspect is handled by two smaller parts known as runC and containerd. Docker’s evolution, driven by community contributions, revealed that creating these smaller components fosters rapid feature development. This approach led to SwarmKit and Swarm mode, now integrated directly into Docker.
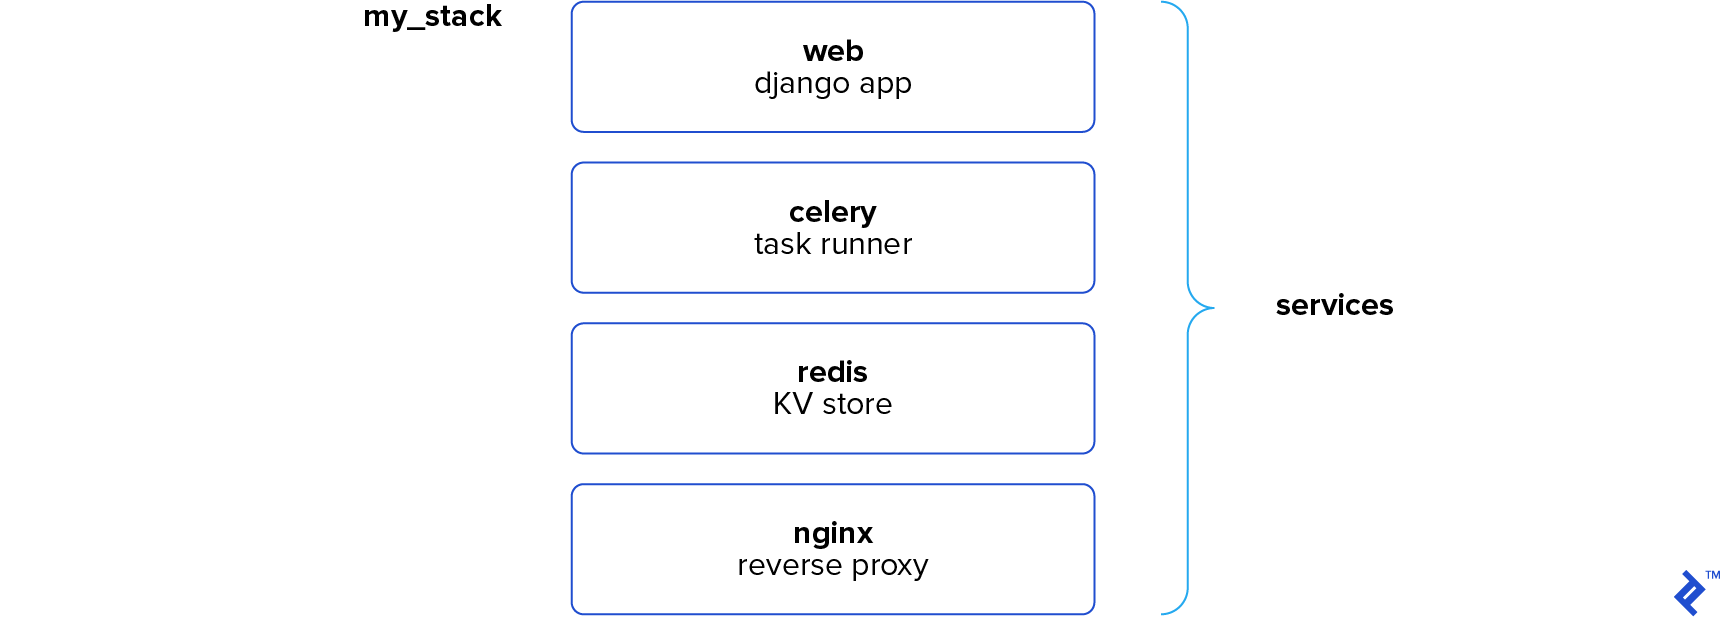
Docker Swarm functions as a container orchestration engine. It combines multiple Docker Engines running on separate hosts, simplifying their management. You define applications as service stacks, and Docker takes care of the rest. Services can range from application instances to databases, or utilities like Redis or RabbitMQ. This approach might resonate with those familiar with docker-compose, as it employs the same concept. In fact, a stack declaration is essentially a docker-compose.yml file using the 3.1 syntax. This allows for consistent configuration across development (using docker-compose) and swarm deployment, but we’re getting ahead of ourselves. What happens when Docker instances operate in Swarm mode?
Maintaining Stability: The Raft Consensus
In the Swarm world, we encounter two node types (servers): managers and workers. It’s crucial to remember that managers are also workers, but with the added responsibility of maintaining the system. Every swarm starts with a leader, which is a designated manager node. From there, adding nodes securely to the swarm is just a single command away.
Swarm’s high availability stems from its implementation of the Raft algorithm. We won’t delve deep into Raft, as this great tutorial comprehensively explains its workings. The basic premise is this: The leader node continuously communicates with fellow manager nodes, synchronizing their states. Achieving “acceptance” for a state change requires consensus among manager nodes, achieved when a majority acknowledge the change.
This mechanism ensures that the swarm remains unaffected even if manager nodes intermittently disconnect. If consensus is reached for a state change, it’s guaranteed to persist on a majority of manager nodes, even if the current leader fails.
Consider three manager nodes: A (the leader), B, and C. If a network hiccup takes A offline, B and C, after a brief, randomized waiting period, will initiate an election process. The first to announce its candidacy becomes the new leader, restoring quorum. Now, imagine A comes back online, still believing it’s the leader. Each election has an associated term. A was elected in term 1. When A tries to resume command, B and C inform it that B is now the leader of term 2, prompting A to step down.
This process scales to larger clusters with numerous manager nodes. However, a swarm can withstand only a certain number of manager failures. A swarm of ’n’ manager nodes can tolerate (n-1)/2 manager losses without losing quorum. Therefore, a three-manager swarm can handle one loss, a five-manager swarm can handle two, and so on. This limitation, rooted in the principle of majority consensus, is vital to consider for production environments.
Task Scheduling and Reconciliation: Ensuring Desired State
We’ve established that managers excel at staying in sync. But what are they actually doing? Recall deploying a service stack to Swarm. When you define your services, you provide Swarm with crucial information about their execution, including the number of replicas, their distribution, node restrictions, and more.
Once a service is deployed, the managers ensure all specified requirements are met. For instance, if you deploy an Nginx service with three replicas, the managers distribute these containers evenly across available nodes.
Impressively, if a container fails or a node goes offline, Swarm automatically compensates by creating containers on remaining nodes. If you want three containers running, Swarm makes it happen, handling the complexities behind the scenes. Scaling up or down becomes as straightforward as adjusting the replication setting in Swarm.
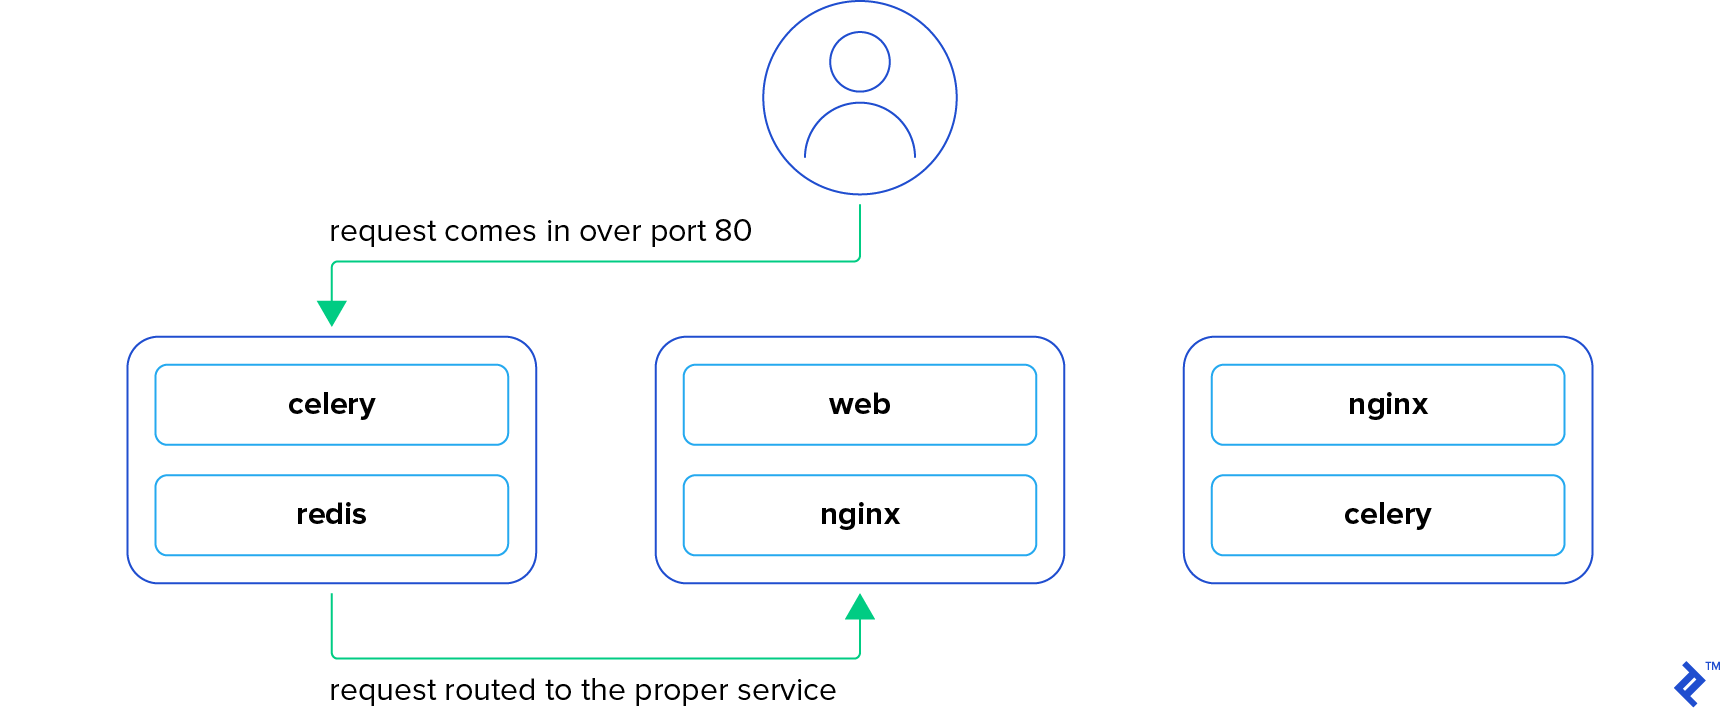
Service Discovery and Load Balancing: Seamless Access, Behind the Scenes
Here’s a critical yet subtle point: When Swarm intelligently deploys containers to nodes, their exact location might not be immediately apparent. While this might seem daunting, it’s one of Swarm’s most powerful features.
Continuing with the Nginx example, let’s expose those containers on port 80. Accessing a node running that container on port 80 reveals its content. But here’s the twist: Sending a request to a node without that container still delivers the same content! How?
Swarm employs an ingress network, routing your request to an available node running the container while simultaneously load balancing it. If you make three requests to the same node, they are likely distributed to three different containers. Accessing any service within the swarm requires only the IP address of a single node. This allows you to point a load balancer (like an ELB) to all swarm nodes without worrying about their specific roles.
This functionality extends to internal communication. Services within the same stack use an overlay network, enabling communication by service name instead of hardcoded IP addresses. If your app needs to talk to a Redis service named “redis,” it simply uses “redis” as the hostname, and Swarm handles the routing. This seamless integration between development (docker-compose) and production (Docker Swarm) eliminates deployment headaches.
Rolling Updates: Smooth Transitions, Minimized Risk
Operations teams know the dread of a production update gone wrong. Whether it’s a code bug or a configuration error, the consequences are dire, and the blame often falls on them. Fear not, Swarm provides a safety net.
When updating a service, you control the number of containers updated concurrently and define actions for container failures. If a threshold is exceeded, Swarm can either halt the update or (as of Docker 17.04) roll back to the previous image and settings, saving you from a stressful morning.
Security: Built-in Protection for Peace of Mind
Last but not least, Docker Swarm boasts robust security features out of the box. When a node joins the swarm, it uses a token for verification, ensuring it’s joining the intended swarm. All subsequent inter-node communication utilizes mutual TLS encryption, automatically provisioned and managed by Swarm. Certificate renewals and other security headaches become a thing of the past. And if you need to enforce key rotation, there’s a command for that.
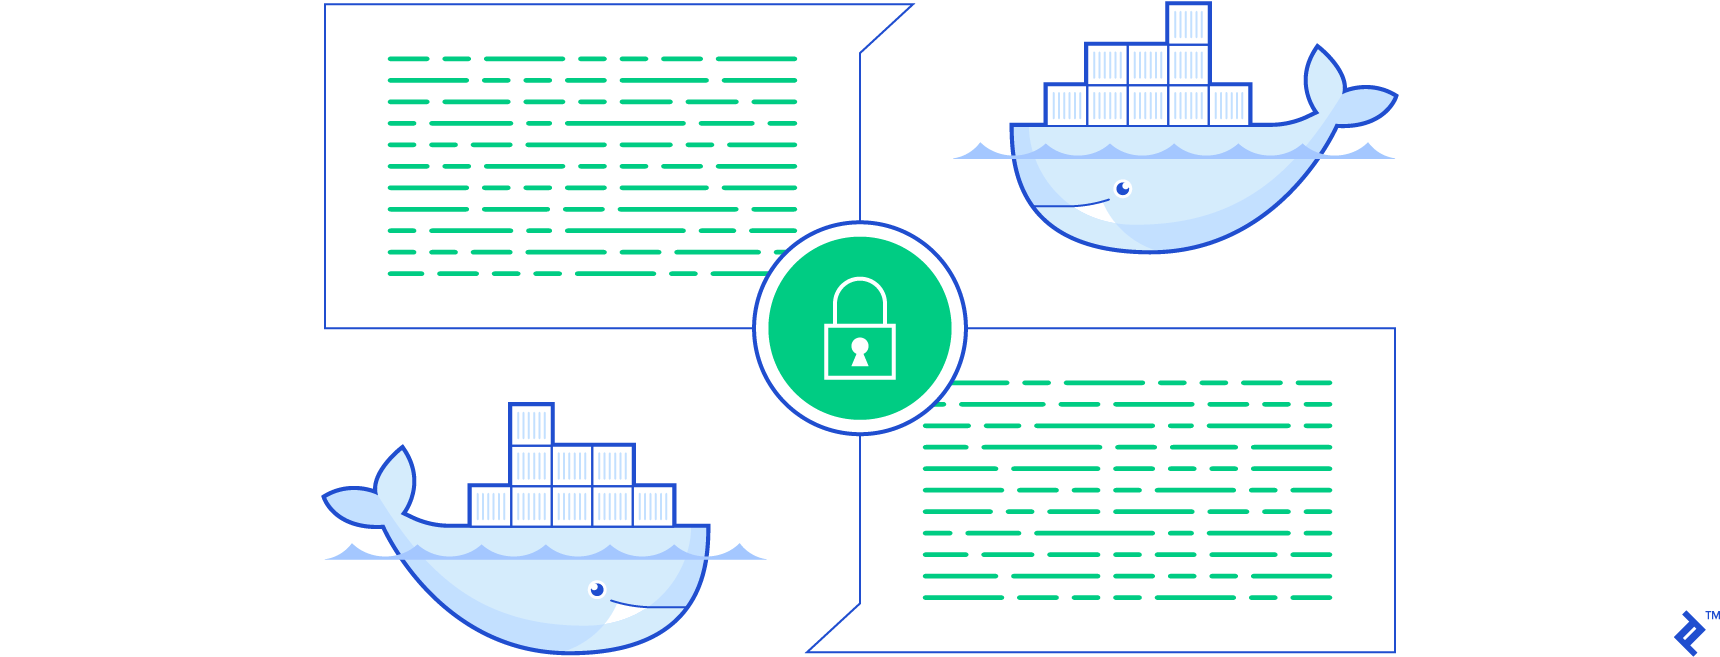
The latest Docker Swarm iteration introduces built-in secrets management. This feature allows secure deployment of sensitive information like keys and passwords to specific services. When provided with a secret, a service’s containers receive a special file mounted in their filesystem containing the secret’s value, a far more secure approach compared to using environment variables.
Diving into the Swarm: From Theory to Practice
By now, you’re eager to experience these features firsthand. So let’s dive in!
Docker Swarm Example App: Illustrating the Power of Swarm
We’ll use a basic Flask app to showcase Docker Swarm’s capabilities and ease of use. This web app displays the serving container’s ID, the total request count, and the “secret” database password.
The app comprises three services: the Flask app, an Nginx reverse proxy, and a Redis keystore. Each request increments a num_requests key in Redis, ensuring accurate request counts across all Flask instances.
The complete source code is available on GitHub, allowing you to explore the inner workings.
Play with Docker: Your Swarm Playground
While you can use your servers, play-with-docker.com offers a convenient alternative for experimentation. This platform, maintained by Docker developers, provides pre-configured, networked nodes with Docker pre-installed. These instances last for four hours, ample time for our example.
Creating a Swarm: Your First Steps
Let’s get started. Create three instances in PWD or spin up three servers with Docker Engine installed. You could even create and reuse an image for adding nodes. Remember, manager and worker nodes have no software differences, eliminating the need for separate images.
Once your instances are ready, we’ll create the first manager and leader node. On your first instance, initialize a swarm using:
| |
Replace <node_ip_here> with your node’s IP address. In PWD, it’s displayed at the top. For VPS setups, use the server’s private IP address, ensuring accessibility from other nodes.
Congratulations, you have a swarm! However, with a single node, it’s not very exciting. Let’s add the other nodes. When you ran init, it displayed instructions for using the join token. We’ll skip that, as it would create worker nodes. Instead, we’ll obtain the manager join token from the first node:
| |
Copy the output command and execute it on your second and third nodes. You now have a three-node swarm! Let’s verify using docker node ls, which lists all nodes in our swarm:
| |
The asterisk next to the first node’s ID indicates the currently connected node. This node is also the Leader, while the others are Reachable in case of failures.
With our swarm ready, let’s deploy our app.
Ship It!: Deploying Our Application
Imagine a scenario where you need to deploy a new app within the hour. Thanks to Docker, it’s achievable. Assuming the development team provided a docker-compose file:
| |
While we’ll break it down later, time is of the essence. Create a file named docker-compose.yml on your first node and paste the configuration above. You can use echo "<pasted contents here>" > docker-compose.yml.
Before deploying, we need to address the db_password secret mentioned in our configuration:
| |
With our secret in place, we instruct Docker to use our configuration:
| |
This command triggers the creation of our three services: web, nginx, and redis. Due to our stack name (demo), the actual service names become demo_web, demo_nginx, and demo_redis. We can view our running services using docker service ls:
| |
Docker has downloaded our images to the appropriate nodes and created containers for our services. If the replicas aren’t at full capacity, give it a moment; Docker might still be downloading images.
Seeing Is Believing: Testing Our Deployed Application
Let’s confirm our app is live. Our configuration exposes NGINX on port 8000. In PWD, you’ll see a blue “8000” link, automatically detected by PWD. Clicking it routes you to the selected node on port 8000. For VPS setups, navigate to any server’s IP address on port 8000.
You’ll be greeted with a screen displaying:

Note the serving container ID and refresh the page. It likely changed. This is because we requested two replicas of our Flask app, and Docker is load balancing requests between them. Refreshing hit a different instance. Notice the request count incrementing; both Flask containers communicate with the single Redis instance.
Feel free to access port 8000 from any node; you’ll always be routed correctly.
Demystifying the Magic: Dissecting the Configuration
Our setup works seamlessly. Let’s examine the docker-compose.yml file to understand our instructions. At a high level, we defined three services: web, nginx, and redis. Like a standard compose file, we provided images and commands for each service. For nginx, we mapped the host’s port 8000 to the container’s port 80. So far, standard compose syntax.
The deploy and secrets keys are new. Ignored by docker-compose, they won’t impact your development environment but are utilized by docker stack. In the web service, we requested two replicas of our Flask app and declared its dependency on the db_password secret. This ensures that the container receives a file named /run/secrets/db_password containing the secret’s value.
Moving to Nginx, we set the deploy mode to global, meaning every swarm node should run one instance. The default, replicated (used implicitly in web), requires specifying the desired replica count. Running docker service ls again reveals three nginx replicas, one per node.
Finally, we instructed Docker to run a single Redis instance within the swarm. Its exact location is irrelevant; our web containers are automatically routed to the Redis host when needed.
Using Swarm Day to Day: Managing Your Swarm
Congratulations on deploying your first app to a Docker Swarm! Let’s review some common commands for daily operations.
Inspecting Your Swarm: Keeping Tabs on Services
Use docker service ls and docker service ps <service name> to monitor your services. The former provides a high-level overview, while the latter displays information about each container running for a specific service, including their host nodes.
Rolling Updates: Updating Your Application with Ease
Updating an app is straightforward with docker stack deploy. It can apply updates to existing stacks. If you’ve pushed a new Docker image, simply rerun the initial deploy command; your swarm will download and deploy the updated image.
If you don’t want to update every service, you can target specific services. For instance, to update the web service after a recent image update, use:
| |
This command also performs rolling updates if specified in your configuration. You can even enforce rolling updates with flags:
| |
This updates one container at a time, pausing for 30 seconds between updates.
Scaling Services Up or Down: Adjusting to Demand
Need more than two web containers? Scaling is simple:
| |
Running this command and checking docker service ps demo_web reveals ten containers, eight of which were recently started. Refreshing the web application now shows a wider range of container IDs due to the increased instances.
Removing Stacks and Services: Cleaning Up
To remove the deployed demo stack:
| |
To remove a single service, use:
| |
Draining Nodes: Performing Maintenance Gracefully
Recall the docker node ls command? It displays node information, including their Availability. By default, nodes are Active, meaning they’re eligible to run containers. However, you might need to temporarily take a node offline for maintenance. While you could shut it down and let the swarm recover, it’s best to provide Docker with a heads-up.
This is where draining comes in. Marking a node as Drain instructs Docker Swarm to relocate running containers to other nodes and prevent new containers from starting until its availability is set back to Active.
To drain node1:
| |
To reactivate it:
| |
Wrapping Up: Embracing the Containerized Future
Docker, coupled with Swarm mode, empowers us to deploy applications with unprecedented efficiency and reliability. While Docker Swarm is relatively new compared to more established container orchestration engines like Kubernetes, it benefits from Docker’s official support and continuous feature development. Regardless of your chosen tool, embrace the power of containerization!