Functional reactive programming (FRP) merges the dynamic nature of reactive programming with the structured function composition of functional programming. It streamlines complex operations, crafts elegant user interfaces, and manages state seamlessly. Due to these and many other clear benefits, FRP is gaining significant traction in both mobile and web development.
However, grasping this programming paradigm is not a simple task—even experienced developers might ask: “What exactly is FRP?” In Part 1 of this tutorial, we established FRP’s core principles: functional programming and reactive programming. This part will equip you to apply it practically, with an overview of valuable libraries and a step-by-step sample implementation.
While geared towards Android developers, the concepts explored here are applicable and advantageous to any developer familiar with general-purpose programming languages.
Embarking on FRP: System Design
The FRP paradigm revolves around a continuous cycle of states and events: State -> Event -> State' -> Event' -> State'' -> …. (Remember, ', pronounced “prime,” denotes a new iteration of the same variable.) Each FRP program begins with an initial state that undergoes updates with every event it encounters. This program consists of elements mirroring those in a reactive program:
- State
- Event
- The declarative pipeline (represented as
FRPViewModel function) - Observable (represented as
StateFlow)
Here, we’ve substituted the general reactive elements with tangible Android components and libraries:

Navigating FRP Libraries and Tools
Several Android libraries and tools can facilitate your FRP journey, also relevant to functional programming:
- Ivy FRP: A library I developed for educational purposes in this tutorial. Consider it a starting point for your FRP approach, not for production use due to limited support. (I’m currently its sole maintainer.)
- Arrow: A leading and widely used Kotlin library for FP, which we’ll also employ in our sample app. It offers nearly everything needed to implement functional programming in Kotlin while remaining lightweight.
- Jetpack Compose: Android’s current toolkit for native UI development and the third library we’ll utilize. It’s indispensable for modern Android development—I recommend learning and migrating your UI to it if you haven’t already.
- Flow](https://kotlin.github.io/kotlinx.coroutines/kotlinx-coroutines-core/kotlinx.coroutines.flow/-flow/): Kotlin’s asynchronous reactive data stream API. While not directly used in this tutorial, it integrates well with common Android libraries like RoomDB, [Retrofit, and Jetpack. Flow works seamlessly with coroutines and offers reactivity. For instance, when used with RoomDB, Flow ensures your app always operates on the latest data. Any table change instantly propagates to flows reliant on that table.
- Kotest: A testing platform providing property-based testing support relevant to pure FP domain code.
Building a Sample Feet/Meters Conversion App
Let’s illustrate FRP in action within an Android app. We’ll construct a simple app converting values between meters (m) and feet (ft).
For this tutorial, I’m focusing solely on code snippets crucial for understanding FRP, simplified from my full converter sample app. If you’re following along in Android Studio, create your project with a Jetpack Compose activity, and include install Arrow* and Ivy FRP. Ensure your minSdk version is 28 or higher and you’re using Kotlin 1.6+ or later.
* Note: There’s now a newer version of Arrow, but the rest of this tutorial hasn’t been tested with it yet.
State
Let’s define our app’s state:
| |
Our state class is quite straightforward:
conversion: Specifies the conversion type—feet to meters or vice versa.value: The float input by the user, to be converted.result: An optional result representing a successful conversion.
Next, we need to manage user input as an event.
Event
ConvEvent is defined as a sealed class to represent user input:
| |
Let’s examine the roles of its members:
SetConversionType: Determines whether we’re converting from feet to meters or meters to feet.SetValue: Sets the numerical values used for conversion.Convert: Executes the conversion of the inputted value using the chosen conversion type.
Now, let’s proceed to our view model.
The Declarative Pipeline: Event Handler and Function Composition
The view model houses our event handler and function composition (declarative pipeline) code:
| |
Before dissecting the implementation, let’s clarify some Ivy FRP library-specific objects.
FRPViewModel<S,E> is an abstract view model base implementing the FRP architecture. Our code needs to implement these methods:
val _state: Sets the initial state value (Ivy FRP uses Flow for reactive data streams).handleEvent(Event): suspend () -> S: Asynchronously produces the subsequent state based on anEvent. The implementation launches a new coroutine for each event.stateVal(): S: Returns the current state.updateState((S) -> S): SUpdates theViewModel’s state.
Let’s now look at some function composition methods:
then: Combines two functions.asParamTo: Generates a functiong() = f(t)fromf(T)and a valuet(of typeT).thenInvokeAfter: Composes two functions and then invokes them.
updateState and thenInvokeAfter are helper methods shown in the next code snippet, used in our remaining view model code.
The Declarative Pipeline: Additional Function Implementations
Our view model also contains implementations for setting conversion type and value, performing conversions, and formatting the final result:
| |
With an understanding of our Ivy FRP helper functions, let’s analyze the code. Starting with the core: convert. This function takes the state (ConvState) as input and produces a function returning a new state containing the converted input. In pseudocode: State (ConvState) -> Value (Float) -> Converted value (Float) -> Result (Option<String>).
Handling the Event.SetValue event is simple; it updates the state with the event’s value (i.e., the user-inputted number). Handling the Event.SetConversionType event is more intriguing; it performs two actions:
- Updates the state with the chosen conversion type (
ConvType). - Utilizes
convertto convert the current value based on the selected type.
Through composition, we can leverage the convert: State -> State function as input for other compositions. You’ll notice the code above isn’t purely functional: We mutate protected abstract val _state: MutableStateFlow<S> in FRPViewModel, introducing side effects when using updateState {}. Achieving entirely pure FP code for Android in Kotlin isn’t feasible.
Composing impure functions can lead to unpredictable outcomes, making a hybrid approach most practical: Utilize pure functions primarily, ensuring any impure functions have controlled side effects. This is precisely what we’ve achieved above.
Observable and UI
Our last step is defining our app’s UI, bringing the converter to life.
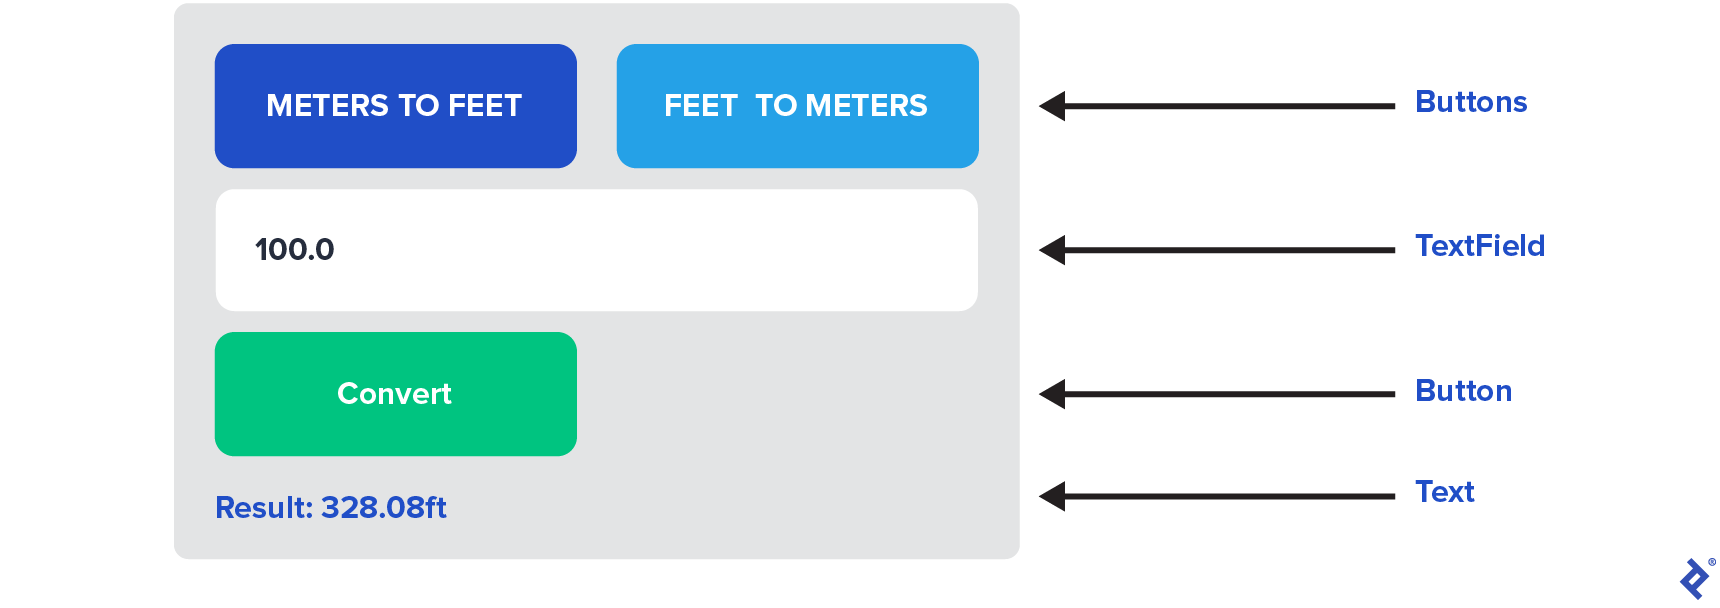
Our app’s UI will be visually basic, as the focus is demonstrating FRP, not elaborate design using Jetpack Compose.
| |
The UI code uses fundamental Jetpack Compose principles with minimal code. However, one noteworthy function is FRP<ConvState, ConvEvent, ConverterViewModel>. FRP is a composable function from the Ivy FRP framework, performing several tasks:
- Instantiates the view model using
@HiltViewModel. - Observes the view model’s
Stateusing Flow. - Propagates events to the
ViewModelwith the codeonEvent: (Event) -> Unit). - Provides a
@Composablehigher-order function handling event propagation and receiving the latest state. - Optionally allows passing
initialEvent, called once the app starts.
Here’s the Ivy FRP library implementation of the FRP function:
| |
The complete converter example code is in GitHub, and the entire UI code resides within the UI function of the ConverterScreen.kt file. To experiment with the app or code, clone the Ivy FRP repository and run the sample app in Android Studio. Your emulator might need increased storage for the app to function correctly.
Towards a Cleaner Android Architecture with FRP
With a solid grasp of functional programming, reactive programming, and now functional reactive programming, you’re equipped to harness the advantages of FRP and build cleaner, more maintainable Android architecture.
The Toptal Engineering Blog thanks Tarun Goyal for reviewing the code samples presented in this article.