Are you prone to errors? I know I am. The first step towards rectifying any mistake is identifying its root cause. While I can’t magically erase all your problems, I can certainly assist in resolving those stemming from PHP code on your WordPress site. And how do I achieve this? By guiding you through the intricacies of debug logs.
A while back, while explaining how to personalize your WordPress site’s wp-config.php file, I touched upon debugging settings. I detailed the process of displaying errors and scenarios where it might be best to avoid doing so. Simultaneously activating WP_DEBUG, as outlined in that particular piece, is crucial during development. However, it can lead to non-fatal errors and unavoidable warnings you might not want your site visitors to see. Furthermore, you might be oblivious to certain errors and warnings simply because you haven’t encountered them yet, but your site’s visitors are experiencing them.
Considering these factors, it’s advisable to keep WP_DEBUG activated on a live site. This prevents errors from surfacing while utilizing the WordPress debug log. To observe these errors and warnings, you’ll need to direct them to a designated log file for review. This article will delve into the setup of error logging and different techniques to access your logs. Additionally, I’ll explain how to input other pertinent data into the log and when this might be beneficial.
Even when displaying errors, logging them remains a beneficial practice. A record of errors often proves invaluable during development. While you might not immediately grasp the make much sense of an error, the logged information can be incredibly insightful as you progress and gain more context.
Getting Started
Here’s a quick recap of the points discussed in my wp-config article. If you’re unfamiliar with editing your site’s wp-config file, or unsure about its purpose or the concept of a constant, I recommend revisiting that article before proceeding.
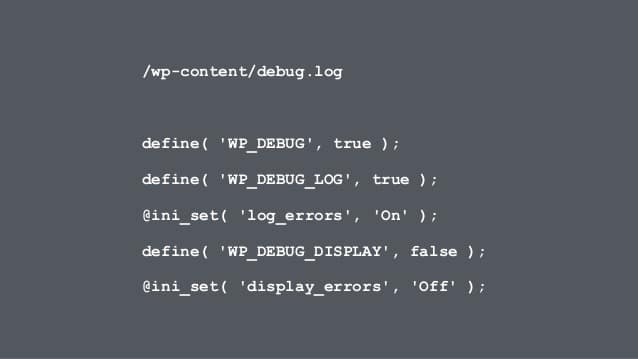
To enable debugging, suppress the display of errors and warnings, and activate error logging, incorporate these three lines into your wp-config:
define( ‘WP_DEBUG’, true ); define( ‘WP_DEBUG_DISPLAY’, false ); define( ‘WP_DEBUG_LOG’, true );
Remember, there’s no foolproof method to prevent a fatal error from triggering a dreaded white screen of death apart from enabling debug display. This will, however, present a white screen accompanied by the error details.
Accessing Your WordPress Debug Log
The debug log itself is stored as a file named debug.log within your site’s content directory. Directly accessing this file is one way to view and clear your log, but it’s not the most efficient, especially if your site resides on a remote server. Several plugins, which I’ll discuss shortly, simplify working with your debug log. However, understanding this direct method is crucial because if a fatal error locks you out of the WordPress backend, your debug log might hold the key to understanding the cause.
Multiple methods allow you to access your debug log from the WordPress backend. My personal preference is the Log Viewer plugin. This free plugin offers two ways to view your debug log and the capability to clear it. With the plugin active, you can view your log directly from its admin page, located within the Tools menu.
Furthermore, if you have the Debug Bar plugin active – one of the most powerful development tools for WordPress – you can access your log through a dedicated panel within the Debug Bar. I wouldn’t recommend running Debug Bar on a live site, so having both options is always a plus. Both plugins can be easily installed from the WordPress installer or the Developer plugin, a treasure trove of tools designed to streamline your development process.
Here’s a glimpse of the WordPress debug log view:
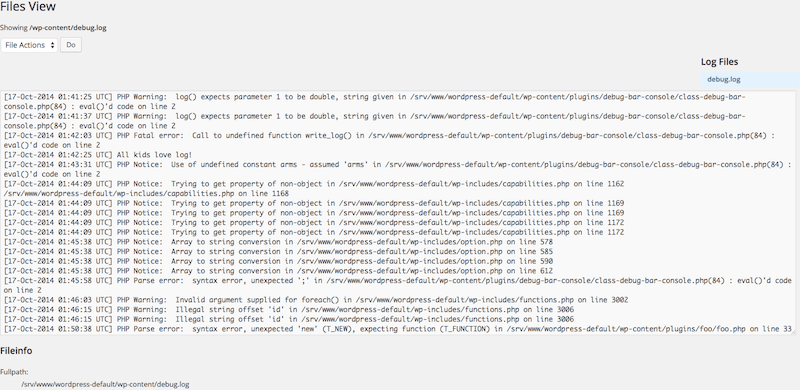
As you can observe, every instance of a warning, error, or notice encountered by WordPress is meticulously documented in the log alongside a UTC timestamp.
Adding Additional Data to the WordPress Debug Log
There might be instances where you need to write information to the log that isn’t strictly an error. PHP has a handy function called error_log for printing data to the error log. By default, it doesn’t print and format as desired. Therefore, I suggest incorporating an additional function into your site to handle formatting. Think of it as a wrapper for error_log that utilizes print_r() to format arrays and objects correctly before logging them. Here’s how the function looks:
if ( ! function_exists(‘write_log’)) { function write_log ( $log ) { if ( is_array( $log ) || is_object( $log ) ) { error_log( print_r( $log, true ) ); } else { error_log( $log ); } } }
I strongly advise against embedding this in your theme’s functions.php to utilize the WordPress debug log. Doing so would render it useless if you ever switched to the default theme as a debugging step. Instead, consider crafting a plugin for this function. This involves creating a file within your plugin directory, adding a plugin header, and inserting this function. Keep the title simple, something like:
/* Plugin Name: Log Error */
Once this function is at your disposal, its applications are vast. Curious if a specific line of code is ever executed? Use:
write_log( __LINE__ );
You can even leverage it to gather valuable insights about your site. For example, want to record when a particular post is viewed and whether the viewer was logged in? Here’s a simple code snippet to accomplish that:
add_action( ‘wp_head’, ‘slug_log_post_view’ ); function slug_log_post_view() { //set the ID of the post you want to track here: $post_to_track = 42;
//get the current post’s ID & make sure it’s a valid ID and it matches our ID $id = get_queried_object_id(); if ( intval( $id ) > 0 && $post_to_track === $id ) {
  //check if current user is logged in and if so get the user ID
  if ( is\_user\_logged\_in() ) {
     $user\_id = get\_current\_user\_id();
     $user\_id = 'a user with the ID ' . $user\_id;
  }
  else{
     $user\_id = 'a user that was not logged in.';
  }

  //log the information
  write\_log( "The post {$post\_to\_track} was accessed by {$user\_id}" );
}
}
While not a replacement for Google Analytics, this function offers a quick and straightforward way to glean information about a specific post. Set the desired post ID in the $post_to_track variable. You could even apply this to all posts by removing the conditional check between $post_to_track and $id. In that case, replace $post_to_track with $id in the final line.
Logging: A Developer’s Best Friend
I hope this introduction to error logging within WordPress has shed light on utilizing this often-overlooked feature for debugging your site’s issues. Remember that PHP errors are just one type of error you might encounter. JavaScript errors, displayed in your browser’s JavaScript console, are another common culprit.