Today, mobile apps depend significantly on interactions between the client and server. This design allows them to shift demanding tasks to powerful back-end servers and unlock features only accessible online.
Back-end servers typically use RESTful APIs to provide services. While simple apps might tempt us to combine API interaction code with other logic, this approach becomes chaotic as apps grow and utilize more APIs.
This article presents a structured way to create a clean REST client networking part for iOS apps, separating all client-server logic from other parts of your app’s code.
Client-Server Apps in Action
Here’s a typical client-server interaction:
- A user interacts with the app (like tapping a button).
- The app sends an HTTP/REST request based on the user’s action.
- The server processes the request and sends a response.
- The app receives the response and updates what the user sees on screen.
This seems simple, but details matter.
Even when a backend server API functions correctly, a poor design can make it inefficient or tricky to use. For instance, APIs might require the same information repeatedly (like data formatting or user identification tokens).
Mobile apps may also need to connect with several back-end servers simultaneously for different tasks. For example, one server might handle user logins while another focuses on collecting app usage data.
Moreover, a typical REST client does more than just communicate with APIs. Essential features include canceling ongoing requests and having a clear way to deal with errors.
The Architecture at a Glance
Our REST client’s core has these parts:
- Models: These represent the app’s data, mirroring how data is sent to or received from servers.
- Parsers: They decode server responses and turn them into model objects.
- Errors: These objects represent problems encountered with server responses.
- Client: This sends requests to servers and receives responses.
- Services: These handle related operations like authentication, user data, or analytics.
Here’s how they work together:
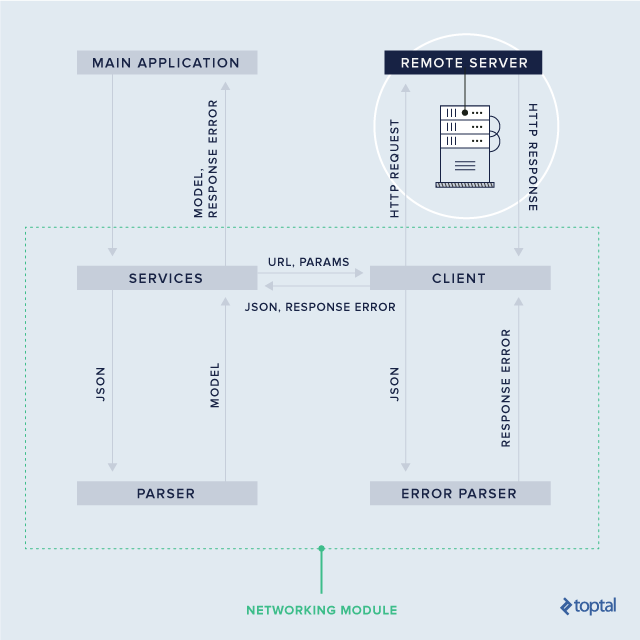
The numbered arrows in the diagram illustrate the flow from the app requesting data to the service returning the data as a model object. Each component plays a specific role, ensuring separation of concerns within the module.
Putting It All Together: Implementation
We’ll incorporate our REST client into a hypothetical social network app. It will load a list of friends for the logged-in user. Our server uses JSON for responses.
Let’s start with models and parsers.
Transforming Raw JSON to Usable Models
Our User model outlines the data structure for a user in our app. We’ll keep it simple for this tutorial, but real apps have many more properties.
| |
Since the server sends user data as JSON, we need to parse the API response it into a usable User object. We’ll add a constructor to User that takes a parsed JSON object (Dictionary). We’ll define a type alias for clarity:
| |
Now, let’s add the constructor to our User struct:
| |
We add this constructor as an extension to keep the original default constructor.
To create a User from a raw API response, we need two steps:
| |
Making Error Handling Smoother
Let’s define a type to represent potential errors when talking to servers. We can group them into three main types:
- No internet connection
- Errors indicated in the server’s response (like validation errors)
- Errors not mentioned in the response (like server crashes)
We’ll use an enumeration and make it conform to Error protocol for easier error handling with Swift’s built-in mechanisms.
| |
Unlike noInternetConnection and other, custom errors have associated values. This allows us to include the server’s error response, giving us more context.
Let’s add an errorDescription to make these errors clearer. We’ll use hardcoded messages for noInternetConnection and other, and use the associated value for custom errors.
| |
Finally, for custom errors, we need to convert the server’s JSON data into an error object:
| |
Connecting the App and Server
The client acts as a go-between for the app and server. It manages their communication without knowing about data models. It’s responsible for sending requests to URLs with parameters and returning parsed JSON data.
| |
Let’s break down this code:
We define RequestMethod to represent common HTTP methods used in REST APIs.
The WebClient class has a baseURL for resolving relative URLs. To interact with multiple servers, we create multiple WebClient instances with different base URLs.
The load method handles API requests. It takes a path, request method, parameters, and a completion closure. The closure receives parsed JSON and potential ServiceError objects. We’ll implement this method soon.
Before that, let’s create a way to build a URL from provided information:
| |
This simply combines the base URL and the given path. For GET and DELETE requests, it also adds query parameters.
Next, let’s enable creating URLRequest instances:
| |
Here, we construct a URL, create a URLRequest, set headers, and add parameters to the request body for POST and PUT requests.
Now we can implement the load method:
| |
This method:
- Checks for an internet connection. If there’s no connection, it immediately calls the completion closure with a
noInternetConnectionerror. (Reachabilityis a custom class using one of the common approaches to check connectivity.) - Adds common parameters, such as application tokens or user IDs.
- Creates a
URLRequestusing our extension. - Sends the request. A
URLSessionsends the data to the server. - Parses the response. Upon receiving a response, it parses the JSON. If the status code indicates success, it calls the completion closure with the JSON. Otherwise, it creates a
ServiceErrorfrom the JSON and passes it to the closure.
Organizing Related Operations with Services
Our app needs a service to handle friend-related tasks. Let’s create a FriendsService class. Ideally, it would manage actions like getting, adding, removing, and grouping friends. For this example, we’ll implement only one method:
| |
The FriendsService has a client property (WebClient) initialized with the base URL of the server responsible for managing friends. Different services could use separate WebClient instances with different URLs.
If the app uses a single server, the WebClient could have a constructor like this:
| |
The loadFriends method prepares parameters and uses the FriendService’s WebClient to make an API request. Upon receiving the response, it converts the JSON into User models and passes them to the completion closure.
Here’s how you might use the FriendsService:
| |
Here, we assume friendsButtonTapped is called when the user wants to see their friend list. Storing the task in friendsTask lets us cancel the request anytime using friendsTask?.cancel(), giving us more control over ongoing requests.
Wrapping Up
This article outlined a simple yet adaptable networking architecture for iOS apps. The key takeaway is that a well-designed REST client, separate from other app logic, keeps your client-server code clean even as the app grows.
I hope you find this useful for your next project. You can find the source code here: on GitHub. Feel free to explore, modify, and experiment with it.
If you prefer a different architecture, please share it in the comments below.