It’s a common scenario: you’re deep in API back-end development, feeling good about your progress, when suddenly, the scope expands. Your boss wants social logins, specifically Facebook and Google, because who wants to create yet another account?
Thankfully, OAuth 2, the industry standard for this, comes to the rescue. It’s used by major players like Facebook and Google, so understanding it opens doors to a wide range of social authentication providers.
Now, if you’re like me, OAuth 2 might sound unfamiliar.
As a Python developer, your first instinct might be to turn to pip, the go-to tool for installing Python packages. However, you’ll quickly find yourself drowning in options - pip lists a staggering 278 packages related to OAuth, with 53 specifically mentioning Django. Sifting through that could take a week, let alone actually writing code.
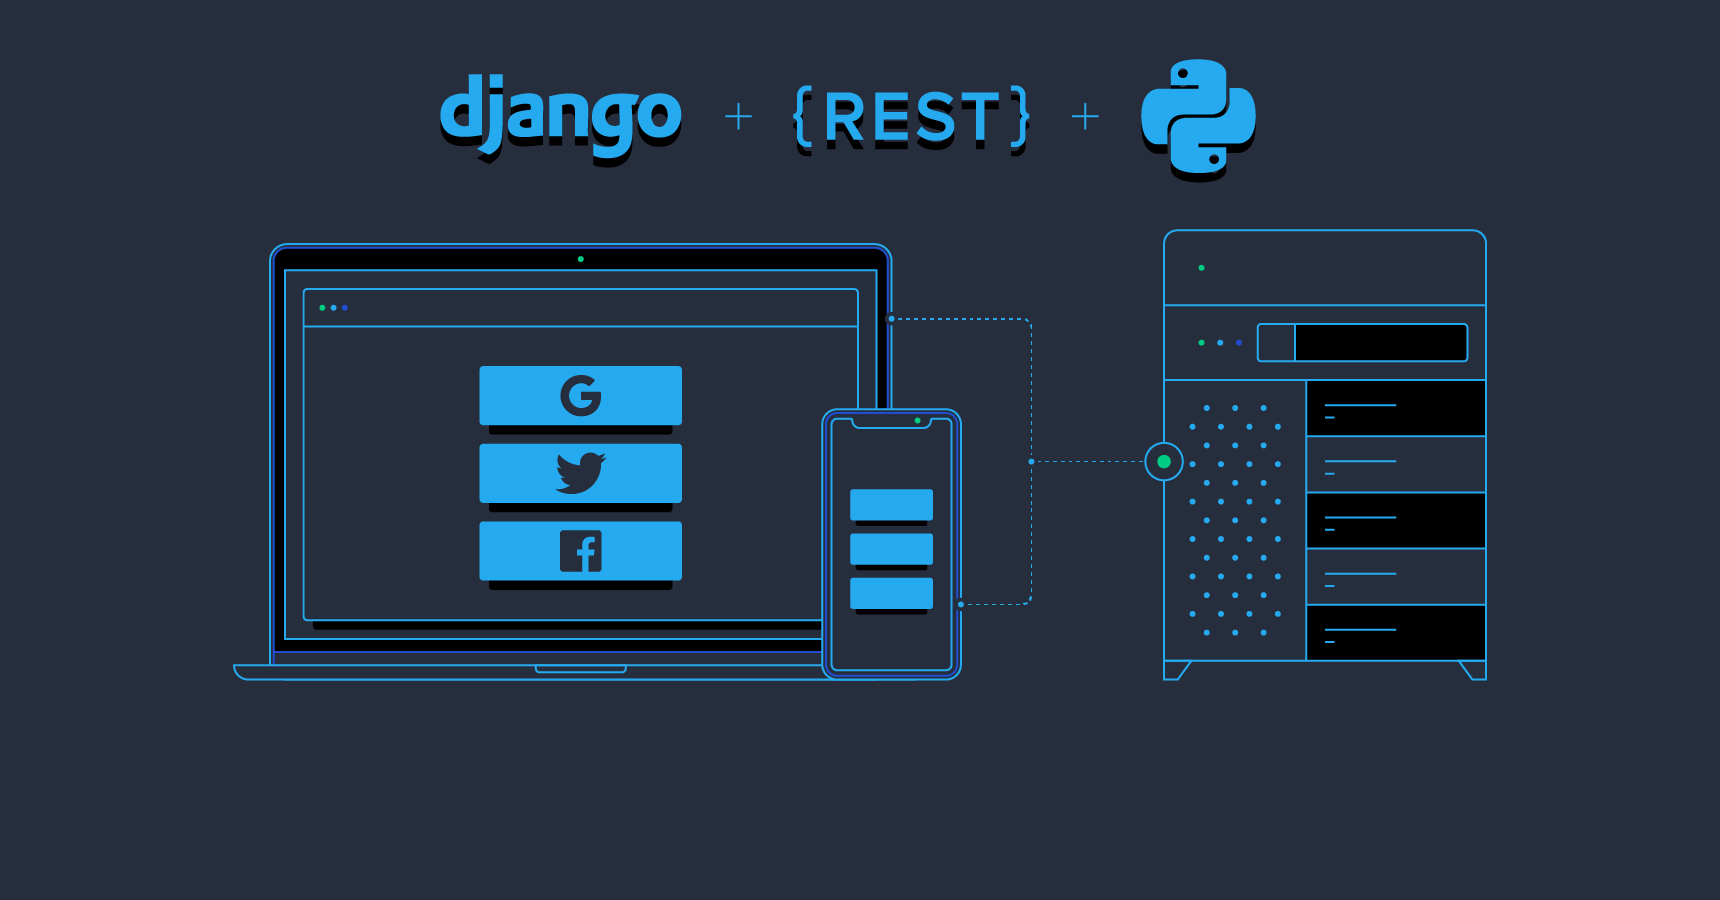
This tutorial will guide you through integrating OAuth 2 into your Django or Django Rest Framework project using Python Social Auth. While we’ll be focusing on the Django REST Framework, the principles discussed here can be applied to other common back-end frameworks as well.
Understanding the OAuth 2 Flow
OAuth 2, designed as a web authentication protocol, relies on tools like HTML rendering and browser redirects. This can pose a challenge for JSON-based APIs, but there are workarounds. Let’s first examine the traditional server-side flow.
Server-side OAuth 2 Flow
Before diving into the application flow, the project owner needs to register it with each OAuth 2 provider you intend to use. This involves providing a callback URI where your application will receive requests and receiving a client key and client secret in return. These tokens are crucial for validating login requests.
It’s important to remember that these tokens identify your server code as the client to the OAuth 2 provider, not your API’s clients.
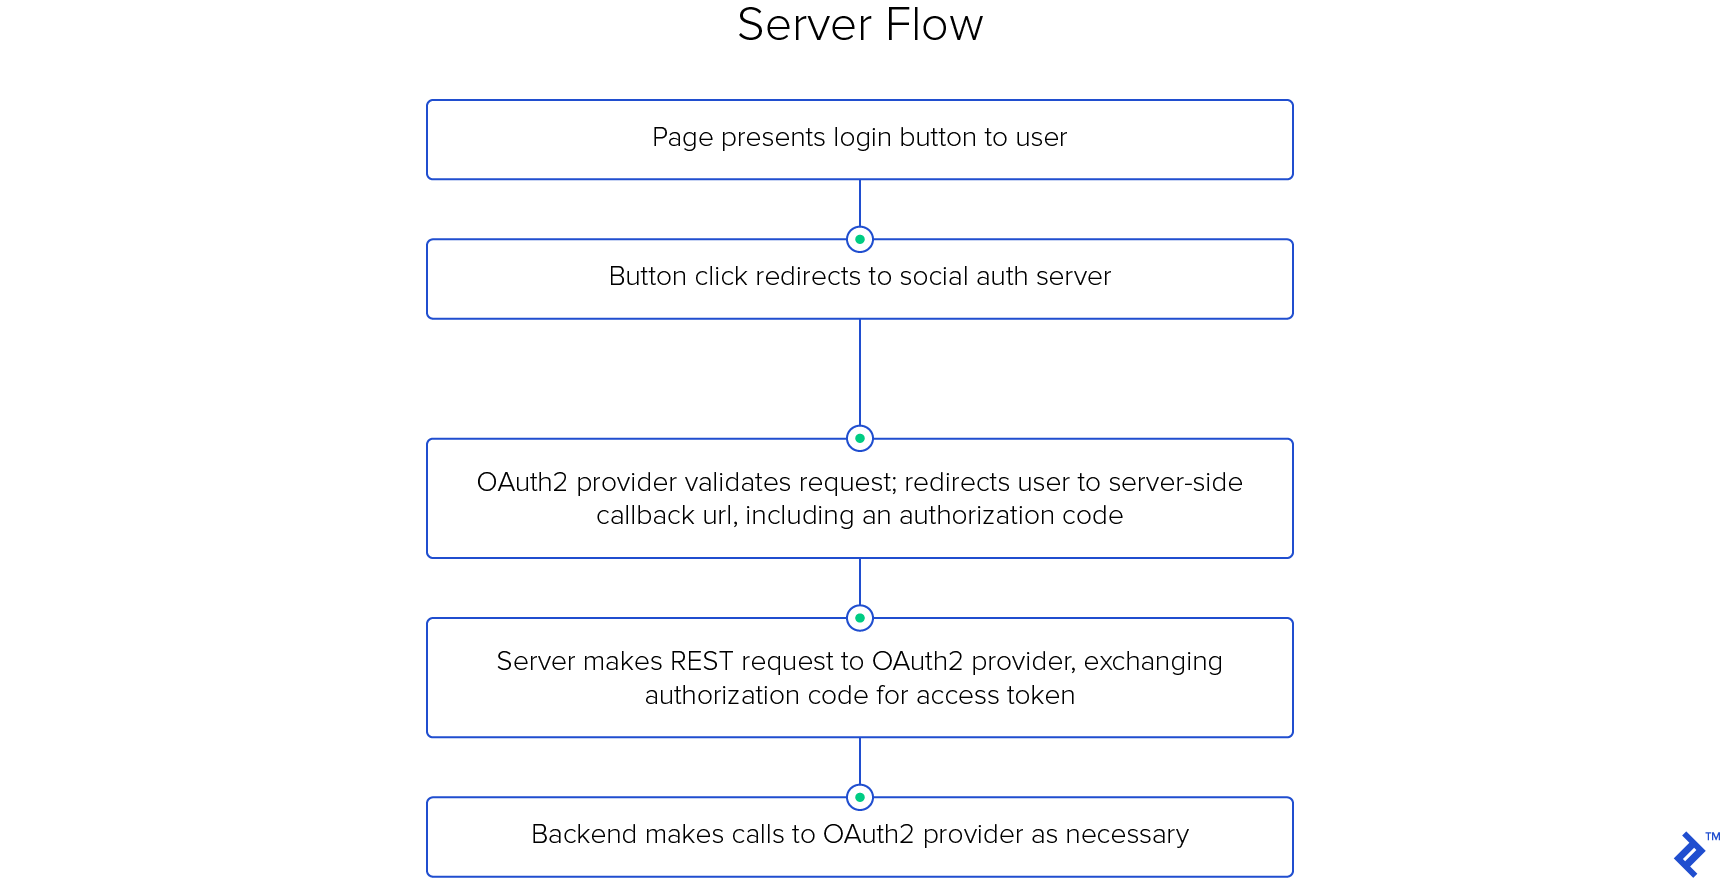
The process starts when your application presents the user with social login buttons (e.g., “Log in with Facebook”). These buttons are essentially links pointing to URLs structured like this:
| |
(Note: Line breaks are added for clarity.)
Notice that you provide your client key and redirect URI, but not your secret. You also specify the desired response type (an authorization code) and the ‘profile’ and ’email’ scopes, defining the permissions you’re requesting from the user.
Upon clicking the link, the user’s browser is directed to a page controlled by the OAuth 2 provider. After verifying the callback URI and client key, the flow branches based on the user’s login status.
Unauthenticated users will be prompted to log in. Afterwards, a dialog requesting permission to grant your application access is presented.

If the user approves, the OAuth 2 server redirects them back to your provided callback URI, including a short-lived, single-use authorization code in the query parameters: GET https://api.yourapp.com/oauth2/callback/?code=AUTH_CODE.
Your server should immediately use this code to make another request to the OAuth 2 provider, this time including both the authorization code and your client secret:
| |
The authorization code authenticates this POST request, but its journey through the user’s system makes it inherently insecure. The short lifespan and single-use restriction mitigate this risk.
This server-to-server call, secured with TLS, is paramount. It ensures the request originates from your server and not malicious actors who might have intercepted the authorization code.
If everything aligns, the server responds with an access token, granting your application authenticated access to the provider’s API as the user.
Your server, after receiving the access token, redirects the user’s browser to the post-login landing page, usually storing the token in the server-side session cache for future use.
Keep the access token confidential; never expose it to the user!
While providers like Google offer refresh tokens to extend access token lifetimes and Facebook provides endpoints for exchanging short-lived tokens for longer-lived ones, these details are less relevant for our client-side flow.
The server-side flow, with its redirects and reliance on server-generated pages, feels clunky for REST APIs. While workarounds exist, a more elegant solution awaits.
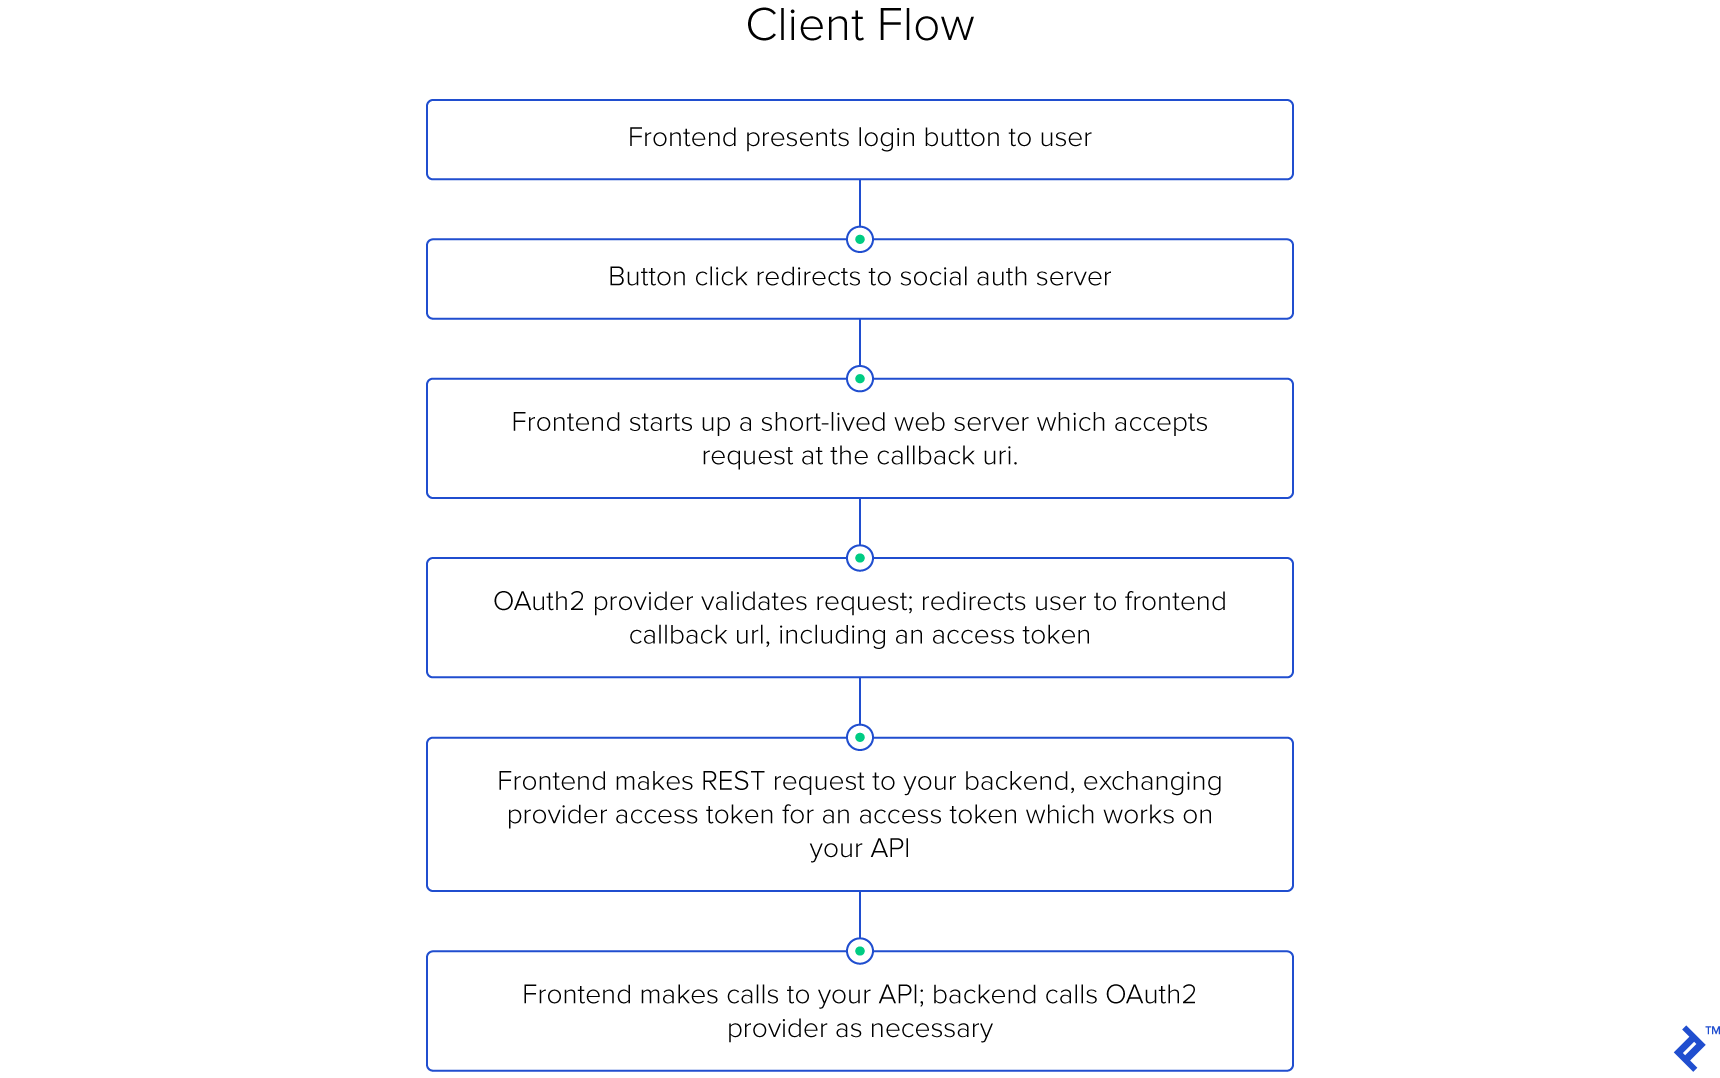
Client-side OAuth 2 Flow
This flow shifts the entire OAuth 2 responsibility to the front-end. While similar to the server-side flow, there’s a key difference: front-ends, residing on user-controlled machines, cannot be trusted with the client secret. Hence, this step is omitted.
As before, the project owner registers the application, but as a web application. The OAuth 2 provider issues a client key but might not provide a client secret.
The front-end presents the user with social login buttons, which redirect them to the OAuth 2 provider’s page. The URL structure differs slightly:
| |
Note the response_type is now token.
Instead of a callback URI, we now have a redirect URI, an address on the front-end equipped to handle the access token. This could be a temporary server on the user’s device (e.g., http://localhost:7862/callback/?token=TOKEN) or a dedicated page. The front-end parses the query parameters and processes the access token.
While the front-end can now interact directly with the OAuth 2 provider’s API, the real goal is authenticated access to your API. This is where your back-end comes in, providing an endpoint for the front-end to exchange the social provider’s access token for one granting access to your API.
Why this exchange, given the inherent security implications of exposing the access token to the front-end?
This approach maintains a clean separation of concerns between the front-end UI and the back-end logic, adhering to the principles of a well-defined JSON API. While a hybrid flow (using the back-end as the redirect URI) is possible, it blurs this separation, forcing the back-end to handle both user-facing pages and the logic for returning control to the front-end.
Allowing the front-end to manage the access token, while slightly riskier, provides a practical solution that preserves this separation.
While this flow might appear complex for the front-end, libraries like Facebook and Google simplify the process by providing pre-built login buttons that handle most of the heavy lifting with minimal configuration.
Streamlining Token Exchange on the Back-end
Despite being relatively isolated from the OAuth 2 process in the client-side flow, the back-end still plays a crucial role. It needs to:
- Validate the access token received from the front-end by communicating with the OAuth 2 provider.
- If valid, issue a token for your API; otherwise, return a descriptive error.
- Create a new
Usermodel for new users, populating it with the necessary information. - Match existing users based on their email address to prevent duplicate accounts.
- Update user profile details based on the information provided by the social provider.
Implementing this functionality is surprisingly straightforward, thanks to the Python Social Auth library (PSA). Ensure social-auth-core and social-auth-app-django are in your requirements.txt, and configure the library as described here.
Below is a simplified example (excluding some error handling) showcasing how to achieve this in roughly two dozen lines of code. Find the complete code here.
| |
You’ll need to add a few more lines to your settings (full code):
| |
Finally, map this function in your urls.py, and you’re good to go!
Demystifying the Magic
Python Social Auth is a powerful and versatile library, capable of handling authentication and access for a multitude of providers (several dozen social auth providers). It integrates seamlessly with popular Python web frameworks like Django, Flask, Pyramid, CherryPy, and WebPy.
The provided code snippet is a standard Django REST framework (DRF) function-based view. It listens for POST requests on the specified path in your urls.py, expecting a specific request format, and returns either a User object or None.
PSA handles the heavy lifting: validating the token, searching for existing user matches, creating new users if necessary, and updating user details from the social provider. The SOCIAL_AUTH_PIPELINE, defined in your configuration, dictates how users are mapped and associated. For a deeper dive into this, refer to the documentation here.
The @psa() decorator is where the real magic happens. It enriches the request object with additional attributes, the most relevant being request.backend. PSA automatically selects the appropriate back-end based on the backend argument in the view, which is populated from the URL.
With the backend object, you can authenticate against the provider using the access code via the do_auth method, which in turn triggers the SOCIAL_AUTH_PIPELINE.
While the pipeline can be extended for advanced scenarios, its default functionality is often sufficient. The rest of the code is standard DRF: if a valid User object is retrieved, an API token is returned; otherwise, an error is generated.
One potential drawback is the lack of detailed error information. PSA simplifies error handling but at the cost of granular insights. However, this aligns with the best practices of secure authentication systems, which prioritize user privacy and security over detailed error messages.
Why Not Build Your Own?
In a nutshell: extensibility. Social OAuth 2 providers differ in their API call structures and data formats, making custom implementations tedious and error-prone.
PSA shines in this aspect. Adding a new provider is as simple as tweaking your settings; no code modifications are required. This abstraction allows you to focus on your application logic, leaving the complexities of OAuth 2 to PSA.
Tackling Testing
Testing OAuth 2 integrations can be challenging. Mocking API calls buried deep within a library like PSA is where tools like unittest.mock fall short. Instead, leverage the Responses library to mock providers at the HTTP level, capitalizing on PSA’s reliance on the Requests library.
While a comprehensive discussion on testing is beyond this article’s scope, refer to the provided test samples here for guidance. Pay close attention to the mocked context manager and the SocialAuthTests class.
Embrace the Power of PSA
OAuth 2, while powerful, involves intricate details. By leveraging libraries like Python Social Auth, you can abstract away much of this complexity, simplifying the integration process.
We’ve demonstrated a concise Django/DRF view that implements the client-side, implicit OAuth 2 flow for seamless user creation and matching in just 25 lines of code, all thanks to the capabilities of PSA. Let it handle the heavy lifting while you focus on building amazing applications.