For retail businesses, dynamic remarketing can be a game-changer. Having spent more than six years as a performance specialist at Google Canada, I’ve seen how this strategy can significantly impact a business’s bottom line. Dynamic remarketing is especially effective for engaging potential customers who have already interacted with your products, but haven’t committed to a purchase yet.
This guide will walk you through the best practices of implementing dynamic remarketing, specifically for retail. By the end, you’ll be equipped to create your own Google Ads campaign that delivers personalized ads, boosting both brand visibility and conversions.
Understanding Dynamic Remarketing in Retail
Dynamic remarketing for retail, powered by Google, is a highly effective advertising method that allows businesses to show tailored product ads to users who’ve previously interacted with their website or mobile app. This technique leverages Google’s robust advertising platform to display ads featuring products a user has viewed or even added to their shopping cart.
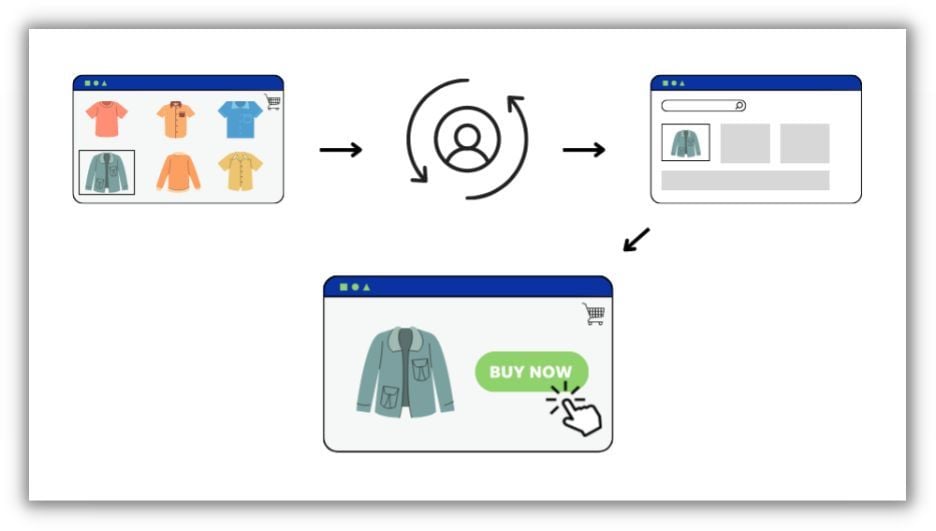
This strategy goes beyond basic retargeting. It analyzes data points like user behavior, demographics, and interests to deliver highly personalized and relevant pay-per-click (PPC) ads. These ads are strategically placed across Google’s extensive network, including Google Search, YouTube, Gmail, and millions of partner websites and apps.
Why Choose Dynamic Remarketing for Your Retail Business?
Dynamic remarketing offers retailers a powerful way to boost conversions and drive revenue. By strategically reminding potential customers of products they’ve previously shown interest in, it helps re-engage their attention, ultimately leading to increase brand awareness, stronger customer loyalty, and increased overall sales.
Google’s dynamic remarketing solution combines advanced targeting capabilities with a real-time bidding system, making it an invaluable tool for retailers looking to elevate their advertising strategies and achieve significant results.
Setting Up Dynamic Remarketing in Google Ads
Follow these six streamlined steps to implement dynamic remarketing for your retail business.
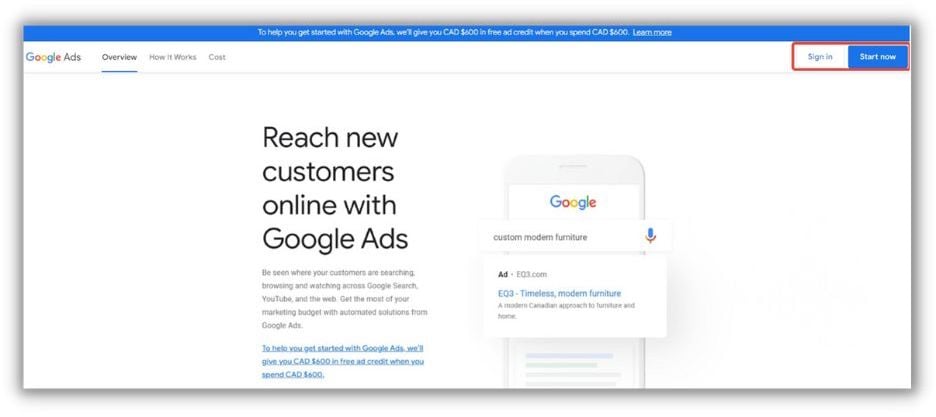
Step 1: Create Your Google Ads Account
If you don’t already have a Google Ads account, setting one up is your first step.
Don’t worry if you already have one; you can skip this step.
To create a new account, navigate to the Google Ads homepage and follow the on-screen instructions. You’ll be asked for basic business information, like your website URL and business location.
Step 2: Integrate Your Products with the Merchant Center
Setting up dynamic remarketing within Google Ads involves a few crucial steps, one of which is creating a product feed. Think of this as a master spreadsheet containing all the vital details about your products - prices, images, and descriptions. Google Ads relies on this data to understand what customers are looking at and to generate relevant product ads.
Creating a product feed is easier than you might think. Any standard spreadsheet or CSV file can be used, which you then upload directly to your Google Merchant Center account (create one here if you haven’t already). This ensures that Google Ads has a clear and consistent view of your product data, allowing for the creation of effective dynamic remarketing campaigns that hit the right audience at the perfect moment.
While compiling a product feed can feel daunting, particularly for those with extensive product catalogs, there are ways to simplify the process, especially for ecommerce businesses using popular platforms. CMS platforms like Shopify and WordPress (with WooCommerce) often include features for seamlessly adding products to the Google Merchant Center.
 An example of where the Shopping Feed can show in Google Ads.
For Shopify users, the API method allows you to integrate your Shopify store with the Merchant Center. This automatic synchronization eliminates the need for a traditional feed and ensures your product data is always consistent across both platforms. This streamlined approach can make setting up dynamic marketing with Google Ads significantly easier for ecommerce businesses.
WooCommerce users can take advantage of rich results for products with Schema.org structured data (for a simplified approach, check out Yoast). This feature lets the Merchant Center crawl your website and automatically gather product information without requiring a separate feed, making the setup process even smoother.
Important: To ensure seamless integration, make sure to link your Merchant Center account to your Ads account so Google Ads can utilize your product feed when creating your dynamic remarketing campaign. This ensures that your product data is readily available for your campaigns.
Step 3: Implement the Data Layer
Adding the Data Layer to your website is a fundamental step in setting up dynamic remarketing. The data layer acts as a container for information about specific products users have viewed on your site, including product ID (which should match the ID in your Merchant Center feed), its value (including cart and final order values), and the specific page category the user is browsing. This data is then relayed to your remarketing tag and subsequently to Google Ads.
But how exactly does the data layer transmit this information to Google Ads? When a user interacts with your website, it triggers an event. While the full event snippet code won’t be directly visible in your tracking tools, you can install the data layer to seamlessly push relevant product data from your website into it.
For example, if a user views two products, the event snippet code will capture their prices and IDs. The Data Layer then passes this information along to Google Ads, enabling you to create highly targeted dynamic remarketing campaigns.
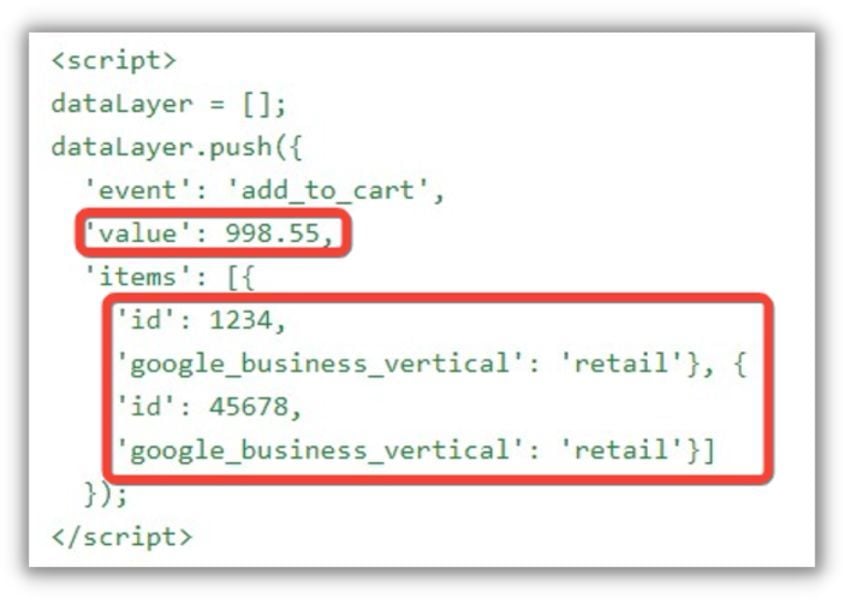
Event names are a critical component of your data layer code, as they define the specific user action being tracked. For example, “add_to_cart” tracks when a user adds an item to their shopping cart. Selecting the right event names is crucial, as Google Ads uses them to categorize users into automatically generated lists.
Assuming you already have Google Tag Manager installed (if not, refer to this Google Help Center article), the next step is integrating the customized Data Layer code for your website. This code is placed above your existing GTM code snippet.
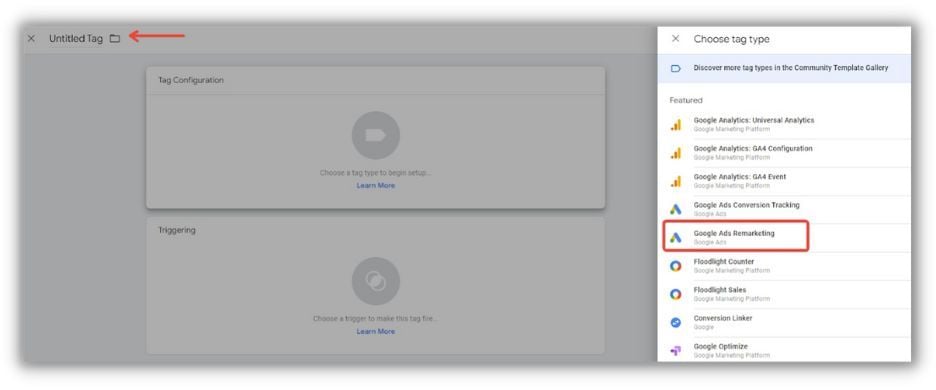
Step 4: Create Your Google Ads Remarketing Tag in GTM
To set up a Google Ads Remarketing Tag within your Google Tag Manager account, follow these steps:
Log in to your Google Tag Manager account.
In the left-hand menu, click on “Tags,” then click the red “New” button.
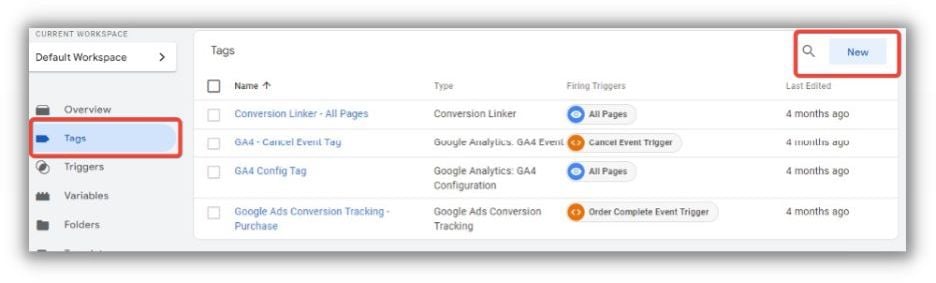
Assign a name to your new tag, then click the tag configuration section and select “Google Ads Remarketing” from the available tag types.
Enter your Google Ads Conversion ID. You can find this by going to “Tools & Settings” in your Google Ads account, then clicking “Audience manager” under Shared Library.
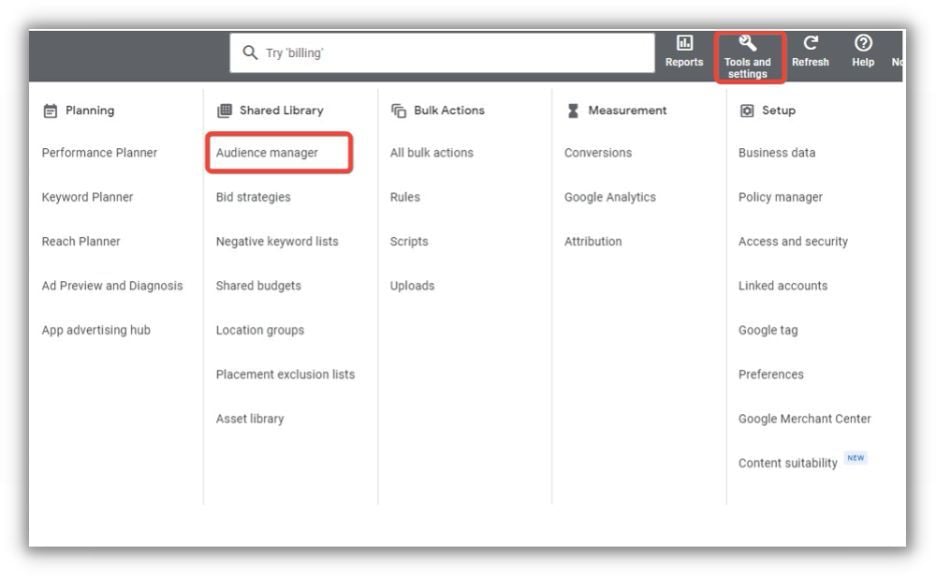
Select “Your Data Sources” on the left and click “Google Ads Tag.” If you haven’t set up a tag yet, you’ll be prompted to create one by clicking “Set up Tag.”
At the bottom of the Google Ads Tag page, click “Tag setup,” then choose “Use Google Tag Manager.” Your Conversion ID will be displayed here.
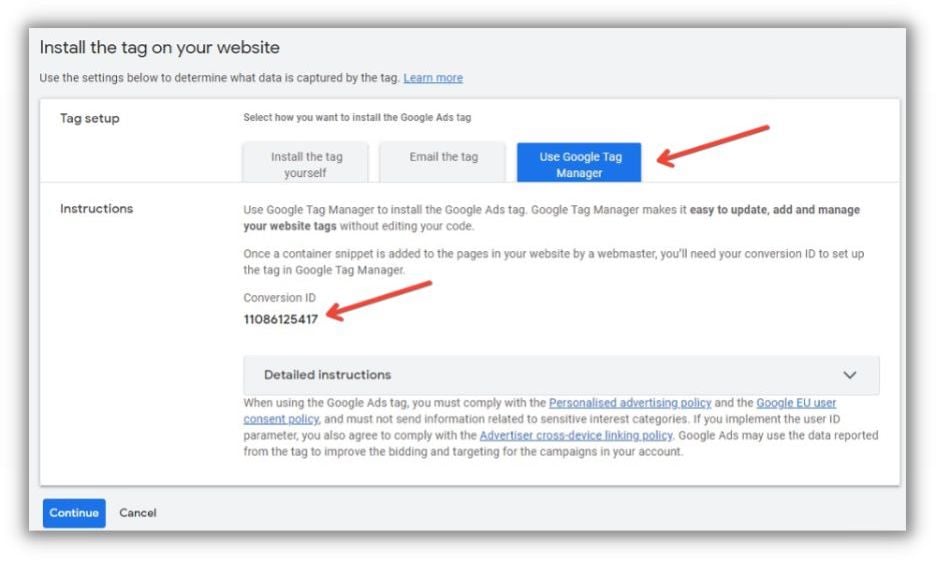
Copy the Conversion ID and paste it into the corresponding section of your Google Ads Remarketing Tag in GTM.
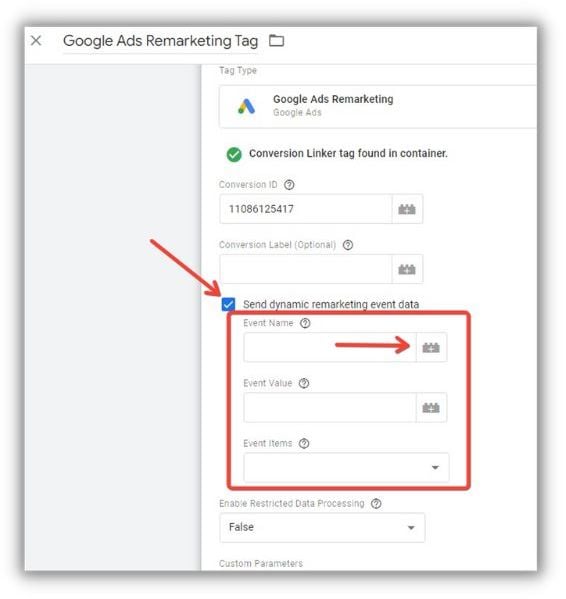
Select the “Send dynamic remarketing event data” option, and you’ll be well on your way to enhancing your marketing endeavors.
Step 5: Make Your Remarketing Tag Dynamic
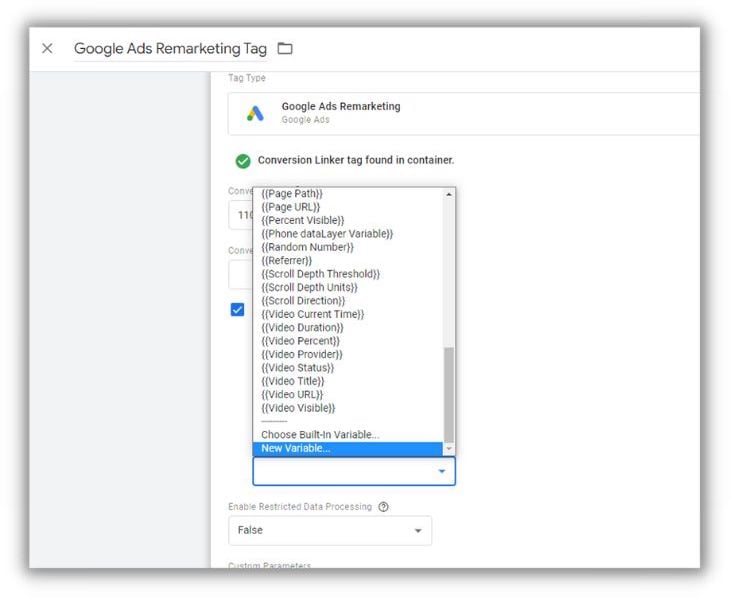
To maximize the impact of your dynamic remarketing efforts, you can utilize custom parameters for your Google Ads Tag’s dynamic remarketing events.
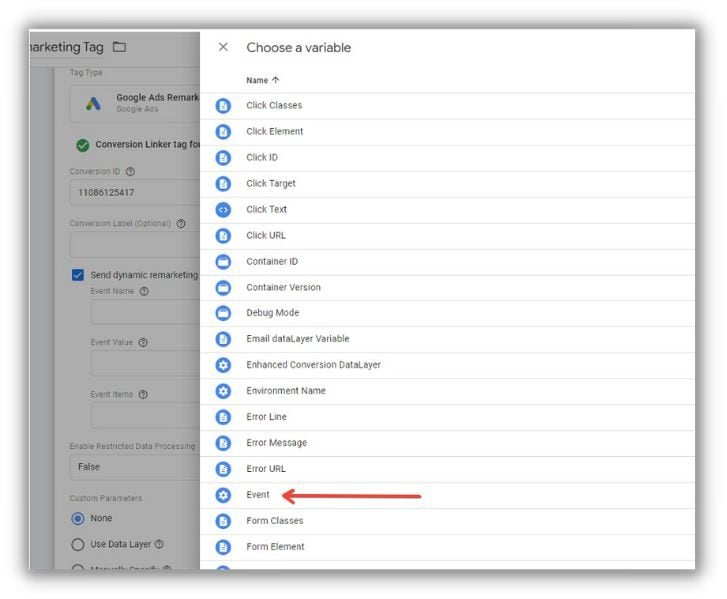
Select the “Event” variable (indicated by a gear icon).
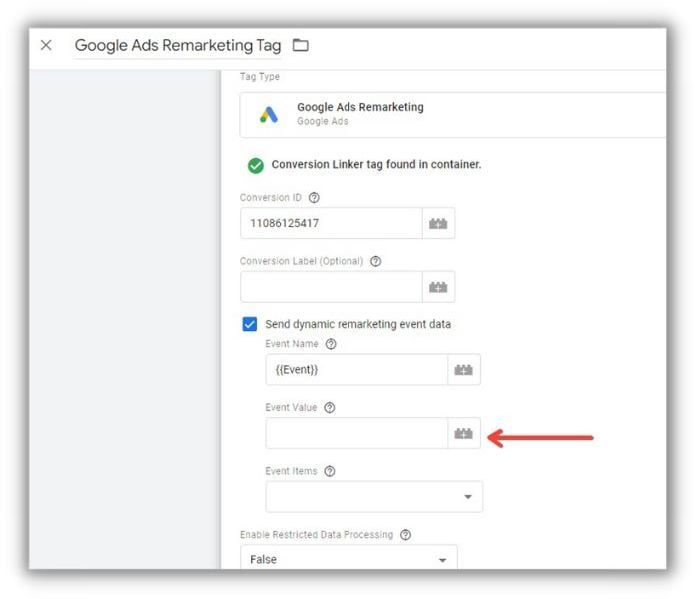
Next, add the Event Value by clicking the “+” icon next to the text box.
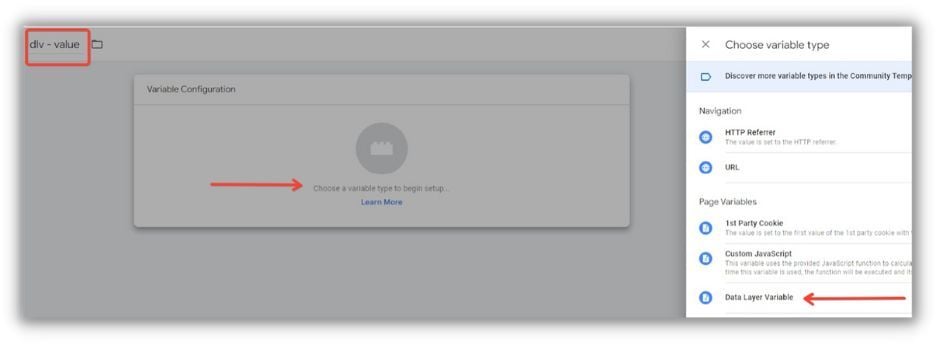
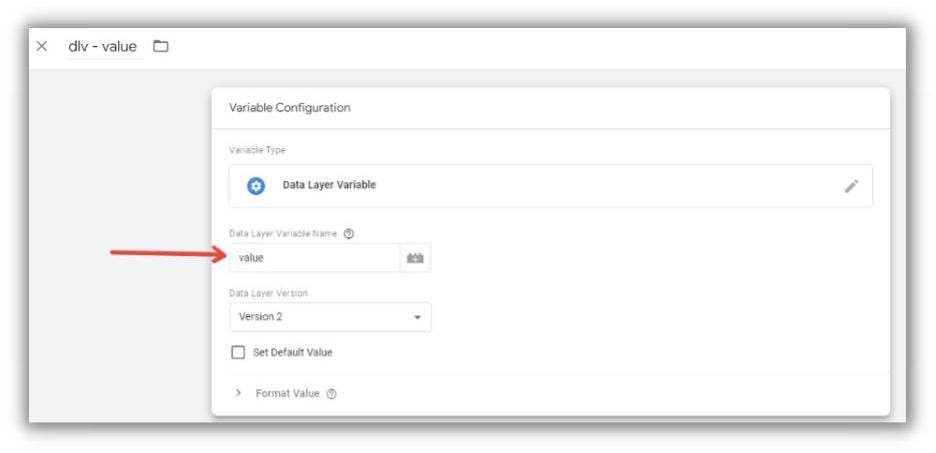
Click the “+” sign in the screen’s top right corner, name the variable (e.g., “dlv – value”), and click “Choose a variable type to begin setup…” Choose “Data Layer Variable.”
Assign the corresponding name from your website’s code to the Data Layer Variable. For instance, if you used “value” in the Data Layer code, assign that to the Data Layer Variable.
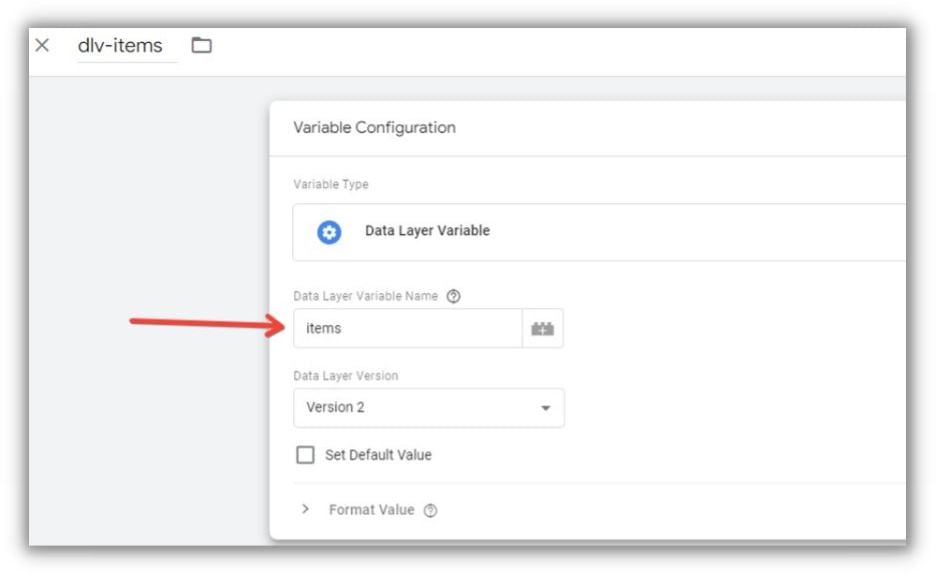
Now, populate the “Event Items” field. You can find the items array in the Data Layer and retrieve it using a Data Layer Variable. Click the “Event Items” dropdown, choose “New Variable,” name it (e.g., “dlv-items”), and select “Data Layer Variable.”
Assign the relevant name from your website code to the Data Layer Variable. If you used “items” in the Data Layer code, assign that to this variable.
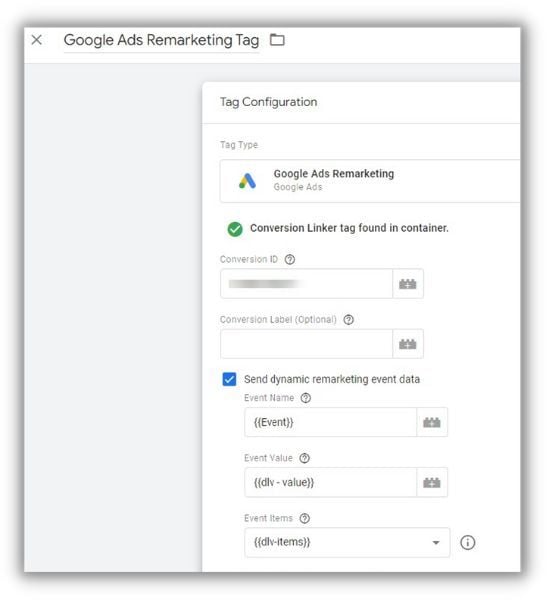
Your completed remarketing tag with customized event Data Layer Variables should resemble this:
Step 6: Set Up a Trigger in GTM for Your Dynamic Remarketing Tag
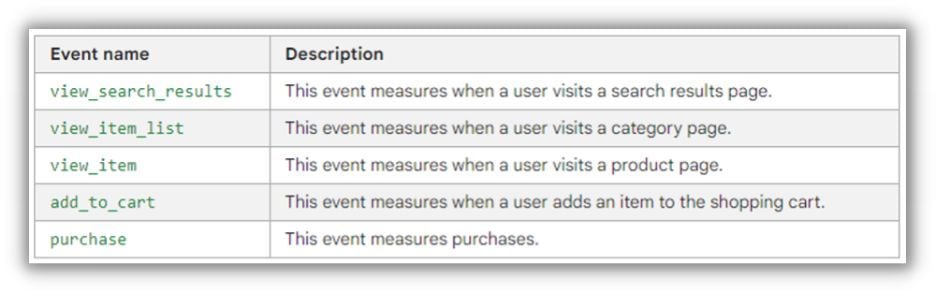
The goal is to activate your Remarketing Tag when certain actions happen, such as a product view, search, category browse, adding an item to the cart, or a purchase. To achieve this, you’ll need a custom event trigger that only fires when these specific events occur.
Begin by checking the “Use regex matching” option, a powerful tool that allows you to use an “or” function represented by a pipe symbol. Copy your predefined event names from Google’s documentation and separate them with the pipe symbol: view_search_results|view_item_list|view_item|add_to_cart|purchase.
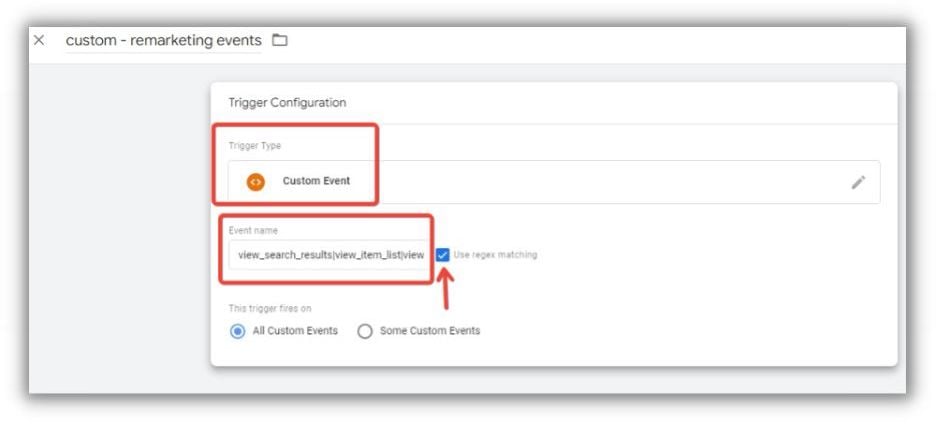
Your tag will only be triggered when a visitor goes through these specific remarketing events, which can be seen as steps taken towards the bottom of the marketing funnel. Name this trigger and save it.
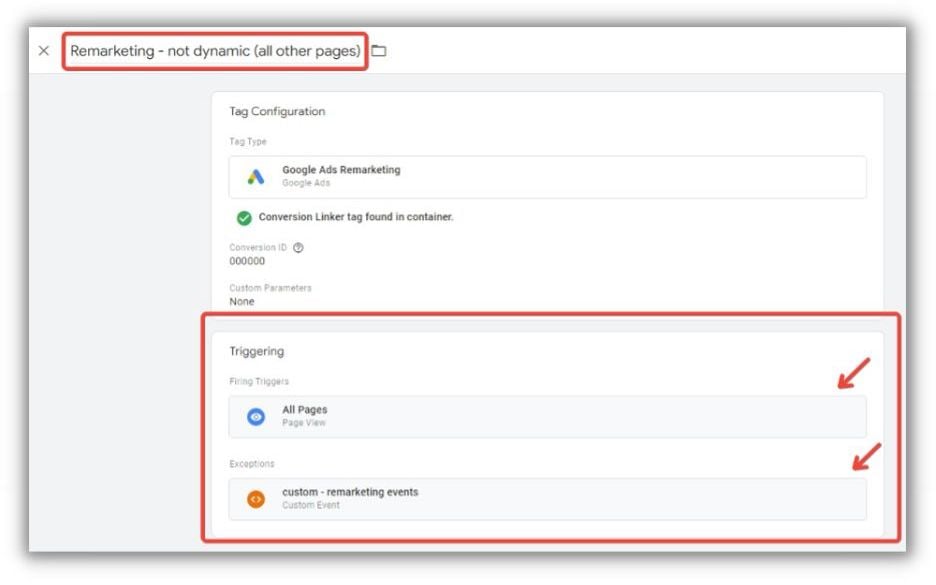
Important: For optimal retargeting reach and flexibility in creating audiences, consider setting up a standard Remarketing Tag alongside your new dynamic Remarketing Tag.
To do this, create a new Remarketing Tag in GTM using the same conversion ID as the dynamic one. However, avoid adding any custom Data Layer events to this tag.
Ensure this trigger activates on all pages except those where your new dynamic Remarketing Tag is triggered. Accomplish this by adding “custom - remarketing events” as an exception within the trigger.
Start Engaging Your Audience with Dynamic Remarketing
Dynamic remarketing ads offer a potent strategy for effectively reaching your target market. By harnessing the capabilities of Google Ads and Google Tag Manager, you can create tailored ads with higher conversion rates, turning potential customers into loyal patrons.
Dynamic remarketing enables you to directly engage with individuals who have already shown interest in your products, making it a powerful tool for boosting revenue and achieving your business objectives. This guide aims to streamline the implementation process and empower you to elevate your online marketing strategy to new heights.
Here’s a recap of the six steps for setting up dynamic remarketing in Google Ads:
- Create a Google Ads account.
- Integrate your product data with the Merchant Center.
- Implement the Data Layer.
- Create a Google Ads Remarketing Tag in GTM.
- Make your Remarketing Tag dynamic.
- Create a trigger in GTM for your dynamic remarketing tag.
Now it’s time to leverage this knowledge and start creating compelling dynamic remarketing ads in Google Ads!