Making Release Management Official (If It Even Exists)
Startups often lack dedicated DevOps or infrastructure engineers to handle new product releases.
Unlike large companies with established procedures, startup CTOs or Heads of Software Development may not grasp the intricacies of software release management. While some developers might, it’s not universal. Without thorough documentation, confusion can arise.
This article offers tips on formalizing the release process, particularly from a developer’s perspective.
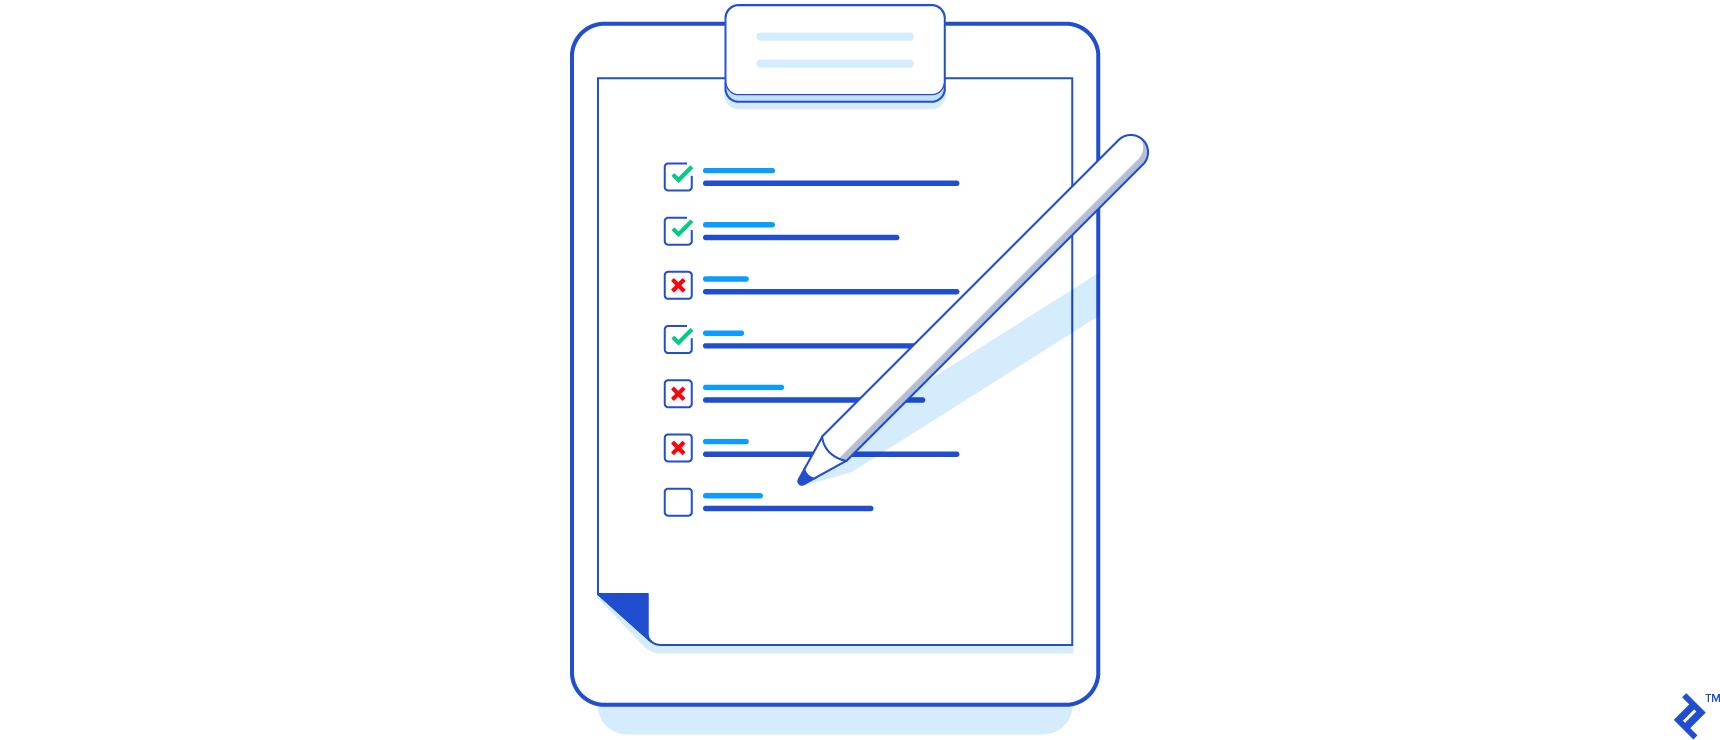
Introducing the Software Release Checklist
You might be familiar with checklists from Atul Gawande’s Checklist Manifesto](http://atulgawande.com/book/the-checklist-manifesto/), and I think a formal release process (like many software development tasks) benefits from them. A [release process checklist should live in a shared document, ideally a collaborative wiki or a Google Drive spreadsheet.
Shared access with editing permissions lets everyone understand and refine the process. This brings transparency, offering real-time updates on the release’s progress and contributors.
Stakeholders can then make “go/no-go” decisions based on these steps. For instance, a failed stress test might lead the project manager to postpone the production release.
Building Blocks: Suggested Steps
This section presents steps to create your own release checklist. Remember, not everything is mandatory. Adapt these suggestions to your app and organization’s workflow.
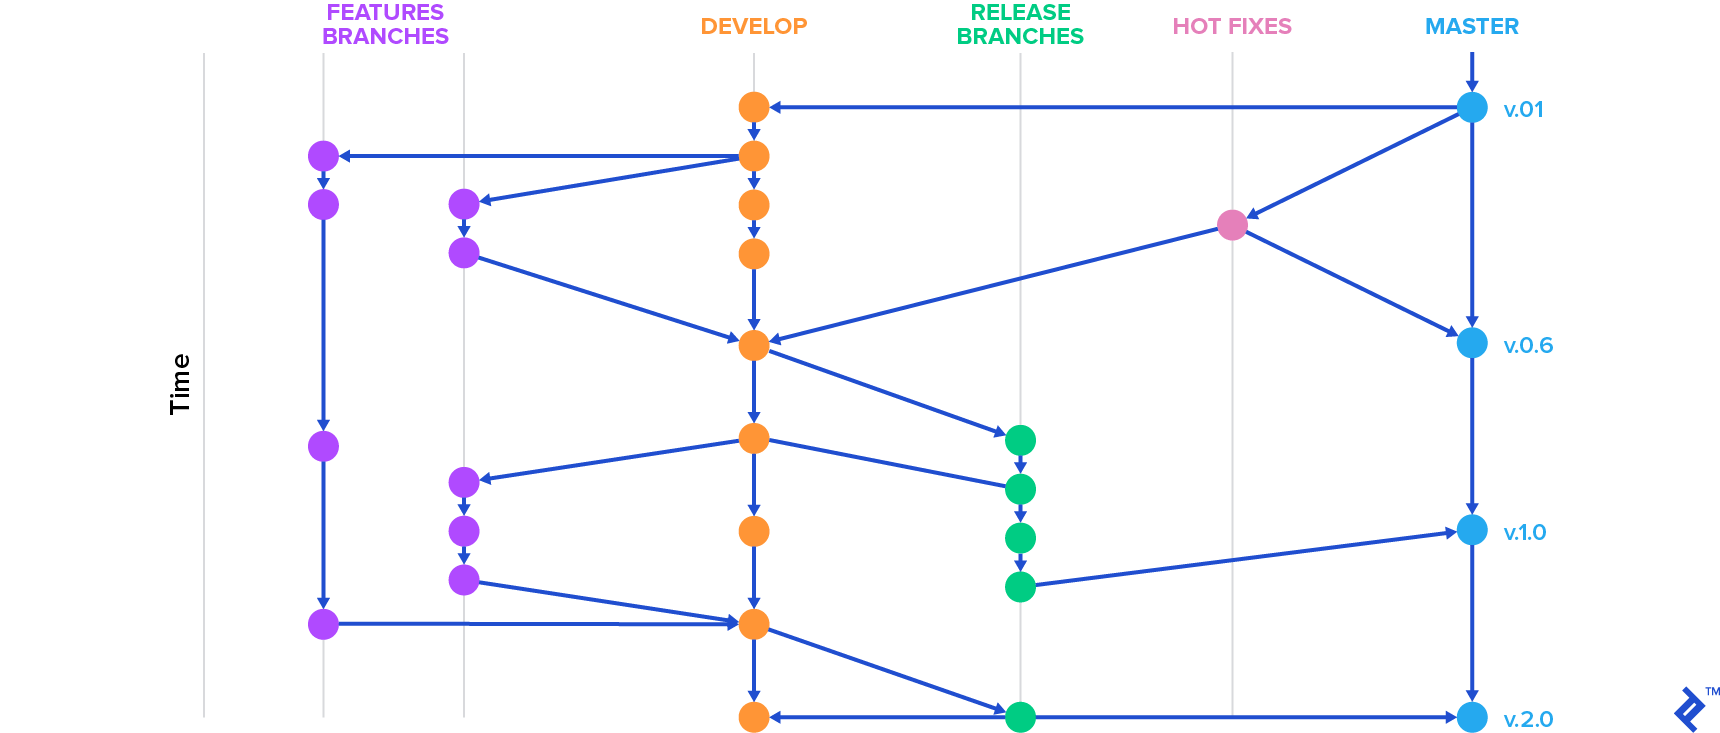
1. Create A Release Branch
You’re likely familiar with Git Workflow](http://nvie.com/posts/a-successful-git-branching-model/) or release branches, covered [in a previous blog post.
Ideally, have at least three branches:
- master: Represents the production environment. Each master commit should be a new release.
- develop: Contains tested, upcoming features. Feature-specific branches are common, merged into develop when ready.
- release: Holds production-ready commits and minor release-related bug fixes.
Unlike the persistent master and develop branches, release branches are temporary, removed post-release.
To create a release branch from develop in your git terminal, use:
$ git checkout -b release/x.y.z
Replace “x.y.z” with your versioning convention (major.minor.patch). Maintain consistency after defining this with your team.
Merge bug fixes made in the release branch back into develop. The release branch primarily provides a preview of the production-ready app.
2. Bump Version
Next, update the version number on the release branch.
Open the file containing your app’s version (e.g., AndroidManifest.xml, package.json) and update it. Then, commit the changes to the release branch.
Version updates help track features per version and inform users of their app version for troubleshooting or support. This version number is usually visible to users in the app’s About section or on app stores. This step is also a good opportunity to update any environment-specific configuration files (though storing these in a separate repository is recommended).
Finally, push the release branch to origin for other developers:
$ git push -u origin release/x.y.z
3a. Merge Release Branch into Master and Tag It
Deploy only the master branch to production. Merge the release branch into master using:
| |
The --no-ff flag, though optional, enforces a new commit object even if a fast-forward merge is possible.
Tag the release on master:
$ git tag -a x.y.z -m 'description of new version, features or fixes included'
Tags mark specific points in the repository’s history, allowing you to create branches from them later.
3b. Merge the Release Branch Using a Pull Request
Another common approach is merging the release branch into master via a pull request.
This offers several advantages. It creates a dedicated space for collaborative discussions about the release. Incorporate code reviews at this stage for additional scrutiny and potential improvements.
Tools like GitHub, Bitbucket, and GitLab (which calls it a “merge request”) facilitate this process. Instead of manual git commands, use their web interfaces to set source and destination branches, add reviewers, and allow inline comments.
Once all reviewers approve, merge the changes into master with a button click.
4. Deploy Master To Production Environment
Before deploying, a tester should perform a smoke test (potentially defined in a separate checklist) on the master branch in a separate testing environment. This ensures nothing broke after the merge. While explaining smoke tests is outside this article’s scope, numerous online resources exist. Document any issues found during the smoke test in the release checklist/spreadsheet.
Now, deploy the master branch to production. The process depends on your infrastructure. It might involve uploading to an Amazon EC2 instance, pushing to a Heroku remote, copying the new version via SSH to your VPS, or other methods.
Verify successful deployment and functionality after uploading.
5. Merge Back Into Develop And Delete Release Branch
With the release almost done, merge the release branch into develop to update the version number and transfer bug fixes:
| |
Remove the release branch:
$ git branch -d release/x.y.z
6. Changelog Generation
Maintain a CHANGELOG.md file (or equivalent) at your project’s root. For each release, add an entry detailing bug fixes, new features, known issues, and other relevant release notes. This helps users and contributors understand the changes between versions.
The changelog entry should include the date, version number, and release notes. Keep entries in reverse chronological order. Here’s a template you can adapt:
| |
Automate this step by scripting it or using tools like:
- Github Changelog Generator (by skywinder)
- ReadmeGen (by fojuth)
- github-changes (by lalitkapoor)
The effectiveness of automation relies on consistent commit message formatting. Agree on a specific format with your team to ensure parsability.
7. Communicate With Stakeholders
This usually involves:
- Announcing the release internally (e.g., on a dedicated Slack channel like #releases). Utilize hooks to automate these messages.
- Emailing stakeholders with a changelog link or attachment.
- Publishing a blog post or tweet.
Adjust these actions based on your organization. The key is to communicate the new version’s availability.
8. Grooming The Issue Tracker
Post-release, update your issue tracker to reflect the current production state. This might involve changing tags (like removing a “release-pending” tag) or updating milestone statuses.
Some issue trackers offer advanced features like release planning, sprint alignment, and bug tracking. Utilize these features effectively.
Remember to include updating the issue tracker in your release checklist.
Towards Automating the Release Process
You might have noticed that besides the changelog step, many others can be automated.
Automating parts of the release process saves time. Start by automating individual steps and work towards a continuous delivery goal. Continuous delivery reduces risks, costs, and developer time spent on releases. You can then release more often and boost development productivity.
The ideal scenario for DevOps companies is a single button press (or command) triggering the entire release process. Even better is a system that automatically releases new versions at scheduled times. While challenging due to the need for automated testing, it’s achievable.
Recommended Best Practices
This section highlights practices that streamline releases or provide safety nets.
Find the Optimal Release Day
Consider releasing apps on Thursdays, between noon and close of business if you have a Monday-Friday workweek.
Avoid Friday releases. If issues arise, you won’t have time to fix them until Monday (unless you’re working weekends). Releasing on Thursday allows you to monitor the new version, fix problems, or roll back on Friday.
For web apps, know your user base’s time zones. Release during low-traffic periods to minimize the impact of potential failures. This can be tricky with a global audience but try to determine the best time.
Back Up Your Database Before Each Release
If you haven’t scheduled periodic database backups, add a backup step before starting the release.
Staged Rollouts
Ever noticed how new features sometimes take days or weeks to appear after an announcement? That’s staged rollouts.
Companies like Facebook use this extensively. They test new features on a small percentage of users, gradually increasing the rollout until reaching 100%. This allows for monitoring user feedback and crash reports, enabling them to postpone releases or fix errors before they affect everyone.
Android’s Developer Console offers a tool for staged rollouts.

Continuous Integration
Continuous Integration is a valuable practice for many reasons. It helps detect errors early, increasing successful release rates. It’s also the first step towards Continuous Delivery and complete automation.
Martin Fowler, a strong advocate of Continuous Integration, highlights its numerous benefits. While a detailed discussion is outside this article’s scope, embracing CI can significantly improve your release process. Advantages include reduced risks, increased visibility, earlier bug detection, and more frequent deployments.
Start by setting up a “continuous integration server.” Tools like CruiseControl, Bamboo, Jenkins, and Travis are worth exploring.
Exitlude: It Will All Work Out
Aggressively, we all defend the role we play Regrettably, times come to send you on your way We’ve seen it all, bonfires of trust, flash floods of pain It doesn’t really matter, don’t you worry, it’ll all work out
Exitlude, The Killers
A well-defined release process is crucial for any app, regardless of its complexity, user base, or organization size.
If you don’t have one, use this guide and others as starting points. Brainstorm with your team to create a first draft, try it out, and iterate. You’ll eventually build a process that works for you.
Next, explore automating parts of the process. Identify areas for improvement. Find ways to reduce release time through optimization. Automation should be your ultimate goal, but don’t aim for it immediately. As with any process, gradual improvement is key.
Do you have any release-related tips or guidelines? I’m always eager to learn. While organized and structured, I’m no DevOps expert. Feel free to share your insights through comments or by contacting me.